Transcription
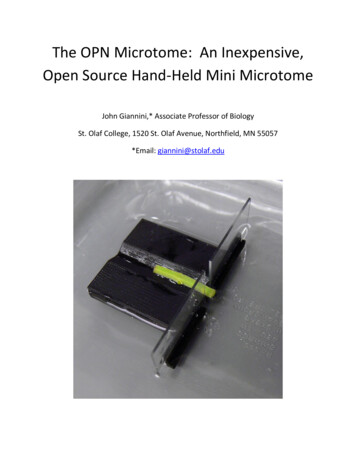
The OPN Microtome: An Inexpensive,Open Source Hand-Held Mini MicrotomeJohn Giannini,* Associate Professor of BiologySt. Olaf College, 1520 St. Olaf Avenue, Northfield, MN 55057*Email: giannini@stolaf.edu
Table of ContentsIntroduction . 3Constructing the OPN Microtome . 4Making an OPN Microtome Using Glass Microscope Slides . 43D Printing the OPN Microtome . 11Making the Knife for the OPN Microtome . 14Using the OPN Microtome . 16Root, Shoot, and Stem Sections . 16Leaf and Delicate Tissue Sections . 26Hazards. 34Acknowledgements and Disclosures . 36References . 36http://pages.stolaf.edu/opn-lab/equipment/2April 15, 2017
IntroductionOne common way to study plant anatomy is to examine hand sections of plant tissue under themicroscope. Because of their rigid cell walls, plants can be sectioned without the use ofchemical fixation and plastic or wax imbedding. In addition, when stained, sections made in thismanner can reveal significant internal detail of various cellular structures.The most common way of hand sectioning plant samples is to hold the plant tissue under waterand carefully slice a thin section with a sharp razor blade. When performed by an experiencedtechnician, the results can be quite dramatic. One major problem with this “free hand” method,however, is that the technique requires a great deal of practice in order to become proficient atit. Plus, a person’s fingers are exposed to a sharp blade without any protection, which can posea serious safety hazard.As a result, over the years, there have been a number of innovative ideas for making relativelyinexpensive hand-held microtomes as well as for improving the hand-sectioning process itself(1 - 5). For example, one common approach is to use a carrot or potato to hold the plant tissuesecurely in place while making thin slices with a razor blade (5 - 7).There are also a number of basic hand-held microtomes for sale online that can be used forhand sectioning, such as the Omano hand-held microtome (and similar models from vendorslike Carolina Biological, Home Science Tools, or Spectrum Scientifics) as well as the MT 5500and MT 5501 cylinder microtomes and the MT 5503 hand-hand microtome by VincentLeermiddelen Scientific. However, some of these devices can be relatively expensive (e.g., theygenerally cost between 40 and 225 each at February 2017 prices, not including shipping ortaxes), and some models further require wax embedding of the sample that will be sliced.In an effort to help bring down some of these costs and make the process of hand sectioningplant tissue more widely available to others, this manual describes how to build or 3D print amini microtome that is relatively inexpensive (roughly 6.50 per instrument if using the websitemakexyz to 3D print the parts) and which should also improve both the safety and efficiency ofmaking thin hand sections. This manual also describes how to use this mini microtome toprepare samples of different plant tissues for microscopic viewing, so that students can beginexploring plant anatomy as part of a teaching lab or other educational activity.Finally, in keeping with the names given to many of the other instruments and pieces ofequipment designed in our lab, this mini microtome is called “the OPN Microtome” since itsplans and parts are intended to be open and accessible for all to use. Ultimately, we hope thatthe OPN Microtome will be a useful tool that helps both teachers and students study theanatomy and physiology of various plant species in their classrooms and ril 15, 2017
Constructing the OPN MicrotomeThere are two ways to make the OPN Microtome. The first approach uses items that should beavailable in most biology teaching labs (primarily, glass slides and epoxy). The second methodrequires a 3D printer. However, for readers that do not have access to 3D printing technology,there are a number of websites (e.g., makexyz, Shapeways, and others) that will 3D print andship any uploaded STL files to you for a fee, which is usually based on the size and volume ofthe part.Making an OPN Microtome Using Glass Microscope SlidesTo make the version of the OPN Microtome that is built from glass microscope slides, readerswill need the following materials: 10 glass microscope slides (Fig. 1);a set of quick-drying (e.g., 5-minute) epoxy, which includes both a resin and a hardenerin separate (or separated) tubes (Fig. 1, upper left);several toothpicks or similar items for mixing the epoxy (Fig. 1, lower right);a small disposable surface on which to mix the epoxy, such as several Post-It Notes (Fig. 1, lower right), a small piece of cardboard, or other similar material;a triangular file (or glass cutter) to scribe a line in one of the glass slides (Fig. 2); anda standard ruler (Fig. l 15, 2017
Step 1. First, use a toothpick (or other similar item) to mix up a small amount of epoxy on adisposable surface, such as several Post-It Notes (Fig. 1, lower right) or a piece of cardboard.Then, glue seven microscope slides together, so that they are stacked one on top of the other(Fig. 1, lower left). Use a toothpick to spread a small amount of epoxy around on top of eachslide before stacking the next slide on top. Also, it is important to use only a small amount ofepoxy, so that the glue does not ooze out of the sides. In addition, make sure to keep the slidesand edges flush, so that the sides and ends are smooth and even. This step is necessarybecause, later, two face plates will be glued to the front of this stack, and an uneven surfacethere may prevent these pieces from fitting together smoothly. Once the stack of slides hasbeen glued together (Fig. 1, lower left), let the quick-drying epoxy set for at least 15 minutes toensure a tight bond.Figure 1. Some of the materials used to make the glass slide version of the OPNMicrotome. In all, seven glass slides are glued together (lower left) using quickdrying epoxy. Then, an additional slide is used to make the face plate, and twoothers are added to create a channel for the samples of plant tissue.Importantly, as explained in the Hazards section, please do not to touch the epoxy with yourbare hands because the compound can irritate your skin and cause possible allergic reactions.Also, do not breathe in the fumes of the epoxy since those vapors can also prove harmful. Forthese reasons, readers should consider wearing a pair of safety gloves when working withepoxy. Similarly, readers should work in a well-ventilated area (or under a fume hood) inaddition to wearing any necessary masks or respirators when using the adhesive /5April 15, 2017
Step 2. Next, to make the face plate for the OPN Microtome, take a new glass microscope slideand identify its center line using a ruler and a permanent or felt-tipped marker (Fig. 2).Figure 2. The materials used to scribe a line down the center of a microscope slide.While a narrow tip triangular file works well (top), readers can instead use a hand-heldglass cutter. Also, note how the center of the slide was first identified using a felt-tippedmarker before the line was April 15, 2017
Step 3. Then, hold a straight edge (e.g., a ruler) across the center of the slide, and use thesharp edge of a triangular file (or glass cutter) to scribe a line down the center. Use enoughpressure to scratch the glass, but not so much pressure that the slide breaks (Fig. 3).Figure 3. Scribing a line down the center of a glass slide using the pointed end of atriangular file and a straight edge (i.e., ruler). Alternatively, a glass cutter can beused instead of a file.Importantly, during this process, readers should wear the proper eye protection (e.g., gogglesor safety glasses) to protect their eyes from any small glass pieces or particles that might proveharmful. Readers may further want to wear a pair of safety or examination gloves to provide anadditional layer of protection against any potential cuts or scratches. In addition, wearing thesegloves may make it easier to grip the glass pril 15, 2017
Step 4. Now, carefully break the slide along the scribed line (Fig. 4). Ultimately, these two glasspieces will form the left and right sides of the face plate for the OPN Microtome. Again, pleasewear safety glasses or goggles during this process to protect your eyes from any potential harmthat could be caused by any small pieces of glass, which might become airborne when the slideis broken in half. Also, readers may want to wear a pair of safety or examination gloves for thisstep to provide an additional layer of protection from any possible cuts or scratches (and tomake it easier to grip the slide).Figure 4. Carefully break the glass slide along the scribed center line to create theleft and right pieces of the face plate for the OPN t/8April 15, 2017
Step 5. Next, use a small amount of epoxy to glue the left and right pieces of the face plate tothe front of the slide stack (Fig. 5). The bottom edge of these pieces should be flush with thebottom of the slide stack, so that the assembly sits level when placed on a flat surface. Also,make sure to leave a 0.5-cm gap (approximately) between the pieces to create an openingthrough which the plant tissue can later be inserted for slicing (Fig. 5, bottom center). Inaddition, let the assembly sit for at least 15 minutes, so that the quick-drying epoxy can beginto form a tight bond.Figure 5. Gluing the left and right pieces of the face plate to the front of theseven-slide stack. Note the 0.5-cm gap between the two pieces (bottom center).Later, the plant tissue will be slid through this opening for 9April 15, 2017
Step 6. Once the face plate has been fixed to the slide stack, mix up another small amount ofepoxy (as described above) and carefully glue two microscope slides to the top of the slidestack, leaving a 0.5-cm wide channel between the two slides (approximately) so that planttissue can be slid through the opening in the face plate (Fig. 6). Again, use only a small amountof epoxy, so that the liquid compound does not ooze out the sides or into the channel, whichmay make it more difficult to position the plant tissue there for slicing.Figure 6. Gluing two additional slides on top of the seven-slide stack to create a0.5-cm-wide channel, so that plant tissue can be slid through the correspondingopening in the face plate.Also, given the 0.5-cm-wide channel, the two glass slides placed on top of the OPN Microtomewill extend far over each side of the stack (Fig. 6). As a result, readers may need to hold eachslide in place for several minutes while the epoxy sets (or come up with their own method toprevent each slide from “drooping” before the epoxy dries). Then, let the OPN Microtome sitovernight to give the epoxy a sufficient enough time to cure. At that point, this version of theOPN microtome will be finished and ready to ril 15, 2017
3D Printing the OPN MicrotomeTo make the 3D-printed version of the OPN Microtome, readers will need the followingmaterials: a standard 3D printer and related filament (e.g., typically, we use ABS filament, but PLAwill also suffice);the CAD or STL files for the OPN Microtome (S1 and S2, respectively);one glass microscope slide;a triangular file (or glass cutter) to scribe a line down the center of that slide;a standard ruler;one set of quick-drying (e.g., 5-minute) epoxy, which includes both a resin and ahardener in separate (or separated) tubes;several toothpicks or similar items for mixing and applying the epoxy; anda small disposable surface on which to mix the epoxy, such as several Post-It Notes , asmall piece of cardboard, or other similar material.Also, for readers who do not have a 3D printer, certain online services (e.g., makexyz,Shapeways, etc.) will 3D print and ship any STL files that you upload for a fee, which is usuallybased on the size and printing volume of the part. For example, the websitehttp://3dprintingpricecheck.com/ estimates that it would cost approximately 6.50 to print outeither version of the OPN Microtome using the makexyz 3D printing service (at February 2017prices, not including any taxes or shipping). Of course, in the long run, purchasing a relativelyinexpensive 3D printer (e.g., 500 or less) and the related spools of filament (about 20 to 25each online) will likely prove to be the most economi
15.04.2017 · Similarly, readers should work in a well-ventilated area (or under a fume hood) in addition to wearing any necessary masks or respirators when using the adhesive compound. http://pages.stolaf.edu/opn-lab/equipment/ 6 April 15, 2017