Transcription
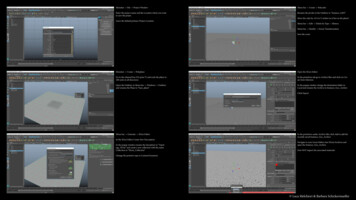
Menubar - File - Project WindowMenu bar - Create - PolycubeEnter the project name and the Location where you wantto save the projet.Rename the pCube in the Outliner to “Instance GEO”Leave the default primary Project LocationMove the cube by 0.5 in Y-Achsis (so it lies on the plane)Menu bar - Edit - Delete by Type - HistoryMenu bar - Modify - Freeze TransformationSave the sceneMenubar - Create - PolyplaneOpen the XGen EditorGo to the channel box (Or press T) and scale the plane to100 units in all diractionsIn the primitives tab go to Archive files and click on Create from SelectionOpen the Outliner in Menu bar - Windows - Outlinerand rename the Plane to “base plane”In the popup window change the destination folder toLocal and rename the Archive to Instance Geo ArchiveClick ExportMenu bar - Generate - XGen EditorIn the XGen Editor Create New DescriptionIn the popup window rename the desciption to “Topology XGen” and create a new collection with the nameCollection to “XGen Collection”In the primitives under Archive files click Add to add therecently saved Instance Geo ArchiveNavigate to your Scene folders into XGen/Archives andopen the Instance Geo ArchiveDon NOT import the associated materialsChange the primitve type to Custom/Geometry Luca Melchiori & Barbara Schickermueller
In the XGen Editor under the primitives change the density to a wished valueIn the Primitive Attributes open the dropdown menu ofthe setting “length” and select create mapIncrease the map resolution to 200 and klick on “Create”Hide the XGen preview in the XGen Editor and Clear theXGen previewRender Menu - Texturing - 3D Paint Tool - OptionsIn the Paint Tool Editor go under “Assign/Edit Texture”and press “Assign/Edit Texture”In the XGen Editor in the Primitives tab go under thePrimitives Attributs save the Length map and open theExpression Editor by klicking on the right iconInsert the line a 30* a; between the 2 lines and pressapplyUpdate the XGen Preview by klicking the Icon in theXGen EditorIn the primitives Tab you play with the “Generate Primitives” in order to achieve different looksBy changing the values in the XGen Expression Editor to“ a 30* a*0.01* frame;” you can animate the growth ofthe XGenBy pressing B - RMB and dragging horizontally you canadjust the Brush RadiusPaint different B/W values on the plane in order to achivedifferent hight valuesIn the XGen Editor in the Primitives tab go under thePrimitives Attributs save the Length map you just createdby clicking the save button Luca Melchiori & Barbara Schickermueller
Menubar - File - Project WindowMenu bar - Create - PolycubeEnter the project name and the Location where you wantto save the projet.Rename the pCube in the Outliner to “Instance GEO”Leave the default primary Project LocationMove the cube by 0.5 in Y-Achsis (so it lies on the plane)Menu bar - Edit - Delete by Type - HistoryMenu bar - Modify - Freeze TransformationSave the sceneMenubar - Create - PolyplaneOpen the XGen EditorGo to the channel box (Or press T) and scale the plane to100 units in all diractionsIn the primitives tab go to Archive files and click on Create from SelectionOpen the Outliner in Menu bar - Windows - Outlinerand rename the Plane to “base plane”In the popup window change the destination folder toLocal and rename the Archive to Instance Geo ArchiveClick ExportMenu bar - Generate - XGen EditorIn the XGen Editor Create New DescriptionIn the popup window rename the desciption to “Topology XGen” and create a new collection with the nameCollection to “XGen Collection”In the primitives under Archive files click Add to add therecently saved Instance Geo ArchiveNavigate to your Scene folders into XGen/Archives andopen the Instance Geo ArchiveDon NOT import the associated materialsChange the primitve type to Custom/Geometry Luca Melchiori & Barbara Schickermueller
In the XGen Editor under the primitives change the density to a wished valueIn the Primitive Attributes open the dropdown menu ofthe setting “length” and select create mapIncrease the map resolution to 200 and klick on “Create”Go the the XGen Editor and in the Primitves Shelf underPrimitive Attributes and save the recently created LengthmapUpdate the XGen Preview by pressing the Preview Icon inthe XGen EditorHide the XGen preview in the XGen Editor and Clear theXGen previewIn the Outliner go to Display and turn off DAG ObjectOnlyIn the XGen Editor go to the General attributes and Increase the Density to 3In the XGen Editor in the Primitives Shelf under PrimitiveAttributs next to Length open the XGen Expression Editorby clicking the icon on the rightInsert the line “ a 30* a*0.01* frame;” between the 2lines and press applyIn the Outliner look for the file File1 and click on itGo to the Attribute Editor and under the File Attributessource the image you want to use for your mappingIn the XGen Editor go to the Preview/Output Shelf under Preview Settings and click on the little arrow next toPrimitive ColorIn the popup Menu click create map and click createIn the Outliner go to File2 and in the Attribute Editorunder File Attributes source the colored image you wantto use as a textureGo back in the XGen Editor and in Preview/Output Shelfunder Preview Settings save the recently created map Luca Melchiori & Barbara Schickermueller
In the XGen Editor go to the Preview/Output Shelf underCustom Shader Parameters enter the name “color” andchange the type to color and press on the iconThen click on the little arrow next to “color color” andcreate a new mapClick on the AiSurface (AiStandartSurface in Maya2018) Node and drag the AiUserDataColor node into the“Diffuse - Color” (Base - Color in Maya 2018) in theAttribute Editor by using the MMBPress “Create”Save the costom shader parameters in the XGen Editorand in Preview/Output shelf under custom shader parametersMenu bar - Windows - Node EditorMenu bar - Arnold - Render Reviewpress tab in the node editor and time in “AiImage” andpress EnterAdjust the exposure to the wished levelDoubleclick the node and in the Attribute Editor underImage Attributes in Image Name Source the colored Image you want to usepress tab in the node editor and time in “AiUserDataColor” and press EnterDoubleclick the node and in the Attribute Editor underColor Attr Name (Attributes in Maya 2018) type in thename of the preview created “color” map and type in“color”Click on the AiUserDataColor Node and drag the AiImage node into the “Default Value” in the Attribute Editorby using the MMBpress tab in the node editor and time in “AiStandart” (AIStandartSurface in Maya 2018) and press EnterSelect the XGen Collection in the Outliner and rightclickon the AiStandart (AiStandartSurface in Maya 2018) nodeand press Assign Material to Viewport SelectionGo to the Render SettingsIn the Common tab under file output Change the imageformat to PNGIn the Common tab under Frame/Animation ext changethe type to name.#.extIn the Common tab under Frame/Range set the startframe and end frame of your animationIn the Common tab under Image/Size select the resolution you wantClose the Render SettingsGo in the Rendering MenuMenu bar - Rendering - Render Sequence (Click on theOption square) and select the destination folderPress Render Sequence and close Luca Melchiori & Barbara Schickermueller
Color Attr Name (Attributes in Maya 2018) type in the name of the preview created "color" map and type in "color" Menu bar - Arnold - Render Review Adjust the exposure to the wished level Go to the Render Settings In the Common tab under file output Change the image format to PNG In the Common tab under Frame/Animation ext change