Transcription
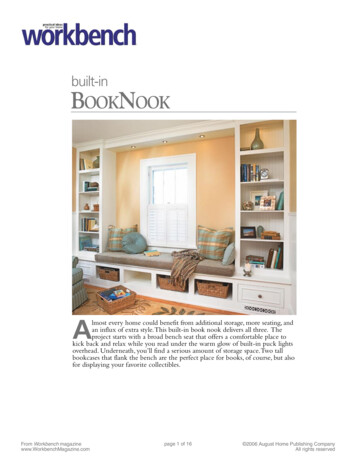
built-inBookNookAlmost every home could benefit from additional storage, more seating, andan influx of extra style. This built-in book nook delivers all three. Theproject starts with a broad bench seat that offers a comfortable place tokick back and relax while you read under the warm glow of built-in puck lightsoverhead. Underneath, you’ll find a serious amount of storage space. Two tallbookcases that flank the bench are the perfect place for books, of course, but alsofor displaying your favorite collectibles.From Workbench magazinewww.WorkbenchMagazine.compage of 16 2006 August Home Publishing CompanyAll rights reserved
PLAN YOUR PROJECTTO SUIT THE SPACEEven a relatively bare room offeredplenty of information aboutbuilding the book nook. Thepainted woodwork and beadedpaneling offered styling cues thathelp the book nook design blendin. An electrical outlet and cold-airreturn needed to be accommodatedin the project design.All projects require planning beforegetting underway. That’s no secret. Butto get an integrated, seamless look witha built-in, the planning process is especially important.Build to Fit — Obviously, youneed to make sure the project will fitthe room where it will be installed.Thatmeans you’ll need to thoroughly surveythe location and record all the criticalmeasurements, as shown on page 13.Build To Suit — Equally important with a built-in, though, is makingthe project complement the room.To dothat, you need to pay close attentionto the stylistic elements of the room(Photo, left, and Illustration, below).In this room, the woodwork is painted,so we painted the project, as well.We alsoechoed the room’s beadboard panelingby using beadboard for the backs of thebookcases. Plus, we removed panelingbehind the book nook to make sure itwould look built in, not tacked on.Results May Vary — This all meansyou’re likely to build your book nookdifferently than ours. The measurements will almost certainly be different (our wall was 11-feet, 3" wideand the ceiling, at 98", is higher thannormal). And you may want to alterthe style, as well. In spite of the inevitable changes, however, this projectwill remain simple to build.VALANCEhides all wiring for puck lightsPROJECTDESIGNaccommodatesidiosyncracies ofroom so parts canbe scribed to fittightly againstwalls and ceilingBEADEDPLYWOODis used forbookcasebacks toblend in withbeadboardpanelingalready inthe roomPAINTED TRIMon windowsand baseboardsmakes apainted projectappropriatefor the roomGRILLSallow airflowto cold airreturn locatedunder windowVISUAL STYLEof book nook matchesthe room and the home wellFrom Workbench magazinewww.WorkbenchMagazine.compage 2 of 16ELECTRICAL OUTLETunder window was relocated intoone of the open compartments 2006 August Home Publishing CompanyAll rights reserved
CONSTRUCTION VIEWBOOKCASE SIDESare built extra-wide on visibleside so they can be scribed tofit tightly against the wallLIGHTEDCOMPARTMENTin top section ofeach bookcaseprovides addeddisplay areaCROWN MOLDINGwraps bookcases andvalance to hide gaps at ceilingand provide a finished lookPUCK LIGHTSare low-voltageunits for easyinstallationFACE FRAMEScover edges ofplywood bookcasesVALANCEconnects the tall cases to tie thebook nook together and providesspace for lighting and wiringCLEATSmade from 2x2s securevalance to wall andto bookcasesCOVE MOLDINGprovides smooth,seamless transitionbetween bookcases,seat panels, andlower face frameBOOKCASESare made from plywoodwith simple joinery,fixed shelves, andsolid-wood face framesSEAT PANELSstart out oversize, then getscribed along back edgeand end to match wallcontours for a gap-free fitGRILLScover holes in face frame toallow air flow to a cold air returnlocated on wall behind book nookFACE FRAMEis built easily with butt joints andpocket screws, then applied tobench seat bases after installationBENCH SEAT BASEis built in two unitsto simplify constructionand installationFrom Workbench magazinewww.WorkbenchMagazine.comDRAWERSadd enclosed storageunder bookcasespage 3 of 16 2006 August Home Publishing CompanyAll rights reserved
A BENCH SEAT STARTS IT OFFThe foundation for the book nook is thisbroad bench seat.With its ample seatingand built-in storage, the bench seat wouldmake a great project on its own.The seat starts off with two plywoodbase units (built separately to simplifyinstallation) that are assembled withBASE ASSEMBLYdado and rabbet joints. A face frameencloses the front, and a plywood seatpanel tops it off (Base Assembly, below).To determine the length of eachunit, measure the wall it will restagainst, and then subtract an inch forclearance (see page 12).Then divide thisnumber in half.Once you’vedetermined howlong to make eachbase unit, cut thebase tops (A), ends(B), and dividers(C) to size from3/ " plywood.4Before movingon, cut a notchin each divider.These will receivea cleat that’s usedto secure eachbase unit to thewall (Cleat Detail, below).Dado for Secure Joints — Now it’stime to lay out a series of dadoes in thebase top and bottom, as well as a dadoand rabbet in each base end. These areshown in the Base Assembly below.You’ll notice that the dadoes thathouse the dividers aren’t spaced equally.This is because of the bookcases thatget added later. As the Photo at leftshows, those bookcases sit directlyabove the outermost compartments inthe bench seat. So I wanted the widthof these outer openings in the seat tomatch the width of the openings inthe bookcases.After laying out the position of thefirst divider dado, I located the dadofor the other divider midway on theremaining length of the base unit.With all the dado locations laid out,you can cut or rout the dadoes andrabbets.Then drill counterbored shankCLEAT DETAILFSEAT PANEL(#/4" ply. x 21#/4" x 67%/8")GSEAT EDGING(!/4" x #/4" x 144" rough)CBASE DIVIDER(#/4" x ply. 19!/4" x 11!/4")DBASE CLEAT(#/4 x 2" x 65%/8")EBASE BACK(!/4" x 12!/4"x 67!/8")ABASE TOP(#/4" ply. x 19!/4" x 66!/8")All rabbets anddadoes are #/4" wideand !/4" deep10#/4"4"CAHFRAME TOP RAIL(#/4" x 2#/4" x 131!/4")VCOVE MOLDING(#/4" x #/4" x 20')22"21%/16"C21%/16"A21%/16"JFRAME END STILE(#/4" x 2!/2" x 16!/4")BBASE END(#/4" ply. x 19!/4" x 16!/4")KFRAME INNER STILE(#/4" x 2!/2" x 8#/4")From Workbench magazinewww.WorkbenchMagazine.compage 4 of 16IFRAME BOTTOM RAIL(#/4" x 4#/4" x 131!/4") 2006 August Home Publishing CompanyAll rights reserved
holes for the screws that will hold eachbase together.Next, you can assemble the bases. Asyou do this, be sure to orient the piecescorrectly — with the wider compartments at the outer ends, and the notchesin the dividers toward the back.Now, turn your attention to thebacks of the base units. First, add basecleats (D).These get attached by screwsdriven in from the base ends, as wellas through the cleats into the dividers.Finally, cut back panels (E) to fit from1/ " hardboard, and then attach each4back with 1" brads.Seat Panels Top It Off — Thebase units are topped by a pair of plywood seat panels (F) made from 3/4"plywood. Each starts out 1/2" longerand 21/4" wider than the assembledbase unit it sits on.At the front, this overhang allowsthe seat panel to extend past the faceframe and molding that get addedwhen the bench seat is installed. Atthe back and outside edges, it gives anextra 1/2" so you can scribe the seat tomatch the walls. For now, cut the seatpanels to these oversize dimensions,and then set them aside.You can also make the seat edging(G) now. It’s just a length of 1/4"-thicksolid stock that gets applied later toconceal the edge of the plywood seatpanels. The Sidebar at right shows aneasy way to make the edging.I cut my edging from a single pieceof 12-ft. long poplar. If you can’t find aboard long enough, you can make theedging in two pieces.That’s one of thebenefits of a painted project: You cansimply fill the seam before painting,and nobody will never know.In either case, set the seat paneledging aside for now, too. It doesn’tget applied until the book nook isinstalled.Best Face Forward — The finalelement of the bench seat is a faceframe that covers the front of both baseunits. This frame is made up of longrails connected by stiles that align withthe dividers in the base units. Wheninstalled, these stiles will conceal thedividers in the base units.The face frame couldn’t be simplerto build. Butt joints and pocket screwshold it together (See below).Like the seat panels, the face frameis also built longer than the distancebetween the walls it spans — 1/2", inthis case. The reason for oversizingremains the same here, too: You canscribe and trim the face frame to fittightly against the walls on both ends.After calculating how long to makeyour face frame, cut the top rail (H),bottom rail (I), end stiles ( J), andmiddle stiles (K) to size.Once again, I was lucky enough tofind 12-ft. long boards for my rails. Ifyou can’t find stock that’s long enough,you can make two-piece rails and jointhem together with pocket screws.Now bore the pocket holes in thestiles, align them with the rails, andthen screw the face frame together. Setit aside until it’s time for installation.MOLDING MADE EASYThe long seat edging is just asimple 1/4" strip dressed up withrounded edges. That means theedging is simple to make, butone trick makes it even easier.Rather than trying to roundover the edges of a thin strip,you’ll get better results byrounding the edges of a wideboard first, and then ripping the1/ "-thick edging free. It’s a three4step process at the router tableand table saw, as shown in thePhotos below.1] After ripping one edge of a longboard straight, rout a 1/8" roundoveralong the edge.POCKET SCREW DETAIL2] Flip the board end-for-end, andround over the second edge usingthe same router-table setup.FACE FRAME3] To complete the seat edging,move to the table saw and rip therounded edge free of the board.From Workbench magazinewww.WorkbenchMagazine.compage 5 of 16 2006 August Home Publishing CompanyAll rights reserved
BOOKCASES COME NEXTThe tall bookcases are built almost likethe base units. Each has a plywood casemade up of two sides that are connectedby shelves that fit into shallow dadoes.A face frame covers the front of theplywood case, while edging covers theplies on the front edge of the shelves(Case Assembly, below).There is one very notable thingabout the way the bookcases are built.Each has one side that’s wider than theother, as shown in the Case Parts View,below right.You’ll see why if you lookat the Photo at left. One side of eachcabinet is visible. That means it likelywill need to be scribed to fit tightlyagainst the back wall.To allow for this,the side is extra-wide and extendsbeyond the back of the case (Wide SideRabbet Detail). The other side of thecabinet is hidden.That means it doesn’thave to be scribed or built extra-wide.As you might guess by now, we alsoaccounted for scribing with the faceframes. Each is 1/4" wider than the caseit attaches to. The overhang sits towardthe outside of each case where it abutsthe side wall of the room.Build the Bookcases — With allthis in mind, now start construction.CASE ASSEMBLYEDGING DETAILFrom Workbench magazinewww.WorkbenchMagazine.compage 6 of 16 2006 August Home Publishing CompanyAll rights reserved
Rather than cut all the sides at once,I started with two 26" 81" blanksmade from 3/4" plywood. Each blank iswide enough to produce one narrowside (L) and one wide side (M).The next step is to cut five dadoesand a rabbet across each blank (CaseParts View). These receive the shelves,and cutting them across a wide blankensures that, when assembled, theshelves in each case will align exactly.You can cut the dadoes and rabbetin a couple of ways. I used my table saw,which has a 52" rip fence — whichoffers plenty of capacity to cut thedadoes. If your saw lacks that muchcapacity, you can use a router andstraight bit guided by a straightedge.CASE PARTS VIEWThat done, rip each blank to make anarrow side (L) that’s 125/8" wide, and awide side (M) that measures 131/4".Run the Rabbets— Now lay out arabbet along the back edge of each wideside. The rabbet serves two purposes. Itdecreases the amount of material you’llneed to trim when scribing, and it provides a notch for the back panel to restin (Wide Side Rabbet Detail).As you lay out the rabbet, rememberthis: On the left-hand bookcase, thewide side will go on the right. On theright-hand bookcase, the wide side goeson the left. Mark each side, so you don’taccidentally rabbet the wrong edge.Bring on the Shelves — Withthe case sides complete, you can cutthe shelves and tops (N) to size. In mybookcases, the upper compartmentis a lighted display area. So beforeassembling the cases, I bored a 21/8"hole centered in the two tops for thepuck lights to fit into.After that, the bookcases can beFACE FRAME ASSEMBLYWIDE SIDE RABBET DETAILFrom Workbench magazinewww.WorkbenchMagazine.compage 7 of 16assembled. I attached the shelvesusing glue and 6d finish nails insteadof screws so that I didn’t have largeholes to fill in the visible (wide) sidesbefore painting.Next, cut two case cleats (O) foreach case and nail them to the case sides.You’ll drive screws through these cleatsto secure the bookcases to the wall.The case backs (P) come next.Toecho the look of the beadboard paneling in the room, I made these backsfrom 3/8"-thick beaded plywood (Iused Ply-Bead from Georgia Pacific;Plytanium.com).The backs get tackedon with 1" brads.Fit the Face Frames — A solidwood face frame comes next for eachcase (Face Frame Assembly, below left).To make them, cut frame stiles (Q),as well as top (R), middle (S), andbottom (T) rails to size from solidstock. Then assemble the frames withpocket screws.You can glue and nail the faceframes to the cases now. Make surewhen doing so that each face framesits flush with the wide side of eachcase and overhangs the side which willsit against the wall.Add Shelf Edging — All that’s leftnow is to add edging (U) to the threeshelves that aren’t covered by the faceframe. This edging features a beadedroundover profile (Edging Detail) madeusing the same three-step techniquethat was used for the seat panel edging(Molding Made Easy, page 5). Start withextra-long edging pieces, then cut eachto fit the shelves. Glue and nails holdthe edging in place without clamps.A Good Time to Paint — Withthe bookcases assembled, most of themajor construction is complete for thisproject. But before you move on toinstallation, I advise painting most of theparts.That way, you can take your timewithout making a big mess in the roomwhere the book nook will be installed.See page 16 for tips that will ensure agreat paint job.I primed and painted everythingbut the seat panels. Those were leftbare because fitting the bookcasesmeans sliding them in and out ofplace a few times, which could scratchup the paint. 2006 August Home Publishing CompanyAll rights reserved
INSTALL THEBENCH SEAT AND BOOKCASESBefore you install the book nook, youmay need to do a little prep work inthe room. For example, I removed thebaseboard behind and beside the benchseat to ensure that I could tuck the backof the base units tight against the wall.At the same time, I stripped off thebeadboard on the back wall where theproject would go.To me, that made thebook nook truly look built-in ratherthan tacked on. This, of course, led to abit of plaster repair.Then I decided togo ahead and repaintthe room, so it wouldfully match the booknook. These types oftasks are often called“might-as-wells.” Theytake time, but reallydo make a built-in projectlook better.Bring in the BenchSeat — Start installationby positioning the seatScrew the baseunits together andmake sure they’restraight across thefront. Then level theassembly using shimsas needed.bases (Base & Frame Installation, below)They should align without problem,but be sure to double-check that thetops are flush and that the front edge ofthe assembly is straight (Photo, left).Thatdone, level the base units (Inset).Next, shim between the back of thebase units and wall if necessary, and thendrive #10 31/2" screws through thebase cleat and into wall studs in at leastfour locations (two in each base unit).Get Framed — Before attachingthe face frame, scribe and trim the endstiles to match the walls. Using a template simplifies this process (see page 15).Align the face frame, and secure it with6d finish nails (Face Frame Detail).Have a Seat — Next up are theseat panels (Add Seat & Trim, page 9).Position one panel so it overhangs theface frame consistently. Now scribe andtrim the back edge and outer end ofthe panel, using the techniques on page14. Remember, once fitted, the panelshould overhang the face frame by 1".BASE & FRAME INSTALLATIONScribe ends offace framethen slideinto positionFACE FRAME DETAILPositionbase units and screwthem togetherShim base assemblylevel and screw throughcleats to wall studsFrom Workbench magazinewww.WorkbenchMagazine.comCut awaybaseboard #/4" infront of base unitsMOUNTING DETAILpage 8 of 16 2006 August Home Publishing CompanyAll rights reserved
Once this first panel fits, clamp itin place. Then fit the second panel thesame way (Photo, below). After that, nailthe seat panels to the base units.Slide In the Bookcases — Fittingthe bookcases comes next (Bookcases TopIt Off, right) Be prepared to test fit thema couple of times to get the best fit.Start by making sure each case sitssquare on the bench seat (Photo, bottom).Then scribe the face frame, remove thecase, and trim it to fit. Refit the case,and then scribe and trim the case side.Now install the bookcase (Case CleatDetail).Finally, glue and nail on the seatedging (Seat Trim Detail). A piece of3/ " cove molding (V) goes below.4More cove wraps around the bookcases (Case Molding Detail). Now youcan paint these parts.ADD SEAT & TRIMScribe back edgeand outside end of first seat pato fit, then clamp in placeScribe andfit secondseat panel, thennail both tobase unitsSEAT TRIM DETAILCut seat-paneledging and cove moldingto length and nailthem in placeBOOKCASES TOP IT OFFAttach bookcasesto wall by driving screwsthrough case cleatsand into studsMark Rough positionbookcase on paneling, then rempaneling that would be covered bEach seat panel gets trimmed to fit thewall on the back and outside end. Thepanels should meet tightly at the center.Scribe andtrim face frame and cabinet sideto match wall contoursMiter covemolding to fit and attachto bookcases at baseCASE CLEAT DETAILCASE MOLDING DETAILUse a framing square to make sure eachtall case is positioned properly beforescribing it and before installing it.From Workbench magazinewww.WorkbenchMagazine.compage 9 of 16 2006 August Home Publishing CompanyAll rights reserved
ADD DRAWERS & A VALANCEDeep drawers add a lot of enclosedstorage for blankets, games, or justabout anything. Like the rest of theproject, they’re attractive yet very easyto build.With the bench seat and bookcasesinstalled, I decided to add some enclosedstorage to the project with a pair ofdrawers (Photo, left). You could choose toleave all the compartments open, or buildeven more drawers. It all depends on whatsuits your needs.Each drawer is just a simple boxcovered by a false front with a decorativemolding (Drawer Assembly).Start by cutting the drawer fronts andbacks (W) and sides (X) to size from1/ " hardwood. Then rabbet the fronts2and backs (Drawer Joinery Detail), and cutgrooves for the plywood bottoms (Y)before assembling the boxes.The false fronts (Z) come next.They’recut to size from 3/4"-thick poplar. Thenyou can add the drawer trim (AA). It’smade using the techniques on page 5,mitered to length, and secured with glueand 1" brads.DRAWER ASSEMBLYSpacers Position the Slides — Beforeyou can install the drawer slides, you’llneed to “build out” the bench seat compartments so that the slides fit flush withthe edges of the face-frame stiles. Spacers(BB) accomplish this (Drawer Slide Detail).Plane or rip each spacer to thickness, andthen mount it to the divider.From there, you can install the drawerslides, and then slip the drawer boxesinto position. Finally, align and mountthe false fronts.Top It Off with a Valance — Thefinishing touch for the book nook is avalance. It spans between the bookcasesto tie the project together, and providesa place to mount lights and run wiring(Valance Assembly, page 11). Consisting ofjust two pieces, it’s one of the easiest partsof this project to build.Construction begins by cutting thevalance bottom (CC) from 3/4" plywood.It starts out oversize. If you want to addlighting, bore holes for puck lights.The extra-long valance face (DD)comes next. It gets a full-length groove toreceive the valance bottom, and roundovers on the lower edge (Valance MountingDetail, page 11).DRAWER JOINERY DETAILDRAWER SLIDE DETAILFrom Workbench magazinewww.WorkbenchMagazine.compage 10 of 16 2006 August Home Publishing CompanyAll rights reserved
After making the valance parts, paintthem, but don’t assemble them yet.Cleats Hold the Valance — Apair of simple cleats (EE) secure thevalance. After cutting them to lengthfrom 2x2s, screw one to the wall, andthe other to the bookcases (ValanceMounting Detail).Finally, scribe the valance bottomand front to fit, nail them together,and then slip the assembly into placeafter routing all wires into the case(Photo, above right).The Crowning Touch — To hideany gaps around the ceiling, wrap thevalance and the bookcases with crownmolding (FF). It just gets mitered to fit,and then nailed in place.With the book nook complete, it’stime to kick back and relax — with agood book, of course.VALANCE ASSEMBLYVALANCE MOUNTING DETAILMATERIAL LISTPartQtyBENCH SEATA BASE TOPS/BOTTOMS 4B BASE ENDS4C BASE DIVIDERS4D BASE CLEATS2E BASE BACKS2F SEAT PANELS2G SEAT EDGING2H FRAME TOP RAIL1IFRAME BOTTOM RAIL 1JFRAME END STILES 2K FRAME INNER STILES 5BOOKCASESL NARROW SIDES2M WIDE SIDES2N SHELVES/TOPS12O CASE CLEATS4P CASE BACKS2Q FRAME STILES4R FRAME TOP RAILS2SizeMaterial#/4" x 19!/4" x 66!/8 "#/4" x 19!/4" x 16!/4"#/4" x 19!/4" x 11!/4"#/4" x 2" x 65%/8"!/4" x 12!/4" x 67!/8"#/4" x 21#/4" x 67%/8"!/4" x #/4" x 144"#/4" x 2#/4" x 131!/4"#/4" x 4#/4" x 131!/4"#/4" x 2!/2" x 16!/4"#/4" x 2!/2" x 8#/4"Birch PlywoodBirch PlywoodBirch PlywoodPoplarHardboardBirch PlywoodPoplarPoplarPoplarPoplarPoplar#/4" x 12%/8" x 81"#/4" x 13!/4" x 81"#/4" x 12%/8" x 23#/4"#/4" x 2" x 23!/4"#/8" x 24!/2" x 81"#/4" x 2!/2" x 81"#/4" x 5!/2" x 20"Birch PlywoodBirch PlywoodBirch PlywoodPoplarBeaded Ply.PoplarPoplarPartQtySizeS FRAME MIDDLE RAILS 2#/4" x 2" x 20"T FRAME BOTTOM RAILS 2#/4" x 3" x 20"U SHELF EDGING6!/2" x #/4" x 20"V COVE MOLDING1#/4" x #/4" x 20'DRAWERSW BOX FRONTS/BACKS 4!/2" x 8!/2" x 19"X BOX SIDES4!/2" x 8!/2" x 18!/2"Y BOX BOTTOMS4 !/4" x 18!/2" x 18!/2"Z FALSE FRONTS2#/4" x 8%/8" x 19&/8"AA FRONT TRIM1#/8" x !/2" x 90"BB DRAWER SPACERS4#/4" x 1!/2" x 19!/4"VALANCE/CROWNCC VALANCE BOTTOM1#/4" x 11!/2" x 86"DD VALANCE FACE1#/4" x 5#/8" x 86"EE VALANCE CLEATS21!/2" x 1!/2" x 86"FF CROWN MOLDING1#/4" x 3!/2" x 20' (64) #8 x 2" Fh Woodscrews (66) #8 x 1!/2" Pocket Screws (2 lbs.) 6d Finish Nails (!/2 lb.) 4d Finish woodPoplarPoplarPoplarBirch PlywoodPoplarPinePine (1 lb.) 1" Wire Brads *(2) Pr. 18" Slides (#34580) *(2) Puck Light Sets (#39748:2-Light; #39705: 3-Light)*Items available from Rockler.com; 800/279-4441From Workbench magazinewww.WorkbenchMagazine.compage 11 of 16 2006 August Home Publishing CompanyAll rights reserved
HOW TOBUILDBETTERBUILT-INSThe secret to great-lookingbuilt-ins is getting a perfectfit in a less-than-perfectspace. These simple tipsshow you how.Built-in cabinets can transforma room. In fact, they oftenbecome the focal point of theentire space. So to look theirbest, built-ins have to fit into the spaceperfectly — like a hand in a glove.But getting that perfect fit can befrustrating. After all, no matter howcarefully you build the project, it willlikely have to fit into a less-thanperfect room. That’s because floorsand ceilings aren’t always level, wallsmay not be plumb, and corners aren’texactly square.Actually, building a built-in that fitsisn’t as tough as you’d think. You justhave to know how built-in cabinets aredesigned, as well as how to survey thespace the cabinet will occupy so you cancome up with correct cabinet sizing.BUILT-IN DESIGN BASICSBuilt-in cabinets have something to hide:BUILT-IN CABINET DESIGNFrom Workbench magazinewww.WorkbenchMagazine.compage 12 of 16Behind the form-fitting facade, they aren’tbuilt to exactly fit the space at all.Start Small — That’s right, a builtin cabinet actually starts out smaller thanthe space it will occupy (Built-In CabinetDesign, left). That allows the cabinet toslip easily into its space. Of course, thismeans there will be gaps around thecabinet that will have to be filled in.Overhangs Fill the Gaps — Thesolution for concealing those gaps is toadd pieces that overhang the cabinetand span the gaps. Later, these pieces gettrimmed to fit tightly against the surfacesthey abut. (This is called scribing, and isdiscussed starting on page 14.)Face Frames & Filler Strips — Atthe front of the cabinet, a commonway to hide the gaps is with a faceframe. You can also extend a faceframe to make it overhang by gluingon filler strips.Wide Sides also Hide — If the sidesof the cabinet will show, build themextra wide, so they extend beyond theback panel. Again, the excess will spanany gap between the cabinet and wall.Add On to Fill In — Sometimesit’s impractical to build the gap fillersinto the cabinet. In those cases, add fillerstrips or molding. In the book nook,for example, we used crown moldingto cover the gap at the ceiling.TAKE A SITE SURVEYBefore you can build your cabinet, you’ll 2006 August Home Publishing CompanyAll rights reserved
have to figure out what size to make it.This is done with a site survey.Measurements are an important partof a site survey, of course, but the process also reveals the “problem” areas ina room.The process is explained below,and in the Illustrations at right.As you work through the site survey,you’ll want to record all the results so5ea where the built-in will be located(Fig. 1, right).To do this right, you’ll needto check the distances from wall to walland floor to ceiling in several places.Check Level & Plumb-—-Next,use a long level (4' or longer is ideal), andcheck to see if the walls are plumb andthe floor and ceiling are level (Fig. 2).Thiswill show whether the gaps between thecabinet and walls will be consistent fromtop to bottom, or tapered.See if It’s Square — Next, check thecorners of the room with a framingsquare. This shows whether the cabinet can be tucked into a corner, orwhether it will need to be pushed outa bit to fit.Look for Bows-—-The last step inthe site survey is checking the flatnessof the walls (Fig. 3). Even if they appearflat, they may bow in or out or berippled. Knowing this will give anindication of how easy or complicatedyour scribing cuts later will be.SIZE THE CABINETWith the site survey complete, you cansize the cabinet. First, find the smallestwidth and height measurements, andsubtract about 1". Build your cabinetto these undersize dimensions.Once you know how large thecabinet will be, compare its size tothe largest width and height measurements. The differences tell you whereyou’ll need to add overhangs, as wellas how wide they will need to be.And you’ll know whether those overhangs are consistent or if they vary byexamining if and where the walls areout of plumb.SURVEY THE SITETHIRD:Check wall towall distance inseveral places1] MEASURE SPACEADetermine the rough locationof the cabinet in relation to thewalls by snapping a chalk line.BMeasure from floor to ceilingon both ends of the room.Record the measurements asyou go.CNext, measure from wall towall in several areas, and writedown any differences in yournumbers.CBBCBSECOND:Record floorto ceilingdistance in Cabineta few areas LocationCAFIRST: Mark location ofcabinet front with a chalk line2] PLUMB & LEVELDUse a long level to check thewalls for plumb. Measure andrecord any deviations.ECheck the floor with the levelin a similar fashion. Again,write down deviations.FIn the corners, hold a framingsquare against the walls tocheck for square.DFIFTH:Check the floorfor deviationsbetween the floorand levelFOURTH:Check wallsfor plumbEFSIXTH: Use a framing squareto check the corners for square3] CHECK FOR BOWSGLast, check the flatness of thewalls using a long straightedge.A jointed 2x4 works well.HAlso check the ceiling andfloor as necessary, and writedown any discrepanciesyou find.IAnother way to check forbows is to run a string alongthe wall and look for gaps.SEVENTH: Checkwalls for bows, andrecord any gapsNail2x4 withjointed edgeStringNOTE: You can alsorun a string against thewall to check for bowsEIGHTH: Also checkthe floor for bowsFrom Workbench magazinewww.WorkbenchMagazine.compage 13 of 16 2006 August Home Publishing CompanyAll rights reserved
SCRIBE FORSUCCESSBuilding a cabinet to account for irregularities in the walls is a good start to agreat-looking built-in project. Now, toget a professional-looking installation,you’ll need to scribe the cabinet andcut it to fit those irregularities.Scribing is the relatively simple process of marking the contour of the wallonto the part of the cabinet that willfit against it. This is accomplished bybutting the cabinet against the wall, andthen running a pencil along the wallto scribe a line on the edge of the part.This part is then cut to the scribe lineto fit against the wall.STEP #1: LEVELTHE PLAYING FIELDBefore you can scribe or cut, though, it’scritical that the cabinet is resting leveland plumb. But attempting to get a largecabinet level and plumb can often beback-breaking work, to say the least.So I recommend mounting thecabinet above a base unit, which youcan level using shims.This base unit canbe a simple toe kick or a low cabinet.An overview of how to level a baseunit is shown in Start Off Level belowleft.
From Workbench magazine www.WorkbenchMagazine.com page of 6 2006 August Home Publishing Company . you're likely to build your book nook differently than ours. The measure-ments will almost certainly be dif-ferent (our wall was 11-feet, 3" wide and the ceiling, at 98", is higher than
