Transcription
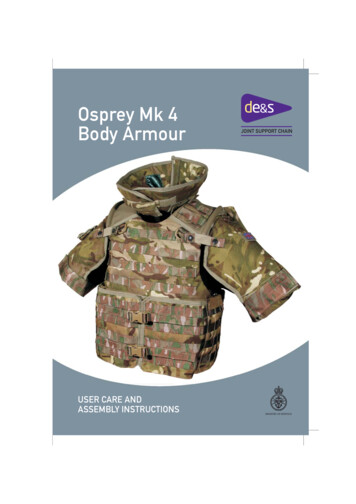
Osprey Mk 4Body ArmourUSER CARE ANDASSEMBLY INSTRUCTIONS
Osprey Mk 4 Body ArmourBody Armour Cover- Vest Front- x1Body Armour Cover- Vest Back- x1Waistbands Set - x1OPS Panel & T Bar fittings - x1Shoulder Guards, PairLeft & Right withelasticated fittings - x1Brassards, PairLeft & Right withelasticatedfittings - x1Cummerbunds, Pair Left & Right - x12 Piece Full Collar - x1Ancillaries Set - x122 Piece Half Collar - x1Blanking Panels,Pair - x1
Accessories & Parts ListingFront ArmourPlate - x1Front Plate Cover - x1SA80 2 MagAmmo Pouchx4Back Plate Cover - x1LMG 100Round Pouchx1WaterBottle Pouchx1SA80 Single MagAmmo Pouchx3Pair Small ArmourPlates - x1Back ArmourPlate - x1SA80 Single MagAmmo Pouchx3First AidPouchx1CommandersPouchx1UtilityPouchx1UGL 8Round Pouchx1Sharpshooter3 Mag Ammo Pouchx1NB: A set of Soft Armour is also included but has not been illustrated.9mm PistolAmmo Pouchx2AP GrenadePouchx2Smoke GrenadePouchx23
Light Fighting OrderNB: When no collar is fittedto the vest, the collar tabsare tucked under themain vest shoulder join.Non SlipShouldersGrabHandlesOPS Panel withadjustableT Bar fittingsT BarAdjustmentComplete Fighting OrderShowing Full Collar,Brassards,Cummerbunds& Shoulder GuardsFull CollarShoulderGuardsBrassardsBrassardsThe OPS Panelis removed. Replacedwith Cummerbundsfitted withadjustable frontwebbing straps4Half Collar
AssemblyOne wayStudsHard Armour PlatesFront and Back Hard Armour Plates should only be used in the fittedcovers provided. These use simple flap & touch & close fastenings.The studs used throughoutthe items in the Osprey Mk4Body Armour, use ‘One WayStuds’ these preventaccidental release offastenings whilst in use.They require no specialequipment or tools to open.Any use of tools couldpermanently damage thefixings.NB: Armour plates should be regularly inspected see page 15.The stud is designed to onlyfasten or release whenpushed or pulled in onedirection, this direction isindicated by a dot on thestud button.Fitting Hard ArmourOpen the innerpocket inside thefront face of the vest2The top studfeaturesa locking nubon the topof theinner rimTo CloseInsert the Hard Armour,Ensuring that the front facesaway from the body.3Close the pocket securely.Armour for both the back andthe front of the vest is fittedin the same manner.12Pull fromDot to OpenTo close the stud the lockingnub at the top of the femalestud should be looped onto theraised rim of the male.Push the base of the stud andthe two units lock.To Open, simply pull the studfrom the base.5
AssemblyUsing the Small Armour PlateAs an alternative to the larger HardArmour Plates,the Small Armour Plates may alsobe fitted into the vest Front & Back.The pocket is located inside the mainplate pocket and is fitted in the same way.Fitting the Soft Armour1This is best fitted after the Hard Armourhas been installed.Install the armour into the vest recess, ensuringit lies flat and that the labels face the body.Pull each tab through the shoulder openings.The top of the shoulder opening features a smallpocket, insert the tab into this pocket.2Close the small pocket.The tabs will be held in placeby the hook & loop fixings.63
AssemblyAssembling the Main Vest BodyOn a suitable flat area.Lay out both parts of the Vest as indicated1Connect the Front & Back Vest panelstogether at the shoulders using theHook & Loop and the two stud fixings.23To complete the vest assembly bring the extendedsides of the back panel around to fix to the front panel,fasten these at the sides by hook & loop fabric.The waist band ( pre fitted) is adjustable.7
AssemblyFitting the OPS Panel231The studded loopshold the OPS Panel tothe main vest bodyT Bars & Webbingstraps add fixingpoints to the sides.The Webbing canbe adjusted forfitting & comfort.First Fixing of the OPS Panel is by Hook & LoopInstalling Hard Armour Platesinto the CummerbundsThe Cummerbunds include pockets tohold the small Armour Plates, addingadditional protection to the lowertorso. Access to the pocket, is bya simple flap sealed byHook & Loop fastenings.84
AssemblyFitting the CummerbundsThe Mollé bars on the reverse ofthe Cummerbund should bethreaded through the Mollé webbingson the vest. See page 11 for furtherdetails on using the Mollé system.The Blanking Panelsare used to preventthe hook & loopfixing during theassembly process.The Cummerbundscan be adjustedusing the front straps.Fitting the CollarsA choice of collars may be fitted.The full collar or the Half Collar.1Both Collars are supplied as atwo piece unit and fit similarly.Join the two collar sections,and fit the collar to the VestCollar Flaps using the Hook& Loop fixings and completebuy closing the three studson each side.2At the back of the collar,pull the webbing strap throughthe central top loop on theVest Mollé WebbingFull Collar3Close the stud on the webbingstrap to complete fitting.Half CollarThe front of the collar isadjustable for comfort.9
AssemblyFitting the Brassards & Shoulder GuardsThe Brassards & Shoulder Guards offer integratedprotection for the upper arm and shoulder.Properly fitted they will not impede movement& flexibility.To fix the Brassard to the Vest, Open the mainshoulder fixing and attached the top tab to theexposed vest using the Hook & Loop fixings.Reattach the shoulder fixing.The Shoulder Guardsattach to the vest bodyusing hook and loopfixings & 3 studs.Additional stability& flexibility is providedby attaching thestudded elasticatedstrap to the Brassard.The Brassards are additionally fixed to the vestby two short elasticated studded straps.The first attaches to the top front shoulder, asseen above.The second is attached ‘through’ the shoulderfixing to its fixing point on the back, see thephotograph right.10
Using the Mollé fixing systemThe pouches and accessories provided for theOsprey Mk4, make use of the ‘Mollé’ fixingsystem. Properly fitted, this provides anextremely strong bond between the pouch orother accessory and the Vest itself.The Rigid Mollé Bar of the Pouch, should be ‘woven’through each of the horizontal webbings in turn.The vest panelsfeature horizontalMollé webbingsMollé Webbingon the VestPouches andAccessories carryhorizontal Molléwebbings and arigid Mollé bar.The base of eachbar features a oneway stud to lockthe bar to the bodyof the pouch.11
Fitting the Ancillary itemsDrop Sling AttachmentThe Drop sling is secured to the rear of the vest,using a T Bar fed into a rear MolléFirstly detach the T Bar and D ring from the sling assemblyand feed this through the Mollé webbing.Hydration UnitFixings.Fixings are provided to meet therequirements of most Hydrationunits. These can be positionedonto the Vest using the integralMollé webbings.Reattach the sling ready for use.2 x Side release bucklesmounted on a T Bar provideattachments for the top of thehydration unit.An additional T Bar with2 x Side release buckles withadjustable webbing strapsprovide attachments for thebase of the hydration unit.Further support is providedby 6 x short studded webbingfixings.12
Rank StrapThe Rank strap can be is fitted onto thefront of the vest.It should be threaded through threeMollé webbings.13
Hard Armour Plate InspectionThese checks should be undertaken at regular intervals toensure that the plates still provide full protection.Front PlateBack Plate1Carefully remove theArmour Plate fromthe cover.2Run your hand overthe front of the Platefeeling for debrisand/or damage.3Visually check theouter green fabric forrips and tears.4Visually check thefaces of the Plate forcracks or damage.Cracks will behighlighted by adefinite white line.Impacts will be visibleas a white indentationand radiatingfractures. See theillustration opposite.145Damaged or CrackedPlates MUST bereplaced.6Minor blemishes orair pockets do notpose any risk.
Soft Armour MaintenanceNATO StockNumbers (NSNs)Inspection for panels and covers should follow the sameguidelines as during laundering.It is essential that the following regular maintenance isconducted:As a minimum period. The body armour is to beinspected annually by the QM Department.The body armour should be inspected for signs ofdamage to armour panels and protective covers.Armour panels should also be inspected at theearliest convenient time if the armour has had anyphysical contact with objects likely to cause damage.The outer cover is to be cleaned in a washingmachine, in accordance with the manufacturersinstructions.Photography, Design & Production - Corvus Design Services. 01271 374593Fillers are to be removed prior to laundering.CleaningTHE COVER AND FILLER MUST BE SEPARATED INACCORDANCE WITH THE FITTING INSTRUCTIONS BEFORECLEANINGCoverThe cover is washed in accordance withthe manufacturers instructions.FillerTo clean the filler, wipe the surface of theprotective cover using a damp cloth.DO NOT IMMERSE IN WATERDry thoroughly before inserting back intothe cover.Cover Osprey BodyArmour Mk4Size 170/1008470-99-925-0872Cover Osprey BodyArmour Mk4Size 170/1128470-99-925-0873Cover Osprey BodyArmour Mk4Size 180/1048470-99-925-0874Cover Osprey BodyArmour Mk4Size 180/1168470-99-925-0875Cover Osprey BodyArmour Mk4Size 190/1088470-99-925-0876Cover Osprey BodyArmour Mk4Size 190/1208470-99-925-0877Cover Osprey BodyArmour Mk4Size 200/1168470-99-925-0878Cover Osprey BodyArmour Mk4Size 200/1248470-99-925-087915
JOINT SUPPORT CHAINDE & SJoint Support ChainPersonal Combat EquipmentIntegrated Capability GroupSpur 6Beckford BlockEnsleighBathBA1 5ABProduct Design & DevelopmentBooklet Production & PhotographyCQC Limited, Barnstaple Devon.www.cqc.co.uk
The pocket is located inside the main plate pocket and is fitted in the same way. Install the armour into the vest recess, ensuring it lies flat and that the labels face the body. Close the small pocket. The tabs will be held in place by the hook & loop fixings. Pull each tab through the shoulder openings. The top of the shoulder opening .
