Transcription
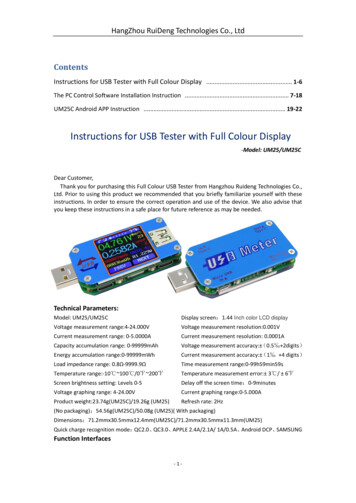
HangZhou RuiDeng Technologies Co., LtdContentsInstructions for USB Tester with Full Colour Display . 1-6The PC Control Software Installation Instruction . 7-18UM25C Android APP Instruction . 19-22Instructions for USB Tester with Full Colour Display-Model: UM25/UM25CDear Customer,Thank you for purchasing this Full Colour USB Tester from Hangzhou Ruideng Technologies Co.,Ltd. Prior to using this product we recommended that you briefly familiarize yourself with theseinstructions. In order to ensure the correct operation and use of the device. We also advise thatyou keep these instructions in a safe place for future reference as may be needed.Technical Parameters:Model: UM25/UM25CDisplay screen:1.44 Inch color LCD displayVoltage measurement range:4-24.000VVoltage measurement resolution:0.001VCurrent measurement range: 0-5.0000ACurrent measurement resolution: 0.0001ACapacity accumulation range: 0-99999mAhVoltage measurement accuracy: (0.5‰ 2digits)Energy accumulation range:0-99999mWhCurrent measurement accuracy: (1‰ 4 digits)Load impedance range: 0.8Ω-9999.9ΩTime measurement range:0-99h59min59sTemperature range:-10 100 /0 200 Temperature measurement error: 3 / 6 Screen brightness setting: Levels 0-5Delay off the screen time:0-9minutesVoltage graphing range: 4-24.00VCurrent graphing range:0-5.000AProduct weight:23.74g(UM25C)/19.26g (UM25)Refresh rate: 2Hz(No packaging);54.56g(UM25C)/50.08g (UM25)( With /71.2mmx30.5mmx11.3mm(UM25)Quick charge recognition mode:QC2.0、QC3.0、APPLE 2.4A/2.1A/ 1A/0.5A、Android DCP、SAMSUNGFunction Interfaces-1-
HangZhou RuiDeng Technologies Co., LtdMeasurement MainInterfaceQuick Charge RecognitionInterfaceCharging RecordingInterfaceData Connection CableImpedance MeasurementInterfaceMeasurement GraphingInterfaceSystem Parameter SettingInterfaceThe Core Function:PC Bluetooth CommunicationAndroid Phone APP ControlQuick Charge RecognitionData Record and StoreCapacity/Energy DetectionDifferential Voltage Method Measurement Data Connection Cable ImpedanceVoltage/Current/Power DetectionLoad connecting detection function (screen auto off, plug the load, screen auto lighting)Device LayoutA:Micro USB Port-2-
HangZhou RuiDeng Technologies Co., LtdB:Multifunction buttons (4)C:Bluetooth SwitchD:USB A Female PortE:USB A Male PortF:Type-C Input Port (Only VBUS、GND、CC1、CC2 four wires)G:1.44 Inch Color ScreenH:Type-C Output Port (Only VBUS、GND、CC1、CC2 four wires)I:Bluetooth Indicator: When connected to the host computer control software, the Bluetoothindicator changes from flashing to steady state. When connecting, the Bluetooth icon is displayedon the screen. (Bluetooth communication version only).Interface Prompt Representing Functions1:Press and hold the key to rotate the Screen Left2:Press the key to close the screen3::Press the key to open the help interface4:Press and hold the key to rotate the screen right5:Press PREV to previous page6:Press Next to next pageOperating InstructionsWhen the unit is first powered on the welcome screen is displayed followed shortly by themain interface screen.Hidden interface: Pressing any buttonwhilst powering on the module willdisplay three options. Option 1 selectsthe Chinese Interface and option 2selects the English interface.The third option is to reset(after reset,system setting data was restored to thefactory setting, all the stored data was not reset).Release the button at the desired selection.Pressing and holding the button after stepping to the third option will exit the hidden interface.Interface 1: Main Measurment Interface.( As shown below)7:Voltage Measurement8:Current Measurement9:Accumulated Capacity10:Accumulated Energy11:Temperature Measurement12:Number of the Data Group inuse13:Load Equivalent Impedance14:Power MeasurementPress the ‘ ? ’ button to enter the interface as shown above:Press and hold the ‘NEXT’ button to switch Data Group. The USB tester can provide a total of 10groups of data to save and view. These are numbered 0-9.-3-
HangZhou RuiDeng Technologies Co., LtdWith Data Groups 1-9 selected the current mAh and mWh are saved after power off. They willcontinue accumulating the next timethe tester is powered on. When the datagroup selected is 0 then the currentvalue of mAh and mWh will betemporarily saved at power off. Whenthe device is next powered on thesevalues will be recalled and will beginflashing. When the accumulated mAh exceeds 1 mAh, the previous data will be cleared andaccumulation will restart.With a Data Group selected, press and hold the ‘PREV’ button to clear the mAh and mWh.(As shown)Press ‘NEXT’ to switch to the Quick Charge Recognition Interface.Interface 2: Quick Charge Recognition Interface15:D : (DP) data positive signal level.16:D-: (DM), data negative signal level.17:Mode displayThe product will automaticallyidentify a device with a supported fastcharging mode. At this time the devicesupports the QC2.0 、 QC3.0 、APPLE2.4A/2.1A/ 1A/0.5A、Android DCP、SAMSUNG.(Note: This quick charge agreement recognition model isfor reference only, because cell phone updated quickly, it can't be absolutely accurate identification)Press ‘NEXT’ to switch to the Charging Recording Interface.Interface 3: Charging Recording Interface18:Accumulated Capacity19:Accumulated Energy20:Time display:The total accumulatedrecording time.21 : Capacity/Energy statistics triggercurrent22:REC:recording status indicator. ‘REC’displayed in red indicates that recording is stopped. ‘REC’ displayed in green indicates thatrecording is in progress.After power on, when the current flowing is greater than the Low Current trigger value. Thesystem automatically begins to record the accumulated capacity, energy, and time elapsed. The‘REC’ indicator will change from red to green.To set the Current trigger value, press and hold the "Next" button to highlight the value thenpress the ‘PREV’ button to adjust the value as required. The value can be set anywhere between0.01A- and 0.30A. (10mA to 300mA).Press "Next" button to switch to the Data Connection Cable impedance Measurement Interface.Interface 4: Data Connection Cable Impedance Measurement Interface.TheTestercanuse-4-
HangZhou RuiDeng Technologies Co., Ltddifferential voltage method to measure the resistance of a data connection cable23:USB Tester directly connected to the power supply with Voltage and Current values displayed24:USB Tester connected via a data connection cable with Voltage and Current values displayed.25:R: Data Connection Cable resistance.Measurement procedure:First, connect the USB Tester directly to the power supply and adjust the appropriate loadcurrent (recommended value 1A) . Press and hold the ‘NEXT’ button to begin recording data. Theindicator prompt will stop flashing .Second, unplug the USB Tester and then reconnect it to the power supply via the MicroUSB/Type-C IN data connection cable and adjust the load current to the same value as in the firststep. Press and hold the ‘NEXT’ button to begin recording data. The indicator prompt stopsflashing and the Data Connection Cable resistance measurement test is completed and the valuedisplayed.Note: If during the second step the screen turns black, this indicates that the voltage difference is too highand the tester will enter the 4V power-down state. The load current needs be reduced. Then re-start themeasurement from the first step. After the Data Connection Cable resistance test is completed, the Tester needsto be powered off and then on again to resume measurement.Press the ‘NEXT’ button to switch to the Measurement Graphing Interface.Interface 5: Measurement Graphing InterfaceThis interface displays the voltagemeasurement over time in the 4-24Vrange and will automatically adjust thedisplayed range in real time to accountfor voltage fluctuations. And the currentmeasurement over time in the 0-5.000Arange and will automatically adjust thedisplay range in real time to account for current fluctuations.Press and hold “NEXT” to switch to D D- graphing, as pictureThis interface displays the D /Dvoltage measurement over time in the0-3.3V range and will automaticallyadjust the displayed range in real time toaccount for D /D- voltage fluctuations.Press the ‘NEXT’ button to switch tothe system parameter setting interface.Interface 6: System Parameter Setting Interface26:Auto screen off time27:Screen brightness28:Temperature display C /F29:Theme background color30:Theme foreground colorPress and hold the "Next" button-5-
HangZhou RuiDeng Technologies Co., Ltdto enter into setting state, press “NEXT” button to step through the options of auto screen offtime, brightness level, temperature display units, theme background color and theme foregroundcolor. Stop on the value you wish to change then press the "PREV" button to change the setting.For auto screen off time setting press ‘PREV’ to repeatedly step though the 10 options from 0to 9 minutes. Default time is 1 minutes.For the screen brightness setting, press ‘PREV’ to repeatedly step though the 6 options from 0to 5 where 0 is the lowest brightness level and 5 is the highest. Default brightness is 4.For the temperature display units, pressing the ‘Next’ button toggles the setting between Cand F. default temperature unite is C.For theme background color, press ‘PREV’ to repeatedly step though the 7 options from 0 to 6where the color sequence is red, green, blue, yellow, light blue, pink, white and black. Defaultcolor is 2, blue.For theme foreground color, press ‘PREV’ to repeatedly step though the 7 options from 0 to 6where the color sequence is red, green, blue, yellow, light blue, pink, white and black. Defaultcolor is 6, white.At any setting state, press and hold the ‘Next’ button to exit the settings menu.-6-
HangZhou RuiDeng Technologies Co., LtdThe PC Control Software Installation Instruction-mode: UM25CNote: This product only supports Windows 7 and above.1 Unzip the installation packageNote: Before unzip the installation package , please install the font package “ArialUnicode MS”.2 Click setup to install-7-
HangZhou RuiDeng Technologies Co., Ltd-8-
HangZhou RuiDeng Technologies Co., Ltd3 Bluetooth connection3.1 open the bluetooth switch on the UM25C.3.2 Use the compute to search bluetooth device.-9-
HangZhou RuiDeng Technologies Co., Ltd- 10 -
HangZhou RuiDeng Technologies Co., Ltd3.3 View bluetooth settingSelect the device connected with bluetooth, view the bluetooth series port COM what PC wasusing. Efferent direction COM (UM25C’Port’) is bluetooth connection port. (note: at win7 system,select bluetooth device, right-click to view properties, display the following widows, view COMport of bluetooth setting, select efferent direction series port to connect. At win10 system, selectbluetooth device, click “more bluetooth option”, view COM port of bluetooth setting, selectefferent direction series port to connect.)- 11 -
HangZhou RuiDeng Technologies Co., Ltd3.4 Connect bluetooth:- 12 -
HangZhou RuiDeng Technologies Co., Ltd3.5 When the Bluetooth indicator changes from blinking to static, click “Connect”4. Function Introduction4.1 Program interface overview:- 13 -
HangZhou RuiDeng Technologies Co., Ltd1: Basic functions: Previous page, Next pages, Rotate screen,2: Corresponding data group: data group switch (click the corresponding number to switchdirectly into this data group ), data group data clear3: Corresponding the main display interface 1: main measurement interface4: Corresponding the main display interface 3: Data recording interface5: Corresponding the main display interface 2: Quick Charge Recognition interface6: Corresponding the main display interface 6: temperature unite switch, dual formattemperature display7: Corresponding the main display interface 6: screen brightness, auto screen off time.8: Corresponding the main display interface 5: Voltage-Current Graphing Interface.4.2 Graphing and Data Export:Move mouse over the Voltage / Time measurement graph then right-click and select thefollowing options:- 14 -
HangZhou RuiDeng Technologies Co., Ltd4.2.1: Automatically adjust the X axis:- 15 -
HangZhou RuiDeng Technologies Co., Ltd4.2.2: Export data to the clipboard:Format : Reference point number on X Axis, Voltage value at that reference point.Read times - VoltageRead times - Current0 23.998 0 0.00021 23.998 1 0.00022 23.998 2 0.00013 23.998 3 0.00014 23.998 4 0.00025 23.998 5 0.00026 23.998 6 0.00217 23.998 7 0.00218 23.998 8 0.00189 24.084 9 0.0018graph Voltage(V) - Voltagegraphgraph Current(A) - Current graph 4.2.3: Export data to Excel:The X scale is adjustable to your preference. You can export up to 120 data reference points, or,only export the current recording data set. Please note, the exported data is only for MicrosoftOffice Excel.4.2.4: Export simplified images:- 16 -
HangZhou RuiDeng Technologies Co., Ltd4.2.5: Clear chart:Note:1. for desktop, when you use the bluetooth adapter to make bluetooth connection, Pleasedon’t use the adapter own driver, and use the windows system bluetooth driver, otherwisethe module can’t make SSP series port communication. If you have installed the adaptordriver, you can uninstall it and unplug the adaptor, then plug in again, the system willinstall it automatically.2. after power off, when power on again, you need to select the COM port again. Whenthe bluetooth indicator is lighting, you can connect the PC with module3. ease use windows official version, simple version may lose some part.4. en communicating, don’t press the button on tester, otherwise there will be some errordata.- 17 -
HangZhou RuiDeng Technologies Co., Ltd5. The exported data is only for Microsoft Office Excel.- 18 -
HangZhou RuiDeng Technologies Co., LtdUM25C Android APP Instruction1, APP Installation:NOTE:The APP only support Android 5.0 and aboveUM25C Android APP 9hpywq/UM251.1 APP download link : , chooseUM25C android APP file to download, you can use the computer to download , then sent thephone, or use the phone download directly.1.2 Open the installation packageABCD2.After- 19 -
HangZhou RuiDeng Technologies Co., LtdInstallation APP icon as the picture2.1 Click APP icon, the interface as the following:1: Export data to the mobile phone folder ( phone SD card root director, repeat to- 20 -
HangZhou RuiDeng Technologies Co., Ltdwrite, generate graph directly in the excel.)2: Multiple language choice, click this to select language. For now there are 17 kinds language( �EnglishрусскийBahasa IndonesiaEspañolHollands PolskiDeutschFrançais 日本語 한국어Slovenskýjazyk latviešu valodaTürkçe), More languages continue to be updated.3: Bluetooth connection: click this to select the device, search this device bluetooth name, selectit and enter pair code (0000 or 1234), click connection (if you can’t search UM24C bluetoothname, you can connect the bluetooth on the phone bluetooth, then open APP to connectdirectly)4: Procedural information the version number, the assist personnel information5:Voltage-current measurement dual graph6:Corresponding the main display interface 1: accumulated mAh, accumulated mWh.7:Corresponding the main display interface 2: quick charge recognition, D D- data signal wirevoltage8:Corresponding the main display interface 6:Screen brightness adjustment: press and hold the slider to adjust.- 21 -
HangZhou RuiDeng Technologies Co., LtdOff the screen time adjustment: press and hold the slider to adjustTemperature display: Celsius/ Fahrenheit9:Switch to next page10:clearing key:clear current data group to zero11:Rotation button: control USB tester display to rotate12:Switch to previous page13:Corresponding the main display interface 3, mAh and mWh display , time recording, controlthe slider to adjust the Low Current trigger value.14 : Corresponding the main display interface 1, voltage measurement value, currentmeasurement value, power measurement value, load equivalent load impedanceNoteA:Because there are too many kinds android phone, so the UI display interface will be differentat some brand phone or different scale screen of one brand phoneB:Application access requirements, allowing the necessary permissions when installing (allowsthe background running, allows to use bluetooth, allowing folder operation, allowed to read theapplication list); and also set application permissions at phone after installation: allows thebackground running , allow to be not cleaned after screen locked, allow auto-start and so onC:Languages selection memory, only at first time you need to select the language when openAPP.- 22 -
and the tester will enter the 4V power-down state. The load current needs be reduced. Then re-start the measurement from the first step. After the Data Connection Cable resistance test is completed, the Tester needs to be powered off and then on again to resume measurement. Press the ZNEX