Transcription
BLUEGRIFFONPublished : 2011-10-12License : None1
INTRODUCTION1. INTRODUCTION2
1. INTRODUCTIONA griffon vulture is a large scavenger bird. But what is BlueGriffon?BlueGriffon is an Open Source Web editing application that allows WYSIWYG (What You See IsWhat You Get) editing and creation of web pages. It is a successor to the NvU editor, which isno longer maintained. BlueGriffon also includes support for new features in HT ML5, which havebeen defined since the time when NvU and some other similar editors were developed. T heBlueGriffon website is http://bluegriffon.org/ and it is released under the Mozilla Public LicenseVersion 1.1.Since it is not as complicated as similar commercial applications, BlueGriffon may be easier tolearn how to use. More importantly, it generates good clean HT ML code.About this tutorialAll the examples in this tutorial are based on running BlueGriffon under the Linux operatingsystem. Fortunately, BlueGriffon operates with a very similar interface regardless of thesystem under which system it runs. All the examples given will be equally applicable to OS Xand Windows. In the event that there is a difference, separate instructions for each operatingsystem will be provided.T his tutorial is written for someone who has little or no previous experience creating webpages or working with HT ML code, and is looking for a tool to quickly and easily get contentready to put on the web. It should also be useful to anyone who is used to other WYSIWYGweb editing applications, and is looking to see what BlueGriffon has on offer. You will not needany knowledge of HT ML to create a web page using this tutorial.T his tutorial will cover:How to construct a simple websiteHow to enter text and imagesHow links workUsing styles to easily control the look and feel of your pageUsing Cascading Style Sheets to easily manage the use of stylesBy the time you complete this tutorial, you should be able to create your own complete andfunctional web page. You should also be able to use styles to customise the look and feel ofyour site without affecting the content of the pages.However, it is beyond the scope of this tutorial to cover the details of getting your sitepublished on the web or the inner workings of HT ML code. So this tutorial makes a couple ofassumptions about its readers:You are familiar with the basics of your operating system (BlueGriffon works on OS X,Linux, and Windows) and you know how to install applications on your computer.You are familiar with the basics of resizing and manipulating images using a programsimilar to the GIMP.You have a hosting solution for your site, and have all the information needed to get thepages you create posted on the web.T he last assumption is not strictly required to use BlueGriffon or create web pages in general,but will be necessary if you want others to be able to see your site.3
GETTING STARTED2. CONTENTS OF A SIMPLE WEBSITE3. CREATING TEXT ON A WEB PAGE4. ADDING AN IMAGE TO A PAGE5. USING LINKS4
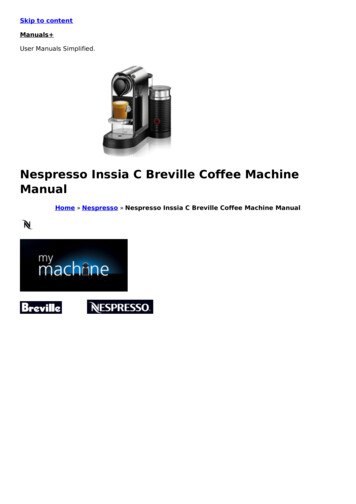
2. CONTENTS OF A SIMPLE WEBSITEAt the most basic level a website is nothing more than a set of files written in a specific waythat can be interpreted (or parsed, in web lingo) by a web browser. In order for all browsers tointerpret the files the web pages must be written in a consistent manner. T his consistency ofform is HT ML, or HyperT ext Mark-up Language. Because HT ML is nothing more than a text filewritten in a specific format, all that is needed to write web pages is a text editor. Creatingpages this way requires knowledge of the HT ML format, and while HT ML is not all that hard tolearn, most people prefer a more visual way of designing pages. Applications such asBlueGriffon allow people to make functional websites by creating the mark-up language foryou, based on the information you provide as you create the content.T he design of BlueGriffon makes the experience of web page design very similar to using aword processor. While this makes learning the software easier for most, there are a few trapsthat lurk in the shadows of this kind of approach. T he Hypertext part of HT ML is what makeslinking possible in web pages, and understanding how links work is crucial before successfullycreating a website. I'll give you a brief introduction here, but I recommend further reading formore detail of how all this works.T he tutorial is about to lead you through the steps of creating one small and simple web pageusing BlueGriffon. If you have not already done so:visit the BlueGriffon website to download and install this application, orfind the BlueGriffon application in the repository of your Linux distribution and install itusing your favorite package manager.When you first open BlueGriffon, whether by e.g.:Activities, Applications, BlueGriffon [via Gnome 3 on Linux],Launcher [on OS X], orStart, Programs, All Programs [on Windows]you will be presented with a screen that resembles:5
6
3. CREATING TEXT ON A WEB PAGE7
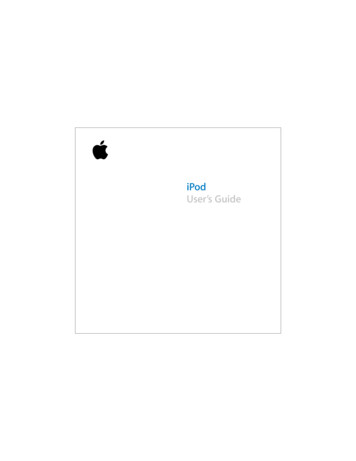
T he large textarea in the lower portion of the BlueGriffon window is where all the content ofthe page is entered. T o enter text, simply select the window and start typing. Don't worryabout fonts or other formatting issues just yet, we'll get to that a little later. After entering abit of text, pause to save the file. Saving the page can be accomplished by selecting the Saveicon button near the upper left corner of the BlueGriffon window.Since this is the first time this page is being saved, a dialogue box will prompt you to providea title for the page. You can enter any text you like here. T he text you enter will appear in thetitle bar of the web browser when the page is viewed. You can always change this later if youwould like.After selecting the OK command button, another dialogue box will appear prompting for thename of this file, as well as its location. Since this is the first, or default page of the site, byconvention it should be called index.html. Most likely, the web server to which you will laterupload your site will automatically display the page named index.html when a visitor enters aweb address without naming a specific file.8
T he location (or folder or directory) where you choose to save this file is also significant. Asuggested habit is to create a folder on the hard drive of your computer that will hold all thefiles needed for a given web site. T his folder should contain no files except those needed todisplay this particular web site. By keeping everything contained in a folder in this way it willmake transferring your site to a server very easy. You can set this up without having to leaveBlueGriffon.Use the various controls in the Save dialog (e.g. select a folder to view its contents in themain pane) to navigate to the vicinity where you would like to preserve the files youcreate while following this tutorial.Select the Create Folder command button to make a new folder for this dedicatedpurpose.In the textbox displayed beside the new folder, type a name you select for the web site,e.g. T utorial Site. Beware that embedding the blank character within file names or foldernames which will be fed to a web browser or a web server will lead to extracomplications. For simplicity, many people choose to use the underscore character " " asa substitute for blanks in file or folder names.After typing the name of the new folder for this web site, press the Enter key or selectthe folder icon to navigate into this folder. T he main pane of the dialog will be empty,as no files have yet been saved in this newly created folder or directory.Once both the Name and its location (e.g. within the T utorial Site folder) have beencorrectly typed and selected, select the Save command button.9
T o gain a tiny bit of immediate gratification, use the Preview icon button near the top right ofBlueGriffon.Since BlueGriffon does not yet know which web browser you prefer to use, you will berewarded with a dialog where you need to specify which one among e.g. Google Chrome,Microsoft Internet Explorer, Mozilla Firefox, Opera, Safari or whatever browsers are installed onyour computer system. T o learn the full path to the program, you are likely to need to dosomething like:[linux] Within a T erminal window (e.g. Activities, Applications, T erminal):[who@localhost ] which firefox/usr/bin/firefox[who@localhost ] [OS X] Within a T erminal window (e.g. Activities, Utilities, T erminal):[localhost: ] who% which firefox/Applications/Firefox.app[localhost: ] who%[Windows] Select with the secondary mouse button (typically the right mouse button) adesktop shortcut to your most-frequently-used web browser, and in the resultingcontext menu select Properties. In the Shortcut tab of the Properties dialog you can seethe path to the browser, e.g. c:\Program Files\Mozilla Firefox\firefox.exe10
Use the Choose. command button to navigate to your selected browser, and select thecheckbox if you would like to avoid having to record your choice again.(If this task was frustrating or confusing, just open your favourite web browser as younormally would. On its menu bar select "File", then "Open File" (or the most similar choiceavailable in your web browser). In the resulting dialogue box, navigate to the T utorial Sitefolder and select the index.html file.) Once you select the OK command button in the LaunchApplication dialog, you should soon see the bit of text you typed earlier displayed in your webbrowser. Not only did BlueGriffon open your web browser (or open a new tab if you alreadywere browsing other pages), but it filled in the URL of the page you have begun to create.While we know it:begins with "file:///" (since you are viewing content on your local system), andends with "/T utorial Site/index.html" if you followed the suggestions abovethe bits in the middle will vary depending upon the operating system in use and theorganizational choices you made for where to create the new folder.11
4. ADDING AN IMAGE TO A PAGEMost web pages have at least some visual (non-textual) content, so let's begin to see howBlueGriffon can be used to place an image on the page. Just as there are benefits to groupingall files for a website within one folder, there are benefits to having a nested folder dedicatedfor the purpose of containing all images used on the website. As you'll soon see keepingthings categorized in this way will make expansion and revision of the site relatively painless.Do you already have a digital image saved in your computer's storage system that you wouldlike to add to the tiny web page we are constructing? Is it an appropriate size for viewing onthe web? Keep in mind that large files take longer to download than small files do. Further,there is seldom any advantage in sending more pixels to a web browser than it can display onyour screen (e.g. an 8 megapixel image will be scaled to a small fraction of its native size inorder to be fully displayed on a 1280 x 1024 pixel screen or monitor). If you have a suitableimage, make a copy of that image and save it in a new folder named "images" within the"T utorial Site" folder.12
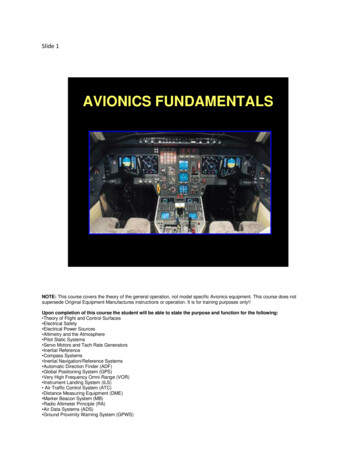
Alternatively, you may choose to copy the image displayed immediately below on this page.You could use your image editing program (e.g. the GNU Image Manipulation Program) tocreate a new image from taking a screenshot of the area of the image above. But you willprobably find it simpler and quicker from within your web browser to select the image withthe secondary mouse button, then select "Save Image As." from the resulting context menu.Remember to create a new folder named "images" within the "T utorial Site" folder, and thensave cheese.jpg within the images folder.Now you are ready to use this saved image on the web page you are constructing. From themenu bar at the top of the BlueGriffon window, select Insert, then select Image from theresulting context menu.Alternatively you may prefer to use the keyboard shortcuts of Alt i then Alt i to achieve thesame effect. Or if you prefer to use your pointing device and make only one selection, selectthe "Insert or edit an image" icon slightly to the left of the middle of the icon bar.13
T his tutorial will seldom show all of the different techniques that you could use to accomplisha given goal, but this example might reduce your surprise as you discover alternate methodsas you use BlueGriffon. In any case, a dialogue box will appear. Select the "Select image" icon,navigate to the file that you saved inside the "Images" directory for your site, then select the"Open" command button.14
Back in the "Select Image" dialog you will notice that your choice has automatically filled in thepath to your selected image, and selected the checkbox "Make URL relative to page location".You may also notice that the "OK" command button is not yet available. BlueGriffon isencouraging you to supply some useful information in the "Alternate text:" textbox. T hesewords will be:used for those who use a screen reader program to hear what is on your web page,displayed to you when you are proofreading your website and somehow failed to uploadthis image file to its correct location, andother possibly infrequent but useful occasions.Once you select the OK button, the Image should appear within your web page. Were yousurprised by where the image was displayed? T here is:no need to delete the image,no need to more carefully select the cursor position, andno need to insert it again.15
Remember, BlueGriffon is a WYSIWYG editor, so just drag and drop the image to the locationbefore / within / after the text where you would like for it to appear.Now would be a good time to save the page with the image inserted. Merely select "File" onthe menu bar, then select "Save", or as before by selecting the "Save" icon button near theupper left corner of the BlueGriffon window. In either case, you will notice this is completedpromptly (without you having to supply a Name and T itle, etc. as you did the first tim
The large textarea in the lower portion of the BlueGriffon window is where all the content of the page is entered. To enter text, simply select the window and start File Size: 1MBPage Count: 49