Transcription
6 Pencil TechniquesA complete Two Week CourseBy Cindy WiderIMPORTANT: If you have purchased the soft cover version of this bookyou can download the image files for the projects at this linkhttp://drawpj.com/book-resources/Page 2 of 52DrawPJ.comCopyright to all articles images, text, projects, lessons and exercises within this course belong to StuartCindy Art and may not bereproduced or used for any commercial purposes whatsoever without the written permission of StuartCindy Art.
Contents:How To Study This Two Week Course . 4Exercise One: Learn to draw Six different pencil strokes . 61. Shading . 62. Broad Strokes . 113. Chisel Point. 124. Fine Lines. 165. Hatching . 176. Cross-hatching. 19Exercise Two: Create a drawing of the ‘Old Hay Shed’ . 22Stage One: Transfer the old Hayshed outline drawing to quality paper . 24Stage Two: Fill in the drawing with the six pencil strokes you have just learned . 27Student Artworks . 31Bonus Project: Transfer and shade ‘The Holiday’ building . 33Extra Bonus Project: Transfer and shade ‘Frangipani Dreams.’ . 41Final words . 51About the Author Cindy Wider: . 52Page 3 of 52DrawPJ.comCopyright to all articles images, text, projects, lessons and exercises within this course belong to StuartCindy Art and may not bereproduced or used for any commercial purposes whatsoever without the written permission of StuartCindy Art.
How To Study This Two Week CourseWelcome to your two week course to help you learn 6 Pencil Techniques. Here’s aquick guide on how to get started:1. Gather your art materials HB, 2B and 4B pencilsOrdinary Hard Plastic Eraser (or vinyl eraser)Pencil sharpenerCotton Buds (Q-tips)Old rag or paper towel (dry only) for wiping your handsFine Sandpaper (320 fine Grit is preferable) for preparing your pencils forsome of the strokes. Alternatively you could use the smooth side of a nail file(emery board) if you don’t have sandpaper on hand.Any normal drawing or printing paper (for practicing your strokes on)Optional: One sheet of good quality paper for your final drawing in weektwo such as Arches Watercolour paper (Hot Press 250gsm smooth). Or otherpaper that is quite thick, smooth but not glossy and has a bit of tooth. Youwill find it easier to achieve good results for the smooth shading techniquewhen using good quality paper, but you can do okay on plain bond paper justfor the sake of practicing the technique. It’s a great idea to put this on yourwish list of things to get if you are serious about learning to draw.Optional: putty eraser2. Complete the first week of your course3. Take a photograph or scan your six pencil strokes from the first week ofyour course.5. Email your drawings from the first week of the course to Cindy Widercindy@drawpj.com to receive comments and suggestions forimprovement.6. Begin the second week of your course.7. Email your final drawing from the second week of the course withcompleted pencil strokes to Cindy Wider cindy@drawpj.com to receivecomments and suggestions for improvement.Page 4 of 52DrawPJ.comCopyright to all articles images, text, projects, lessons and exercises within this course belong to StuartCindy Art and may not bereproduced or used for any commercial purposes whatsoever without the written permission of StuartCindy Art.
IntroductionDuring this complete two week course you will learn six different pencil techniques.These techniques enable you to draw unique pencil ‘strokes.’ Once learned, thesetechniques will enable you to create a huge variety of drawings not limited to theones presented to you here in this two week course. Once you understand how toapply these techniques to make the pencil strokes, you will then use your brand newskills to create a wonderful pencil drawing of a landscape to hang on your wall orgift to family or friends. There are two bonus projects at the end of the course foryou to complete on your own with your new skills.In the first week you will learn the six pencil techniques presented to you in twostages. The first stage teaches you how to prepare your pencil for each individualpencil stroke. The second stage teaches you the skill of how to hold your pencilthe correct way for each stroke. Through this process of you will be able to draw somany things with loads of fun!The second part of your two week course is an exercise presented to you in twoseparate halves. In the first half of the second week you will begin by learning howto transfer the picture of an ‘Old Hayshed’ from rural outback Australia (see Fig. 32)onto your better quality drawing paper. The second half of this exercise involvesapplying the textured pencil strokes to the drawing which will complete a smallartwork that you can hang on your wall.General information on Graphite PencilsDuring this two week course you will be using graphite pencil. The humble graphitepencil (also known as the lead pencil) does not contain any lead at all! It is actuallya non-toxic mixture of graphite and clay. If you are interested, you might like to takea minute to find out more about the history of the wonderful medium of graphitepencil. Just Google; lead pencil history and you will be fascinated in the amount ofinformation available. Here are two interesting links:http://www.officemuseum.com/pencil history.htmhttp://en.wikipedia.org/wiki/Pencil lead#Discovery of graphite depositIt seems like such a simple tool but yet it can achieve some incredible results in thehands of a master like Albrecht Durer, Leonardo Da Vinci, Michelangelo, ArminMersmann, Kelvin Okafor and Norman Lindsay. Please also take time to Googlethese artists. Type in the artist’s name then the words ‘pencil drawings.’ Put yoursearch setting on images and prepare to be amazed at the incredible skill of theseartists. Once you have completed your studies this week, go back and revisit theseartists again to see if you can detect in their drawings the very pencil marks you arestudying here!Page 5 of 52DrawPJ.comCopyright to all articles images, text, projects, lessons and exercises within this course belong to StuartCindy Art and may not bereproduced or used for any commercial purposes whatsoever without the written permission of StuartCindy Art.
What Pencils to UseWhen you go to a stationery supplier or art materials store you might becomeconfused with the huge array of pencils available. Here is some general informationto help you decide for future projects.The most common graphite pencil used for general drawing is the HB. If you take alook along the side of your pencil towards the bottom, you will see a little code ‘HB’written in small letters. The pencils you have gathered for your art kit are HB, 2Band 4B.The letter ‘B’ stands for how Black the graphite in the pencil is. The higher thenumber; the more black your pencil will be. The ‘B’ range is a softer pencil than the‘H’ range, however it is also the blackest or darkest pencil range. We do not use the‘H’ range in this two week course as it is a harder pencil and can easily indent yourpage. Indentations are not easy to remove if you do not wish to have them there.The ‘H’ pencil range achieves a paler (lighter) effect. The higher the number thepaler the effect and the harder the graphite is.Time to begin, let’s get started!Exercise One: Learn to draw Six different pencil strokesThere are six traditional pencil strokes that are commonly used by manyprofessionals in the art industry. Your goal should be to practice these all manytimes, then finally produce one A4 sheet (or standard printing size sheet of paper)with each of these strokes all on the one piece of paper. You will need to read thefull instruction for each individual stroke before you begin. Here are the six pencilstrokes (techniques) that you will be learning today:1.2.3.4.5.6.ShadingBroad StrokesChisel pointFine linesHatchingCross-hatching1. ShadingThe technique for fine shading work is very specific and your pencil needs to beprepared and held in a special way to get good results. There are two main factorsthat influence your results; how you prepare your pencil and how you hold yourpencil.Page 6 of 52DrawPJ.comCopyright to all articles images, text, projects, lessons and exercises within this course belong to StuartCindy Art and may not bereproduced or used for any commercial purposes whatsoever without the written permission of StuartCindy Art.
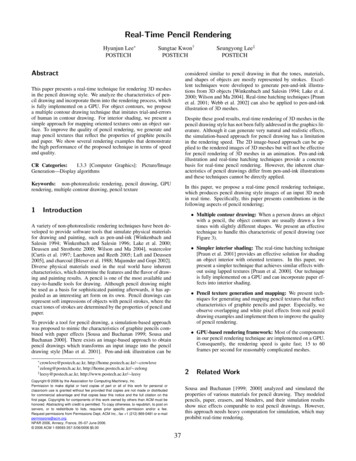
The results – what you should be trying to achieveThe following strokes were created on various pieces of paper so that you can seethe difference that each paper makes to this first stroke. If you wish to save on yourgood quality paper, you can create your smooth shading strokes on plain bond(printing) paper along with the other strokes. However, it is not the ideal paper forsmooth shading at all. Smooth shading is a very specific technique and the paperdirectly affects your results. The medium textured paper is too severe for thesmooth shading technique. You can also use Stonehenge paper if you were able tofind that. If not, the smooth water colour paper is next best.)Fig. 1. Results of shadingon medium textured watercolour paperFig. 2. Results ofshading on smoothwater-colour paperFig. 3. Results ofshading on plain bondpaper Different textures of paper will produce significantly different results with shading.The rougher the paper is, the more of the white of page shows through in tinyspeckled-patches. Medium and smooth textured papers will show less of the whitepage. Notice the difference between the three papers above (see Figs. 1, 2 & 3.) Youcan just use plain bond paper for your exercises this week and then during yourfinal drawing for the second week you could use the smooth water colour paper. When you create the smooth shading technique correctly, there should be noevidence of lines, circles or the direction of the shaded stroke – just a mass ofshaded tone.Page 7 of 52DrawPJ.comCopyright to all articles images, text, projects, lessons and exercises within this course belong to StuartCindy Art and may not bereproduced or used for any commercial purposes whatsoever without the written permission of StuartCindy Art.
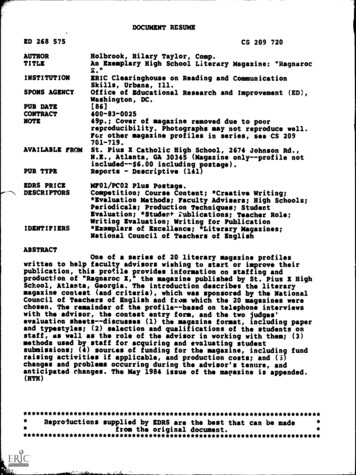
Step One: Prepare your pencil for the shading techniqueYour goal is to expose as much graphite as possible while also keeping it smootharound the edges. If you have the resources to do so, it’s a great idea to purchasean electric sharpener, sharpener with a winding handle or one that sharpens toexpose a long length of graphite. This makes it easier for you to get great resultswith smooth shading. If you have a normal sharpener that’s okay too, simply use thesteps below to learn how to prepare your pencil for the smooth shading technique.Fig. 4. How to prepare your pencil for shading1. Sharpen your HB pencil (or any pencil can be used for smooth shading) with apencil sharpener, exposing as much graphite as possible without it breaking.2. Smooth out any rough or jagged edges on the graphite part of your pencil byrolling it a full 360 degrees (to avoid flat edges) and at the same time asdragging it across a piece of fine sandpaper. Place the graphite section ofyour pencil almost flat onto the sandpaper (see Fig. 4.)Page 8 of 52DrawPJ.comCopyright to all articles images, text, projects, lessons and exercises within this course belong to StuartCindy Art and may not bereproduced or used for any commercial purposes whatsoever without the written permission of StuartCindy Art.
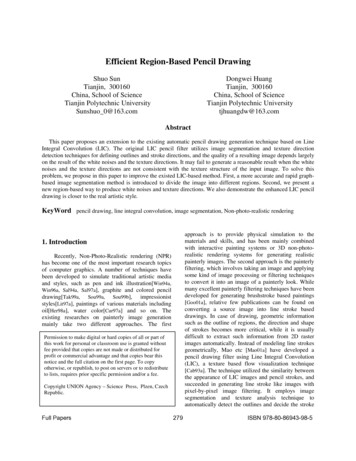
3. Lift the pencil on a slight angle off the surface of the sandpaper so that thewood doesn’t scrape along the surface of the sandpaper.4. Gently roll and drag the pencil (at the same time) across the surface of thesandpaper.5. Gently wipe off the excess graphite particles (from the tip of the pencil) ontoa paper towel, rag or tissue if needed.Step Two: Hold your pencil for the shading techniqueYour goal is to hold the graphite section of your pencil as flat to the surface aspossible, whilst still resting the main part of your hand on your page for support.Fig. 5. How to hold your pencil for shading1. Hold your pencil as flat to the page as possible without allowing the woodpart to touch the surface (see Fig. 5.) otherwise it can cause scratches and aninconsistent shaded area.2. Notice the way the back end of the pencil is securely tucked inside the handand a pinch-grip is made on the post of the pencil. This way of holding thepencil enables the flat edge of the outside of your hand to remain resting onyour page as you move your pencil back and forth across the surface.Page 9 of 52DrawPJ.comCopyright to all articles images, text, projects, lessons and exercises within this course belong to StuartCindy Art and may not bereproduced or used for any commercial purposes whatsoever without the written permission of StuartCindy Art.
Tip: Make sure you place a piece of scrap paper (or if you have it on hand its usefulto use a piece of non-greasy baking paper) under your hand to prevent smudgesand to help your hand slide along the surface easily.3. As you hold your pencil as flat to the page as possible, gently stroke it fromside to side. Make sure you move your entire arm back and forth or up anddown the page (from your shoulder.) Use your entire upper torso in themovement. You should notice the skin wobble on the underside of your armand your wrist should be stiff (unless you are working in a very smallarea.)4. When working in very small areas you can use tiny circular motions. With thesmooth blending technique there should be no evidence of these circles leftbehind whilst using these fine shading techniques.Extra Tip: Smile while you work and take notice of the things your mind is saying toyou. Correct your thoughts if they are in any way negative. Replace all negativethoughts with ‘I can do this and I will.’ Or ‘I love the feeling of the graphite justslipping across the surface of the paper, it's so sensual and relaxing .almostmeditative.’ Smiling relaxes your entire upper torso and immediately improves yourdrawing skills.5. Begin with minimal pressure and gradually apply more pressure to createslightly darker areas. It is better to build your shaded areas up in a series oflayers rather than pressing too hard right away. Darker areas should be builtup by using darker pencils and never built up too much using a HB asthis can cause a shiny film to develop on the surface of your page which willrepel any further layers of 2B and 4B pencil. Use your darker pencils on aslightly higher angle off the page as the tip is softer and will not indent aseasily. You will need to do this to achieve a dark-enough result.For this exercise, please just create an even area of smooth shading, not varyingin tone at all, and with no smudging or blending of the area.Blending with the cotton bud (Q-tip)Never use your finger to blend with as it contains oils that will repel any extrapencil you wish to put down, as well as leaving a greasy imprint. You can use avariety of objects to blend the shaded area with, such as a paper stump, a smallpiece of leather, chamois or even a tissue. A cotton bud (or Q-tip) is also a usefulinstrument for shading with (see Fig. 5.) Blending with these different objects andtextures will create a variety of effects. You can experiment to see these foryourself. Be careful not to over-work the surface, as it can tear or be spoilt in someway.Page 10 of 52DrawPJ.comCopyright to all articles images, text, projects, lessons and exercises within this course belong to StuartCindy Art and may not bereproduced or used for any commercial purposes whatsoever without the written permission of StuartCindy Art.
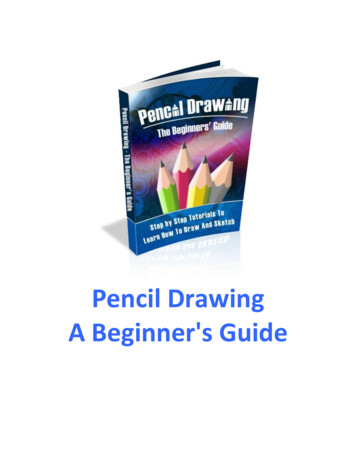
You can first of all shade a new area to blend (as mentioned previously) thengently rub the section with a cotton bud, using soft circular movements. Becareful not to damage your paper by rubbing too hard or too much (see insert inFig. 7.) Another way to shade using other textures is to shave the pencil on sandpaperand tip the powder onto a spare piece of paper, then dip a cotton bud or softbrush into the powder (see Fig. 6.) This technique will enable you to achieve very soft effects (see Fig. 7.)Shaded withpencil stroke firstthen blended witha cotton bud.Fig. 6. Dip your cotton bud into the graphite powderFig. 7. Cotton bud techniques2. Broad StrokesThis stroke is ideal for achieving long, wide lines and to indicate objects like fenceposts, tree trunks, grooves on a tin-roof etc. It requires confidence. Remember tosmile and don’t be tense. Smiling relaxes all the entire upper torso muscles. Havefun!The results – what you should be trying to achieveFig. 8. Broad strokes are wide lines and can be all shapes and sizesPage 11 of 52DrawPJ.comCopyright to all articles images, text, projects, lessons and exercises within this course belong to StuartCindy Art and may not bereproduced or used for any commercial purposes whatsoever without the written permission of StuartCindy Art.
Step One: Prepare your pencil for the broad strokePrepare your pencil exactly the same as you did for the shading stroke. This timeuse your 4B pencil.Step Two: Hold your pencil for the broad strokeAlthough you prepared your pencil the same way you did for the shading stroke,your pencil must be held in a different way for the broad stroke (see Fig. 8.)Fig. 8. How to hold your pencil for broad strokes1. Hold your pencil on a slight angle off the page (almost flat but lifted up atouch) without your hand resting on the page this time.2. Apply pressure with your index finger and drag as you press firmly.3. Practice a full sheet of straight broad strokes. Broad strokes can vary too;they can also be curved and closer together or further apart, wiggly, shortlines etc. Experiment with this stroke.3. Chisel PointThe chisel point stroke is fascinating and can produce a large variety of effects.When used with a flicking motion the stroke has a wide base and a thin tail as ittapers off (see Fig. 9.) The chisel point shaped pencil can also be used to shadesmall areas or draw broad lines.Page 12 of 52DrawPJ.comCopyright to all articles images, text, projects, lessons and exercises within this course belong to StuartCindy Art and may not bereproduced or used for any commercial purposes whatsoever without the written permission of StuartCindy Art.
The results – what you should be trying to achieveFig. 9. Chisel point strokesStep One: Prepare your pencil for the chisel point stroke1. Prepare a 4B pencil for this stroke by first of all resting the tip of the graphite ona sheet of fine sandpaper.2. Place it carefully on an angle that is just about 25 to 30 degrees off the surfaceof the sandpaper. Begin to shave the graphite section backwards and forwardsonly, do not roll it at all! This is to grind down the tip on an angle in a specialway (see Fig. 10.) Make sure that you maintain the exact same angle as you rubthe graphite section against the sandpaper because if you wobble or roll yourpencil around at all, you will not achieve the shape on the tip we are after. Theshape we are after is a beautiful elongated ellipse on the end of the graphite part(see Fig. 11.)3. When viewed from side on, this ellipse shape appears as an angle on the tip ofthe graphite section (see Fig. 12.)4. The chisel point stroke will only work if you prepare the chisel point correctly asmentioned. You must continually shave and prepare your point as you workthroughout your drawing (by using this procedure.) Once the chisel point losesits shape, you will no longer be able to achieve the chisel point stroke.Page 13 of 52DrawPJ.comCopyright to all articles images, text, projects, lessons and exercises within this course belong to StuartCindy Art and may not bereproduced or used for any commercial purposes whatsoever without the written permission of StuartCindy Art.
Fig. 10. Prepare your pencil for the chisel point stroke by shavingit backwards and forwards across fine sandpaperFig. 11. The Chisel point now has a wide ellipse shape on the end of the graphiteFig. 12. When viewed side on, the graphite now has an angle on the end of itPage 14 of 52DrawPJ.comCopyright to all articles images, text, projects, lessons and exercises within this course belong to StuartCindy Art and may not bereproduced or used for any commercial purposes whatsoever without the written permission of StuartCindy Art.
Step Two: Hold your pencil for the chisel point stroke1. First of all the ellipse shape must be placed snuggly and evenly onto the pagesurface. Make sure it is completely flat. This means it should be held on theexact same angle that you recently held it on when you shaved it across thefine sandpaper (see Fig. 13.)2. Once you have placed the ellipse flat onto your page, swipe it across with aflicking motion, like you are drawing a ‘tick’ using the large ellipse surface. Theresult should be a line that has a thicker wider end and a graduating fine tip (seeFig. 13.)3. You can draw long straight or wavy lines or tiny short stumpy shapes with thechisel point stroke. The short lines are really just little marks and they makegreat leaves on drawings of trees. (see Fig. 13 and Fig. 14.)Fig. 13. Place the ellipse shape flat on your page first before you begin the chisel pointstroke. You can achieve marks that look like leaves on a treeFig. 14. A variety of lines can be created with the chisel point strokePage 15 of 52DrawPJ.comCopyright to all articles images, text, projects, lessons and exercises within this course belong to StuartCindy Art and may not bereproduced or used for any commercial purposes whatsoever without the written permission of StuartCindy Art.
4. Fine LinesIt is amazing how fine a line you can achieve just by being vigilant in pencilpreparation. If you want to draw many fine lines be willing to carefully prepare yourpencil constantly. As soon as you forget to prepare your pencil your lines will not beas fine as you would like them to be. It requires continual sharpening andpreparation.The results – what you should be trying to achieveFig. 15. A wonderful array of strokes can be achieved using fine lines.Step One: Prepare your pencil for fine linesPrepare your pencil exactly the same as you did for the shading stroke. This timeuse your HB pencil and concentrate on maintaining a sharp tip.Step Two: Hold your pencil for fine linesTo achieve very fine lines, you must use the very sharp point of your pencil. To dothis, you must hold it in an almost upright position. Find a comfortable position forthis stroke so long as the pencil is almost perpendicular to your page. You can roll itoften on the sandpaper to keep the tip sharp. You must prepare the pencilcontinually throughout your drawing for the best results.Page 16 of 52DrawPJ.comCopyright to all articles images, text, projects, lessons and exercises within this course belong to StuartCindy Art and may not bereproduced or used for any commercial purposes whatsoever without the written permission of StuartCindy Art.
5. HatchingThe main characteristic of a traditional hatching stroke is that it is usually laid downon the page in a series of equidistant lines stroked alongside one another called a‘set’. This technique requires great skill and can take years to fully perfect. Some ofthe great masters of art became extraordinarily disciplined in this part of their craft.For practice fill an entire sheet of paper with random sets of hatching lines. Trycurved lines as well as straight. Try long with short lines (see Fig.16.)The results – what you should be trying to achieveFig. 16. Various sets of hatching linesPage 17 of 52DrawPJ.comCopyright to all articles images, text, projects, lessons and exercises within this course belong to StuartCindy Art and may not bereproduced or used for any commercial purposes whatsoever without the written permission of StuartCindy Art.
Step One: Prepare your pencil for hatching strokesPrepare your pencil exactly the same as you did for the shading stroke and finelines. Again, use your HB pencil and concentrate on maintaining a sharp tip. You canhatch with a chisel point but in this exercise we use a fine tip.Step Two: Hold your pencil for hatching strokes1. To achieve the fine hatching stroke, use the very sharp point of your pencil. Holdit on a slight angle so that it is not quite upright (see Fig. 17.)2. Find a comfortable position for this stroke and continually turn your page arounduntil you find your natural hand motion. This will help you to achieve manydifferent effects. Eventually you will find the best position for you.3. Begin by simply placing the tip of your pencil and resting it gently on yourpage to avoid indenting and creating a dot or short line.4. Once you have placed your pencil on the page ‘flick’ your wrist as you swipe yourpencil across the page to achieve a tapered line. Use your entire arm in theprocess from shoulder to elbow to wrist. It’s much easier to do this one quicklywithout thinking too much about it. If you drag too slowly your lines will wobblebut you also need to make sure the lines are equidistant, so try to find a happymedium. Have fun and remember to smile for the best results.Fig. 17. Hold your pencil so that it is comfortable for the hatching stroke. Place the pencilon the page gently then flick with your wrist.Page 18 of 52DrawPJ.comCopyright to all articles images, text, projects, lessons and exercises within this course belong to StuartCindy Art and may not bereproduced or used for any commercial purposes whatsoever without the written permission of StuartCindy Art.
5. When you are hatching, think of the object you are rendering (drawing) andfollow the shape of the form. If you do not do this, your object can easily lookflat. There is a big difference in the results of a drawing where hatching is usedto follow the shape of the object and one where hatching is simply applied (SeeFig. 18. and Fig. 19.)Fig. 18. Hatching on an angle Fig.19. Hatching following the shape of the form6. Cross-hatchingCross-hatching is two or more sets of hatching laid over each other. Traditionally,the first set is laid over the other on a slight angle which results in a diamond-likepattern (see Fig. 20.) Other sets can later be laid over the top by gradually alteringthe angle each time until a set becomes horizontal or vertical (see Fig. 21.)Cross-hatching can also be a series of random curvy lines that follow the shape of avariety of different forms. Have a go at these – nothing specific, just do randomcurvy lines (see Fig. 22.)For practice fill an a4 sheet with random sets of hatching lines. Try curved lines aswell as straight ones. Try long with short lines (see Fig. 23.)Page 19 of 52DrawPJ.comCopyright to all articles images, text, projects, lessons and exercises within this course belong to StuartCindy Art and may not bereproduced or used for any commercial purposes whatsoever without the written permission of StuartCindy Art.
The results – what you should be trying to achieveFig. 20. Cross hatching with two setsFig.21. Cross hatching with three setsFig. 22. Cross hatching with a series of random curvy linesPage 20 of 52DrawPJ.comCopyright to all articles images, text, projects, lessons and exercises within this course belong to StuartCindy Art and may not bereproduced or used for any commercial purposes whatsoever without the written permission of StuartCindy Art.
Fig. 23. Cross hatching with a series of random linesStep One: Prepare your pencil for cross hatching strokesPrepare your pencil exactly the same as you did for the hatching stroke and finelines. Maintain a sharp tip by continually sharpening and then rolling on your finesandpaper.Step Two: Hold your pencil for cross hatching strokesHold your pencil the same as you did for hatching; continually move your page untilyou feel comfortable. Hatching and cross hatching should be produced using thenatural movement of your hand. Lay one set down then turn your page to lay onanother and so on. Have fun and relax!Well done! You have successfully learned six different pencil techniques, that’s acause for celebration!IMPORTANT: You are invited to submit these pencil strokes for commentsand helpful advice from the author Cindy Wider. Please make sure thatyou have drawn all six pencil strokes onto just one sheet of paper, thenphotograph or scan your drawings at full colour 300dpi and save as a largefile. Email to cindy@drawpj.com before proceeding onto the next exercisethe ‘Old Hayshed.’IMPORTANT INFO FOR THE NEXT EXERCISE:If you have purchased the soft cover version of this bookyou can download the image fi
applying the textured pencil strokes to the drawing which will complete a small artwork that you can hang on your wall. General information on Graphite Pencils During this two week course you will be using graphite pencil. The humble graphite pencil (also known as the lead