Transcription
Book Creation Guide
Contents01 File Creation.3Formatting.4Interior Text and Styling.4Interior Color Options.4Photo and Graphic Resolution.5Document Color Setup.6Anatomy of a Book.8Formatting Terms.9Gutter Area.10Gutter Additions.10File Dimension and Full Bleed. 11Cover Layout.13Lulu Generated Cover.13Create & Upload Your Own Cover.13Spine Width Guide.13Spine Width Calculations.13Adjusting the Spine Width.15Designing For The Spine .16Trimming & Variance. 1702 File Submission.21File Preparation. 22Interior File Specifications. 23Cover File Specifications. 23Proofing. 24Human Error. 24File Error. 25Printing Variance. 25Production or Shipping Error. 25
File CreationFormattingCover Layout
FormattingInterior Text and StylingOnce you have your text and images compiled into one file, use Styles andHeadings to create a consistent look for text and section headings. Use PageBreaks instead of hard returns or paragraph breaks to ensure your formattingis preserved during the creation of your print-ready PDF file. Apply your ownspacing rules to styles to maintain a consistent look throughout your book.The use of styles allows you to simultaneously edit all text assigned that stylerather than editing line-by-line.Interior Color OptionsThe need for color printing should be considered early in the formattingprocess. Is your work text-only? If so, you can take advantage of our Whiteor Cream, 60# Uncoated Standard Black & White products to reducemanufacturing costs. For high contrast, grayscale images, Lulu offers aWhite, 80# Coated Standard Black & White. Our White, 60# UncoatedStandard Color products allow you to incorporate exciting elements suchas colored fonts, highlights, charts, graphs, small photos, or low pigment/saturation color blocks into your printed work without the premium cost.If you want the highest quality color printing, the Premium Color optiongives you the quality you need for high resolution photos and Full Bleed pagecoverage. Available on White, 80# Coated and Uncoated paper, you cancontrol your price point while exhibiting beautiful graphics and vibrant colors.LULU BOOK CREATION GUIDEFILE CREATION4
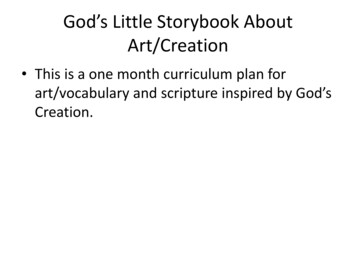
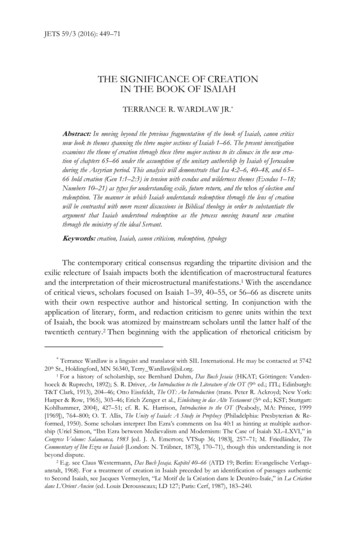
Image Resolution Comparison72 PPI150 PPI300 PPIThe standard resolutionMinimum resolution forIdeal resolution for complexfor most graphics whensimple graphics intendedor detailed graphicsappearing digitally.for print.intended for print.Photo and Graphic ResolutionPixels per inch (PPI) is used to describe the pixel density of a screen(computer monitor, smartphone, etc.). Dots per inch (DPI) refers to theprint resolution of an image by counting the number of dots per printed inch.The more dot’s the higher the quality of the print (more sharpness and detail).Most print-ready file formats know how to handle the conversion betweenthe PPI and DPI. PDFs allow you to have print-ready files with multiple PPIvalues, but it’s a good idea to consider the desired results before insertingjust any image size.72 PPI is the standard resolution for most screens. This may be adequatefor digital images, but text and details of the graphic could end up lookingdistorted or fuzzy in print. As a general rule, we recommend a minimum of150 PPI for simple graphics, and 300 PPI for complex or detailed graphics.LULU BOOK CREATION GUIDEFILE CREATION5
Document Color SetupRGB is an additive process, meaning it adds red, green and blue togetherin varying amounts to produce other colors while CMYK is a subtractiveprocess that uses different amounts of cyan, magenta, yellow and black toremove reflected colors from paper to create other colors we can see. Thetwo processes have different ranges of color, with RGB providing a widerarray of possibilities thus making it used in electronic devices like computermonitors. Printing uses CMYK.Therefore, we’ve been told to convert RGB colors to CMYK before sending ourfiles to print. No harm will be done if you stick to this old habit, but advancesin printing workflows have eliminated it as a necessity.Why are the Adobe InDesign templates set up in RGB?Modern workflows, like our process at Lulu, allow printers to use color profilesthat automatically match CMYK ink to RGB values to produce results that aresimilar. Following these few simple guidelines will ensure the best color inyour book:1. If you’re starting from scratch, setup your document as an RGB file.2. We recommend using the sRGB color space in your RGB documentcolor profile and applying the sRGB color space to any RGB images orlinks before you make your print-ready PDF.3. If you’ve already created or converted your file to CMYK and convertedany images to CMYK, keep it in CMYK and do not switch back to RGB.Changing color space settings after finalizing your file may result inundesirable color variance.4. Solid blacks will print solid at 100% with no other colors added. If youdo add colors to improve the richness of the black, TAC (total areacoverage) should never exceed 270%.5. Avoid very light color builds of less than 20%. Below 20% tint variation isvery difficult to control on a consistent basis.6. If you are printing a color book that includes black & white images, theblack & white images should have the color space set to grayscale.LULU BOOK CREATION GUIDEFILE CREATION6
7. The gamma of a grayscale image should be between 2.2 and 2.4.8. Use only high resolution photos (300 DPI or higher) and ensure they areconsistent with the document color space whether using RGB or CMYK.9. Use Premium Color Interior printing and 80# Premium Paper whenprinting any book that contains photos or graphics where heavy inkcoverage is used and a vibrant, colorful printed book is desired.Lulu Printer Color Space Profiles:RGB: sRGB IEC61966–2.1CMYK: Coated GRACoL 2006LULU BOOK CREATION GUIDEFILE CREATION7
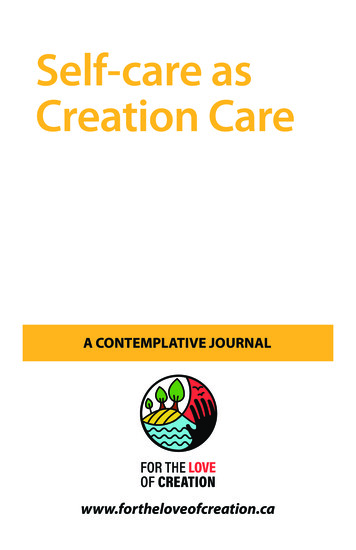
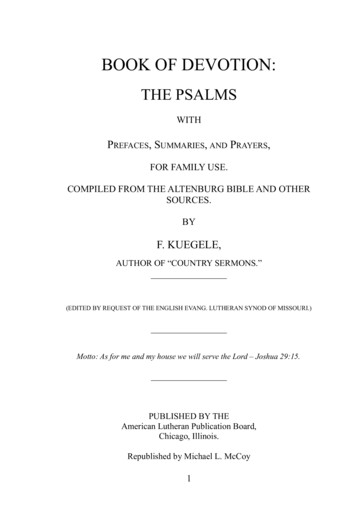
Anatomy of a BookBACK COVERFRONT COVERBook CoverINTERIORBook InteriorLULU BOOK CREATION GUIDEFILE CREATION8
Formatting TermsTotal Document SizeThe total dimensions of the file with bleed included.Spine AreaThe spine width varies based on the number of pages included in yourbook. Use the appropriate formula or table to determine spine width forPaperback and Hardcover books. Coil Bound and Saddle Stitch books arenot glued at the spine, so do not require special calculations.Safety MarginWe recommend maintaining a border between the trimmed edgeand important content (e.g. text, images, pages numbers) to preventunintended trimming.Bleed AreaA border is trimmed from the printed book pages during manufacturing.Images, text, or other elements that are intended to extend to the edgeof the page must fill the bleed area. If a file is uploaded without a bleedmargin, Lulu must add a 0.125 in margin on all sides to allow propertrimming and binding. See “File Dimension and Full Bleed” section(page 11).Barcode Area (Optional)The recommended area in which your ISBN is placed. Books not intendedfor Global Distribution do not require a barcode or ISBN. Lulu does notgenerate or insert your barcode or ISBN for you.Gutter Area (Shown on page 10)Inner margin for interior pages, allowing for the curve of the page.See “Gutter Additions” section (page 10).LULU BOOK CREATION GUIDEFILE CREATION9
Gutter AreaINTERIORINTERIORGutter AdditionsThis refers to an extra bit of space on the binding side of facing pages toaccount for the portion of the page inserted and glued into the book binding.Coil Bound books do not require a gutter. If your book includes more than150 pages, we recommend adding a gutter Margin to your work. If you arecreating a Paperback or Hardcover, reference the gutter additions table:Page CountAdd to InteriorMarginRecommendedInterior MarginRecommendedInterior Margin(Full Bleed)Less than 600 in or 0 mm0.5 in or 13 mm0.625 in or 16 mm61 to 1500.125 in or 3 mm0.625 in or 16 mm0.75 in or 19 mm151 to 4000.5 in or 13 mm1 in or 25 mm1.125 in or 29 mm400 to 6000.625 in or 16 mm1.125 in or 29 mm1.25 in or 32 mmOver 6000.75 in or 19 mm1.25 in or 32 mm1.375 in or 35 mmLULU BOOK CREATION GUIDEFILE CREATION10
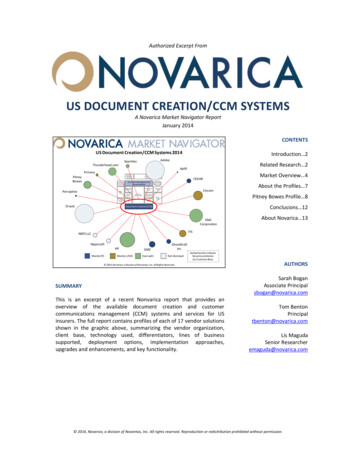
When to Use Full Bleed DimensionsNot NeededYesYesIf work is mostly text orWhen graphics or contentIt’s important to preparehas distinct white marginsextends over the edge of the the print file with Full Bleedaround the body, then Fullpage, Full Bleed dimensionsdimensions for accents andBleed dimensions aren'tshould be used whengraphics intended to extendnecessary.preparing your file.to the page edge.File Dimension and Full BleedWhen books are manufactured, the files are printed then trimmed tospecification. All book files are printed 0.125 in (3mm) larger on all sidesthan the final trim size in order to account for the final trimming process. Foraccents at the edge of pages, backgrounds and fills, the best results comefrom trimming over the page assets.If your formatted file does not include imagery that extends to the edgeof the page, you can prepare your file at the book’s final trim size and oursystem will automatically add a trim border.If your formatted file includes graphics, fills, or content that extends to the edgeof the page, use the chart below to determine the ideal interior file dimensions.Note: If one page of the interior needs to be Full Bleed, then all pages ofthe interior will use the same dimensions.LULU BOOK CREATION GUIDEFILE CREATION11
Trim NameTrim SizeInterior FileDimensions- No BleedPocketbook4.25 in x 6.875 in108 mm x 175 mm4.25 in x 6.875 in108 mm x 175 mm4.5 in x 7.125 in114 mm x 181 mmDigest5.5 in x 8.5 in140 mm x 216 mm5.5 in x 8.5 in140 mm x 216 mm5.75 in x 8.75 in146 mm x 222 mmA55.83 in x 8.27 in148 mm x 210 mm5.83 in x 8.27 in148 mm x 210 mm6.08 in x 8.52 in154 mm x 216 mmRoyal6.14 in x 9.21 in156 mm x 234 mm6.14 in x 9.21 in156 mm x 234 mm6.39 in x 9.46 in162 mm x 240 mmUS Trade6 in x 9 in152 mm x 229 mm6 in x 9 in152 mm x 229 mm6.25 in x 9.25 in159 mm x 235 mmComic Book6.63 in x 10.25 in168 mm x 260 mm6.63 in x 10.25 in168 mm x 260 mm6.88 in x 10.5 in175 mm x 267 mmExecutive7 in x 10 in178 mm x 254 mm7 in x 10 in178 mm x 254 mm7.25 in x 10.25 in184 mm x 260 mmCrown Quarto7.44 in x 9.68 in189 mm x 246 mm7.44 in x 9.68 in189 mm x 246 mm7.69 in x 9.93 in195 mm x 252 mmSmall Square7.5 in x 7.5 in191 mm x 191 mm7.5 in x 7.5 in191 mm x 191 mm7.75 in x 7.75 in197 mm x 197 mmA48.27 in x 11.69 in210 mm x 297 mm8.27 in x 11.69 in210 mm x 297 mm8.52 in x 11.94 in216 mm x 303 mmSquare8.5 in x 8.5 in216 mm x 216 mm8.5 in x 8.5 in216 mm x 216 mm8.75 in x 8.75 in222 mm x 222 mmUS Letter8.5 in x 11 in216 mm x 279 mm8.5 in x 11 in216 mm x 279 mm8.75 in x 11.25 in222 mm x 286 mmSmallLandscape9 in x 7 in229 mm x 178 mm9 in x 7 in229 mm x 178 mm9.25 in x 7.25 in235 mm x 184 mmUS LetterLandscape11 in x 8.5 in279 mm x 216 mm11 in x 8.5 in279 mm x 216 mm11.25 in x 8.75 in235 mm x 184 mmA4 Landscape11.69 in x 8.27 in210 mm x 297 mm11.69 in x 8.27 in210 mm x 297 mm11.94 in x 8.52 in303 mm x 216 mmCalendar11 in x 8.5 in279 mm x 216 mm11 in x 8.5 in279 mm x 216 mm11.25 in x 8.75 in286 mm x 222 mmLULU BOOK CREATION GUIDEInterior FileDimensions- With BleedFILE CREATION12
Cover LayoutLulu Generated CoverOur system inserts the information you provide to create a compelling bookcover complete with the title, subtitle, contributor(s), and description. This is agreat, quick option when you are short on time or simply need proof copies.Create & Upload Your Own CoverOnce you have uploaded your interior file, we will generate a cover templateyou can download that is custom crafted to your book’s specifications. Bycreating your own cover, you have full control over the content.Spine Width GuideYour cover spine width is determined by the type of book you make andthe total page count. Paperback covers require a minimum of 32 interiorpages and use a formula to find the spine width. Hardcover books require aminimum of 24 interior pages and use a table with page ranges.Note: Lulu provides a cover template after uploading your interior PDF withthe spine size included.Spine Width CalculationsIMPERIALSpine Width in Inches (# of Interior Pages / 444) 0.06 inMETRICPaperback CoversUse the formula to calculate the spine width dimension in inchesor millimeters.Spine Width in Millimeters (# of Interior Pages / 17.48) 1.524 mmLULU BOOK CREATION GUIDEFILE CREATION13
Hardcover CoversUse the table to determine the spine width dimension.Page CountSpine Width (inches)Spine Width (mm)0-23N/AN/A*24-840.25 in6 mm85-1400.5 in13 mm141-1680.625 in16 mm169-1940.688 in17 mm195-2220.75 in19 mm223-2500.813 in21 mm251-2780.875 in22 mm279-3060.938 in24 mm307-3341 in25 mm335-3601.063 in27 mm361-3881.125 in29 mm389-4161.188 in30 mm417-4441.25 in32 mm445-4721.313 in33 mm473-5001.375 in35 mm501-5281.438 in37 mm529-5561.5 in38 mm557-5821.563 in40 mm583-6101.625 in41 mm611-6381.688 in43 mm639-6661.75 in44 mm667-6941.813 in46 mm695-7221.875 in48 mm723-7501.938 in49 mm751-7782 in51 mm779-7992.063 in52 mm8002.125 in54 mmLULU BOOK CREATION GUIDEFILE CREATION14
Adjusting the Spine WidthLulu offers templates in different formats that allow cover creation in thesoftware you’re most comfortable with. Below is a brief description on howto adjust the spine width using Adobe InDesign or Adobe Photoshop. Thetemplates are available in PDF and PNG formats as well. Every cover templatespine guide is preset to the minimum width dimension. Keep this in mindwhen adjusting your spine.Adobe InDesignUse the page tool to adjust the spine page width.1. Locate the Page Tool from the tools panel and select it.2. In the pages panel, click on the spine page (page 2 of the spread). Thepage will appear highlighted in the pages panel. Specify the followingsettings in the Liquid Layout control panel (Window Interactive Liquid Layout):; Liquid Page Rule: Object-based; Object Constraints: Resize with Page: Width3. After determining your spine dimensions by using the formula(Paperback) or the calculator table (Hardcover) found in this PDF, resizethe page with the Height and Width widgets in the control bar. Theentire cover should update automatically and is now ready foryour artwork.Note: The document must be setup with facing pages checked for thefront cover page to automatically shuffle.Watch & Learn on YouTube Interior and Cover File Setup Using Adobe InDesign Interior and Cover File Setup Using Affinity Publisher Cover File Setup Using Adobe PhotoshopLULU BOOK CREATION GUIDEFILE CREATION15
Adobe PhotoshopAdjust the canvas size, revise the spine width, and position thecover guides.1. Subtract the existing minimum spine width dimension listed on thefront cover from the spine dimension found by using the formula(Paperback) or the calculator table (Hardcover) in this PDF and add thatvalue to the canvas size. Go to Image Canvas Size and enter in therevised total width dimension.2. Use the path selection tool to select the spine shape layer in the guidesfolder and enter the correct width dimension found using the formulaor spine calculator table.3. Center align the spine guide, right align the front cover guide, and leftalign the back cover guide to the document spread. Make sure guidelayers are positioned correctly and there are no issues.Designing For The SpineSpine placement can shift slightly during production. To allow for smallamounts of variance, we encourage authors to follow these guidelines whencreating your cover and in particular when preparing your spine.1. Do not include text that fills the entire width of the spine. Any shiftingwill cause text from the spine to run over onto the front or back cover.Leave at least 0.125 in between the spine text and the edge of the spineon both sides of the text.2. Do not include text on projects of 80 pages or fewer. For books with alow page count, the slightest shift of spine placement will cause yourspine text to run over on the front or back cover.3. Omit any images or solid colors/stark contrast that run right up to andstop at the spine on either the front or back cover. Keep the spine thesame color/graphic as the rest of the cover.4. If your spine will be a different color from the rest of the cover, designthe cover to intentionally include the spine color or graphic wrappingaround the front and back covers.LULU BOOK CREATION GUIDEFILE CREATION16
Trimming & VarianceThere are tolerances that should be considered when designing both yourinterior and cover. When building your file, please follow the guidelines belowto ensure your project is printed correctly. Our trimming tolerance is 0.125in toward the front and back cover. Designing your content with sufficientmargins and variance in mind will help you avoid issues with spine textalignment and any cut off text around the edges of your content.Trim EdgeThis is the edge of the final printed book.Bleed EdgeImages should be pushed out to the Bleed Edge, 0.125 in past the trimedge on every side.Safety MarginText and other important elements should be placed within the SafetyMargin which is 0.5 in inside the Trim Edge. This will ensure that no text iscut off due to variation in the trimming process.Trim Variance Cover Examples (pages 18-20)ISBN 978-1-79471-012-2900009 781794 710122Back CoverSpineFront Cover(A5 Paperback)LULU BOOK CREATION GUIDEFILE CREATION17
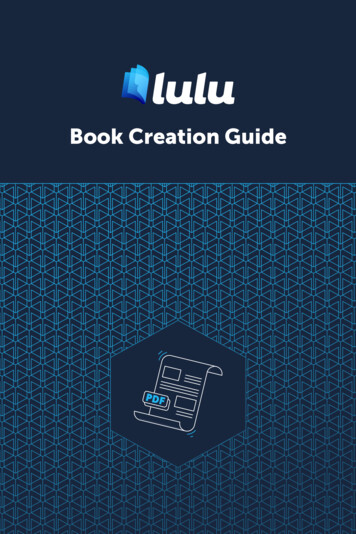
CorrectThe background image has been extended 0.125 in past the Trim Edge andboth the text and important artwork are within the Safety Margin.ISBN 978-1-79471-012-2900009 781794 710122Back CoverLULU BOOK CREATION GUIDESpineFront CoverFILE CREATION18
IncorrectThe background image has not been extended to the Bleed Edge. This couldresult in strips of white around the edges of the cover.ISBN 978-1-79471-012-2900009 781794 710122Back CoverSpineFront CoverIncorrect Formatting ResultLULU BOOK CREATION GUIDEFILE CREATION19
IncorrectThe back cover text and spine text has not been kept within the Safety Margin.This could result in text being cut off due to tolerances during trimming.ISBN 978-1-79471-012-2900009 781794 710122Back CoverSpineFront CoverIncorrect Formatting ResultLULU BOOK CREATION GUIDEFILE CREATION20
File SubmissionFile PreparationProofing
File PreparationWhen you upload your interior file to Lulu’s system, we scan and analyze howsuitable your work is for print. If it’s just a little off, we will make a few slightadjustments. Sometimes our system determines a big change is required. Ifthis is the case, we’ll alert you. We strongly recommend you download andreview your print ready files before completing the publishing process.Using Lulu’s PDF Job OptionsWhen creating a PDF with Adobe Products, we recommend usingLulu’s Adobe Job Options. Job Options files apply settings whenexporting your PDF based on our printer requirements. The JobOptions files (a single page setting for Interior files and a spreadpage setting for Cover files) are included in Lulu’s design bundlesfound on the Product page.Job Options files should automatically install when you open thefile. If they do not, you can manually install the files:Adobe InDesign1. Go to: Choose File Adobe PDF Presets Define.2. Click Load and select the .joboptions file.3. Export your file, select Lulu’s settings from the ‘AdobePDF Preset’ drop-down list to export as a PDF using theJob Options settings.Adobe Photoshop1. Go to: Edit Adobe PDF Presets.2. Click Load and select the .joboptions file.3. Use ‘Save as Photoshop PDF’ and select the .joboptionssettings from the drop-down menu.LULU BOOK CREATION GUIDEFILE SUBMISSION22
Adobe Acrobat Distiller1. Go to: Settings Add Adobe PDF Settings.2. Navigate to the .joboptions file and click OK.3. The new settings will be available in the ‘DefaultSettings’ drop-down list. Make sure to select thembefore importing your Postscript (.PS) file.Interior File SpecificationsWhen creating your book with Lulu, you must provide a single page PDFcontaining all interior elements. This includes the title and copyright pages,as well as any blank pages you wish to include. Single page, portrait oriented layout Embedded images are 300 PPI resolution minimum, not exceeding 600PPI resolution Vector images are rasterized All fonts are properly embedded Transparent layers and vector objects are flattened Pages sized to match intended book size—include bleed dimensions(0.125 in) with your PDF page size:Example: 6 x 9 in book requires a PDF with pages sized 6.25 x 9.25 in tomeet Full Bleed print requirements Allow a minimum 0.50 in Safety Margin for all content Allow a minimum 0.20 in Gutter Margin for inner edge of all pages Do NOT include trim, bleed, or margin lines Do NOT use any security / password file protectionCover File SpecificationsYour cover must be a single page integrated spread PDF (back cover, spineand front cover) that includes all cover content. Lulu will provide a covertemplate with exact spine dimensions included after you upload your interiorPDF. We strongly recommend utilizing this template to ensure your coverPDF prints and trims correctly.LULU BOOK CREATION GUIDEFILE SUBMISSION23
Specifications: Embedded images are 300 PPI resolution minimum, not exceeding 600PPI resolution Vector images are rasterized All fonts are properly embedded Transparent layers and vector objects are flattened Pages sized to match intended book size—see page 13 for spine widthcalculation Include bleed dimensions (0.125 in) with your PDF page size Allow a 0.5 in Safety Margin for all content Do NOT include trim, bleed, or margin lines Do NOT use any security / password file protectionMagazine and Comic Book CoversIf you are creating a Magazine or Comic Book product, you will have theoption to print on the inside front and back cover. This printing requires atwo-page cover file. Please refer to the Magazine and Comic Book covertemplate for more information.ProofingPerhaps one of the most important (and often overlooked) steps of thepublishing process is the final proof approval. This means you have uploaded,printed, and received a physical copy of your work as a reader would receiveit. Proofing your printed material is critical in troubleshooting and identifyingmistakes. Some issues you may discover while proofing include:Human ErrorSometimes when working under a deadline, you do not have time to fullyreview your completed file before going to print. Upon receiving your proofcopy, you may notice typos or formatting issues. The best solution is to editthe interior file, re-upload and order a new proof copy.LULU BOOK CREATION GUIDEFILE SUBMISSION24
File ErrorLow image resolution, transparencies, and unembedded fonts are commonissues that may not be obvious when viewing your manuscript on a screen.While our system will detect and repair many of these issues, some may slipthrough. If you discover an error in your printed book that does not appear inyour electronic file, please contact us for assistance.Printing VarianceAll manufacturers strive to produce 100% accurate products. However, aswith any mechanical process, there are tolerances that should be taken intoaccount. Our trimming tolerance is 0.125 in toward the front and back cover.Designing your content with sufficient margins and variance in mind will helpyou avoid issues with spine text alignment and any cut off text around theedges of your content.Production or Shipping ErrorOur goal is to print, bind and deliver the highest quality books possible;however, due to the nature of bespoke book production, we cannotguarantee 100% perfection for every book. If your book is bent, ripped, torn,or exhibits other manufacturing or shipping damage, please contact us forassistance.LULU BOOK CREATION GUIDEFILE SUBMISSION25
book. Use the appropriate formula or table to determine spine width for Paperback and Hardcover books. Coil Bound and Saddle Stitch books are not glued at the spine, so do not require special calculations. Safety Margin We recommend maintaining a border between the trimmed edge and import