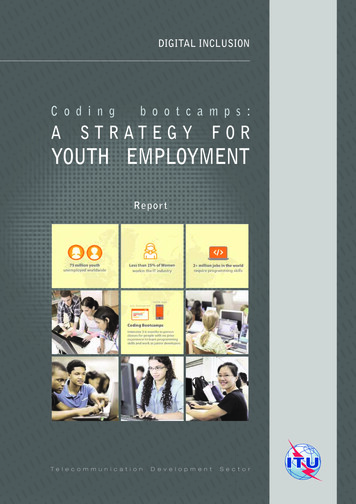
Transcription
CODING PROJECT:MAKE A GREETINGCARD USINGSCRATCH
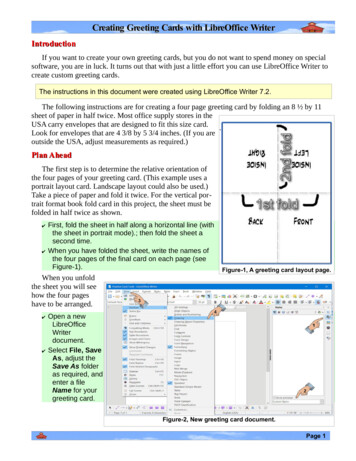
CODING PROJECT:MAKE A GREETING CARD USINGSCRATCHWhat you need to know:Basic knowledge of computer and Internet useWhat you need: Computer Internet AccessWant to send your family and friends customized eCards while also learning aboutScratch programming? This guide will get you started in Scratch so you can gocustomization crazy!Getting Started – Backdrops and Sprites1.! Open a web browser and type scratch.mit.edu in the address bar.2.! Click on “Create” in the blue menu bar at the top of the page.3.! Start by changing the backdrop of your card. You have the option to draw abackground, use your own image, or use one from their library. Let’s use one of thebuilt in backgrounds. Click on the white Stage box and then click on the little pictureof a mountain under New Backdrop. Select your image and click OK. Now you shouldsee your selected background in the display window.4.! You automatically have the Scratch mascot in the middle of your Ecard. Images andcharacter like this are called “Sprites.” Let’s remove the existing Sprite and start fromscratch. First, click on the scissors in the grey menu bar. Then click on the cat Sprite inthe middle of the screen with the scissor icon that replaces your cursor. Now we canadd the Sprite of your choice.Page 2 of 6
CODING PROJECT:MAKE A GREETING CARD USINGSCRATCH5.! To add a new sprite, click on the icon that looks like a little elf in the Sprites box. Justlike choosing a backdrop, pick your image and then click OK.Animating Sprites with costumesMany Sprites will come with multiple costumes, which let you animate characters throughyour code. Here’s how to use those costumes to animate a character.6.! Try to find a person or an animal that comes with a costume (most do). Select it andclick OK to add it to your Sprite collection.7.! While your new Sprite is selected in the Sprite window, click on the Costumes tab tothe right of the display window. You will see all of the costumes that it comes with.Click on each of them to get an idea of what animation/s you can do.8.! Now, click on the Scripts tab to the left of the Costumes tab. If you want the animationto start right away, click on the orange Events tab and drag the When Flag Clickedblock to the workspace. Then click on the purple Looks tab and connect the SwitchCostume block to the flag block. Click on the Switch Costume drop-down menu tochoose which costume it will switch to. If there are multiple costumes, you cancontinue dragging switch costume blocks to cycle through the available costumes.Page 3 of 6
CODING PROJECT:MAKE A GREETING CARD USINGSCRATCH9.! Costumes switch really fast with this arrangement. Make sure to drag a Wait blockfrom the yellow Control tab in between each Switch Costume block. Play around withadjusting the speed between switches and order of costume changes. If you want yourSprite to continue a switch cycle, drag a Forever block so that it is around your codeand underneath the flag block.Add a text greeting10.!Now we will need a greeting for our card. We can add animations to letters in theSprites gallery or typed text. To spell a message with the built in letters, you can sortby Letters on the left of the gallery window. Add each letter you need to spell yourmessage.11.! You can drag each letter within the preview window to arrange your message. Youcan also use the Grow and Shrink tools (next to the scissor in the top grey menu) ifyou need to adjust sizing. When you click on one of the tools, your cursor will changeand you can click on the Sprite that needs adjusting.Page 4 of 6
CODING PROJECT:MAKE A GREETING CARD USINGSCRATCH12.! Now we can add some color animations to our message. Click on a letter in the Spritesmenu. You should see the Scripts workspace appear on the right. Start by clicking onthe orange Events tab. Drag the When Flag Clicked block to the empty workspace.Now click on the purple Looks tab. Drag the block that says Change Color Effect by 25to connect with the flag block. This will change the color of one letter one time.13.! If you would like the letter to flash color for longer, click on the yellow Control tab anddrag the Forever block so that it goes around the color block and attaches to the flagblock. This will make colors flash really quickly. To slow it down, drag the Wait 1 secblock and attach to the color block. You can adjust the seconds until you’re happywith the speed. Now you have a colorful greeting!Page 5 of 6
CODING PROJECT:MAKE A GREETING CARD USINGSCRATCHAdd a sound effectYou can add sound effects to Sprites, or let a song play in the background. You can evenrecord your own greeting. For this card, let’s add some background music.14.!Click on the thumbnail of your backdrop in the bottom left. Then click on the Soundstab next to the Scripts menu that appears on the right. Click on the speaker icon topreview the sounds in the library. If you find one you like, click on it and then click OK.Now you will be able to add that sound to your code.15.! Click on Scripts and drag a When Flag Clicked block to your workspace. Then click onthe pink Sounds tab and drag a Play Sound block so that it connects to the Flag block.Choose your sound from the dropdown menu. Now the song will play along with youranimations! You can also change your event script so that sounds play when certainSprites are clicked. Play around with it!Keep Customizing!There are all sorts of things you can edit and add to your Scratch greeting card. Add moredecorations, and play around in the script tabs to make more animations or sounds. If youmake a Scratch account, you can share your creations with friends and family!Page 6 of 6
CODING PROJECT: MAKE A GREETING CARD USING SCRATCH 5.!To add a new sprite, click on the icon that looks like a little elf in the Sprites box. Just like choosing a backdrop, pick your image and then click OK. Animating Sprites with costumes Many Sprites will come with multiple cost