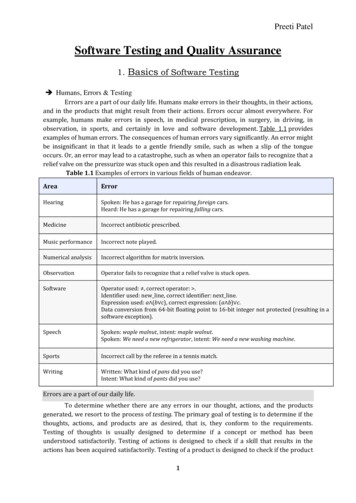
Transcription
Quality Assurance-SCWINTEAMEducation Department TEAM Softwaretraining@teamsoftware.comMarch 2014 Version 2014.03CONTENTSQuality Assurance-SC . 0Winteam .0Quality Assurance SC . 1Education Manual.1Objectives . 1Areas. 2Items . 2Copyright 2013 TEAM Software, Inc.0 Page
Response Systems . 4Response Methods grid/Response Method Details grid .4Checkpoints Templates. 6Quality Assurance tab in the Job Master File . 8Quality Assurance tab in the Employee Master File . 10Checkpoints. 10Deficiency Review . 13Checkpoint Review . 14Quality Assurance Reports . 15Checkpoint Report . 15Checkpoint Results Report . 16Checkpoint Templates . 17Objectives . 19Quality Assurance SCEDUCATION MANUALObjectives1.2.3.4.5.6.7.8.Learn how to setup Areas.Learn how to setup Items.Learn how to setup Response Systems.Learn how to setup Checkpoint Templates.Learn how to complete Checkpoints.Learn how to review Deficiencies.Learn how to review Checkpoints.Learn how to run Quality Assurance Reports.Copyright 2013 TEAM Software, Inc.1 Page
9. Learn about the Quality Assurance tab in the Job Master File.10. Learn about the Quality Assurance tab in the Employee Master File.AreasQA Areas are used to categorize, group, and report on Items. When creating a new Area, the defaultArea Type and associated Quality Objective from the Area Type add/edit list defaults to this screen.However, it can be modified. Areas can be added directly to the Checkpoint Templates tree or they canbe a subset of a Section. Items are then added to an Area.Use the Description field to enter a unique name for the record.Select the Area Type to associate with the Area. On a new record, the Type will populate if an Area Typewas selected as a default on the Area Types add/edit list. However, it can be modified.Enter a percentage of quality that must be met in order to be deemed acceptable for the Area.Acceptable percentages are from 0 to 100. If a default was selected on the Area Types add/edit list, theassociated Quality Objective populates here when creating a new Area. However, it can be modified.Select the Weight of the Area from 1x – 10x. The Default weight is 1x. Weighting allows evaluators toindicate how important this Area is to others. Since some criteria may be more important than others,you need to include that relative importance into your decision making process. To do this, assign aweight to each Area. The larger the weight, the more important the weight.ItemsQA Items are used to categorize, group, and report on Items. Typically, Items are in the form of aquestion to be answered during completion of a Checkpoint.Copyright 2013 TEAM Software, Inc.2 Page
Use the Description field to enter a unique name for the record.Select the Item Type to associate with the Item. On a new record, the Type will populate if an Item Typewas selected as a default on the Item Types add/edit list. However, it can be modified.Select the Weight of the Item from 1x – 10x. The Default weight is 1x. Weighting allows evaluators toindicate how important this Item is to others. Since some criteria may be more important than others,you need to include that relative importance into your decision making process. To do this, assign aweight to each Item. The larger the weight, the more important the weight.The Details text field can be used for entering a detailed description of the Item. You can enter up to 500characters. The Item Details can be included when running the Checkpoint Templates Report.Copyright 2013 TEAM Software, Inc.3 Page
Response SystemsResponse Systems are groups of answers for a Checkpoint Template that have a set minimum andmaximum score. The set minimum and maximum values ensure that all Response Methods within thissystem have the same value (prior to weighting).Use the Description field to enter a unique name for the record. The Description is limited to 50characters.Select to indicate if this Response System should serve as the default Response System when creating anew Checkpoint Template.Enter a minimum and maximum score to be used by this Response System. When creating a new record,this entry is required. Enter a score of 0 through 1000. On an existing record, this field is not availablefor entry.RESPONSE METHODS GRID/RESPONSE METHODDETAILS GRIDCopyright 2013 TEAM Software, Inc.4 Page
An entry cannot be made in the Response Methods grid until a new Response System has been added.The Response Method Details must contain a Score equal to the Minimum Score and a Score equal tothe Maximum Score. When a Response Method has been saved, you can no longer edit the Minimumand Maximum Score in the header area.You can enter as many Response Methods as you want and each Response Method must contain detailrecords including both the minimum and maximum scores. You must select a Default Response Methodbefore saving. When you select the Number of Choices, the Details grid will populate with a detail lineitem for the minimum score, maximum score, and a N/A entry.Change the Description in the Details grid to be more specific with the choices. Make sure each choice(detail line) has a Score. You are not required to select a Default Response Method Detail. Once a valueis selected in this field, it cannot be edited, changed or deleted.When a user selects the Number of Choices, the bottom grid populates with new rows based on theNumber of Choices. The rows initially contain Descriptions as “Description 1,” “Description 2,” etc., andwill always include a row with a Description of N/A that cannot be renamed. This N/A row always has ablank score which cannot be changed. This row, however, can be selected as the default and made aDeficiency. The N/A row does not count towards the Number of Choices. So, a Choice count of 4 wouldyield 5 rows: 4 Choices and 1 N/A row.If you select the Deficiency check box for a specific Score, the Item will display as a Deficiency wheneveran Item is scored with that result.Copyright 2013 TEAM Software, Inc.5 Page
Checkpoints TemplatesCheckpoint Templates are used as a basis for creating Checkpoints. Checkpoint Templates can beprinted using the Checkpoint Templates Report.Click the Hide/Show Header button to collapse/show the header so viewing for the actual Template isexpanded.Use the Description field to enter a unique name for the record.Select the Template Type to associate with the Checkpoint Template. The Template Type lets you groupsimilar types of Checkpoints. To add a new Template Type, double-click in the Type field, or type a newTemplate Type. The Template Types add/edit list displays.Select from the list of Response Systems. Only Active Response Systems display in the list. Double-clickto open the Response Systems screen.Enter the Quality Objective for the entire Checkpoint. You can enter a percentage between 0% and100%.Use the Job options to determine which Jobs should have this template available for use. Select All tomake this template available to all Jobs. Select Pick to select specific Jobs by Tiers or by excluding orincluding Jobs. The Templates will be listed in all Job Master Files (Quality Assurance tab), AvailableTemplates grid, for all master files it applies to.Select the Allow New option for ESS and CSS Users to show this Template in the Template list for theJobs included in the Jobs list, in the eHub Checkpoint screen. If Allow New ESS is selected, this TemplateCopyright 2013 TEAM Software, Inc.6 Page
will only be available for ESS users to Complete. If Allow New CSS is selected, this Template will only beavailable for CSS users to Complete.NOTE: Access to Templates for eHub Users is based on both the current Job hierarchy and QA Groups.QA Group members are in addition to the current Job hierarchy that we use for eHub orLocation/Company for WinTeam.Select the Default Publish option to auto populate on the Checkpoints. This is used for CompletedCheckpoints. If this field is marked, the Completed Checkpoint will automatically populate in eHub. IfDefault Publish ESS is selected, the Completed Checkpoint will automatically populate for ESS users. IfDefault Publish CSS is selected, the Completed Checkpoint will automatically populate for CSS users.These buttons can be applied to ESS, CSS or both.Enter any notes relevant to this template.The Checkpoint Template is created in this tree view area. Sections, Areas, Items, and Responses areadded to create the Checkpoint. You can drag and drop Items or Areas to other locations inside the treeview.The tree view has its own toolbar to provide actions and has right-click functionality. The commands onthe toolbar (will be available or disabled) and in the right-click menus vary depending on whether youare on a Section, an Area, or an Item.There are several ways to add an Area or Item to a Template: Type ahead functionality – Start typing in the field and the system will show Area or Item basedon characters entered.F4 - if the F4 key is selected when a user is in an Area or an Item, the list of Area/Items willdisplay for selection.Arrows – Use the up/down arrows to select Areas or Items from the list.The commands on the toolbar will be available or disabled depending on whether you are on a Section,an Area or an Item.Right-click menus vary depending on whether you are on a Section, an Area, or an Item. When you rightclick on a Section, you can add a Section or an Area. The Duplicate, Cut, Copy, and Delete commandspertain to the Section. When you right-click on an Area, you can add a Section, an Area, or an Item. TheDuplicate, Cut, Copy, and Delete commands pertain to the Area. When you right-click on an Item, youcan add a Section, an Area, or an Item. The Duplicate, Cut, Copy, and Delete commands pertain to theItem.Click and Drag any Section, Area or Item to another location on the template.The root item of the tree view is the Checkpoint level. The Template Description from the header is usedas the label. Sections and Areas can be added to the Checkpoint level.Copyright 2013 TEAM Software, Inc.7 Page
Sections are used only to assist with grouping and organizing the Checkpoint, and contain only aDescription. Sections are not tied to an Area or an Item, nor are they used for reporting purposes.Sections can be added to the Checkpoint level. (This will add a child section to this level and is onlyavailable if current tree view item is not more than 2 levels.) Areas can be added to the Checkpoint level.Areas are selected from the list of Active Areas set up. The Weight and Quality Objective default fromthe Area record. Areas can be hosted on the root, or in Sections, or in other Areas. Areas contain Itemsand cannot be empty. Sections, Areas, and Items can be added from an Area. When adding an Area, youcan start typing the name of the area in the tree view and be presented with options.Items are selected from the list of Active Items set up. Items must be hosted inside of an Area andcannot act as a parent to other objects. Once an Item is added, the Weight, Quality Objective, andDetails default from the Item record, but these can be overwritten. However, the Item Descriptioncannot be overwritten.Response Methods display only at the Item level. The Response Methods list defaults based on theResponse System default Method selected in the header. However, you can select a different methodfrom that Response System.For an Area, the Weight defaults from the Area record. For an Item, the Weight defaults from the Itemrecord.For an Area, the Quality Objective defaults from the Area record. For an Item, the Quality Objective isbased on the Item Type associated with the Item.Details are available at the Item level and default from the Item record.Quality Assurance tab in theJob Master FileCopyright 2013 TEAM Software, Inc.8 Page
The Quality Assurance tab is used to view available templates and Checkpoints for the Job. It alsoprovides a summary view of QA data for the Job.Select an eHub QA Group to allow its members to complete Checkpoints for the Job. These members arein addition to the current Job hierarchy that we use for eHub or Location/Company for WinTeam.The Available Templates grid displays all the templates that are available for this Job. The availability isbased on the Jobs selected on the Checkpoint Templates. The Type field populates based on the Typeassociated with the Checkpoint Template. You can double-click in the Description and the Type. Click thedrill-down button on the end of the row to open a new Checkpoint for this Job.Checkpoint Sites grid will be used for clients for large office buildings who need a way to quicklyassociate a Checkpoint with a specific area of a building. A Checkpoint Site can be added to aCheckpoint. They cannot be added to a Template.The Checkpoints grid defaults to filter for 30 days from the current date. Checkpoints for this Job displayin the grid. You can double-click on the Template Type, Template, Performed By and Employee #. Clickthe drill-down button to open the Checkpoint record.You can choose to publish Checkpoints in eHub ESS and CSS by selecting the appropriate check box orunselect the check box to unpublish.Copyright 2013 TEAM Software, Inc.9 Page
Quality Assurance tab in theEmployee Master FileThe Quality Assurance tab is used to view the Checkpoints that have been performed on an Employee. Italso provides a summary view of QA data for the Employee.You can double-click on the Template Type, Job, Template and Performed By. Click the drill-down buttonto open the Checkpoint record.You can choose to publish Checkpoints in eHub ESS and CSS by selecting the appropriate check box orunselect the check box to unpublish.CheckpointsCheckpoints can be used to create and respond to questions, act based on responses, and share results.Checkpoints are created based on an existing Checkpoint Template. Use the Checkpoint screen to createa Checkpoint, complete an In Progress Checkpoint, or view a completed Checkpoint. Blank andCompleted Checkpoints can be printed using the Checkpoints Report.Enter the Job Number that will use this Checkpoint, or use the Lookup to locate the Job Number.Copyright 2013 TEAM Software, Inc.10 Page
Select the Checkpoint Template to use as a basis for this Checkpoint. Only templates that are availableto this Job display in this list, as designed by the Template. The Templates Available for a Job also displayin the Job Master File (Quality Assurance tab) for each Job. The Template list contains the Description ofthe template, the Type of template, the Notes field from the template and the Template ID.Once a Template is selected, the tree view will populate based on the template. If you double-click inthe Template field (with an entry), the selected Checkpoint Template screen displays. If you double-clickin the Template field (without an entry), a new Checkpoint Template screen displays. If you attempt toselect a Template without first entering a Job Number, no Templates display in the list.Select who is to perform the Checkpoint. If an Employee is to perform the Checkpoint, enter theEmployee Number, or use the Lookup to locate the Employee Number.If a Contact is to perform the Checkpoint, enter the Contact Number, or use the Lookup to locate theContact Number. The Contacts in this Lookup display only those Contacts assigned to the currentlyselected Job. Contacts can be subcontractors or other third-party individuals who perform Checkpoints.They are not Employees, nor are they CSS Users. Contacts represent the smallest percentage ofCheckpoint users. If a CSS User is to perform the Checkpoint, enter the CSS User Name, or use theLookup to locate the Customer Contact. CSS Users will primarily complete surveys and inspections.On a new Checkpoint or a Checkpoint that has not been Completed, the Status displays In Progress.Once the Finish button is selected the Status changes to Completed. The Status field is read-only andcannot be changed. If a Completed Checkpoint is modified, Modified displays in green text above theStatus.Use the Send Notification button to send an email notification when the Checkpoint has beencompleted. A pop-up window displays to type email address(es).Select a Site to associate a Checkpoint with a specific area of a building. Only the Sites added to theselected Job Master File (Quality Assurance tab) display in this list. You can double-click in the Site fieldto open the selected Job Master File with focus on the Quality Assurance tab.Enter the Date the Checkpoint is completed. The system defaults to today's date.Enter the time the Checkpoint was performed. The system will also default in the time.Copyright 2013 TEAM Software, Inc.11 Page
Enter the Employee Number to associate an employee to the Checkpoint.Select to publish to ESS, CSS, both, or neither. If selected, the Completed Checkpoint automaticallyshows in eHub.Use the Upload button to attached images to the Checkpoint. Use the View button to view the imagesuploaded to the Checkpoint.Enter any notes relevant to this Checkpoint.When Expand All is selected, the entire Checkpoint displays, including all Items. When Collapse All isselected, the entire tree of the Checkpoint is reduced to the first Area level. These buttons do not havefunctionality on a new Checkpoint (before the header is saved).The Finished button displays once the header has been saved and the Status is In Progress. It does notdisplay on a Completed Checkpoint.Once the header information is entered, the Checkpoint grid populates with the details from theselected Template. If a default selection was made for the Response Method, it displays in the Responsecolumn.Once all Items have been scored and Notes entered, if applicable, click the Finished button to calculatethe results of the Checkpoint.A summary of the Results display showing Points and Percentages for Actuals, Quality Objectives, andPossible. The Results area also displays the number of Deficiencies in the Checkpoint and the differencebetween the Actual Percentage and the Quality Objective Percentage.The Weight, Value, Score, and Quality Objectives columns also display. The Results area will match theCheckpoint level in the grid. The results for the Checkpoint are the sum of the Sections, which include allItems. The results for the Area are the sum of its Items. The results for the Section are the sum of itsAreas.Weights are not applicable at the Section or Checkpoint levels as they are a part of the calculated Value.Areas and Items display the Weight assigned from the Template.For an Item, the Value is the Value of the Response multiplied by the Item Weight. For an Area, theValue is the sum of all Items multiplied by the Area Weight. For a Section, the Value is the Total of Areas.For a Checkpoint, the Value is the Total of all Sections.Copyright 2013 TEAM Software, Inc.12 Page
The Score for an Item is its Value divided by Possible Points. The Score for an Area is its Value divided byPossible Points. The Score for a Section is its Value divided by Possible Points. The Score for theCheckpoint is its Value divided by Possible Points.The Quality Objectives are derived from the Checkpoint Template associated with the Checkpoint.If the Deficiency check box was selected for a specific Score in the Response Method Details, the Itemwill display as a Deficiency whenever an Item is scored with that result. The number of deficiencies isincluded in the Results area. Double-click the deficiency icon in the Checkpoint to open the DeficiencyReview screen. The Items display with an Open Status. You can decide how you want to handle theDeficiency (Create a Work Ticket, Assign a Work Ticket, or Close the Deficiency) directly from theDeficiency Review screen.Actual Points are the actual Value for all Sections. Actual Percentage is Section Values/Total PossiblePoints. Q.O. Points are Possible Points * Checkpoint QO QO Points. Q.O. Percentage is not calculated,but rather it is based on the Checkpoint Template. Possible Points are the total value if a user were toscore the highest possible value (max point value) for each Item. Possible Percentage is not calculatedand is always 100%.% Above/Below Target indicates percentage that the actual (achieved) point value is above or below theQuality Objective percentage (target). An up/down arrow is used to indicate if the item is above orbelow Quality Objective.Deficiencies indicates a count of deficiencies. If there are no Deficiencies, this icon does not display.Deficiency ReviewThe Deficiency Review screen is used to view and take action on Deficiencies that were created on theCheckpoint. It is a great tool to manage by exception. From the Deficiency Review screen you can CreateWork Tickets, Assign Work Tickets, Open and Close Deficiencies. Standard grid functionality applies tothis screen. Deficiencies are included in the Checkpoint Report and the Checkpoint Results Report.The Deficiencies can be filtered by From Date, to Date, Job Number, and Open Status Only. The griddisplays Deficiencies for the previous 30 days by default. You can leave the From Date blank so alldeficiencies are displayed. If a change is made in the Filters area, click the Refresh button to update thedata in the grid based on your new filters.Copyright 2013 TEAM Software, Inc.13 Page
Click the Create Work Ticket to open the WS Schedules screen and create a single work ticket based onthe information from the selected Deficiency. Creating the Work Ticket from the Deficiency links theWork Ticket to the deficiency via the Assigned Work Tickets field.Click the Assign Work Tickets button to open the Related Tickets screen and assign an existing WorkTicket to a deficiency. You can assign one or multiple work tickets to this deficiency. If a deficiency haswork tickets assigned, they can be changed, removed or new ones linked.The Open Deficiency button displays when Open Status Only check box is not selected. Click the OpenDeficiency button to mark a Closed deficiency as Open. This applies to all selected records in the grid.Click the Close Deficiency button to mark an Open deficiency as Closed. This is available only when oneof the selected deficiencies is Open, in which case it should close the open ones. This applies to allselected records in the grid.The Deficiency grid displays data based on the filters selected. You can double-click in the Checkpoint IDcell to open the Checkpoint that created the Deficiency. You can double-click in the Job cell to open theJob Master File record. The Score Description displays, along with the Value. The Notes display anyNotes that were created when completing the Checkpoint. The Assigned Work Tickets column displaysWork Tickets that are linked to this Deficiency. It is used to track tickets that were created as a resultfrom this Deficiency. The Change icon displays info when the Deficiency has been closed. If theDeficiency is Open, no information is available, since this Change Info pertains only to ClosedDeficiencies.Use the Field Chooser to view additional columns in the grid. Section 1 displays the top-level section inthe tree of this Deficiency from the Checkpoint. Section 2 displays the next-level section in the tree ofthis Deficiency from the Checkpoint.Checkpoint ReviewThe Checkpoint Review screen is used to view Checkpoint Results based on selected criteria.Click the Proceed button to gather results based on the selected criteria. The Results tab will open.Standard grid functionality applies to this screen. The grid is sorted ascending order by Job Number. Youcan double-click on the Job Number to open the Job Master File record. There are three possible levelsof information that can display within the grid.Copyright 2013 TEAM Software, Inc.14 Page
Job - Displays the grand total for each Job. Checkpoints totals display the values from all theCheckpoints that were created for that Job.Template Type - Displays the Checkpoint Type from the Checkpoint Template. Totals are thesum of all Checkpoints for the Template Type.Checkpoint - Displays results of each Checkpoint performed. Click the Detail button to open theselected Checkpoint.You can also print this report by clicking the Print button in the lower-right hand corner.Quality Assurance ReportsCHECKPOINT REPORTThe Checkpoint Report can be run using Blank Checkpoints or Completed Checkpoints. BlankCheckpoints are typically used when you need a hardcopy to perform the Checkpoint. CompletedCheckpoints include both Completed and Modified Checkpoints. You may filter, group, and print thereport by Tiers, allowing for total customization of the report. Use the Tier Templates to set up and savetemplates. This makes it easy to create a specific report each time you need one without recreating thecriteria.Copyright 2013 TEAM Software, Inc.15 Page
CHECKPOINT RESULTS REPORTCopyright 2013 TEAM Software, Inc.16 Page
The Checkpoint Results Report is used to view results in various formats based on the numerousselection criteria. Three report formats are available: Detail, Summary, and Trend. The results can begrouped by Area Type, Item Type, Job, Performed By, Template, or Template Type. Filters are availablebased on the Publishing to ESS and CSS. You may filter, group, and print the report by Tiers, allowing fortotal customization of the report. Use the Tier Templates to set up and save templates. This makes iteasy to create a specific report each time you need one without recreating the criteria. The report canalso be run showing Deficiencies only.There is an option to show total the total number of Checkpoints based on the filter criteria. Select theInclude Checkpoint Counts to display the number of results.CHECKPOINT TEMPLATESThe Checkpoint Templates Report is a true copy of the Template that was created. The report can befiltered by Response Systems, Templates, and Template Types. The report includes Item Details bydefault. You can also select to include Template Notes.Copyright 2013 TEAM Software, Inc.17 Page
Copyright 2013 TEAM Software, Inc.18 Page
Objectives1.2.3.4.5.6.7.8.9.10.Learn how to setup Areas.Learn how to setup Items.Learn how to setup Response Systems.Learn how to setup Checkpoint Templates.Learn how to complete Checkpoints.Learn how to review Deficiencies.Learn how to review Checkpoints.Learn how to run Quality Assurance Reports.Learn about the Quality Assurance tab in the Job Master File.Learn about the Quality Assurance tab in the Employee Master File.Copyright 2013 TEAM Software, Inc.19 Page
9. Learn about the Quality Assurance tab in the Job Master File. 10. Learn about the Quality Assurance tab in the Employee Master File. Areas QA Areas are used to categorize, group, and report on Items. When creating a new Area, the default Area Type and associated Quality Objective