Transcription
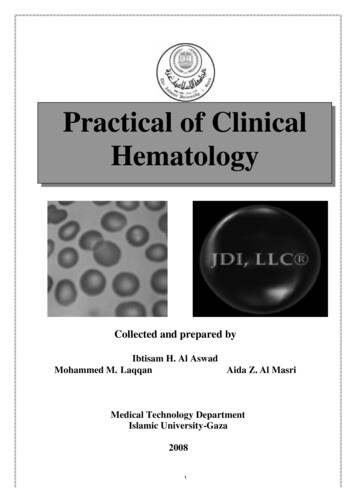
BLOOD SMEAR BASICSJENNIFER A. NEEL, DVM, DACVP (CLINICAL)ASSOCIATE P ROFESSOR, CLINICAL P ATHOLOGYNC STATE COLLEGE OF VETERINARY MEDICINERALEIGH, NC, 27607IntroductionAlthough tremendous advances have been made in the field of point-of-care hematology analyzers,examination of a well prepared, well stained blood smear remains the cornerstone of veterinarydiagnostic hematology. Even the most sophisticated hematology instruments are unable to consistentlyprovide accurate differential cell counts, and no analyzer is capable of accurately identifyingmorphology changes, hemoparasites, neoplastic cells, etc. This review will cover the basics of how toapproach blood smear evaluation in a consistent and systematic manner and will focus on recognitionof clinically significant findings.Making a quality blood smearAlthough there are several techniques described for making blood smears, most people use the wedgeor push technique. Always start with room temperature, well-mixed, clot free, EDTA anticoagulated blood(heparin is used for some exotic species). If the blood has been refrigerated, allow it to returnto room temperature. The best slides to use for making blood smears are the premium, pre-cleaned kind; those witha frosted end also facilitate easy labeling. If you are not using premium pre-cleaned slides, youwill need to wipe off each slide you plan to use for making the blood smear, including spreaderslides, in order to eliminate glass grit and dust which can ruin your smear. Always mix the specimen immediately before making the smear by gently rolling the tubeseveral times to ensure good cellular distribution, don’t shake or invert. To transfer blood from the tube to the slide, fill a plain microhematocrit tube with blood bycapillary action and place a finger over the end to prevent the blood from running out. Do NOTtry to dab blood from the cap onto the slide or use a 1 ml plastic pipette; the microhematocrittube will give you better control and, if you have a microhematocrit centrifuge, you can simplyplug the clean end after making your slide and spin the tube for your hematocrit and totalprotein. Place an approximately 4mm diameterdrop of blood on one end of the slide.If there isn’t enough blood in themicrohematocrit tube to produce therequired droplet of blood, DO NOTrepeatedly tap the tube onto the glassto try and get enough blood out; goback and get some more from theEDTA tube. Holding the spreader slide at anapproximately 30-45º angle, back intothe drop of blood and, as soon as youA well made blood smear. The classic blood smear has asee the drop spreading along the edgethumb print appearance. A well developed feathered edge isapparent. The dense body of the smear takes up most of theof the spreader slide, push the spreaderslide and there is a thin counting area which blends with theslide forward in a smooth, moderatelyfeathered edge and the dense body.fast motion; apply only enough
pressure to keep the spreader slide on the glass, excessive pressure will push too much bloodforward without allowing development of a good body and monolayer; you should be pullingthe blood along the slide, not pushing it.If the blood is very thin (severe anemia) you may need to increase the angle of the spreaderslide to avoid going off the end of the slide.A good quality smear has the following features; A dense body; this should take up about 2/3 of the entire smear and should blend smoothly intothe monolayer area. A well-developed feathered edge. This edge should have a fine, feathery appearance; if thereis a thick line of blood where the slide stopped, it’s an indication of a poorly made smear. A monolayer area just behind the feathered edge. This region should be noticeably thinner thanthe body, but should blend in with the body of the smear. Often this area is only about ½ cmwide. Prior to staining, if the slide is held up to the light, there is a rainbow effect seen justbehind the feathered edge on well made smears.Poor quality slides are typically cause by excessive downward pressure, a slow spreading motion, orwobbling of the spreader slide on the surface of the smear. Slow spreading motion tends to cause long,thin smears that lack a dense body, thin monolayer and well-developed feathered edge. The leadingedge may have a line of blood instead of a thin, feathered appearance from pushing the blood insteadof pulling it. Often there is streaking in the smear. Linear lines arranged horizontally to the leading edgeare called hesitation marks and they indicate hesitation in the forward motion. Excessive downwardpressure will produce short slides with hesitation marks and a poorly developed feather edge andmonolayer region. Wobbling is often due to inexperience or trying to exert pressure rather than lettingthe spreader slide rest on the surface of the smear. If you are having trouble making quality slides, itcan be helpful to have an experienced individual spot your techniqueSlide stainingRomanowsky-type stains give good nuclear and cytoplasmic detail. Red blood cells stain red-orange,nuclei stain blue-purple and cytoplasm stains blue to pink. Most commercial laboratories use someform of Romanowsky-type stain (e.g. Wright - Geimsa) and these stains give excellent result but tendto be fussy. Quick Romanowsky type stains (such as Diff-Quik) are modified versions that areinexpensive, robust, fast and easy to use and generally give very good results. However, note that mastcell and basophil granules may not stain. I recommend the standard 6/6/6 dipping protocol for bloodsmears; dips should be slow (1-2 seconds each) and smooth. Some people prefer to add 2-3 extra dipswhen examining a smear for red cell parasites as this makes the organisms stand out more, but thisshouldn’t be done routinely because it imparts an excessive blueness to the slide making toxic changeand polychromasia difficult to recognize.Staining problems. The most common problems arising from use of rapid stain are 1) poor samplefixation 2) under-staining of the specimen 3) poor staining from use of weakened or exhausted stain orfixative and 4) stain contamination 5) excessive stain precipitation. Poor sample fixation. You can’t over fix a slide, but you can definitely under fix one, andunder-fixed cells will lyse and fail to stain adequately. Once you move from the fixativesolution to the stain solution, an under-fixed slide can’t be improved. For very thin cytologysmears and for blood smears, 5 or 6 dips in the fixative solution should be adequate, but forthick cytology smears, up to 120 seconds may be required for adequate fixation. When in doubt,fix them a little longer. Under-staining of the specimen. This occurs when there is inadequate contact with the stainsolutions. It can also occur if you attempt to stain several slides at once and the specimen
surface of one slide is covered by another slide. As long as a slide has been adequately fixed, apoorly stained slide can be put back into either stain solution for additional time, thus a poorlystained specimen can gradually be stained to the desired color intensity. An over-stained slidecan be soaked in fixative solution until stain is removed and re-stained, although I have oftenfound that with rapid stains, results are not as good as getting it right the first time.Poor staining due to weakened/exhausted stain or fixative. Stain solutions do weaken withrepeated use, and prolonged exposure of the fixative to air at room temperature can result inimpaired staining from formation of degradation products. How often you need to change thestain will depend on how many slides are put through it. The best advice is to keep an eye onthe quality of the slides; when staining is not as good as typically seen, it’s time to change thesolutions. Signs that your stain is weakening include overall pale staining, especially pale bluenuclei that lack sharp chromatin detail. Never top off a weakened stain, it must be changed!Also remember that stain, even when kept in closed containers, will eventually go bad. If youdon’t use a lot of stain, purchase smaller containers to avoid losing money on stain that goesbad before you can even use it.Contamination. Stain contamination occurs when ‘dirty’ specimens such as fecal smears, earscrapings, skin cytology or material from abscesses are stained in the same solution as ‘clean’specimens (blood films, most cytology specimens). The easiest way to avoid this is to set uptwo staining stations, one for clean samples and one for dirty samples. Contamination of thefixative with water can produce refractile ‘water artifact’ on slides. Slides should be completelydry before staining (use of a gentle amount of warm air from a hair dryer can facilitate this),slide holders should be dried before slides are loaded, and stains should be tightly coveredwhen not in use.Stain precipitation. This appears as fine, dark blue-purple stippled material on the backgroundof the slide and on the cells. It makes identification of small hemoparasites a nightmare.Typically it’s associated with the development of a green sheen on the surface of the dark bluestain solution; changing the solution for new typically eliminates the problem.Staining artifacts. Left; refractile water artifact in red cells. Right; stain precipitate, image courtesy of Ms. Tillie Laws.MicroscopyYou will need the standard objectives for blood smear review; 10x, 40x and 100x oil immersion.Remember, if you are using a 40x objective, you will need to place a coverslip on top of the slide to geta sharp focus; this objective is designed to be used with a cover slip and without one, everything looksa little fuzzy. A 50x oil immersion objective is expensive ( 800-1000), but is very useful forhematology. It negates needing to use a coverslip and allows you to move seamlessly from low power
to 100x without worrying about oiling the 40x. It also magnifies everything more than the 40x whichis helpful for morphology and cell evaluation.Always adjust the microscope for Köhler illumination when you get ready to look at blood smears orcytology slides. It is done to ensure optimal lighting of the slide. Examining a slide with a microscopeadjusted for urine sediments or fecal wet-mounts is a waste of time. The procedure is as follows;1. Focus on a slide at 10x2. Close down the field diaphragm; this is located at the base of the microscope where light comesout. Look into the microscope while you close it down, you should see the light reduced to thecenter of the field as you close it. If your microscope is really off, instead of seeing a centralcircle of light, everything may just get really dim. Inexpensive microscopes may not have afield diaphragm. If you are trying to adjust a microscope that doesn’t have one, skip the nextstep and simply raise the condenser almost all of the way up.3. Adjust the condenser vertically via the condenser focus knob until the circle of light has asharply defined edge. The condenser is portion of the microscope underneath the stage andthere is a knob located on one side that moves the entire unit up and down. Usually thecondenser must be moved up because someone has lowered it to look at urine sediments orfecal wet mount preps.4. Center the ring of light using the silver centering screws on the condenser5. Open the field diaphragm so that the entire field is flooded with light.6. Open the condenser diaphragm about ¾ of the way. NOTE: This is actually a small fib, but itis easy to remember and works pretty well. If you want to learn more about microscopyincluding the technically correct last step in Köhler illumination, visithttp://microscopy.fsu.edu/primer/index.html for more information.Systematic smear evaluationBe systematic and thorough when evaluating blood smears. It actually makes the procedure moreefficient and you are less likely to overlook a major finding. You might find it’s beneficial to start asmall slide collection. Include a few examples of normal smears from the species you work with andexamples of anemia, leukopenia and leukocytosis (especially useful if you have the actual counts tocorrelate with the appearance on the slide) and good examples of atypical/abnormal cells andmorphology changes. These slides can be used as references or to train new individuals.1. Examine the entire feathered edge. You are looking for large things because very large itemsoften end up on the feathered edge. Common things include platelet clumps and microfilaria,less common things include blast cells, mast cells, and macrophages, rare things includemegakaryocytes or schizont laden macrophages in Cytauxzoon infections. You also want tosee if a disproportionate number of the WBCs have ended up on the feathered edge – thishappens with poor smear technique and is important if you are estimating cellularity vs. usinga machine count.2. Estimate/confirm cell counts. If you don’t have a hematology instrument, you will need toestimate WBC density and the platelet count, and even if you do have an analyzer, you shouldstill correlate the machine count with the slide. Estimations are crude, but are useful fordetecting significant changes. For WBCs, examine the slide on 10x in the monolayer (see #3for how to find the monolayer) region. Normal animals will have anywhere from 18-50 cellsper 10x field in health on a well made blood smear. Each WBC corresponds to about 330cells/µl. While typically assessed via a PCV or with an analyzer, if needed, the RBC densitycan also be estimated. Using the 10x objective, start at the middle of the feathered edge andmove back in a straight line through the monolayer counting area and into the body of the slide.In a normal animal, the RBCs should quickly become thickly piled up after leaving themonolayer region, but in anemic animals, the cells will never pile up as well, and the counting
3.4.5.6.area will be extended. Anemic animals will also have a paler blood smear grossly, so it’sbeneficial to look at the smear against a white background before putting it on the microscope.Find the monolayer. Start at the very edge of the feathered edge on 10x. Move back towardsthe body of the slide. At the leading edge of the smear, you’ll notice the blood cells break intolittle pools of cells with white spaces between them giving a reticulated pattern. As you moveaway from the feathered edge and into the monolayer, the white spaces disappear and the redcells form a smooth monolayer. Generally, it takes about 2-4 10x fields to get from thefeathered edge into the monolayer. When you are doing your WBC and RBC morphology, youneed to stay in the monolayer region. Ifyou wander too close to the featherededge, you’ll see the reticulated patternforming and if you wander too deep intothe smear, you’ll see the red cells startpiling up on each other.Examine the WBCs. Classify 100 cellsfor a differential count. It’s often usefulto just spend a few minutes lookingaround at what cells are present beforeyou do a differential so you can decidewho’s who. Note any major morphologychanges (toxic changes, reactivelymphocytes) and any abnormal cellThe transition zone between the feathered edge on the rightpopulations (blast cells, immatureand the monolayer on the left. Near the feathered edge, theneutrophils).red cells and white spaces for a reticulated pattern. As youmove deeper into the smear, white spaces disappear as theExamine the RBCs. Give an estimationmonolayer forms(rare, mild, moderate, marked) ofanisocytosis, poikilocytosis and polychromasia. Note that a well stained blood smear is neededto clearly see polychromasia. For poikilocytosis, look to see if there’s anything specific suchas acanthocytes or spherocytes.Estimate or confirm the platelet count. Remember to check the feathered edge for plateletclumps as these will invalidate a low count. Using the 100x objective, average the number ofplatelet over several fields in the monolayer. Multiply this number by 20,000 to give arough estimate of the platelet count.Red cellsColor changes. Polychromasia is recognized as larger, slightly bluer-staining red cells and is an excellentindicator of a regenerative response. Note: you will have a hard time identifying polychromasiaif your smear is over-stained. Polychromasia is typically semi-quantified as rare, slight, mild,moderate or marked (can use similar criteria as with morphology quantification, see below).
Red cell color changes. Right; polychromatophilic RBCs are present. These cells are larger and more basophilic thannormal RBCs. This image show moderate polychromasia. Left; hypochromatic RBCs. The area of central pallor isincreased and the cells, overall, are paler staining. Note a couple of polychromatophilic RBCs are also present. Imagescourtesy of Ms. Tillie Laws. Hypochromasia indicates iron deficiency andis recognized by increased central pallor ANDpale color. This is recognized in dogs moreoften than cats. This is different from‘punched out’ RBCs in which there is adistinct, round, pale central area that is sharplydelineated from the rim of hemoglobin.Punched out cells have a wider rim ofhemoglobin than do hypochromic cells, andthe hemoglobin color is normal, not pale. Notethat in iron deficiency, there often is a lot ofpoikylocytosis present as well.Red cells with a ‘punched out’ appearance; the area ofMorphology changescentral pallor appears enlarged and is sharply delineatedfrom the cytoplasm. This has no significance and should not Changes can be quantified as rare ( 1/100xbe confused with hypochromasia; the rim of cytoplasm isfield), occasional (1-3/ 100x field), few/mildstill larger than is seen in hypochromic RBCs and the color(4-10/100x field), moderate (10-25/100x field)of the cytoplasm is robust.or marked/many ( 25/100x field). In practice,these are estimated rather than actually counted. Acanthocytes. These are cells with unevenly distributed cytoplasmic projections, and are mostcommonly seen in feline hepatic lipidosis or in dogs with hemangiosarcoma, especially whenit involves the liver.
Schistocytes. These are small, irregular fragments of cells and are most commonly seen inhemangiosarcoma, microangiopathies, DIC and iron deficiency.Many acanthocytes and schistocytes. On the left, several acanthocytes are indicated by the arrows. On the right , twoschistocytes are indicated. Acanthocytes have irregularly spaced cytoplasmic projections that are typically blunted andmay have a knob-like end. Schistocytes are irregular, torn pieces of RBC cytoplasm formed by sheering of cells. Spherocytes. These are red cells that are round instead of flat and most commonly indicateIMHA, but can also form after removal of Heinz bodies by the spleen and low numbers arenoted in fragmentation anemia. Because they are rounded, they appear smaller and darker thannormal red cells and there is a lack of central pallor. Spherocytes are best appreciated in dogsdue to the prominent central pallor in the normal canine RBC, and are more difficult to detectin other species. Be careful not to interpret RBCs along the feathered edge as spherocytes; cellsin these areas (where there are large open spaces) tend to round up and lose their central pallornormally.Right; an example of spherocytes in a dog. Spherocytes classically are small, round cells that lack central pallor andappear darker red than surrounding blood cells. Sometimes, when they have all the features of spherocytes but do notappear darker than surrounding cells, they are referred to as ‘pre-spherocytes’ or ‘imperfect’ spherocytes and mayalso indicate immune mediated targeting of RBCs. Left; RBCs from the feathered edge of a canine blood smear. Notethat the cells appear to have lost their central pallor – don’t mistake RBCs without central pallor on the featherededge for spherocytes, this is normal. This dog also has a large platelet and, in the RBC in the center, a Babesia canispiroplasm.
Heinz bodies. These indicate oxidative damage to hemoglobin, and large numbers are seen withoxidative hemolytic anemia. They appear as small, roundish structures can protrude from themargin of the cell as a pale structure, or appear as a small pale dot near the edge of the cell.Cats often develop large Heinz bodies when it’s the result of an oxidative drug or plant; Heinzbodies seen in sick cats (renal disease, lymphoma, hyperthyroidism) tend to be smaller andpresent in lesser numbers.Heinz bodies. Left; on Romanowsky stained slides, Heinz bodies appear either as small projections from the margin ofthe cell, or pale stained regions on the interior of the cell. Right; with new methylene blue staining, Heinz bodies arebasophilic blue dots. Blister cells and keratocytes. Blister cells are red cells with a round, clear blister at the edge ofthe cell. When the blister ruptures, one or two thin remnants of cytoplasm are seen and it’s thencalled a keratocyte. These shape changes indicate oxidative damage and are most common iniron deficiency, but can also be seen in any cause of oxidative damage including toxicities (e.g.onions) or drugs. Eccentrocytes are a related shape change also indicating oxidative damage.They form the RBC cell membranes stick together and are identified by seeing cells with a paleregion where membranes are fused and a darker region where all the cytoplasm has been pushedto one side. These can look like spherocytes, but careful examination will ensure you see thepale area of fused membranes.Echinocytes. These are cells that are covered with small, blunted to sharp, evenly distributedspicules; they look sort of like a sea urchin. This can be a drying artifact, in which case theywill be unevenly distributed on the slide and are called crenated cells. When real, they areassociated with renal disease, severe electrolyte abnormalities and snake-bite envenomation.With snake bites, virtually all cells are affected and the spicules are small and very sharp.
Top left; a keratocyte (left arrow) and a blister cell (right arrow). This dog is also hypochromic. Top right; akeratocyte with only one projection – some people refer to these as ‘apple-stem’ cells. Bottom left; eccentrocytescharacterize by fusion of the RBC membranes creating a pale region (image courtesy of Ms. Tillie Laws). Bottomright; echinocytes characterized by small, evenly spaced spicules.Agglutination and rouleaux. Agglutination indicates IMHA and appears as grape-like clusters of RBCs.Often the best places to look for agglutination are just behind the feathered edge or between themonolayer and the body of the smear. It’s also easier to spot on 10x vs. 40x or higher. High proteinlevels can also cause red cells to clump and appear agglutinated, so if you think you see it, you need todo a saline dispersion test to confirm. Take 1 drop of patient blood and mix with 2-3 drops of normalsaline. Tilt the slide back and forth to get the fluids mixing and moving, and then look at it under themicroscope right away on 10x, while the cells are still in motion. You’ll need to drop the condenserdown or stop down the condenser like you would for examining fecals or urine sediments since theblood is unstained. Look at the cells as they fly by. If the cells are generally individualized and onlyrarely in twos or threes, then it’s negative, but if you see whole clumps going by, it’s positive. Rouleauxoccurs when RBCs are stacked like coins and is best appreciated on 10x as well and is most prominentwhere the monolayer starts blending into the body. Some rouleaux is OK in cats, horses always haveit. Increased rouleaux typically occurs in inflammatory conditions or with hyperproteinemia, includinganimals with gammaglobulinemias (multiple myeloma, some lymphomas). It will disperse with saline.
Left; canine blood smear showing agglutination. Cells are present in small clusters that are easiest to appreciate on lowpower. Right; normal equine blood smear showing the ‘stacked coin’ appearance of rouleaux.Red cell parasites Mycoplasma. M. haemocanis and M. haemofelis appear as small, epicellular bacterialorganisms on RBCs. They can form small rings, dots, and linear chains. Cats can also beinfected with M. haemominutim which is less pathogenic and also smaller and more difficultto identify. When Mycoplsma is seen on the very periphery of the cells, it’s possible to see aslight indentation of the cell membrane. The organism can be associated with agglutinationand, in cats with M. haemofelis, there is typically a strongly regenerative hemolytic anemiapresent unless there is a concurrent immunosuppressive disease or condition (FeLV forexample). There are a few things to keep in mind with this parasite. The first is that cytologicdetection has low sensitivity compared with PCR, so not seeing the organism is no reason toexclude it. Second, appearance of the organism in peripheral blood, especially in cats, can beMycoplasma. Left; M. haemofelis; note the extremely small size of the organisms. Left; M. haemocanis. Note theorganisms in the background that have fallen off the RBCs. Clean stain is essential when looking for this organismepisodic, so it can be missed. Third; once the infected RBCs sit in EDTA for awhile, theorganisms start to fall off the cells, so a freshly made smear soon after collection is best. Fourth;if your stain has a lot of precipitate or your fixative is contaminated with water causingrefractile water artifact, this organism can be very difficult to distinguish from debris, so useclean stain.
Babesia canis. B. canis is a protozoal organism that forms large, piriform (tear drop) shapedmerozoites in RBCs and these may be paired. They generally are about 3-5 µm in size with adot-like nucleus and pale blue cytoplasm with a distinct cell wall. There are subspecies of B.canis and, in the US, the most common is vogeli which also happens to be the least pathogenic.The same is not true of the other subspecies which can cause more severe disease. Most casesin the US represent subclinical carrier states, although this organism can cause more severedisease in young animals, animals that are heavily infected and in those with underlyingconditions. Babesia can be detected by PCR. Examination of peripheral capillary blood fromthe ear or nail bed may concentrate the organisms making it easier to identify them. AlthoughB. canis is the most common large form Babesia seen in dogs, it’s not the only one; otherspecies have been detected.Babesia gibsoni. B gibsoni is a small form of Babesia and is much more pathogenic; acuteinfection can cause severe hemolytic anemia, thrombocytopenia and a shock-like syndrome.It’s also been linked to dog fighting or bites from dogs involved in fighting. Dogs surviving theacute phase can show non-specific hematologic findings but often have mild anemia andthrombocytopenia. Although this organism is also detectable by PCR, making a timely andaccurate diagnosis can be more urgent, thus identification of infection on a blood smear is ofsignificant value. These organisms are much smaller than B. canis; they are typically 1-2.5 µmin size with a very small dot like nucleus and a ring shaped or safety pin shaped membrane.The membrane is thinner and more delicate and the nucleus smaller compared with B. canismaking them more difficult to see. As with B. canis, capillary blood from the ear or nail mayconcentrate infected RBCs. There does appear to be different isolates of this organism, andthere may be different organisms with similar cytologic appearance, but all are associated withmore severe disease. Staining slides with quick stains such as Diff Quik and staining them moreintensely with the second stain solution (6-6-9 or 6-6-12) can facilitate identification. Cleanstain is essential.Babesia. Left; B. canis showing the classic piriform (tear) shaped organism. Here they are paired and you can clearlysee the nucleus, cell margin and the pale cytoplasm. Note that they are relatively large and easy to see. Right; B. gibsoni.Notice these organisms are very small and difficult to see. They are ring shaped with a dot like nucleus. This slide wasstained with a quick stain (Diff Quik) with extra dips in solution II (dark blue) in order to enhance detection of theparasites. Cytauxzoon felis. C. felis is a devastating protozoal disease of cats that is often, but not always,fatal; timely identification with aggressive treatment is successful in a significant number ofcats. Although PCR is available, it is not really of much diagnostic utility due to the rapidprogression of the disease. Identification of organisms by light microscopy remains the bestmeans of diagnosis in the clinical setting. Parasitemia is variable necessitating a thorough
search for organisms. The organisms are very small (about 1-1.5 µm), ring or safety pin shapedstructures with a very small dot-like nucleus. Similar to B. gibsoni, over-staining with solutionII of the quick stains can facilitate identification and clean stain is essential. Unlike Babesia,C. felis has a tissue stage in addition to a red cell stage, and it is believed that proliferation ofthe tissue stage is responsible for the shock-like syndrome that cats develop. The tissue stagedevelops before the red cell stage, so suspect cats that are negative for the organism onperipheral blood should have tissue aspirates performed to look for the tissue stage. The tissuestage consists of hypertrophied macrophages with developing schizonts within their cytoplasm.The cells are large with very large eccentric nuclei that contain prominent nucleoli. Thecytoplasm is distended with developing schizonts. Early in development, the schizonts appearas pale blue lobulated clouds of material. As the schizonts develop, the material becomesmottled with magenta nuclear material. The latest stages can be identified as stippled materialrepresenting individual organisms within the macrophage cytoplasm. Although the organismcan be found in almost every tissue, lymph node,
BLOOD SMEAR BASICS JENNIFER A. NEEL, DVM, DACVP (CLINICAL) ASSOCIATE PROFESSOR, CLINICAL PATHOLOGY NC STATE COLLEGE OF VETERINARY MEDICINE RALEIGH, NC, 27607 Introduction Although tremendous advances have been made in the field of point-of-care hematology analyzers, examination of a w