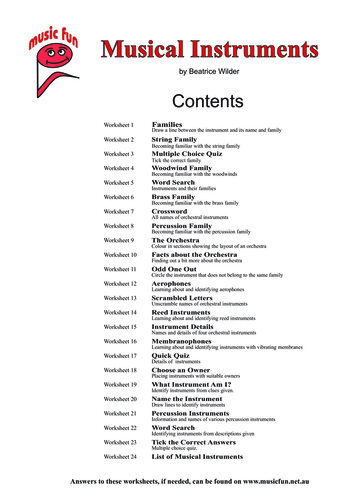
Transcription
Effective Management of Surgical InstrumentsLinda Timmons, RN, BA, CNORTerri Goodman, PhD, RN, CNORDeveloped with an unrestricted educational grant fromEffective Management of Surgical InstrumentsPREVIOUSNEXT
DisclosuresRequirements for Successful Completion View the activity in its entirety Complete the Evaluation Form Achieve at least the minimum score on the Post-TestConflict of Interest The authors have no conflict of interest to declare. The activity has been reviewed to ensure that content meets therequirement for continuing nursing education. One author is the owner of Terri Goodman & Associates, the approvedprovider of continuing nursing education.Commercial Support This presentation was developed with an unrestricted educational grant from Bausch Lomb Storz Ophthalmics.Non-endorsement of Products Neither the American Nurses Credentialing Center’s Commission on Accreditation nor the Texas Nurses Associationendorses commercial products.Effective Management of Surgical InstrumentsPREVIOUSNEXT
Disclosures (cont.) This Continuing Education program has been granted 1.7 contact hours for nurses with a minimum score of 80on the post test. Contact hours expire on December 31, 2015.Terri Goodman & Associates is an approved provider of continuing nursing education by the Texas NursesAssociation, an accredited approver by the American Nurses Credentialing Center’s Commission on Accreditation. This Continuing Education program has been granted Continuing Education credits from the CertificationBoard for Sterile Processing & Distribution, Inc. (CBSPD) for 2.0 contact hours with a minimum score of 70 onthe Post-Test. This Continuing Education program has been granted Continuing Education credits from the InternationalAssociation for Healthcare Central Service Materiel Management (IAHCSMM) for 2.0 contact hours with aminimum score of 70 on the Post-Test.Effective Management of Surgical InstrumentsPREVIOUSNEXT
Objectives Discuss the roles of personnel in both the operating room andsterile processing department (SPD) in the effective management ofsurgical instruments. Describe activities that impact the process of managing surgicalinstrumentation effectively. Explain the steps in preparing and sterilizing surgical instruments.Effective Management of Surgical InstrumentsPREVIOUSNEXT
ManagingSurgical Instrumentsis A Team EffortEffective Management of Surgical InstrumentsPREVIOUSNEXT
Perioperative personneland processing personnelmust work togetherto ensure the effectivemanagement of surgicalinstruments.Effective Management of Surgical InstrumentsPREVIOUSNEXT
Purpose StatementThe purpose of this educational activity is to demonstrate propermanagement of surgical instruments and to emphasize that effectivecommunication between perioperative and instrument processingpersonnel is essential to ensure that instruments used in surgical andother invasive procedures facilitate safe and effective patient outcomes.Effective Management of Surgical InstrumentsPREVIOUSNEXT
Patient Safety Optimal surgical outcome. Reduced complications related totissue damage. Reduced incidence of infection. Reduced recuperation time.Effective Management of Surgical InstrumentsPREVIOUSNEXT
Reduced Expenses Reduce patient length of stay. Reduce expenses related to hospital-associated infection. Reduce expenses related to complications. Extend instrument life. Reduce replacement costs.–– A major cause of instrument damage is mishandling and abuse.Effective Management of Surgical InstrumentsPREVIOUSNEXT
Instrument managementbegins in the operating roomat the point of instrument use.Effective Management of Surgical InstrumentsPREVIOUSNEXT
During the ProcedureInstruments must beinspected before useon the field.Effective Management of Surgical InstrumentsPREVIOUSNEXT
Any defective or missing instrumentsmust be clearly identified for SPD orthe instrument technician in ambulatorysurgery.Effective Management of Surgical InstrumentsPREVIOUSNEXT
Handling Handle instruments carefully and one at a time or in small numbers. Use instruments only for the purpose for which they were intended.Effective Management of Surgical InstrumentsPREVIOUSNEXT
Use scissors only for the material for which they were designed.–– Cutting other materials can cause misalignment, loss of sharpness, damage(e.g. Use Mayo scissors, not Metzenbaums ormore delicate scissors to cut drapes and materialother than tissue). Use sharp instruments (diamond knives,cystotomes, dissectors, knives) only fortheir intended use.–– Misuse can cause blades and edges to dull andimpair surgical performance.Effective Management of Surgical InstrumentsPREVIOUSNEXT
Use forceps appropriate to the task at hand–– Improper alignment can create serious problems withfunction and harm to the patient Match needle holders to the sizeof needle for which it is intended–– Large needles will spring the jaws ofdelicate needle holders and reduceholding powerEffective Management of Surgical InstrumentsPREVIOUSNEXT
During the procedure, wipe blood and tissue from instrumentsimmediately after use.–– Debris that is allowed to dry on instrumentscauses deterioration, corrosion, and pitting.–– Saline solution may be be used to wipeinstruments that will be used again during theprocedure.Effective Management of Surgical InstrumentsPREVIOUSNEXT
Protect tips of instruments with tip protectors.–– Prevent tips of instruments from contacting other instruments and snagging on towelsand sponges.Effective Management of Surgical InstrumentsPREVIOUSNEXT
Following the Procedure Remove disposable sharps;manage sharps appropriately.Effective Management of Surgical InstrumentsPREVIOUSNEXT
Prepare the Instruments Open box locks. Insure that all multipart instrumentsare disassembled.–– Keep parts together for easyreassembly after processing Expose all surfaces–– Cleaning, disinfectants, and sterilants mustcontact all surfaces of an instrument for the process to be effectiveEffective Management of Surgical InstrumentsPREVIOUSNEXT
All cannulated equipment andhandpieces should be flushed.Effective Management of Surgical InstrumentsPREVIOUSNEXT
Organize instruments into sets.–– All instruments, used and unused, go backinto the set.–– Once opened onto the sterile field, the entireset is considered contaminated. Place heavy instruments on thebottom; lighter instruments on top.Effective Management of Surgical InstrumentsPREVIOUSNEXT
Clearly identify deficient/missing instruments.Effective Management of Surgical InstrumentsPREVIOUSNEXT
Contain contaminated instruments to protect personnel. Do not allowblood and debris to dry on instruments.–– Soak in demineralized water to prevent drying of bioburden.–– Saline, disinfectants, and chlorinated solutions can cause pittingand corrosion and should never be used for soaking instruments. Transport instruments to SPD as quicklyas possible.–– Instruments should not remain in water for lengthyperiods of time.–– Biofilms may form, particularly within lumens.Effective Management of Surgical InstrumentsPREVIOUSNEXT
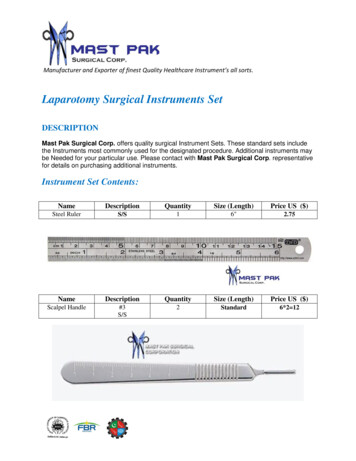
Biofilm An aggregate of organisms encased within a gelatinous matrix.–– Biofilm is the slimy feeling on the inside of a container that has held water for a periodof time.–– Once formed, a biofilm cannot be rinsed away; it can only be removed bymechanical means. The presence of a biofilm makes cleaning more difficult.–– Biofilm can pose a serious threat to health.–– Biofilm can compromise the disinfection and sterilization processes.Effective Management of Surgical InstrumentsPREVIOUSNEXT
A biofilm can break freefrom the surface of adevice resulting in a massiveinfusion of bacteria thatcan cause an infection thatis difficult to treat.Printed with permission: Montana State UniversityEffective Management of Surgical InstrumentsPREVIOUSNEXT
Cleaning is the first and most important step in instrument processing. An instrument must be clean before it can be sterilized.–– Debris prevents sterilant from contacting all surfaces of an instrument.–– Improper cleaning of instruments can cause harm to patients.An instrument can be clean but not sterile;No instrument can be sterile but not clean.Effective Management of Surgical InstrumentsPREVIOUSNEXT
Sterile Processing Responsibilities Cleaning/Decontamination–– Wash–– Rinse Lubrication Inspection and Testing–– Continue Reprocessing–– Send for Repair/Discard Prepare forsterilization Sterilization StorageEffective Management of Surgical InstrumentsPREVIOUSNEXT
Toxic anterior segment syndrome (TASS) An acute inflammation of the anterior chamber,or segment, of the eye following cataract surgery. Can be caused by inadequate or inappropriatecleaning of instruments leaving irritants on thesurface of intraocular surgical instruments.Effective Management of Surgical InstrumentsPREVIOUSNEXT
Toxic anterior segment syndrome (TASS) (cont.) Risks may be associated with the use of enzymatic cleaners.–– Incomplete rinsing, especially of cannulated instruments, has been identifiedwith TASS. Chemical sterilization methods such as EtO and peracetic acid mayleave chemical residues on the instruments that promote TASS.Effective Management of Surgical InstrumentsPREVIOUSNEXT
Manual Cleaning Hand wash microsurgical instruments and trays. Remove mats from trays and clean each separately. Do not put delicate microsurgical instruments in mechanical washerunless it has a delicate cycle.Effective Management of Surgical InstrumentsPREVIOUSNEXT
Manual Cleaning (cont.) Open all hinged microsurgicalinstruments for maximum exposureof hinges. Debris left in box locks or crevicescan be baked on in sterilization,causing future breakage under stress. Disassemble instruments withremovable parts.Effective Management of Surgical InstrumentsPREVIOUSNEXT
Manual Cleaning (cont.) Wash each instrument individually to ensure proper cleaning and toprevent injury.Effective Management of Surgical InstrumentsPREVIOUSNEXT
Manual Cleaning (cont.) Do not use abrasive cleaners whencleaning microsurgical instruments; theycan damage or scar finishes. Use soft brush and instruments wipes.–– Brush all serrations, crevices, tips, handles, andhinges.–– Brushing should be done under the surface of thewater to prevent aerosolization of contaminants.Effective Management of Surgical InstrumentsPREVIOUSNEXT
Cannulated instruments Cannulas, irrigation cannulas,irrigation/aspiration (I/A) handpieces,suction tips, cystotomes. Use a brush of the appropriate size toclean the lumen; hold instrument andbrush below the water surface.–– Clean and sterilize the brush daily or accordingto the manufacturer’s directions.Effective Management of Surgical InstrumentsPREVIOUSNEXT
Cannulated Instruments (cont.) Flush lumens using a syringe filledwith warm distilled or deionized wateraccording to the manufacturer’sdirections. Flush below the surface of the waterto avoid aerosolizing contaminants.Effective Management of Surgical InstrumentsPREVIOUSNEXT
Cannulated Instruments (cont.) Follow rinse with air dry.–– 50cc syringe filled with air.–– Compressed airEffective Management of Surgical InstrumentsPREVIOUSNEXT
Automated Cleaning / Mechanical washing A washer-decontaminator can be used to mechanically washsturdier instruments in an agitated detergent bath. Use detergent with neutral pH.–– Follow the recommendations of both the manufacturer of the detergent and themanufacturer of the instrument.Effective Management of Surgical InstrumentsPREVIOUSNEXT
Automated Cleaning / Mechanical washing (cont.) Place heavy instruments in the bottomof the tray or basket. Load small or light instruments inseparate trays.Effective Management of Surgical InstrumentsPREVIOUSNEXT
Automated Cleaning / Mechanical washing (cont.) Do not put microsurgical instrumentsinto a washer decontaminator unlessit has a delicate cycle. Do not put powered or lensed instrumentsinto a washer decontaminator unlessrecommended by the instrument manufacturer. Do not use a washer decontaminatorfor heat, moisture, or pressure-sensitive instruments.Effective Management of Surgical InstrumentsPREVIOUSNEXT
Mechanical Cleaning with Hard Water Mineral deposits will accumulate on the walls of equipment afterrepeated use. Clean equipment regularly to remove impurities and scale. Water purifying system or softening agent added before each useminimizes formation of scum, scale, and discoloration.Effective Management of Surgical InstrumentsPREVIOUSNEXT
Prepare the Instruments Just as in the OR, SPD personnelmust insure that–– Box locks are open–– All multipart instruments are disassembled–– All instruments in a set are together–– All surfaces are exposed so thatdisinfectants and sterilants can reach ALLsurfacesEffective Management of Surgical InstrumentsPREVIOUSNEXT
Prepare the Instruments (cont.) Protect sharp instruments–– Sharp tips and sharp edges are easily dulled or broken. Protect personnel from injury from sharpinstruments.–– Don’t bury sharp instruments among other instruments.–– They should be readily visible to avoid injury whenhandling.Effective Management of Surgical InstrumentsPREVIOUSNEXT
Ultrasonic Cleaning Ultrasonic cleaners use high frequency sound waves to createmechanical vibration. Cavitation: microscopic bubbles form on every surface, thenimplode, creating a vacuum which pulls particles from every creviceof the instrument. Ultrasound penetrates areas that a brush or mechanical washercannot reach.Effective Management of Surgical InstrumentsPREVIOUSNEXT
Ultrasonic Cleaning (cont.) Use detergent at the proper concentration andtemperature, recommended by the manufacturer. Ultrasound for 5 minutes or according to themanufacturer’s directions. The ultrasound machine should be drained andcleaned/disinfected frequently.–– Frequency of cleaning is based on the amount of use.–– Frequency can be as often as every 1-2 hours or after every use.Effective Management of Surgical InstrumentsPREVIOUSNEXT
Ultrasonic Cleaning (cont.) Sort instruments into batches, separated bymetal composition. Never place different metals in ultrasoniccleaner at the same time. Stainless steel and titanium instruments mustbe cleaned separately. Mixing incompatible metals can cause pitting,etching, and degradation of surface treatments.Effective Management of Surgical InstrumentsPREVIOUSNEXT
Ultrasonic Cleaning (cont.) Powered instruments should be notcleaned in an ultrasonic washer. A neutral pH ultrasound solution is alsovital to protect the passivation layer oninstruments and prevent corrosion.Effective Management of Surgical InstrumentsPREVIOUSNEXT
Ultrasonic Cleaning (cont.) Protect tips, cutting edges and box lockfrom other instruments.–– Ultrasonic vibration can cause premature wear wheninstruments contact adjacent instruments. Rinse instruments thoroughly with distilledwater after the cycle to remove residueand particles from surfaces and to preventstaining.Effective Management of Surgical InstrumentsPREVIOUSNEXT
Ultrasonic Cleaning (cont.) Check screws on instruments, as vibration may loosen screws. Instruments should be air dried with filtered, compressed air. Use hot air dryer. Avoid canned, compressed air due to particulates.–– Protect fine tips and edges which can be damaged when snagged on gauze or towel. If drying with a towel, the towel should be lint-freeEffective Management of Surgical InstrumentsPREVIOUSNEXT
Lubrication helps prevent staining, rusting and corrosion (if specifiedby the instrument manufacturer). Lubrication promotes smooth action of hinged instruments Proper lubrication helps to keep instruments clean by preventingmineral and protein build up.Effective Management of Surgical InstrumentsPREVIOUSNEXT
Lubrication (cont.) Lubricate only instruments with mechanical parts. Use a water-soluble, anti-microbial lubricant after each cleaning,or a minimum of once each day. Water soluble lubricant penetrates the box locks, hinges andcrevices, preventing binding and excessive wear. Do not lubricate cannulated instruments.Effective Management of Surgical InstrumentsPREVIOUSNEXT
Lubrication (cont.) Follow the manufacturer’s instructions for lubrication.–– Place instruments individually in a perforated tray; do not allow instruments to touch oneanother. Immerse the open perforated tray in the lubricant.–– 30-40 seconds is the usual immersion time. Replace the lubricant at least daily to keep it clean. Do not use silicone sprays or other oils which can build up in hingesand crevices and inhibit sterilization.Effective Management of Surgical InstrumentsPREVIOUSNEXT
Lubrication (cont.) Let the instruments drain. Do not rinse or wipe the instruments. Some lubricant will be removed duringultrasonic cleaning.Effective Management of Surgical InstrumentsPREVIOUSNEXT
Lubrication (cont.) Lubricant film should remain on instruments through the sterilizationprocess.–– Though much of the lubricant is removed during preparation and sterilization, thelubricant that remains provides surface protection.Effective Management of Surgical InstrumentsPREVIOUSNEXT
Inspecting and Testing Magnified visual and mechanicalinspection is a crucial step in theprocessing of instruments. Each instrument is inspected following thelubricant bath.–– Misalignment, malfunction, dull edges or points onsharp instruments, bent tips, loose screws, pits, nicks,cracks, corrosion, etc.Effective Management of Surgical InstrumentsPREVIOUSNEXT
Inspecting and Testing (cont.) Damaged instruments are set asidefor further evaluation, repair, orreplacement.–– Damaged instruments must never be put into sets.–– A set should not be processed until the damagedinstrument has been replaced; incompletesets can cause delays in surgery.Effective Management of Surgical InstrumentsPREVIOUSNEXT
Inspecting and Testing (cont.) The instrument finish should have no dull spots, dents, nicks, or cracks. Incompletely cleaned instruments must be reprocessed.Effective Management of Surgical InstrumentsPREVIOUSNEXT
Inspecting and Testing (cont.) Sharp instruments (scissors, rongeurs, osteotomes, curettes, knives,etc.) should be tested for sharpness and smooth cutting undermagnification. Hinged instruments should work smoothly without stiffness.Effective Management of Surgical InstrumentsPREVIOUSNEXT
Forceps Jaws that overlap when tightly closed are outof alignment. Teeth of forceps must mesh properly. Tying platforms must meet evenly over the fulllength to eliminate damage to fine sutures.Effective Management of Surgical InstrumentsPREVIOUSNEXT
Box Lock Hold the ring handles in both hands, open the instrument, wiggle theinstrument to identify excessive play in the box lock.–– Excessive play indicates alignment problems or wear.–– Instrument may not hold securely.Effective Management of Surgical InstrumentsPREVIOUSNEXT
Ratchet Test tension by closing the instrument gently; whenjaws touch, a space of 1/16” or 1/8” should occurbetween the ratchet teeth of each shank. Close ratchet to first tooth. Hold instrument by jaws and tap against your hand. If instrument springs open, it is an indication ofdefective ratchet teeth or poor shank tension.–– The instrument will not hold tissue, sponges, or needles securely.Effective Management of Surgical InstrumentsPREVIOUSNEXT
Scissors When closed, scissor should meet only at tips. All scissors should operate smoothly.–– Rough operation implies wear, damage, or failure. Look for burrs on blade tips. Scissors with nicks in the blades should be identified and tagged for repair. Shanks should be in good alignment; if not, the blades may not closesmoothly.Effective Management of Surgical InstrumentsPREVIOUSNEXT
Scissors (cont.) Many facilities use Theraband (the samelatex product that is used for exercisebands) to test the sharpness of Mayo andMetzenbaum scissors.–– There are two thicknesses; one for scissors with bladeslonger than 5 inches and one for scissors with bladesless than 5 inches.Effective Management of Surgical InstrumentsPREVIOUSNEXT
Needle Holders A needle should be held firmly in place when the needle holder isclosed to the lock or stop. If the needle can be twisted or rotated, the needle holder needs repair. If light can be observed between jaws that are closed and/or locked,the jaws are sprung or damaged and will require repairEffective Management of Surgical InstrumentsPREVIOUSNEXT
Rongeurs The cutting edges of a rongeur must be sharp. A sharp Kerrison rongeur should take aclean bite out of a 3x5 index card. Bone-cutting rongeurs should bite througha tongue depressor. There are commercially available sharpnesstest kits and standards for surgical instruments.Effective Management of Surgical InstrumentsPREVIOUSNEXT
Instruments are assembled and placedinto containers for sterilization. All surfaces of each instrument mustbe exposed to sterilant.Effective Management of Surgical InstrumentsPREVIOUSNEXT
Preparation for Sterilization Arrangement of instruments in a set should:–– Maximize exposure to sterilant.–– Protect the instruments from damage.–– Facilitate setting up for the surgical procedure. Stringers or posts keep ringed instruments open.–– String instruments from large to small with jaws and tips pointing in same direction. Position cupped or concave instruments so they will not collect water. Delicate instruments must not touch one another in trays.Effective Management of Surgical InstrumentsPREVIOUSNEXT
Preparation for Sterilization (cont.) Heavier instruments should be loaded first, andkept separate from lighter instruments. Tray weight should not exceed 25 lbs. Delicate instruments are often packaged incases specially designed to protect them. Protect tips and sharp edges with tip protectorsthat have been validated for sterilization cycles.Effective Management of Surgical InstrumentsPREVIOUSNEXT
Monitoring Every package must be monitored to insure that the sterilizationprocess was successful. Chemical monitors demonstrate that the parameters of sterilizationhave been met. Biological monitors demonstrate that all microorganisms, includingspores, have been killed.Effective Management of Surgical InstrumentsPREVIOUSNEXT
Monitoring (cont.) Sterility Assurance Level (SAL) – 10-6–– There is a probability of only one in one million organisms surviving the sterilization process.Effective Management of Surgical InstrumentsPREVIOUSNEXT
Chemical Monitors Will change color when conditions that are measured have been met.Classes of monitors: Class I: process indicator–– When exposed to heat the indicatorchanges color.–– distinguishes between processed andunprocessed items.**Note: Class II indicator (Bowie Dick) is used to verify air evacuation in a dynamic air removal sterilizer.Effective Management of Surgical InstrumentsPREVIOUSNEXT
Chemical Monitors (cont.) Class III: single variable indicator–– Measure one of the parameters Class IV: multi-variable indicator–– Measures more than one parameter Class V: integrators–– Measures all parameters Class VI: Cycle specific indicatorsEffective Management of Surgical InstrumentsPREVIOUSNEXT
Chemical Monitors (cont.) There should be a processindicator on the outside of thepackage or set to distinguishprocessed items fromunprocessed items.Effective Management of Surgical InstrumentsPREVIOUSNEXT
Chemical Monitors (cont.) An indicator should be placed in eachpackage in the site most challengingfor the sterilant to reach.–– Near the center of the set or package.–– Must be visible to the scrub person andcirculator when the package is opened.Effective Management of Surgical InstrumentsPREVIOUSNEXT
Chemical Monitors (cont.) Label items packaged for sterilization clearly.–– Contents.–– Initials of the package assembler.–– Lot control number. Lot control number indicates:–– sterilization date; sterilizer used; cycle or load number.–– In conjunction with computerized instrument trackingsystems, lot control numbers facilitate inventory control,stock rotation, and retrieval of items in the event ofsterilization or sterilizer failure.Effective Management of Surgical InstrumentsPREVIOUSNEXT
Chemical Monitors (cont.) Individual facilities may have theirown protocol for information to printon each package. Use indelible, non-bleeding,non-toxic markers. Write on the plastic side of pouches.Effective Management of Surgical InstrumentsPREVIOUSNEXT
Event Related Sterility A package remains sterile until it is opened or an event occurs thatcontaminates the package.–– Wrapping is torn or punctured.–– Package exposed to moisture.–– Package is dropped on floor.Effective Management of Surgical InstrumentsPREVIOUSNEXT
Event Related Sterility (cont.) If an item is not contaminated during storage, it will remain sterileindefinitely. The longer a package is stored, the greater the possibility forcontamination to occur.Effective Management of Surgical InstrumentsPREVIOUSNEXT
Use the sterilization method(s) recommended by the instrumentmanufacturer.Effective Management of Surgical InstrumentsPREVIOUSNEXT
Sterilization (cont.) High temperature: Steam–– Most common.–– Least expensive. Low temperature–– Ethylene oxide (EtO).–– Hydrogen peroxide plasma.–– Hydrogen peroxide vapor.Effective Management of Surgical InstrumentsPREVIOUSNEXT
Dynamic Air Removal Steam Sterilizer (PreVac) Most common steam sterilizer. Has a variety of settings to accommodatedifferent instrument requirements. Fast and efficient. Evacuates all of the air prior to introductionof steam.Effective Management of Surgical InstrumentsPREVIOUSNEXT
Dynamic Air Removal Steam Sterilizer (PreVac)(cont.) Injected steam instantaneously and uniformly contacts load surfaces. Sterilization is rapid by comparison to gravity sterilizers. Multiple prevacuum/steam pulses provide for efficient heating andremoval of air from the load prior to exposure. Following the preconditioning phase, the load is then heated to thedesired temperature and pressure for the pre-selected exposure time. Requires Bowie Dick (Class II) monitor to validate air evacuation.Effective Management of Surgical InstrumentsPREVIOUSNEXT
Gravity Displacement Steam Sterilizer Older technology. Longer cycle times; fewer settings.Effective Management of Surgical InstrumentsPREVIOUSNEXT
Table Top Sterilizers Usually found in facilities where there is a limited number of medicaldevices to be sterilized such as ambulatory surgery, physician offices,dental offices, clinics and laboratories. It is important to follow the sterilizer manufacturer’s instructions forinstallation, load configurations and biological testing. Usually have pre-set cycles which cannot be adjusted (e.g. wrapped,unwrapped, liquids). Make sure these cycles are compatible with theitems to be sterilized.Effective Management of Surgical InstrumentsPREVIOUSNEXT
Table Top Sterilizers (cont.) Generates its own steam when distilled or deionized water is added bythe operator. Follow the sterilizer manufacturer’s instructions for water quality(usually distilled water) and care, maintenance and cleaning of thewater reservoir. Drying usually takes place with the door open, follow instructions toprevent contamination of packs during the drying phase.Effective Management of Surgical InstrumentsPREVIOUSNEXT
Loading the Sterilizer Sterilant best penetrates packs whenthe sterilizer is loosely loaded. Do notoverload the sterilizer. Position wrapped instruments to allowfor adequate circulation, penetrationof steam, air removal and condensatedrainage.Effective Management of Surgical InstrumentsPREVIOUSNEXT
Loading the Sterilizer (cont.) Arrange pouches in the vertical position, all facing in the samedirection. Place basins upright on edge so that water runs out and does notaccumulate.Effective Management of Surgical InstrumentsPREVIOUSNEXT
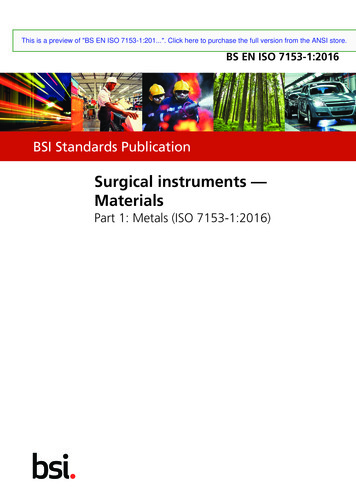
Minimum Cycle Times for Dynamic-air-removal steam sterilization cyclesITEMEXPOSURE TIME AT 132 C (270 F)Wrapped Instruments4 MinutesEXPOSURE TIME AT 135 C (275 F)20 to 30 Minutes3 MinutesTextile Packs16 Minutes4 Minutes5 TO 20 Minutes3 MinutesWrapped UtensilsDRYING TIMES3 Minutes4 Minutes20 Minutes3 Minutes16 MinutesUnwrapped Non-Porous Items(e.g Instruments)3 Minutes3 MinutesNAUnwrapped Non-Porous andPorous Items in Mixed Load4 Minutes3 MinutesNANOTE-- This table represents the variation in sterilizer manufacturers’ recommendations for exposure at different temperatures. For a specific sterilizer, consult only thatmanufacturer’s recommendations.“Reprinted from ANSI/AAMI ST79:2010 with permission of the Association for the Advancement of Medical Instrumentation, Inc. (C) 2010 AAMIwww.aami.org. All rights reserved. Further reproduction of distribution prohibited.”Effective Management of Surgical InstrumentsPREVIOUSNEXT
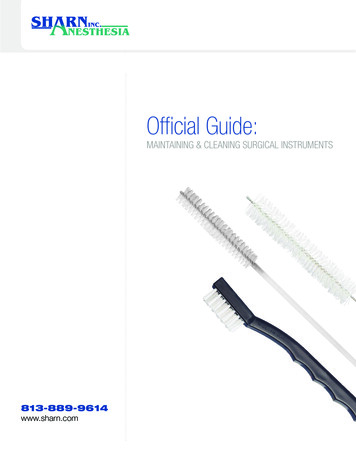
Minimum Cycle Times for Gravity-Displacement Steam Sterilization CyclesITEMEXPOSURE TIME AT121 C (250 F)EXPOSURE TIME AT132 C (270 F)Wrapped Instruments30 Minutes15 MinutesEXPOSURE TIME AT 135 C(275 F)15-30 Minutes10 MinutesTextile Packs30 Minutes25 Minutes30 Minutes30 Minutes15 Minutes10 MinutesWrapped UtensilsDRYING TIMES15 Minutes30 Minutes15-30 Minutes10 Minutes30 MinutesUnwrapped Non-Porous Items(e.g Instruments)3 Minutes3 Minutes0-1 MinuteUnwrapped Non-Porous andPorous Items in Mixed Load10 Minutes10 Minutes0-1 MinuteNOTE-- This table represents the variation in sterilizer manufacturers’ recommendations for exposure at different temperatures. For a specific sterilizer, consult only thatmanufacturer’s recommendations.“Reprinted from ANSI/AAMI ST79:2010 & A1:2010 with permission of the Ass
Eflective Management of Surgical Instruments PREVIOUS NEXT Cleaning is the first and most important step in instrument processing. An instrument must be clean before it can be steriliz ed. – Debris prevents sterilant from contacting all surfaces of an instrument. – Imp