Transcription
GanttProject User GuideRelease 2.8
2Table of ContentsIntroduction . 4What’s new. 4Feedback. 4Get started . 4Downloading and installing GanttProject . 4Screen layout . 5Overview of creating a project and adding tasks and resources . 6Projects . 7Creating a project . 7Changing project properties . 7Opening and saving a project . 8Resources . 8Resource roles . 8Adding, modifying, deleting, and e-mailing a resource. 8Changing the listed order of a resource . 10Tasks . 10Creating a task . 10Creating a summary task . 13Modifying or deleting tasks . 14Changing the listed order of tasks . 15Linking and unlinking tasks . 15Displaying critical path through tasks . 16Baselining task dates to see schedule changes . 16Common operations . 17Searching for a task or resource . 17Cutting, copying, and pasting tasks and resources . 18Undoing and redoing operations . 18Printing tasks and resources. 19Viewing GanttProject version, license, and software libraries . 19Workspace, FTP, and CSV settings . 19Changing days visible in a task or resource chart. 19GanttProject User GuideRelease 2.8
3Managing task and resource columns . 20User interface, chart, and other settings . 20Reports, imported files, and exported files . 22Creating a project report . 22Importing MS Project, CSV, and other files . 23Exporting MS Project, CSV, and image files. 23PERT charts . 24Viewing PERT chart of project tasks . 25Troubleshooting. 25Getting information on errors from log file . 25Recovering automatically saved file after malfunction . 25Index . 26GanttProject User GuideRelease 2.8
4IntroductionThis user guide describes how to use GanttProject, which is a project management software application.You can use it to create a schedule of tasks, assign resources to them, and track the progress of aproject. GanttProject is similar to Microsoft Project but has fewer features and is simpler. Also, it isopen-source software and has been in existence since 2003.What’s newNew GanttProject features and enhancements are summarized in the following table.GanttProjectRelease2.8DescriptionThe use of all functionality in this release isdescribed in the first version of this guide.FeedbackIf you have comments on this document, please send them to santos.r@husky.neu.edu.Get startedTo start using GanttProject, you first need to download and install it. Then, to quickly get oriented withit, it helps to understand the overall layout of the task and resource screens, which are the two mainscreens and are similar. Lastly, before starting to use GanttProject, it helps to understand the main stepsneeded to create a project in it.Downloading and installing GanttProjectBefore you can use GanttProject, you first need to download and install it and the Java RuntimeEnvironment (JRE), which it requires.To download and install GanttProject and JRE1. Go to www.ganttproject.biz.2. Select the large Download new button.3. For option one, select an operating system, or, for option two, select the Free Download link.4. Follow the on-screen instructions to download the installation software, which will be in anexecutable file with a .exe extension.5. GanttProject requires the Java Runtime Environment (JRE). If you do not have JRE on yourdevice, then download and install it by doing the following:a. Select the provided Java link on the GanttProject webpage.b. At the Java site, follow the on-screen instructions to download the JRE software, whichwill be in an executable file with a .exe extension.GanttProject User GuideRelease 2.8
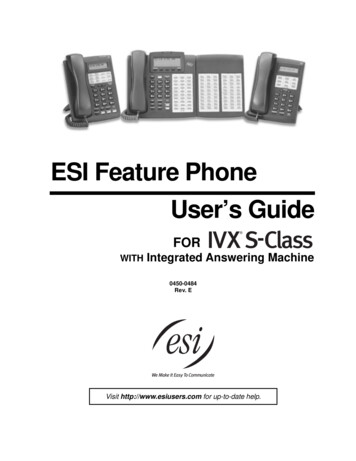
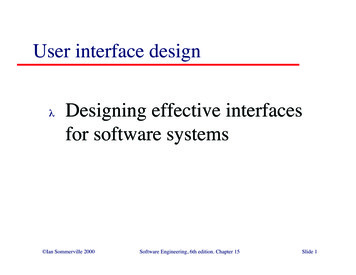
Get started5c. Run the downloaded JRE software by double-clicking it.d. Follow the instructions in the Java Setup screens.6. Run the downloaded GanttProject installation software by double-clicking it.7. Follow the instructions in the setup wizard.Screen layoutFigure 1 and 2 below show example screenshots of the tasks in a project and the associated resources inthat project, respectively. Many display options are available for these screens, especially for tasks, soyou can change the information displayed in them. These two screenshots are from the project in thefile HouseBuildingSample.gan. This file is in the folder named GanttProject-X.Y, which is named after aspecific version of GanttProject and is created when GanttProject is installed. You may want to open thisfile to learn more about the ways GanttProject can be used to schedule and track a project.Both screenshots in the figures contain a panel on the left for the tasks or resources in the project and acorresponding chart in the area on the right. This house building project runs for about 20 weeks, butonly the first 7 weeks are shown in the charts. Some additional explanatory information is provided inthe callouts on the atorBlack barrepresentspercentage oftask completedDiagonal linesindicate a taskon critical pathNote ontask inthis rowFigure 1 Tasks in a ProjectGanttProject User GuideRelease 2.8
Get started6Red indicatesresource isutilized morethan 100%ResourceTasks forresourceGreen indicatesresource isutilized lessthan 100%Gray indicatesresource isutilized 100%Figure 2 Resources in a ProjectOverview of creating a project and adding tasks andresourcesThe recommended main steps for creating a project and adding tasks and resources to it are presentedhere. Note that resources are typically used for people who complete tasks but could be for things, suchas equipment or materials, that are needed for tasks.1. Project: Create a project, as described in To create a project.2. Resource roles: If you want to assign roles, such as developer and tester, to resources, then firstadd them to the project, as described in To add resource roles.3. Resources: If you want to assign resources to tasks, then add resources, as described in To add aresource.4. Tasks: Add tasks, as described in To create a task. You can create links between tasks when youcreate them or afterward in the following step.GanttProject User GuideRelease 2.8
Projects75. Links: If you did not add all needed links in the previous step, then link tasks, as described in Tolink tasks.ProjectsBefore creating a task schedule and associated needed resources, you first create a project that willcontain them. In a project, you can also create resource roles, such as developer and tester, which youcan assign to resources. Also, you can create a calendar of holidays and nonwork days. After creating aproject, you then save this information in a project file.Creating a projectYou can create a project that contains the name of the project, resource roles, which you can assign toresources, and a calendar of holidays and nonwork days. Later you can add tasks and associatedresources to the project.To create a project1. Select Project New or Ctrl N.2. In the dialog box, enter a name for the project and other information as needed.3. Select Next.4. (Optional) Select from available role sets to add the included roles to the project. You can hoverover a role set to see the included roles.5. Select Next.6. Configure holidays and nonwork days for the project as needed. Tip: You can also import a holiday calendar, as described in To import a holiday calendarin an iCalendar file.7. Select OK.Changing project propertiesYou can change a project’s name and various items used in a project. This includes resource roles, suchas developer and tester, and a calendar of holidays and nonwork days.To change project name and description1. Go to Project Properties.2. Change the Name, Description, and other items as needed.3. Select OK.To change project calendar1. Go to Project Properties.2. Go to the Calendar tab.3. Change information on nonwork days, including weekends and holidays, as needed. Tip: You can also import a holiday calendar, as described in To import a holiday calendarin an iCalendar file.4. (Optional) Change the project start date.5. Select OK.GanttProject User GuideRelease 2.8
Resources8To add resource roles1. Go to Project Properties.2. Go to the Resource roles tab.3. Select the row at the bottom that contains Type new role name here.4. Enter the name of the role, such as developer or tester, and then select the Enter key. To enteradditional roles, repeat this step.5. Select OK.To delete resource roles1. Go to Project Properties.2. Go to the Resource roles tab.3. Select the role that you want to delete.Warning: To avoid errors, do not attempt to simultaneously delete multiple roles.4. Select Delete.5. If you want to delete more roles, repeat the previous two steps.6. Select OK.Opening and saving a projectYou can open or save a project file in your file system. Project files are stored in GanttProject files, whichhave a .gan suffix, or XML files, which have a .xml suffix.To open a project Go to Project Open.To save a project Select Project Save or Project Save As.ResourcesResources are typically used for people who complete tasks but could be for things, such as equipmentor materials, that are needed for tasks. You can create resources and roles for them, such as developerand tester. Later, when you create tasks, you can assign these resources to them.Resource rolesYou can create resource roles, such as developer and tester, and then assign these roles to resources.These roles are maintained in a project’s Properties. For information on adding and deleting resourceroles, see the subsections on roles in Changing project properties.Adding, modifying, deleting, and e-mailing a resourceYou can add, modify, and delete resources. Also, you can initiate the creation of an e-mail message to aresource from within GanttProject.To add a resource1. Go to the Resources Chart tab.GanttProject User GuideRelease 2.8
Resources92. Do one of the following: Select New Resource , Ctrl H, or Resources New Resource. Right-click in the resource panel and then select New Resource.3. Enter the name of the resource.4. Enter other information as needed, including for the following: Default role: Select a role for the resource.Note: For information on adding roles to a project, see To add resource roles. Standard rate: Enter a daily pay rate for the resource. A currency value is not defined,and it is recommended that you consistently use the same currency in a project.Note: The calculated cost of a task, which is partially based on the rates ofresources, is displayed in the Properties for a task in the Resources tab.5. (Optional) To enter days that the resource will be unavailable, select and then populate theDays off tab.6. (Optional) To create custom columns that will be displayed in the resource panel, go to theCustom Columns tab and then do the following:a. Select Manage columns.b. Select Add.c. Enter the name of the column and then select the Enter key.d. (Optional) Change the Column type and enter a Default value.e. (Optional) Add more columns by repeating the previous three steps.f. Select OK.7. Select OK to complete the addition of the resource.8. (Optional) To move the new resource up in the list of resources, select Move resource upinthe upper left part of the resource panel.To modify a resource1. Go to the Resources Chart tab.2. Double-click the resource that needs to be modified.3. Change the contact information, role, pay rate, days off, and other information as needed.4. Select OK.To delete a resource1. Go to the Resources Chart tab.2. Select the resource to delete.3. Select Delete resourceor the Delete key.Warning: There is not a confirmation step for this delete operation. However, if aresource is accidentally deleted, you can restore it by selecting Undo.To e-mail a resource1. Go to the Resources Chart tab.2. Select the resource to e-mail.3. Right-click on the selected resource and select Send an e-mail. A message composition windowwill open using your default e-mail program. Note that the e-mail address used is taken from theMail entry in the resource’s Properties.GanttProject User GuideRelease 2.8
Tasks10Changing the listed order of a resourceYou may want to list the resources in the resource panel in a specific sequence, such as alphabetically,or group them based on roles. To do this, you can change the order of resources.To change the listed order of a resource1. Go to the Resources Chart tab.2. Select the resource to move.3. In the upper left part of the resource panel, select Move resource updownas many times as needed.or Move resourceTasksYou can create and link tasks that you want to track in a project. Also, to organize tasks and bettervisualize projects that contain many tasks, you can create summary tasks that contain subtasks.Additionally, you can show the critical path through the tasks in a chart to see the tasks that determinewhen a project completes. You can also create baselined copies of a chart and then later display acomparison of one to a changed version of the chart, such as after some tasks are delayed.Creating a taskWhen you create a task, you can select dates for it, such as for starting and completing the task, createlinks from other tasks, and select resources needed for the task.To create a task1. Go to the Gantt tab.2. If you want to create the task directly below an existing task in the task panel, select that task.Otherwise, the task will be created at the bottom of the current list of tasks.3. Do one of the following: Select New task , Ctrl T, or Tasks New Task. Right-click in the task panel or chart and select New task.4. Enter the name of the task and then select the Enter key. Tip: If you select Alt Enter here instead of Enter, you can skip the next step.5. Double-click the new task to open it.General tab: Enter dates and general task information6. Change values as needed, including for the following: Milestone: Select if this task is a milestone task. A milestone task is displayed as adiamond in the task chart, and its name is displayed immediately above the milestone’sdate on the timeline at the top of the task chart. Additionally, the Duration for amilestone is set to 1 and cannot be changed. Note that you may want to use a uniquecolor for a milestone by using the Colors control, as described in this subsection on theGeneral tab. Scheduling options in this dialog box: Select this link to choose whether the Begin date,End date, or Duration is calculated. You enter values for the two items not calculated.Duration is in days.GanttProject User GuideRelease 2.8
Tasks11 Earliest begin: Select if there is a restriction on the earliest date the task can start. Also,select the associated Copy begin date link to use the value of the task’s Begin date. Priority: Select the priority of the task. The priority can be displayed as a small coloredcircle in the Priority column in the task panel. The priority colors are as follows:PriorityLowest and LowNormalHigh and HighestColor Displayed in Priority ColumnGreenBlueRedFor information on displaying the Priority column, see To show or hide task or resourcecolumns. Progress: Enter a value from 0 to 100 to indicate the percentage of the task that hasbeen completed. In the task chart, a horizontal black bar is displayed inside the task, andthe length of the bar corresponds to this percentage. Show in timeline: Select to display the task name immediately above the task’s startdate on the timeline at the top of the task chart. Shape: To make a task appear unique, select a pattern to fill the task bar in the taskchart. Colors: To make a task appear unique, select the Choose link to set the color of the taskin the chart. In this dialog box, multiple color models are available to specify a color, asindicated by the tab names. Select a color in one of the tabs and then select OK.7. Enter values in the remaining tabs or select OK if done.Predecessors tab: Create links from other tasks8. To create links from other tasks, go to the Predecessors tab.9. Select Add.10. Select the Task name of the predecessor or other task.11. Change other values as needed: Type: To change the type of link, select the default value in the Type cell, and thenselect a link type from the list. The following types are available, and the descriptionsare for the case when the Delay is at its default value of 0.Link TypeFinish-StartDescriptionThe added task must finish at the same time or before thetask being created starts. This is the default and is typical.Finish-Finish The added task must finish at the same or before the taskbeing created finishes.Start-Finish The added task must start at the same time or before thetask being created finishes. Note that this is rare.Start-StartThe added task must start at the same time or before thetask being created starts. Delay: To change the delay (or lag time) between the added task and the task beingcreated, double-click the default delay value and enter the number of days for thedelay. This time can be a positive or negative value. A negative value can be used, forexample, to have the task being created start a specified number of days before theadded task finishes.GanttProject User GuideRelease 2.8
Tasks12 Link hardness: To change the amount of flexibility in the time between the tasks, selectthe default value in the Link hardness cell, and then select a value from the list. Thefollowing values are available:Link hardnessStrongRubberDescriptionThere is no flexibility in the time between tasks. Forexample, if the Type of link is Finish-Start and the Delay is 2days, then the task being created must start exactly 2 daysafter the added task finishes. Solid lines are used for Stronglinks in the task chart.There is flexibility in the time between tasks. For example, ifthe Type of link is Finish-Start and the Delay is 2 days, thenthe task being created can start 2 or more days after theadded task finishes. This also means that the added task canfinish 2 or more days before the start of the task beingcreated. Dashed lines are used for Rubber links in the taskchart.Note: The default value for Link hardness is configured in GanttProject’ssettings, as described in To change Gantt chart settings.12. (Optional) Add more linked tasks by repeating the previous three steps.13. Enter values in the remaining tabs or select OK if done.Resources tab: Select resources needed for task14. To select resources needed for the task, go to the Resources tab.15. Select Add.16. Select the Resource name of the resource.17. Change other values as needed: Unit: Enter the percentage of time that a resource, such as a person, will spend on thetask. Note that if a value over 100 is entered, the resource will be displayed asoverloaded in the resource chart. Coordinator: Select if the resource is the coordinator for a task. This can be significant incases in which multiple people are resources for a task. Role: To change the role of the resource, select the default value in the Role cell, andthen select a role from the list.Note: For information on adding roles to a project, see To add resource roles. Task cost: Select the way the task cost is determined. The Calculated method displays acost that is the sum of all the costs of the resources supporting the task. The cost of aresource is calculated using the following formula:Resource Cost Task Duration Resource Pay Rate Percent of Resource TimeThe source of the terms used in this formula are as follows:Task Duration: The value of Duration, which is in days, is in the task’s Generaltab.Resource Pay Rate: The value of Standard rate is in the Properties of theresource.GanttProject User GuideRelease 2.8
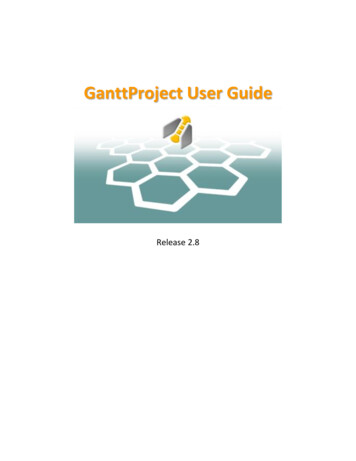
Tasks13Percent of Resource Time: The value of Unit is in this tab on Resources.A currency value is not defined for costs and resource rates, and it is recommended thatyou consistently use the same currency in a project. Tip: You can display a Cost column in the task panel that contains costs for tasks.For more information, see To show or hide task or resource columns.18. (Optional) Add more resources by repeating the previous three steps.19. Enter values in the remaining tab or select OK if done.Custom Columns tab: Create custom task columns for task panel20. To create custom columns that will be displayed in the task panel, go to the Custom Columnstab.21. Select Manage columns.22. Select Add.23. Enter the name of the column and then select the Enter key.24. (Optional) Change the Column type and enter a Default value.25. (Optional) Add more columns by repeating the previous three steps.26. Select OK to complete the creation of the columns.27. Select OK to complete the creation of the task.Creating a summary taskIf you have a group of related tasks, you can create a summary task that contains them. A summary taskcan be expanded or collapsed in the task panel and can contain other summary tasks. Consequently, youcan use summary tasks to organize and better visualize projects that contain many tasks. An examplesummary task that contains three subtasks is shown here.To create a summary task containing subtasks1. Go to the Gantt tab.2. Go to Tasks New Task.3. Enter the name of the summary task and then select the Enter key.4. Do one of the following, depending on whether you prefer to drag subtasks to the summary taskor select subtasks and indent them under the summary task. Drag method:a. Select one or more tasks that you want to have as subtasks. Use and continue tohold Shift and click to select two or more consecutive rows, or use and continueto hold Shift, Ctrl, and click to select two or more non-consecutive rows.b. Drag the selected task or tasks to the summary task. Indent method:GanttProject User GuideRelease 2.8
Tasks14a. Select Move task upas many times as needed until the summary task is rightabove the task or tasks that are to be subtasks.b. Select the task or tasks below the summary task that are to be subtasks. UseShift and click to select two or more consecutive rows.c. In the upper left part of the task panel, select Indent .Modifying or deleting tasksYou can modify a task or delete tasks. If you want to change the dates or duration of a task, then youneed to consider if they are constrained by links to other tasks. If they are, you need to change the datesfor the other tasks or change the Link hardness for links to Rubber. Link hardness is specified in a task’sProperties in the Predecessors tab.To reschedule a task or change its duration1. Go to the Gantt tab.2. Do one of the following, depending on whether you prefer to make the change in the task chartor task properties: Task chart: Select Ctrl and drag the task to the left or right to reschedule it, or select theright edge of the task and drag it to the left or right to change its duration. Task properties:a. Double-click the task that needs to change.b. Change the Begin date, End date, or Duration as needed. Note that as per theScheduling options in this dialog box link, either Begin date, End date, orDuration is calculated based on values you enter for the other two. Duration isin days.c. Select OK.To change the resources needed for a task1. Go to the Gantt tab.2. Double-click the task that needs to change.3. Go to the Resources tab.4. Do one of the following, depending on whether you want to add, change, or delete a resource: Add resource:a. Select Add.b. Select the Resource name of the resource.c. (Optional) Change other attributes as needed. For information on theseattributes, see the subsection on the Resources tab in To create a task. Change resource:a. In the row of the resource to change, select the resource in the Resource namecell, and then select a new resource.b. (Optional) Change other attributes as needed. For information on theseattributes, see the subsection on the Resources tab in To create a task. Delete resources:a. Select one or more resources. Use Shift and click to select two or moreconsecutive rows, or use Shift, Ctrl, and click to select two or more nonconsecutive rows.b. Select Delete.5. Select OK.GanttProject User GuideRelease 2.8
Tasks15To change task properties1. Go to the Gantt tab.2. Double-click the task that needs to change.3. Change the priority, progress, predecessor links, and other information as needed. Forinformation on the description of items in a task, see To create a task.4. Select OK.To delete tasks1. Go to the Gantt tab.2. Select the task or tasks to delete. Use Shift and click to select two or more consecutive rows, oruse Shift, Ctrl, and click to select two or more non-consecutive rows.3. Select Delete taskor the Delete key.Changing the listed order of tasksTo better organize tasks listed in the task panel, you can change their order.To change the listed order of tasks1. Go to the Gantt tab.2. Select the task or tasks to move. Use Shift and click to select two or more consecutive rows.3. In the upper left part of the task panel, select Move task upor Move task downas manytimes as needed. Tip: To sort all tasks by date, select the column heading of Begin date or End date in the taskpanel.Linking and unlinking tasksYou can link tasks by adding them to the Predecessors tab in a task’s Properties when you create a task,as described in To create a task. Also, you can link tasks after you have created them without using thistab, as described here.To link tasks1. Go to the Gantt tab.2. Do one of the following, depending on whether you prefer to create the link by drawing it in thetask chart or selecting tasks in the task panel: Task chart: Click on a task and drag the link arrow to another task. Task pa
project, you then save this information in a project file. Creating a project You can create a project that contains the name of the project, resource roles, which you can assign to resources, and a calendar of holidays and nonwork days. Later you can add tasks and associated resources to the project. To create a project