Transcription
Special Edition Includes:Dr. Ellington Darden’sSix Week Fast Fat Loss –Body Leanness ProgramThe Bowflex Ultimate 2Owner’s Manualand Fitness Guide (Shown with optional accessories)WWW BOWFLEX COM000-4302-091530.D
iOwner’s Manual and Fitness Guide Table of ContentsSafety Precautions . . . . . . . . . . . . . . . . . . . 1Get To Know Your Bowflex Ultimate 2. . . . . . . 2Using Your Bowflex Ultimate 2 . . . . . . . . . . . . 3About Your Bowflex Ultimate 2 Attachments . . . . 7Defining Your Goals . . . . . . . . . . . . . . . . . . . 13Exercising Properly . . . . . . . . . . . . . . . . . . . 15The Workouts . . . . . . . . . . . . . . . . . . . . . . 16Chest ExercisesBench Press . . . . . .Chest Fly . . . . . . .Decline Bench Press .Incline Bench Press. .Resisted Punch . . . .Lying Cable CrossoverDecline Chest Fly . . .22222323242425Shoulder ExercisesRear Deltoid Rows . . . . . . . .Standing Lateral Shoulder RaiseSeated Shoulder Press . . . . . .Front Shoulder Raise . . . . . . .Shoulder Extension . . . . . . .Shoulder Shrug . . . . . . . . . .Scapular Protraction . . . . . . .Scapular Depression . . . . . . .Lying Front Shoulder Raise . . .Reverse Fly . . . . . . . . . . . .Seated Lateral Shoulder Raise .Scapular Retraction . . . . . . .Rotator Cuff External Rotation .Rotator Cuff Internal Rotation . .Stiff Arm Pulldown . . . . . . . .262627272828292930303131323233. . . . . . . . . .Grips. . . . . . . . . . . . .3434353536363737Back ExercisesLying Lat Pulldowns . . . . .Low Back Extension . . . . .Wide Pulldowns . . . . . . .Narrow Pulldowns with HandSeated Lat Rows . . . . . . .Reverse Grip Pulldowns . . .Standing Lat Row. . . . . . .Wide Pulldowns with Grip . .Arm ExercisesTriceps Pushdown . . . . . . . . . . . . . . . . . . 38French Press . . . . . . . . . . . . . . . . . . . . . 38Arm Exercises (continued)Lying 45 Triceps Extension . . . .Cross Triceps Extension . . . . . .Standing Biceps Curl . . . . . . . .Seated Biceps Curl . . . . . . . . .Preacher Curl . . . . . . . . . . . .Reverse Tricep Pushdown . . . . .Standing Biceps Curl with PulleysTricep Kickback . . . . . . . . . . .Lying Biceps Curl . . . . . . . . . .Seated Wrist Extension . . . . . .Standing Wrist Curl . . . . . . . .Reverse Curl . . . . . . . . . . . .Seated Wrist Curl . . . . . . . . . .Standing Wrist Extension . . . . .“Rope” Pushdowns . . . . . . . .Resisted Dip. . . . . . . . . . . . .39394040414142424343444445454646Abdominal ExerciseReverse Crunch . . . . . . . . . . . . . . . . . . . .Resisted Reverse Crunch . . . . . . . . . . . . . .Seated (Resisted) Abdominal Crunch . . . . . . .Seated (Resisted) Oblique Abdominal Crunch. . .Ab Crunch using optional Ab Crunch Attachment.Trunk Rotation . . . . . . . . . . . . . . . . . . . .474748484949Leg ExercisesLeg Extension. . . . . . . . . .Lying Leg Extension . . . . . .Squat using Squat AttachmentLunge . . . . . . . . . . . . . .Ankle Eversion . . . . . . . . .Ankle Inversion . . . . . . . . .Standing Hip Extension . . . .Standing Hip Abduction . . . .Seated Hip Adduction . . . . .Seated Hip Abduction . . . . .Standing Leg Kickback . . . . .Seated Calf Press . . . . . . . .Dorsi Flexion . . . . . . . . . .Leg Press . . . . . . . . . . . .Standing Calf Press . . . . . .Standing Hip Flexion . . . . . .Wide Squat . . . . . . . . . . .Leg Curl Knee Flexion . . . . .505051515252535353545555565657575859.Muscle Chart . . . . . . . . . . . . . . . . . . . . . . 60The Bowflex Body Leanness ProgramBy Ellington Darden, Ph.D. . . . . . . . . . . . . . . 61Bowflex Ultimate 2 Warranty . . . . . . . . . . . . . 81Bowflex Ultimate 2 Warranty Card . . . . . . . . . . 83
Safety Precautions1sAlways read and follow the Warning and Safetylabels attached to your Bowflex Ultimate 2.Do not remove these labels. If you needreplacement labels, please call a Nautilus Representative at (800) 605-3369.s2EAD THE OWNER S MANUAL AND FOLLOW IT CAREFULLYbefore using the machine.s0ARENTS AND OTHERS IN CHARGE OF CHILDREN SHOULDbe aware of their responsibility, because thenatural play instinct and the fondness forexperimenting of children can lead to situationsand behavior for which the training equipment isnot intended.s.EVER ALLOW CHILDREN TO USE THE BowflexUltimate 2 unsupervised. To do so couldresult in injury. If children are allowed to usethe equipment, their mental and physicaldevelopment should be taken into account.They should be controlled and instructed onthe correct use of the equipment.s4HIS EQUIPMENT IS UNDER NO CIRCUMSTANCESSUITABLE AS A CHILDREN S TOY s)NSPECT YOUR MACHINE FOR ANY WORN OR LOOSEcomponents prior to use. Tighten or replaceany worn or loose components prior to use.Pay close attention to cables, or belts andtheir connections.s.EVER USE DUMBBELLS OR OTHER WEIGHT EQUIPMENTto incrementally increase the weight resistance.Use only the Power Rod units that came withyour Bowflex Ultimate 2.s3ET UP AND USE YOUR Bowflex Ultimate 2 on ahard, level surface.s O NOT WEAR ANY LOOSE OR DANGLING CLOTHING ORjewelry while using the Bowflex Ultimate 2.Stand clear of all moving components.s"EFORE BEGINNING ANY EXERCISE PROGRAM CONSULTyour physician or health care professional.Only he or she can determine the exerciseprogram that is appropriate for your particularage and condition. If you experience any lightheadedness, dizziness, or shortness of breathwhile exercising, stop the exercise and consultyour physician.s4HIS MACHINE IS MEANT FOR INDIVIDUAL CONSUMERuse only, and is not meant for use byinstitutions.s-AXIMUM USER WEIGHT FOR THE "OWFLEXUltimate 2 is 300 pounds (136 kg). For yoursafety, do not use or allow others to use theBowflex Ultimate 2 if they weigh in excess of300 pounds (136 kg).s!LLOW A WORKOUT AREA OF AT LEAST v X v m x 2 m) of free space for safe operation of theBowflex Ultimate 2.s EEP YOUR BODY WEIGHT CENTERED ON THEmachine, seat, or base frame platform whileexercising.s7HEN USING THE "OWFLEX 5LTIMATE 2 home gymfor standing leg exercises, always grasp the LatTower on your machine for stability.s EEP OUT OF THE PATH OF THE 0OWER 2OD unitswhen exercising and make certain that observersalso stand clear of the Bowflex Ultimate 2 whenthe Power Rod units are in use.s.EVER MOVE OR ADJUST THE SEAT WHILE SITTING ON IT Never stand on the seat.s7HEN HOOKING UP 0OWER 2OD units do notstand directly looking over the top of the rods.Stand off to the side while attaching rods.s.EVER ATTEMPT TO EXERCISE WITH MORE RESISTANCEthan you are physically able to handle.s EEP CABLES AND 0OWER 2OD units bound withthe rod binding strap when not in use.s"EFORE EXERCISING MAKE SURE THE CABLE PULLEYsystem is properly secured, properly attached,and in perfect working condition.s!LL EXERCISES IN THIS MANUAL ARE BASED ON THEcalibrated resistance and capacity levels ofthe Bowflex Ultimate 2. Exercisesnot in this manual are not recommended bythe manufacturer.s.EVER ATTEMPT TO EXERCISE WHILE THE SEAT RAIL ISin the folded position unless you are specificallyinstructed to do so.
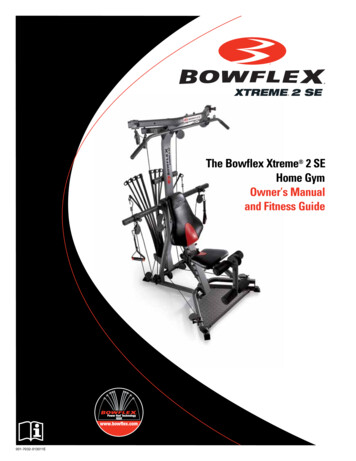
2Get to Know Your Bowflex Ultimate 2Please take your time to read through theentire manual and follow it carefully beforeattempting to use your Bowflex Ultimate 2.Also locate and read all warning labels thatARE POSTED ON THE MACHINE )T S IMPORTANT TOunderstand how to properly perform eachexercise before you do so using Power Rod Resistance.SquatAttachmentPreacher CurlAttachmentAb CurlAttachment(optional)Bowflex Ultimate 2 Parts Reference GuideLat Bar Rests6ERTICAL -AIN &RAMELat BarRod HookCableBenchAdjustablePulley SystemPreacher CurlAttachmentPulley FrameRod BoxSeatPulleyHand Grip/Ankle CuffLeg Extension/Leg Curl AttachmentSpring LockSeat PinSeat RailStanding/Squat Platform
3Using Your Bowflex Ultimate 2 Power Rod ResistanceThe Power Rod units are made from a specialcomposite material. Your rods are sheathedwith a protective black rubber coating. Each rodis marked with its weight rating on the “RodCap”.Hooking up the closest rod first prevents rodsfrom crossing over the top ofone another.SafetyWhen hooking the PowerRod units to the cablehooks, do not standdirectly over the tops ofthe rods. Stand off to oneside when connectingand disconnecting thePower Rod units from thecables.Adjusting AndUnderstandingThe ResistanceThe Bowflex Ultimate 2comes with 310 lb. (140 kg)of nominal resistance {onepair of 5 lb. (2.25 kg) rods,two pairs of 10 lb. (4.5 kg)rods, one pair of 30 lb. (13.5kg) rods, and two pairs of50 lb. (22.5 kg) rods}. If youupgraded to a 410 lb. (185kg) capacity, you will havean additional pair of 50 lb. (22.5 kg) Power Rod units.Note: The actual resistance supplied by therods can vary because ofenvironmental conditions,such as temperature orhumidity.Hooking The Power Rod Units To The CablesYou may use one rodor several rods incombination, to createyour desired resistancelevel.To hook multiple rods upto one cable, bend theclosest rod toward thecable and place the cablehook through that rodcap. You can then hook up the next closest rodthrough the same cable hook.When You Are NotUsing YourBowflex Ultimate 2Disconnect thecables from thePower Rod unitswhen your are notusing your BowflexUltimate 2. Use therod binding strapincluded with yourmachine to bind allthe rods together atthe top. You can alsoplace your cablesand grips through the strap to keep them outof the way.To upgrade to 410 pounds(185 kg) of Power Rod Resistance pleasecall 1-800-663-6315
4Using Your Bowflex Ultimate 2Folding & Moving Your Bowflex Ultimate 2Folding and moving your BowflexUltimate 2 is easy. Follow the simplesteps below to fold your BowflexUltimate /NCE IT S FOLDEDsimply roll it away.1. Remove all attachments andthe bench from the machine.2. Lock the sliding seat in theforward locked position.3. Lift the seat rail (toward thePower Rod units) and lock itin the upright position usingthe rail securing device.4. Fold the rail supportleg down.5. Squeeze the platformrelease handle and lift theplatform (toward the Power Rod units) untilit locks in the upright position.Maintenance & Care of Your Bowflex Ultimate 2Inspect your machine for any worn or loosecomponents prior to use. Tighten or replaceany worn or loose components prior touse. Pay close attention to cables, or beltsand their connections.Clean the bench with a non-abrasive householdcleanser after each use. This will keep it lookingnew. Do not use automotive cleaner, which canmake the bench too “slick.”Review all warning notices. The safety andintegrity designed into a machine can only bemaintained when the equipment is regularlyexamined for damage and repaired. It is thesole responsibility of the owner to ensurethat regular maintenance is performed. Wornor damaged components shall be replacedimmediately or the equipment removed fromservice until the repair is made. Only manufacturersupplied components shall be usedto maintain/repair the equipment.If you have any questions regarding your Bowflex Ultimate 2, please call our Customer ServiceDepartment at 1-800-605-3369 or by mail at: 16400 SE Nautilus Drive, Vancouver, WA 98683.Unfolding Your Bowflex Ultimate 2To fold or unfold the Bowflex Ultimate 2 simplygrasp the metal bar and plastic handle and squeezethem together to retract the locking pins. Whenfolding the Front Base, release the plastic handlewhen the base is vertical and make sure it lockssecurely into place.With use, the cables can stretch and the lockingpins may not engage. If you experience problemswith getting pins to lock into place when foldingor unfolding the machine, refer to your assemblymanual for instructions on how to adjust the thecables.
Using Your Bowflex Ultimate 25 The Workout BenchYour Bowflex Ultimate 2 home gym has fourdifferent bench positions. To adjust the bench,simply locate the spring lock pin on the side of theseat. Pull out pin to release seat, then slide it to thedesired position. Pull out pin, give it half a turn, andrelease to place it in a “free sliding” position forexercises such as rowing.Quick Release Bench: The long portion of yourbench attaches to and releases from the seatportion very easily. To attach it, simply insert thehalf hinge on the end of the bench into the halfhinge on the seat. For standing exercises, simplyremove the bench by lifting up on the long portionand pulling away from the seat.Flat Position:Along the sideof the seat railthere are threeholes for thespring lock seatpin. Pull outon the pin andUsing the Bowflex Ultimate 2Hand GripsThe Bowflex Ultimate 2hand grips can be usedas regular grips, handcuffs or ankle cuffs.slide the entire bench forward until the spring lockseat pin locks into a hole. With the bench in the flatposition, there are two possible holes for the springlock pin to lock into, oneforward and one back.Incline Position: Startwith the bench flat in thefurthest position awayfrom the Power Rod units.Pull out on the springlock seat pin and lift thelong bench pad up. Slideforward until the pin locksinto the farthest forwardHOLE 2EST THE BENCH S INCLINE SUPPORT BRACKET ON THEbase of the Power Rod units.“Free Sliding”Position:Remove thelong benchpad. Pull outon the springlock seat pin,Regular Grip: Grasp the handleand cuff together to form a gripwithout inserting your handTHROUGH THE CUFF PORTION -OST OFthe exercises you perform utilizethis grip.Hand Cuff Grip: Slip your handthrough the cuff portion of thegrip so that the foam pad restson the back of your hand. Thengrasp the remainder of the gripthat is sitting in your palm. Thismethod of gripping is great forexercises like front shoulderraises or any exercise where yourpalm is facing down.Ankle Cuff Grip: The cuffopening can be made larger toaccommodate the ankle. Simplyinsert your hand in the cuff andslide it away from the handle.Insert your foot or ankle andtighten the grip by sliding thehandle back toward the cuff.Grips manufactured under license agreement with Hands-On Sports & Gym Accessories, Inc. Patent #4756527
6Using Your Bowflex Ultimate 2Using the Bowflex Ultimate 2 Leg Press BeltThe Leg Press Belt is usedexclusively for the Leg Press andthe Calf Raise exercises.s 7ITH THE Bowflex Ultimate 2seat adjusted to the “freesliding” position (spring lockseat pin unlocked), the handgrips removed, and the desiredamount of resistance hooked up,sit on the seat and position theleg press belt around your hips.s 0LACE HANDS ON VERTICALmain framepush yourself backwhile placing feet,one at a time, ontothe pulley frame.ands 'RASP BELTnear whereIT S ATTACHED TOthe cables andbegin to pressback.s 3LIDE FORWARD TO THE PULLEYS ANDplace your feet through the rightand left openings under the rodcables.s !TTACH THE ROD CABLES TO THED-rings on the Leg Press Belt sothat the belt is taut.Using the Bowflex Ultimate 2 Adjustable Pulley SystemUsing the Bowflex Ultimate 2 adjustable pulleysystem is as easy as pulling a pin and expandingthe pulley out.Pulley knobs are spring-loaded and are located onthe back of the adjustable pulley system. To extendthe pulley, simply twist the knob a couple of turnsto the left, then pull out. Next, pull the adjustablesleeve out away from the machine until it clicks intothe extended position. Then, tighten the knob tolock the adjustable pulley into position.The adjustable pulley system was designed tochange the angle ofresistance to increasethe effectiveness ofmany upper bodyexercises.Use the pulley systemin either the wideor narrow pulleyPOSITION 7E VEincluded a guidein each exercise so you can use the pulley at thecorrect position.To avoid injury, do not attempt to use the pulleyin the wide position when the manual indicates toperform the exercise in the narrow pulley position.-AKE CERTAIN THEadjustable pulley systemis locked and securebefore adding anyPower Rod resistanceto the pulley.Exercises in the wideposition may require alighter weight than thosein the narrow position.The Bowflex Ultimate 2adjustable pulley systemallows you to work the samemuscles from differentangles, depending on thewidth of the pulley angle.
7About Your Bowflex Ultimate 2 Attachments Using the Bowflex Ultimate 2 Leg Extension/Leg Curl AttachmentThe Bowflex Ultimate 2 leg extension/leg curlattachment is a gym-quality attachment that helpsyou develop strong, muscular legs.To set up for leg curls, simply remove the quickrelease bench and place it onto the hinge of the legextension/leg curl seat.With all Power Rod resistance off and with the benchin the incline position, move the attachmentto the end of the sliding seat rail anduse the spring lock seat pin to lock itinto position. Next, place the hookson the Leg Extension attachment overthe posts on the Seat Rail supportand press firmly down intoposition. Now, hook the cablesto the hooks at the bottom ofthe Leg extension attachment.The leg extension/leg curl attachment has fivepossible angles of adjustment. To rotate the arm, pulldown on the plastic handle (located just under thepivot point), rotate the arm up or down, and releasethe handle to lock the arm in your preferred position.Safety:s -AKE SURE THE ATTACHMENT IS COMPLETELY SEATED ONthe posts and the sliding seat is locked in positionbefore sitting on it or adding weight to the cables.To do a seated leg extension,place the hooks on the LegExtension seat attachmentover the posts at the top of theLeg Extension and place the cross brace on the seatframe in the bracket behind the sliding seat.Using a snap hook, attach the loops at the end of theleg attachment cables to the rod cables. Once thisis accomplished, you are ready to add Power Rod resistance to the attachment.1) Hook the LegExtension to theSeat Rail Support2) Hook the LegExtension Seat tothe Leg Extension3) Place the Benchon the Seat RailThe Bowflex Ultimate 2 Preacher Curl AttachmentThis attachment is specifically designed to give addedsupport for working the biceps. The attachment ismounted on the rear of the machine and serves tostabilize the arms to create a more effective exercise.To use the preacher curl attachment, first remove anyPower Rod resistance.Slide the seat all the way to the end of the seat rail anduse the spring lock seat pin to lock it into position. Next,place the hooks on the leg extension attachment overthe posts on the seat rail support and press firmly downinto position. Now, place the hooks on the preacher curlattachment over the posts at the top of the leg extensionand press firmly into position. Hook the two cables to thehooks at the bottom of the leg extension attachment. Usea snap hook to attach a curl bar to the strap between theroller pads.The leg extension/leg curl attachment has five possibleangles of adjustment. To rotate the arm, pull down on theplastic handle (located just under the pivot point), rotatethe arm up or down, and release the handle to lock thearm in your preferred position.Safetys -AKE SURE THE ATTACHMENTS ARE COMPLETELY SEATED ON THEposts and the sliding seat is locked in position beforesitting on it or adding weight to the cables.s "EFORE USING THEattachment makesure all fastenersare in place andtightened.s !LWAYS CHECKfasteners, snaphooks, cables andpulleys beforeeach workout toensure properfunctioning.1) Hook the LegExtension to theSeat Rail Support2) Hook thePreacher Curlto the LegExtension
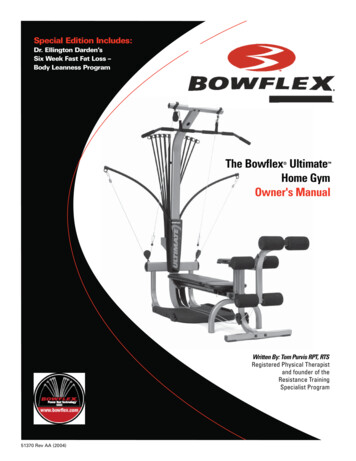
8About Your Bowflex Ultimate 2 AttachmentsUsing the Bowflex Ultimate 2 Squat AttachmentWARNING Failure to secure the Seat Rail Securing Device into the seat rail may cause injury.Figure 1It is important to lock the Seat Rail Securing Device into the SeatRail before performing the following exercises:ssssss3TANDING ,AT 2OW3TANDING "ICEPS #URL WITH PULLEYS3QUAT,UNGE3TANDING #ALF 0RESS7IDE 3QUATPart ALock the Seat Rail Securing DeviceFigure 2Step 1: Remove the Seat BackStep 2: Lock the Sliding Seat -AKE SURE THAT THE SLIDING SEAT LOCK HANDLE IS IN THE LOCKEDposition (Figure 1).Step 3: Lift the Seat Rail3-1 Bend at the knees and grab the Seat Rail with one hand andthe locked Sliding Seat with your other hand (Figure 2).3-2 Use your legs to lift the Seat Rail (Figure 3).3-3 With both hands, push the Seat Rail all the way up until thelocked Sliding Seat is touching the mast of the machine(Figure 4).Figure 3(Part A continued on page 2)Figure 4
About Your Bowflex Ultimate 2 Attachments Part A (continued)Lock the Seat Rail Securing DeviceStep 4: Secure the Seat Rail Securing Device4-1 Insert the Seat Rail Securing Device into the hole in theSeat Rail until it clicks (Figures 5, 6, 7).Step 5: -AKE SURE THAT THE 3EAT 2AIL IS SECURED 5-1 Stand to the side of the machine base and Seat Rail.WARNING Do not stand on the base below the Seat Railwhen you pull on it. This may cause injury.5-2 Pull down on the Seat Rail to make sure that the Seat RailSecuring Device is secured (Figure 8).Figure 5Seat RailSecuringDeviceSeat RailFigure 6Figure 7Figure 89
10About Your Bowflex Ultimate 2 AttachmentsUsing the Bowflex Ultimate 2 Squat AttachmentSafetyPart BAttach the Squat Frame-AKE SURE THE Seat Rail Securing Device lockssecurely into the seat rail. Hook the lower hooks onthe squat attachment onto the lower posts on thesliding seat frame, then rotate the squat frame upuntil it locks into position.Before attaching the cables you must position thesquat attachment into the lowest position on theseat rail. To do this, pull the spring lock seat pin outto the unlocked position and pull out on the releasehandle and rotate it forward to allow the squatattachment to slide along the seat rail. Now pushup slightly on the squat attachment to release thesafety lock and slide the squat attachment down tothe lowest position. Pull out on the release handleand rotate it back to the locked position. Finally,slide the squat attachment up until it locks into thelowest hole on the bottom of the seat rail. Now youcan extend the cables from the sliding pulleys onthe chest bar to the hooks on the sides of the squatattachment and add Power Rod resistance.s !LWAYS WEAR SHOESwith non-skidsoles whenusing the lowpulley/squat attachment.s !LWAYS ADJUST CABLE TRAVEL ANDtension of the squat harness insuch a manner that it will notcause a hazard.s !LWAYS CHECK FASTENERS SNAPhooks, cables and pulleys beforeeach workout to ensure properfunctioning.Use the squat attachment by squatting under thehandlebars with the shoulder pads resting on yourshoulders. Now pull out on the release handle androtate it forward to allow the squat to slide freelyalong the seat rail.1) Hook the Squat Attachmentto the Sliding Seat2) Fold Squat Attachment up.Squat Attachment willlock into place3) Attach the cables4) Unlock the Seat Pin
About Your Bowflex Ultimate 2 Attachments Part CRelease the Seat Rail Securing DeviceStep 1: Secure the Seat Rail Securing Device1-1 With your inside foot on the machine base, hold the SeatRail with one hand and push your shoulder into it lightly(Figure 9).1-2 Continue to hold the Seat Rail with one hand and yourshoulder. Use your free hand to unlock the Seat RailSecuring Device (Figures 9 and 10) until it releases (Figure11).Step 2: Lower the Seat RailFigure 92-1 When the Seat Rail Securing Device releases use bothhands to hold onto the Seat Rail (Figure 12).2-2Use both hands to carefully lower the seat downinto the horizontal position (Figure 13).WARNING Do not stand on the base below the Seat Railwhen you lower it. This may cause injury.Figure 10WARNING Always use both hands to lift and lower the SeatRail. Bend at the knees when lifting or setting down the SeatRail. Failure to use proper lifting techniques may cause injury.Figure 11Figure 12Figure 1311
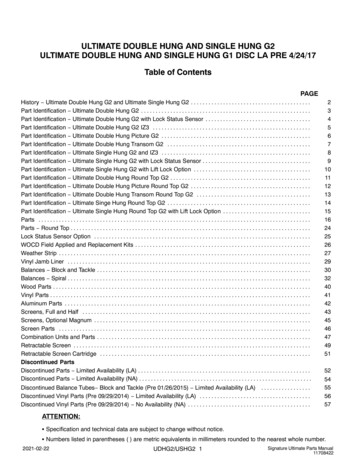
12About Your Bowflex Ultimate 2 AttachmentsThe Bowflex Ultimate 2 Ab Crunch Attachment (optional)To use the ab crunch attachment, slide the seat all theway to the end of the seat rail and use the spring lockseat pin to lock it into position. Next, place the hookson the ab crunch attachment over the posts on theseat rail support and press firmly down into position.Finally, hook the cables to the hooks at the bottom of1) Hook the Ab Crunch to theSeat Rail SupportSafetys -ake sure the attachment is completely seated onthe posts and the sliding seat is locked in positionbefore adding weight to the cables.s !LWAYS CHECK FASTENERS SNAPhooks, cables and pulleysbefore each workout toensure properfunctioning.2) Push firmly into placethe ab crunch cable.The Bowflex DVD Player (optional)The optional DVD player provides entertainmentduring your workout.To install the DVD player, remove the rubber coverfrom the fact plate and insert the DVD bracket intothe slots on the face plate. You can position theDVD player in three different viewing angles byusing the different positioning slots in the DVDbracket.To order the Bowflex DVD Player pleasecall 1-800-663-6315
Defining Your Goals139OUR BODY WILL DO WHAT YOU TRAIN IT TO DO 4HAT S WHY IT S IMPORTANT TO DEFINE YOUR GOALS AND FOCUS ON THOSEgoals. Here are some fitness components that will help you define your goals and choose your fitnessprogram.Muscle Strength is the maximum force you canThen practice the skill associated with your sport,exert against resistance at one time. Your musclelearning to apply this newly achieved power.strength comes into play when you pick up aBody Composition is the ratio of fat weight (fat) toheavy bag of groceries or lift a small child. It islean weight (muscles, bones and tissue). As youdeveloped when a localized muscle is worked bothage, the ratio shifts. The fat weight increases andpositively (concentric) and negatively (eccentric) atthe lean weight decreases. Training for musclea resistance great enough to perform only five tostrength will generally increase muscle size andeight repetitions of the exercise before the muscleaerobic conditioning will help burn extra calories.fails. Each set of repetitions is followed by a restPerforming these two forms of exercise, either atinterval that typically runs three times longer thandifferent times or together, will create the greatestthe set. Later, between exercise sessions, thechanges in body fat weight.muscle overcompensates for the stress and usuallyincreases in both strength and size.Balanced Strength and alignment is the resultof equal strength developed in all parts of theMuscle Endurance is the ability to perform repeatedbody. It comes into play in your standing andcontractions. It comes into play when you crosssitting posture, and in your ability to perform justcountry ski or work on your feet all day. Enduranceabout any activity safely and effectively. An overtraining addresses the slow twitch, endurancedevelopment of the back will round the shoulders;muscle fibers, which depend on oxygen for energy.weak or stretched abdominals can cause lowerTo develop muscle endurance, use low resistanceback pain. You want a balance of muscle strengthand high repetitions— about 15-20 repetitions inin front and back. In addition, you need a balanceeach set, three sets to each exercise, working theof strength between your middle, lower, and uppermuscle only to fatigue.body.Muscle Power is the combination of strength andFlexibility is the ability of a muscle or group ofspeed of the muscular contraction. This is oftenmuscles to move the joint through a full rangemisinterpreted as:of motion. Flexibility comes into play when youa) Being directly associated with certain skill orexecute an overhand serve or stretch for the topsport; and/orshelf in the kitchen. It is a cooperative movementof opposite muscle groups. When a muscleB -EANING THAT YOU MUST MOVE FAST contracts, its opposite muscle group must relaxfor the action to occur. Increased flexibility meansLoad is actually a more important factor thanan increased range of motion, made possible byspeed when attempting to improve power.this simultaneous contracting and relaxing. GoodWhen training to achieve muscular power, pick aflexibility is important in protecting the body fromresistance that fatigues you in the 3-5 repetitioninjury and can be achieved through the balancedrange. When performing these reps, it is morestrength training programs included in this manual.important to think of contracting the muscles fasterrather than attempting to move faster. PerformingCardiovascular Endurance is the ability of thesport simulation exercises usually results in aheart and lungs to supply oxygen and nutrientsdeterioration of the motor pattern or skill. Theto exercising muscles over an extended periodbiomechanically sound method of improving powerof time. It comes into play when you jog a milein your sport is to train for power using the corrector ride a bike. It is a critical component of overalljoint movements, as described in this manual.fitness and health. Any exercise program must be
14Defining Your Goalssupplemented with cardiovascular training, such asrowing on the Bowflex Ultimate 2.exercises that address compound joint movementsand single joint movements. In addition, selectexercises that address complementary musclegroups.Put first things first: During each session, first workthose muscle groups that need the most training.Reaching Your GoalsTo reach your goals you must follow a consistent,well designed program that provides balanceddevelopment to all parts of the body and includesboth aerobic and strength exercise. Only then willyou meet your goals safely and efficiently.The workout routi
1 s Always read and follow the Warning and Safety labels attached to your Bowflex Ultimate 2. Do not remove these labels