Transcription
The Bowflex Sport Home GymOwner’s Manualand Fitness Guide 51198 Rev B (06-19-06)
Table of ContentsSafety RequirementsSafety Warning LabelsGet to Know Your MachineHow to Use Your MachinePower Rod ResistanceAdjusting/Understanding The ResistanceHooking Power Rod Unit to CablesSafetyWhen You Are Not Using Your GymHow to Use Your MachineThe Workout BenchRemoving the BenchFlat Bench45 Incline BenchLeg ExtensionFree-Sliding SeatStoring Your Bowflex Sport Home GymMaintenance and CareHow to Use Your MachineAccessories and EquipmentUsing Your Leg Press Belt andSquat Bar PulleysBowflex Body Leanness ProgramPersonal Guarantee From Dr. Ellington DardenThe WorkoutsDefine Your GoalsWarm Up / Cool 3537Chest ExercisesShoulder Horizontal AdductionBench PressDecline Bench PressIncline Bench PressDecline Chest FlyIncline Chest FlyResisted PunchLying Cable Crossover383838393940404141Shoulder ExercisesRear Deltoid RowsStanding Lateral Shoulder RaiseSeated Shoulder PressFront Shoulder RaiseShoulder ExtensionShoulder ShrugScapular ProtractionScapular DepressionLying Front Shoulder RaiseReverse FlyShoulder Rotator CuffShoulder Rotator CuffSeated Lateral Shoulder RaiseScapular Retraction424242434344444545464647474848Back ExercisesLying Lat PulldownsLow Back ExtensionPulldownsNarrow Pulldowns with HandgripsLying Lat FlyLying Narrow Lat PulldownsSeated Lat RowsStiff-Arm PulldownBent Over Row49494950505151525253Arm ExercisesTriceps PushdownSingle Arm PushdownFrench PressLying Triceps ExtensionCross Triceps ExtensionLying 45o Triceps ExtensionSeated Triceps ExtensionStanding Biceps CurlSeated Biceps CurlLying Biceps CurlSeated Wrist ExtensionStanding Wrist CurlReverse CurlSeated Wrist CurlStanding Wrist Extension“Rope” l ExercisesReverse CrunchResisted Reverse CrunchSeated (Resisted) Ab CrunchSeated (Resisted) Oblique Ab CrunchTrunk Rotation626262636364Leg ExercisesLeg ExtensionSquatLying Leg ExtensionAnkle EversionAnkle InversionStanding Hip ExtensionStanding Hip ExtensionStanding Hip AbductionSeated Hip AdductionSeated Hip AbductionStanding Leg KickbackLeg PressProne Leg Curl6565656666676768686969707172Muscle ChartUS Warranty InformationContact Information73743
Product SpecificationsProduct Weight195 lbs. (88 kg)Product Dimensions90" L x 38" W x 83" H (229 cm L x 97 cm W x 211 cmFolded Footprint52" L x 38" W x 83" H (132 cm L x 97 cm W x 211 cmWorkout Area100" L x 78" W (254 cm L x 198 cm W)Number of ExercisesOver 60Power Rod Resistance210 lbs. (95 kg)Power Rod Upgradability310 lbs. (141 kg.)410 lbs. (186 kg.)User Weight Limit300 lbs. (136 kg)Regulatory Approvals:Meets:EN957-1 Class HEN957-2 Class HMeets:ASTM F2276-05ASTM F2216-05 USUS 4
Safety RequirementsIMPORTANT SAFETY INSTRUCTIONSThe following definition applies to the word “Warning” found throughout this manual:Used to call attention to POTENTIAL hazards that could resultin personal injury or loss of life.READ ALL INSTRUCTIONSBEFORE USING THE MACHINE. Always read and follow the Warning and Safetylabels attached to your Bowflex Sport homegym. Do not remove these labels. If you needreplacement labels, please call a NautilusRepresentative at 1-800-NAUTILUS (628-8458). Read the owner’s manual and follow it carefullybefore using the machine. Parents and others in charge of children should beaware of their responsibility, because the naturalplay instinct and the fondness for experimentingof children can lead to situations and behavior forwhich the training equipment is not intended. Never allow children to use the Bowflex Sport home gym unsupervised. To do so could result ininjury. If children are allowed to use the equipment,their mental and physical development should betaken into account. They should be controlled andinstructed on the correct use of the equipment. This equipment is under no circumstances suitableas a children’s toy. Inspect your machine for any worn or loosecomponents prior to use. Tighten or replace anyworn or loose components prior to use. Pay closeattention to cables, or belts and their connections. Never use dumbbells or other weight equipmentto incrementally increase the weight resistance.Use only the Power Rod unit that came with yourBowflex Sport home gym.Set up and use your Bowflex Sport home gym ona hard, level surface. Do not wear any loose or dangling clothing orjewelry while using the Bowflex Sport homegym. Stand clear of all moving components. Before beginning any exercise program consultyour physician or health care professional. Only heor she can determine the exercise program that isappropriate for your particular age and condition.If you experience any light-headedness, dizziness,or shortness of breath while exercising, stop theexercise and consult your physician. This machine is meant for individual consumer useonly, and is not meant for use by institutions. Maximum user weight for the Bowflex Sport home gym is 300 pounds (136 kg). For your safety,do not use or allow others to use the BowflexSport home gym if they weigh in excess of 300pounds (136 kg). Allow a workout area of at least 8’4” L x 6’6” W(2.6m x 2 m) of free space for safe operation of theBowflex Sport home gym. Keep your body weight centered on the machine,seat, or base frame platform while exercising. When using the Bowflex Sport home gym forstanding leg exercises, always grasp the Lat Toweron your machine for stability. Keep out of the path of the Power Rod unit whenexercising and make certain that observers alsostand clear of the Bowflex Sport home gymwhen the Power Rod unit is in use. Never move or adjust the seat while sitting on it.5
Safety RequirementsNever stand on the seat.6 When hooking up Power Rod caps, do not standdirectly looking over the top of the rods. Stand off tothe side while attaching rods. Never attempt to exercise with more resistance thanyou are physically able to handle. Keep cables and Power Rod unit bound with therod binding strap when not in use. Before exercising, make sure the cable pulley systemis properly secured, properly attached,and in perfect working condition.
Safety Warning LabelsThe following safety warnings are located on the Bowflex Sport exercise machine. Please readall safety precautions and warning information prior to using your product. Be sure to replace anywarning label if damaged, illegible, or missing. If you need replacement labels, please call a NautilusRepresentative at 1-800-NAUTILUS (628-8458).Label 1Label 2Label 3Label 5Label 4Home Gym7
Safety Warning LabelsThe following safety warnings are located in site specific areas on the unit. Please review and understand thesafety warning labels and their locations on the unit prior to use.If you do not have, or cannot find, or need to replace a warning label please call 1-800-NAUTILUS (1-800628-8458) to obtain a new label.Label 1: Please make sure all users read, understand, andfollow the warning labels on the home gym. SeeFigure 1 for general use safety label.Location: The warning label in Figure 1 is located on theback of the lat tower.Figure 1Label 2: See figure 2 for “Caution” safety label.Location: Left and right side of rod box.Figure 28
Safety Warning LabelsLabel 3: See Figure 3 for “Caution” safety label. Avoid crush hazardwhen folding the bench.Location: Top of the seat rail bracket.Figure 3Label 4: See Figure 4 for “Caution” safety label. Stay clearof the leg when folding the leg extension.Location: Back of rear leg of leg extension.Figure 4Label 5: See Figure 5 for “Caution” safety label.Location: Back of the lower lat tower, below chest bar.Figure 59
Get to Know Your MachineCONGRATULATIONS on your commitment to improvingyour health and fitness! With the Bowflex Sport home gym,you have everything you need to exceed all of your physicalfitness, strength and health expectations!The Bowflex Sport home gym’s exceptional resistance andquality is unmatched by any other single piece of home fitnessequipment available. You will not believe the amazing resultsyour body will get with the Bowflex Sport home gym!Please take your time to read through the entire manual andfollow it carefully before attempting to use your BowflexSport home gym. Also locate and read all warning labelsthat are posted on the machine. It’s important to understandhow to properly perform each exercise before you do so usingPower Rod Resistance.With all of the fitness choices available today, finding thebest workout equipment for your needs can be very confusing.Everyone at Nautilus would like to thank you for selecting theBowflex Sport home gym.Bowflex Sport home gym is the finest home fitness productavailable, and you’re just about to prove it to yourself.Home GymLat Cable StorageBent Lat BarUpperLat TowerPower Rod UnitLat Bar PulleyRod CapsRod HookLeg AttachmentCableRod BoxChest BarPulleySquat BarSquat Platformand Pulleys10Bench
How to Use Your MachinePower Rod ResistancePower Rod rods are made from a specialcomposite material. Your rods are sheathed with aprotective black rubber coating. Each rod is markedwith its weight rating on the “Rod Cap”.Adjusting AndUnderstandingThe ResistanceThe standard BowflexSport home gymcomes with 210 pounds(95 kg) of resistance(one pair of 5 lb. (2.25kg) rods, two pair of 10lb. (4.5 kg) one pair of30 lb. (13.5 kg) rods,and one pair of 50 lb.(22.5 kg) rods).If you upgraded to a 310lb. (140 kg) or 410 lb. (186 kg) capacity you will havean additional one or two pair of 50 lb. (22.5 kg) rods,respectively.When hooking the PowerRod caps to the cablehooks, do not standdirectly over the tops ofthe rods. Stand off to oneside when connecting anddisconnecting thePower Rod unit fromthe cables.When You Are NotUsing Your Bowflex Sport Home GymDisconnect the cables from the Power Rod unitwhen you are not using your Bowflex Sport homegym. Use the rod binding strap included withyour machineto bind all the rods together at the top. You can alsoplace your cablesand grips through thestrap to keep themout of the way.Hooking the Power Rod Unit to the CablesYou may use one rod orseveral rods in combination,to create your desiredresistance level.To hook multiple rods up toone cable, bend the closestrod toward the cable andplace the cable hook throughthat rod cap. You can thenhook up the next closest rodthrough the same cable hook.Hooking up the closest rodfirst prevents rods fromcrossing over the top of oneanother.To order additional50 lb. (22.5 kg) Power Rod setsplease call1-800-NAUTILUS(1-800-628-8458)Safety11
How to Use Your MachineThe Workout BenchYour Bowflex Sport home gym has a number of seatand bench positions: flat bench forward, flat bench back,45 incline and free-sliding seat extension.To adjust the seat, pull out the Seat Rail Knob, then slidethe seat to one of the three locking holes on the Seat Rail.Release the Seat Rail Knob to secure when finished.Removing the Bench:The Bench easily attaches and releases from the Seat. Toattach the Bench, insert the half hinge on the end of theBench into the half hinge on the seat. To remove theBench, lift up on the long portion and pull away fromseat.Flat Bench:The Flat bench position is used for most exercises. Youmay lock the bench into a Back (closestto Power Rod unit) or Forward(farthest from Power Rod unit) positionto accommodate height/reach needs.45 Incline Bench:Start with a flat bench, following theabove instructions to release and movethe seat and bench. Lift the bench whilesliding the seat toward the Power Rod unit until the bench back is restingagainst the Lat Tower.Leg Extension:Refer to page A-12 of the AssemblyManual for instructions on installing theLeg Extension Seat.Free-Sliding Seat:Remove the Bench, pull out the SeatRail Knob, give it half a turn and releaseto place the Seat in a “free sliding” position for AerobicRowing.Storing Your Bowflex Sport Home GymFolding your Bowflex Sport home gym for storage iseasy.1) Lock the Seat and Bench into the flat position.2) Remove all Power Rod resistance and thenbind the Power Rod unit with the rod bindingstrap.123) Ensure that the Leg Extension Lock-out Pin isinstalled. (Refer to page A-9 for instructions.)4) Remove the Seat Rail Knob from the seat rail.5) Tilt the bench toward the Power Rod unit.6) While holding the Rear Leg with one hand,disengage the seat Rail Pull Pin to allow the RearLeg to fold against the Seat Rail. (See figure 8b onpage A-7.)7) Secure the bench by inserting the Seat RailKnob into the hole in the side of the Seat RailBracket.Maintenance and Care of Your BowflexSport Home GymInspect your machine for any worn or loose componentsprior to use. Tighten or replace any worn or loosecomponents prior to use. Pay closeattention to cables, or belts and theirconnections.Clean the bench with a non-abrasivehousehold cleanser after each use. Thiswill keep it looking new. Do not useautomotive cleaner, which can make thebench too “slick.”Review all warning notices. Thesafety and integrity designed into amachine can only be maintained whenthe equipment is regularly examinedfor damage and repaired. It is the soleresponsibility of the owner to ensurethat regular maintenance is performed.Worn or damaged components shall bereplaced immediately or the equipmentremoved from service until the repairis made. Only manufacturer suppliedcomponents shall be used to maintain/repair the equipment.If you have any questions regarding your BowflexSport home gym, please call our Customer ServiceDepartment at 1-800-NAUTILUS (628-8458) or by mailat: 16400 SE Nautilus Dr., Vancouver, Washington, USA98683.
How to Use Your MachineAccessories and EquipmentHand Grips:The Hand Grips fit snugly around your hand, ankle, or wrist. Attach the pulley cable clips tothe D-Rings on the Hand Grips to attach them to the cables.Standard Grip: Grasp the grip and cuff together to form a gripwithout inserting your hand through the cuff portion. Most of theexercises you perform utilize this grip. The Standard Grip also isused for Hammer Grip exercises, when you need to hold the HandGrip vertically for greater wrist support.Hand Cuff Grip: Slip your hand through the cuff portion of the grip so that the foam padrests on the back of your hand. Then grasp the remainder of thegrip that is sitting in your palm. This method of gripping is great forexercises like front shoulder raises or any exercise where your palmis facing down.Ankle Cuff Grip: The cuff opening can be made larger toaccommodate the ankle. Place your hand in the cuff and slide itaway from the grip. Insert your foot or ankle and tighten by slidingthe grip back toward the cuff.Lat Cross Bar: The Lat Cross Bar enhances exercises that work back, shouldersSafety:and triceps muscles. Before using the Lat Cross Bar, make sure that all fasteners are in place and tightened. Make sure that the Lat Tower cables are securely fastened to the regular Bowflex cables and the Bent Lat Bar, Squat Bar or Hand Grips. Always use the Bent Lat Bar holders to support the Bent Lat Bar, or remove the barwhen not in use. Do not hang from or attempt to perform “chin ups” from the Lat Cross Bar. Never pull on the Bent Lat Bar unless there is resistance attached to it.Leg Extension: Designed to add more effective exercises that target your legs, thighs, calves, etc.Safety: Before using the Leg Extension, make sure that all fasteners are in place andtightened. Make sure that the Extension’s cables are securely fastened to the regular cables. When installing the Leg Extension Seat always ensure that the Support Tube BracketHooks fully engage with the Roller Tube Spacers. Always use the supplied Lockout Pin to secure the Leg Extension Pivot Tube to the RearLeg when not in use.Grips manufactured under license agreement with Hands-On Sports & Gym Accessories, Inc. Patent #475652713
How to Use Your MachineUsing Your Leg Press Belt and Squat Bar PulleysLeg Press Belt:The Leg Press Belt is used for the Leg Press exercise. With the Bowflex seat adjusted to the “free sliding” position (spring lockseat pin unlocked), the hand grips removed, and the desired amount ofresistance hooked up, sit on the seat and position the leg press belt aroundyour hips. Slide forward to the pulleys and place your feet through the right and leftopenings under the rod cables. Attach the rod cables to the D-rings on the Leg Press Belt so that the belt istaut. Place hands on vertical main frame and push yourself back while placing feet,one at a time, onto the pulley frame. Grasp belt near where it’s attached to the cables and begin to press back.Squat Bar Pulleys:Used with Squat Harnesses and Squat Bar to perform Squat, Bent Rows and otherexercises.Safety: Always check fasteners, hooks, cables and each workout to functioning. Remove workout bench and lock seat into closest position to the Power Rod unit. Always wear shoes with non-skid soles when using the Squat Bar Pulleys. Fasten each squat cable to a D-ring on each squat harness to thecorresponding D-ring on the squat bar using a snap hook. You can now add Power Rod resistance and adjust the squat straps to yourheight using adjuster buckles. Always adjust tension of the squat harness in such a manner that it will notcause a hazard.14
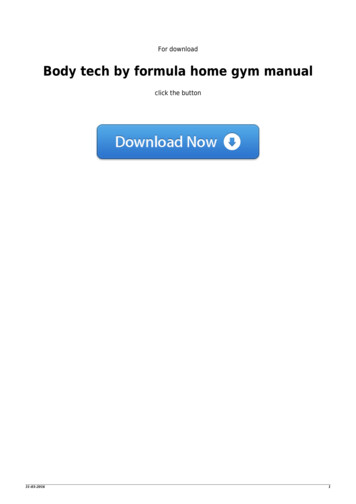
The BowflexBody LeannessProgram By Ellington Darden, Ph.D.The following program was created byDr. Ellington Darden. It contains arigorous fitness and dietary program.Please consult your physician beforebeginning any fitness or dietaryprogram.Some of the names of theexercises listed in thisprogram have beenchanged in order tomatch the namesof the exercisesin this manual.The exercisesthemselveshave not beenchanged,in orderFAST FATLOSSNOW!
IntroductionThe Bowflex Body Leanness ProgramThis program is scientifically designed for maximalfat loss over six weeks. It is important that youpractice every aspect of the plan to achieve optimumresults.The program separates into three two-week stages.During each stage you will exercise, control thenumber and quality of calories you consume, anddrink plenty of ice-cold water.Before starting the exercise routine you must befamiliar with your Bowflex home gym. Youshould experiment with finding the proper amountof resistance to use on each exercise. You should beable to perform 8 repetitions, but not more than 12repetitions, for each exercise. It is essential that youlearn how to perform each movement before tryinga complete circuit, because part of the effectivenessof the training depends on minimal rest betweeneach exercise.WARNING!Before beginning this program consult your physician or healthcareprofessional. Show this plan and your Bowflex Owner’s Manual toyour physician or healthcare professional. Only he or she can determineif this course is appropriate for your particular age and condition. If youexperience any light-headedness, dizziness, or shortness of breath whileexercising, stop the movement and consult a physician.Make sure you read your Bowflex Owner’s ManualBEFORE attempting a workout.There are a few people who should not try this program: Children andteenagers; pregnant women; women who are breast feeding; diabetics;individuals with certain types of heart, liver, or kidney disease; andthose suffering from certain types of arthritis. This should not be takenas an all inclusive list. Some people should follow the course only withtheir physician’s specific guidance. Play it safe and consult a healthcareprofessional.16
A Personal Guarantee FromDr. Ellington DardenDear Bowflex Enthusiast,I’m excited, really excited! I’m elated because I’ve developed an exercising and eating program that produces fat lossfaster than any plan I’ve ever tested.The men involved in my research, for example, had an average fat loss of 27.95 pounds (12.68 kg) per man. Womenon the same program averaged a reduction of 16.96 pounds (7.69 kg). Best of all, these dramatic results were achieved— not in six months — but in only six weeks!That’s right. Similar results can be accomplished by you in six short weeks, which include just 18 workouts (3 perweek) on the Bowflex machine.Bowflex equipment was a significant part of the results. The exercises performed on it allowed the participants tobuild muscle, which accelerated their metabolisms, and produced faster and greater fat losses.The plan worked so well that it became know as The Bowflex Body Leanness Program.Leanness means to strip away the fat from under the skin as well as at deeper levels. Leanness also implies a pleasingshape and tone to the skeletal muscles.You might say leanness is the opposite of fatness because the people involved in my research certainly got rid of theirexcessive fatness in record time.All the guidelines that were applied have been organized in the booklet you are now holding in your hands. It’s thenext best thing to actually going through one of my research projects. In fact, it’s probably better since nothing isexperimental. All of the fine points have been tried, tested and proven effective.If you are overfat, and if you are interested in doing this program, there are several things that you need to understandabout my experience. Since 1965, I’ve trained more than 10,000 overfat individuals. After many years of pushing,coaxing, and listening to these trainees, certain traits became evident to me: People are not lazy by choice. They are forced into it by the confusion that surrounds the abundance of fitnessinformation that is available. If these individuals are given simple decisive instructions, they will train very intensely. People, if they are provided with specific menus, will drastically alter their eating habits. Most of these people, however, will do neither of these challenging things for more than a week — unless theyquickly see and feel changes in their body.The Bowflex Body Leanness Program emerged from these findings. For you to get the best-possible results, youmust be willing to exercise very intensely on the Bowflex machine and adhere to a strict eating plan.In return, you’ll get simple exercise instructions, specific menus to use, and my guarantee that if you follow theprogram exactly as directed, you’ll observe the pounds and inches disappear on almost a weekly basis.Now it’s your turn to get excited, and get started!Sincerely,Dr. Ellington Darden
MeasurementsIf you would like to measure your personal before-and-afterresults, there are several steps you need to take. It is importantthat you accurately perform each task, then at the end of thesix-week program, repeat the process in the same manner.Body Weight:Women Measure:Suprailium, triceps, and thigh.Men Measure:Chest, abdomen, and thigh.Remove clothing and shoes and record your weight to thenearest quarter pound or hundred grams. Be sure to use thesame scale when weighing yourself at the end of the six-weekprogram. For the most accurate recordings, weigh yourselfnude in the morning.Since the program is divided into three two-week segments,you may want to weigh yourself at the end of each two-weekperiod. Understand, however that weight loss is not the bestway to determine your success. Fat loss is the key component.To determine the amount of fat you’ve lost, you’ll need tofollow the instructions in the next section.Enter your starting weight on the RESULTS SUMMARYSHEET provided.Circumference of Body Parts:1For an even better idea of the changes that will occur to yourbody in the next six weeks, it is necessary to measure thecircumference of certain body parts. This will tell you wherethe fat is shrinking and what areas are toning up.234Use a plastic tape to measure the following:51) Upper arms — hanging and relaxed, midway betweenthe shoulder and elbow.2) 2” (5 cm) above navel — belly relaxed.3) At navel — belly relaxed.4) 2” (5 cm) below navel — belly relaxed.5) Hips — feet together at maximum protrusion ofbuttocks.6) Thighs — high, just below the buttocks crease with legsapart and weight distributed equally on both feet.Record each measurement on your Results SummarySheet.186
MeasurementsSkinfold MeasurementsTo accurately track your progress through this six-week program, it is necessary to take skinfold measurements.By measuring yourself in this way, you will be able to determine your lean-body mass and your body-fat percentage.The goal of this program is to increase your lean-body mass and decrease your body-fat percentage.Please read this section carefully. Proper measuring techniques are essential to track your success. It is best to havesomeone measure you. Measuring yourself can lead to inaccurate results.Women Measure: Suprailium, triceps, and thighMen Measure: Chest, abdomen, and thighSuprailiumStand relaxed. Pick up a diagonalskinfold just above the crest of the hipbone on the right side of the waist.TricepsStand with right elbow flexed 90degrees and locate the center of theback of the upper arm midway betweenthe shoulder and the elbow. Relaxarm at your side. Pick up skinfold aspictured.ChestStand relaxed. Pick up a diagonalskinfold over the right pectoralismuscle, midway between the armpitand the nipple.ThighStand relaxed with most of the weighton your left leg. Pick up a skinfold inthe vertical plane on the front side ofthe right thigh, midway between thehip and knee joints.AbdomenStand relaxed. Pick up a verticalskinfold on the right side of the navel.19
MeasurementsUsing Calipers When Measuring SkinfoldsThe procedure for measuring skinfold thickness is to grasp firmly with the thumb and forefinger a fold of skin andsurface fat and pull it away from the underlying muscle. Take the caliper in your other hand and open the jaws.Clamp the jaws over the pinched skin and fat. The jaws exert constant tension at the point of contact with the skin.The thickness of the double layer of skin and fat can then be read directly from the caliper, which is marked nThighThighTotalTotalUse these figures on the following chart to determineyour body-fat percentage and enter the number onthe line below.Starting body-fat percentageOptional Picture TakingPictures can be the most exciting evaluation you can do.The numbers and the tape measurements are great, butactually seeing differences from comparison photographsof yourself is quite satisfying.Taking full-length photographs is not difficult, but to seethe maximum difference between before and after, youshould follow these guidelines.1) Keep everything the same. Wear the same outfit, asnug solid color is best, and have the person taking thepicture stand in the same place, with the same settingbehind you.2) Make sure you stand against an uncluttered, lightbackground.203) Have the person taking the photograph move awayfrom you until he can see your entire body in theviewfinder.4) Stand relaxed for three pictures, front, right side, andback. Do not try to suck in your stomach.5) Interlace your fingers and place them on top of yourhead, so the contours of your torso will be plainlyvisible. Keep your feet 8” (20 cm) apart in all threepictures.6) When you get the film developed tell the processorsto make your after photos the same size as yourprevious ones. This way, your height in both sets ofphotos is equal and more valid comparisons can bemade.
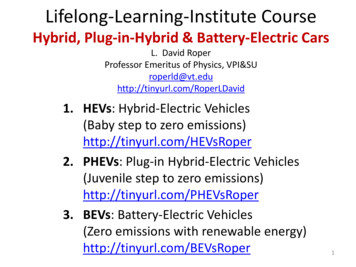
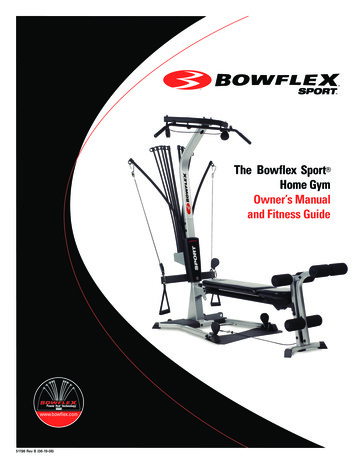
Determining Your Body FatTo Use The Nomogram:1) Locate the sum of your three skinfolds in the right column and mark it.2) Locate your age in years on the far left column and mark it.3) Connect the two marks with a straightedge. Where the straightedge intersects the line in the middle columnappropriate to you, you will find your body-fat percentage.Baun, W.D, Baun, M.R., and Raven, P.B. A nomogram for the estimate of percent body fat from generalizedequations. Research Quarterly for Exercise and Sport, 52:380-384, 1981.130125120115Female110Male105403355902934Age in 14351210Sum of Three Skinfolds (mm)316010038302520151021
Calculating Lean Body MassNow that you know your body-fat percentage, you can calculate your lean-body percentage. This will eventually showyou how many pounds of muscle were added to your body, after completing the program.For Example:Before the program, Joe weighs 200 pounds (90.7 kg) and measures 30% fat, which amounts to 60 pounds (27.2 kg).Thus, his lean-body mass is 70%, or 140 pounds (63.5 kg).After the program, Joe weighs 180 pounds (81.6 kg) and is 20% fat, which equals 36 pounds (16.3 kg). His lean-bodymass is 80%, or 144 pounds (65.3 kg).Simple calculations allow us to find the amount of fat Joe lost, and the amount of muscle Joe gained. Before fat weight(60 pounds), minus after fat weight (36 pounds) equals 24 pounds (10.8 kg) of fat lost. After lean-mass weight (144pounds) minus before lean-mass weight (140 pounds) equals 4 pounds (1.8 kg) of muscle gained.Enter Your Information Here: (Pounds or Kilograms)BeforeBody WeightFat Percentage xBody WeightBody Fat WeightWeight of Body Fat–Lean-Body Weight Use the Same Factors to Calculate After Six Weeks.AfterBody WeightFat Percentage xBody WeightBody Fat WeightWeight of Body Fat–Lean-Body Weight Final ResultsBefore Body Fat WeightAfter Body Fat Weight –After Lean-Mass WeightBefore Lean-Mass Weight–22Total Fat LostTotal Lean-Mass Gained
Your Results Summary SheetNameAgeHeightWeight LossWeight BeforeMuscle GainWeight AfterFat LossPlease follow the instructions in the “Measurements” section for measuring ght ArmLeft Arm2” (5 cm) Above NavelNavel2” (5 cm) Below NavelHipsRight ThighLeft ThighTotalPercent Body FatIf you wish to send in your results, please send to: Bowflex Results, 16400 SE Nautilus Dr., Vancouver, WashingtonUSA. 98683. Or you may fax this sheet to Bowflex Results at 1-360-694-7755. Please include your name, address, andpho
exercise and consult your physician. This machine is meant for individual consumer use only, and is not meant for use by institutions. Maximum user weight for the Bowflex Sport home gym is 300 pounds (136 kg). For your safety, do not use or allow others to use the Bowflex Sport home gym