Transcription
Rectangular Dining Table PlansMaterials Needed: 1 – 36 x 60 sheet of hardwood plywood4 – 4 x 4 x 28 1/4 boards1 – 1 x 4 x 43 inch board8 – 1 x 2 x 25 ¼ inch boards2 – 1 x 4 x 49 inch boards2 – 1 x 4 x 28 3/4 inch boards2 – 1 x 4 x 21 inch boards4 – ¾ x 8 foot lengths of decorative mouldingSand paperWood finish screwsFinish nailsWood fillerWood stain (optional)Clear polyurethane sealerTools Needed: Skill sawMiter sawMeasuring tapePencil3D View Instructions (on the last page of this document)In the left panel is a Model Tree. Items in the tree can be toggled off and on by checkingand unchecking the boxes next to each section.The 3D model can be rotated by left clicking your mouse and dragging to rotate.When hovering your mouse over the page with the model on it a top menu will appearoffering more options for viewing the model.SafetyAlways apply polyurethane sealer in a well-ventilated area.Goggles and gloves should always be worn when working with power equipment.Children should be kept at a safe distance.
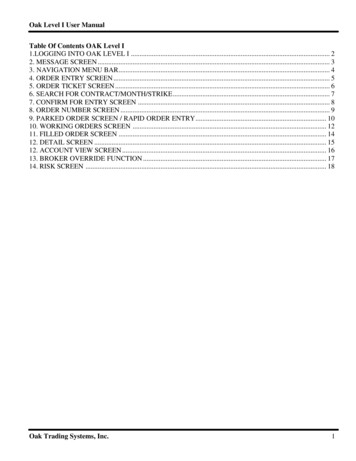
Assemble the Table Top FrameCut the end of each board to a 45 degree angle using a miter saw.Use wood screws to assemble the pieces as shown below.Attach the Table LegsUse long wood screws to attach the table legs to each corner of the table top frame.
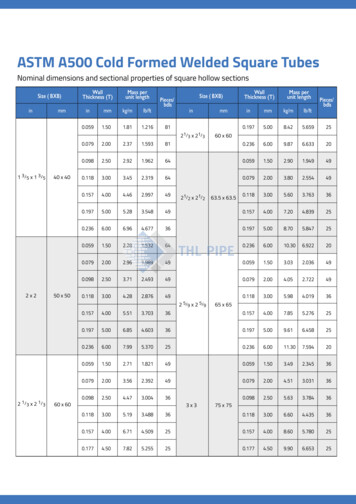
Attach the Outside Leg SupportsAttach one 1 x 4 x 21 inch board to each end of the table between the table legs. Thebottom of each board should be 3 inches from the bottom and should be centeredbetween the table legs.Attach the Center Table Leg SupportAttach the center table leg support with wood screws as shown below.
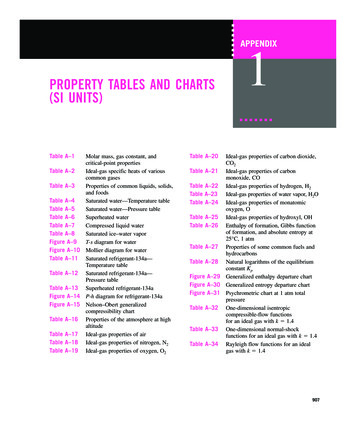
Attach the Decorative End BoardsThe decorative end boards should be attached to the outside of the leg support andinside the table top support.Choose a spacing and attach four 1 x 2 x 25 ¼ inch decorative end boards to each endof the table.Attach Decorative Moulding to Table Top FrameCut decorative moulding to size using a miter saw to create 45 degree angles on theend of each piece. Attach the moulding to the bottom of the table top support usingfinish nails.
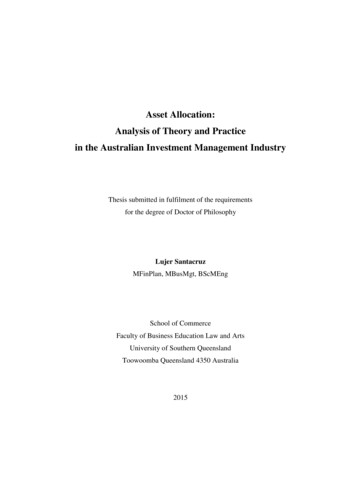
Attach the Table TopCenter the 36 x 60 inch hardwood plywood on the table frame. Attach to the frame usingfinish nails.Attach the Decorative Moulding to Table TopCut decorative moulding to size using a miter saw to create 45 degree angles on theend of each piece. Attach the moulding to the edges of the table top using finish nails.
Fill, Stain and Seal the TableFill any dings, dents and nail holes with wood filler.Optionally, stain the table and allow time to for the stain to dry.Use polyurethane to seal the table. Allow to dry.Congratulations! Your table is complete.
Rectangular Dining Table Plans . Materials Needed: 1 – 36 x 60 sheet of hardwood plywood 4 – 4 x 4 x 28 1/4 boards 1 – 1 x 4 x 43 inch board 8 – 1 x 2 x 25 ¼ inch boards 2 – 1 x 4 x 49 inch boards 2