Transcription
Lesson 7: Introduction to the Access Database7193INTRODUCTION TO THE ACCESS DATABASEKeeping student recordsLEARNING OUTCOMESIn this tutorial you will learn about databases in general and about the Access database inparticular. The concept of a database is not as easy to grasp as that of a word processor or aspreadsheet. So if this is the first time you are learning about databases you would be welladvised to read over the lesson first, away from the computer, and perhaps highlight the text toease understanding.Specifically this tutorial will introduce you to the following: the general idea behind a databaseplanning a new databasecreating a database templateadding records to a new or existing databaseviewing the data in a databaseclearing entries and records from a databasemaking a backup copy of a databaseA caveat before you begin: You'll find it easiest to use the tutorial if you follow the directionscarefully. On computers there are always other ways of doing things, but if you wander off onyour own be sure you know your way back!
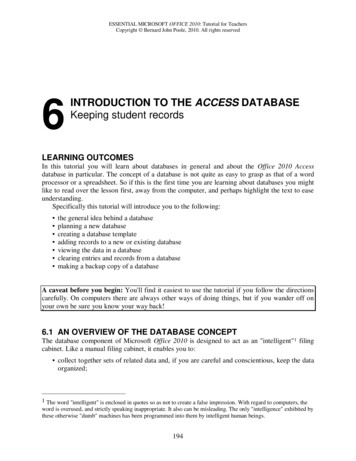
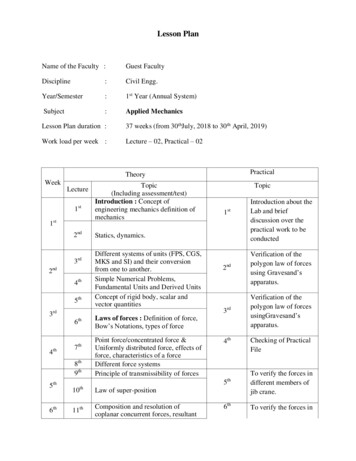
ESSENTIAL MICROSOFT OFFICE XP: Tutorial for TeachersCopyright Bernard Poole, Lorrie Jackson, Rebecca Randall, 2002. All rights reserved1947.1 AN OVERVIEW OF THE DATABASE CONCEPTThe database component of MS Office is designed to act as an "intelligent"1 electronic filingcabinet. Like a manual filing cabinet, it enables you to collect sets of related data and keep the data organized; update the data once you've collected them, by adding or deleting records and by changingexisting records;An electronic filing cabinet such as a database allows you also to easily and quickly use the data-sort them, create reports, merge the data with other documents, and so forth.How is a database organized?Access is an object-oriented relational database management system. The objects that make upany particular database that you create using Access are illustrated in Fig. 7.1.Fig. 7.1 The Access database objects1 The word "intelligent" is enclosed in quotes so as not to create a false impression. With regard to computers, theword is overused, and strictly speaking inappropriate. It also can be misleading. The only "intelligence"exhibited by these otherwise "dumb" machines has been programmed into them by intelligent human beings.
Lesson 7: Introduction to the Access Database195 A Table is an object which represents the data in rows and columns, rather like aspreadsheet. For this reason, when you view a table in an Access database, you are inwhat Access refers to as a Datasheet View. You will learn about Tables in this lesson. A Query is an object which makes a request to the database to find some set of data thatis stored in the database. You will learn about queries in Lesson 8. A Form is an object which gives the user another view of the data in the database.Whereas a Table allows the user to view multiples records at once, a Form displays thecontents of just one record at a time. You will learn about Forms in this lesson, too. A Report is an object which is designed based on the data in the database and which isused to inform the user of the selected contents of the database. You will learn aboutreports in Lesson 8. A Page is a special type of web page designed for viewing and working with data fromthe Internet. This Access feature is beyond the scope of these tutorials. A Macro is a sequence of instructions which can be carried out with a single click of themouse button on a button in a toolbar or by pressing a key or combination of keys on thekeyboard. You may recall developing a Word macro in Lesson 6. Finally, a Module is a collection of programming procedures designed to giveprogrammer control over the Access database look and feel.A reminder of the general terminology for secondary storage of dataWords are our stepping stones to knowledge. Personal computers today, for the most part, stilluse electronic disks as the medium for the secondary storage of data. The Windows computeroperating system, like most operating systems, organizes data hierarchically on the disk usingdocuments and directories. Documents are usually stored in directories or subdirectories that arepart of the overall directory file management system.Within documents, different terminology is used to describe the organization of datadepending on the type of document in question. Word processed documents tend to organize data in paragraphs and sentences; spreadsheet documents organize the data in rows and columns; database documents organize the data into records and fields.The Access database terminology in particularAn Access database is able to contain thousands of records; records contain fields; each fieldcontains the raw data called entries made up of characters which are the basic building blocks ofdata.For example, let us say you have given a student an assignment to study birds and to build adatabase to store the data collected. The student decides to set up a record for each bird sighted.Each record will include field names (Access database field names may be up to 63characters long) such as Common Name of bird, type (Family) of bird, Size, Habitat, etc. A fieldname such as Common Name of bird might contain the entry "seagull", for example.A database thus contains records; records have fields; the fields contain entries. These entriesare made accessible by the Data View (Table), Form, and Report functions of the Accessdatabase. At the end of the year, for example, the student would be able to write a relatively
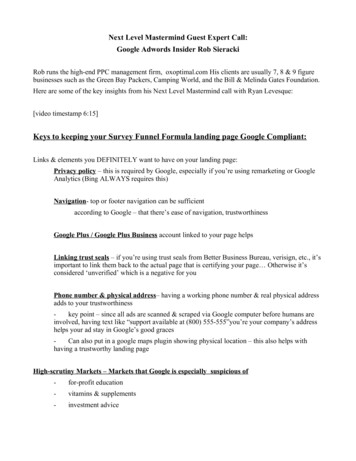
196ESSENTIAL MICROSOFT OFFICE XP: Tutorial for TeachersCopyright Bernard Poole, Lorrie Jackson, Rebecca Randall, 2002. All rights reservedsophisticated report using the word processor, merge into the report the data collected in thedatabase, and even add illustrations of the birds.It will be useful for you at this stage to see an actual Access database on the computer.Put your Work Disk in the disk drive, then open the Office DatabaseManagement program called AccessIn the New File Task Pane (Fig. 7.2), under Open a file, click on Morefiles Fig. 7.2 The New File Task PaneAccess will display the Open dialog box.Make sure the drive with your Access Disk in it is the active drive, thendouble click to open the database document named Birds (Birds.mdb)Showing the Full menus and organizing the ToolbarsIn case you're using a computer in a lab or some computer other than your own, you should setthe options to Always show full menus, Show the Standard and formatting toolbars on two rows,List font names in their own font, and Show ScreenTips on toolbars.You may recall doing this at the beginning of all the previous lessons. If the computer you'reusing doesn't already have these settings, here's what you do.
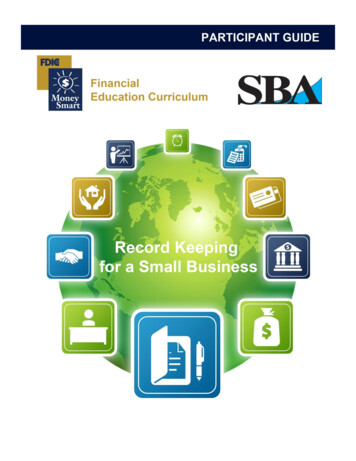
Lesson 7: Introduction to the Access Database197In the Tools menu, select Customize , and in the dialog box that pops up,select the Options tab (Fig. 7.3)Fig. 7.3 The Customize dialog boxMake sure there is a check mark next to the item to Always show full menusWhile you're at it, check the box next to Show Standard and Formatting toolbarson two rows, List font names in their font, and Show ScreenTips on toolbarsClick the Close button when you're readyAccess displays a dialog box (Fig. 7.4) prompting you to decide how you want to view the dataon the screen.Fig. 7.4 How do you want to view the data in the database?Each of the Objects listed in the menu on the left side of the Database dialog box represent oneof the objects of the Access object-oriented database management system.You can view the data either as a form, record by record, as illustrated in Fig. 7.5.
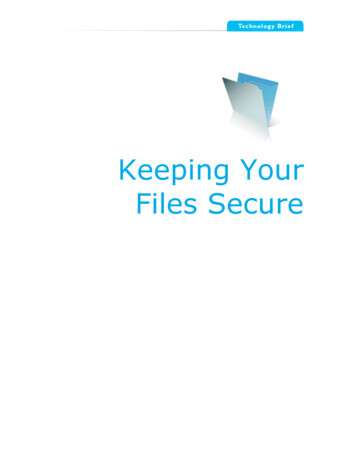
198ESSENTIAL MICROSOFT OFFICE XP: Tutorial for TeachersCopyright Bernard Poole, Lorrie Jackson, Rebecca Randall, 2002. All rights reservedFig. 7.5 The Form View of the databaseThis Forms view gives you a view of the records one by one. On the other hand, you can viewthe data as a Table, where the data is displayed in columns or as a list (Fig. 7.6).Fig. 7.6 Records listed in Table ViewMake sure the Tables Object button is selected on the Birds Databasedialog box and the BirdSightings table highlighted, then click on the Openbutton in the Birds database toolbar (or just double click on BirdSightings)In the top left corner of the window, in the Title bar, you see the Table name (BirdSightings). Inthe bottom left corner of the Form and Table View windows are tools to access specific recordsin the database.
Lesson 7: Introduction to the Access Database199Fig. 7.7 illustrates what each of these navigation tools does.Fig. 7.7 Navigation tools in the Access databaseAs you can see there are 50 records in the database. The field names (Common Name, Family,Size, etc.) are at the top of each column of data. As you can see, the screen is not big enough toallow you simultaneously to see all the records in the Birds database. If you want to scrollthrough the records or look at any specific record, you have several options:You can use the scroll bar on the right of the screen to scroll through the records.Try this nowTo move one by one through the records, you can click left or right on the arrows in the accesscontrol tools in the lower left corner of the window.Try this nowTo go directly to a specific record, you can select the number of the record you want to view bytyping the number of that record in the small data entry box between the arrows.Try this now to select record 12, and hit EnterYou can select Go To in the Edit menu and go to either the First, Last, Next, or Previous record,or you can opt to create a new record. So much for the nuts and bolts of databases. You are nowready to get your feet wet planning your own database of student records.In the File menu select Close to close the BirdSightings table, then in theFile menu select Close again to close the Birds databaseEject your Work Disk from the disk drive7.2 PLANNING A NEW DATABASEBefore we begin to develop a new database, you need to have at hand the disk on which you'regoing to save it. You may be using a CD-RW or a zip disk for these tutorials, in which casemake sure it is in the disk drive. In Lesson 1, you began by preparing several blank, formatted1.44 mbyte floppy disks, one of which you named Access Disk. So, if you are using floppy disks,make sure you have this disk ready now to save the documents you will create in Lessons 7 and8. Also, if you didn't already do so, prepare a second blank, formatted disk for backup purposes.Call this disk Access Disk Backup.There are three rules of database design: Rule 1—Plan; Rule 2—Plan; Rule 3—Plan.The more complex the data, the more you need to plan. But even the simplest databaseshould be thought through on paper before being created in Access. Poor planning often resultsin a database that fails to meet overlooked needs.Points to ponder when planning a database
200ESSENTIAL MICROSOFT OFFICE XP: Tutorial for TeachersCopyright Bernard Poole, Lorrie Jackson, Rebecca Randall, 2002. All rights reservedThe rule of thumb that should guide you is that changes become increasingly difficult to makethe further along you go in the process of building a new database. This is true of anything youcreate. Here, then, are some maxims that you should bear in mind when designing a database.Taking your time up front saves time later onThe database you create will have a long, useful life if you take time to plan it carefully. Afteryou have decided on the fields to include with each record, and before you create the database,you should still invest time designing layouts for reports. Thinking about reports will cause youto think about what data you plan to put in the database.Teamwork helpsDuring the planning stage, run your ideas by others who are familiar with the kind of databaseyou have in mind. Network among your friends. Tell them what you have in mind. Ask them toreview your design. You'll be surprised how many valuable ideas they'll come up with that mayhave escaped you if you had relied on your own resources. Another good idea is to involve yourstudents in the design. This will help them learn skills that will benefit them throughout theirlives.Keep fields simpleThe more "atomic" your fields the more flexible will be your database. Atomic here means"reduced to its simplest form." The less each field captures in the way of entries the better. Forexample, in a database of names and addresses, you would keep each part of the person's nameas a separate field. The first name should be stored by itself; the same for the middle name andlast name. That way you can sort the names by first or last name. You can print a listing lastname first or first name last, with or without the middle name, and so on. You will have choices.Lumping the whole name under one field limits your options.Design guidelines for a Student Roster databaseYou have to build a database for a Student Roster. Let us say that your planning has helped youdecide the following about the database and its use: The database will be accessible to, and managed by, your students. Each of them will entertheir own data at the beginning of the year. You will advise them that they are not obligedto fill out every field--that it is OK to leave entries blank. Privacy is an important issue towhich our students need to be sensitized. We need to take every opportunity to teach themthat they should exercise control over data about themselves. They must make decisionsabout what is, and is not, privileged information. In a world where, inevitably andincreasingly, personal data will be available to whomever wants to use it, our students mustlearn early on in their lives that they have a responsibility to keep tabs on that data so as toensure, as far as is humanly possible, that they are correct at all times. Managing their ownrecords on the class database will give them valuable experience in this privacy arena. You have drawn up a list of fields (illustrated later in Table 7.1) for each record i
File menu select Close again to close the Birds database Eject your Work Disk from the disk drive 7.2 PLANNING A NEW DATABASE Before we begin to develop a new database, you need to have at hand the disk on which you're going to save it. You may be using a CD-RW or a zip disk for these tutorials, in which case make sure it is in the disk drive. In Lesson 1, you began by preparing several