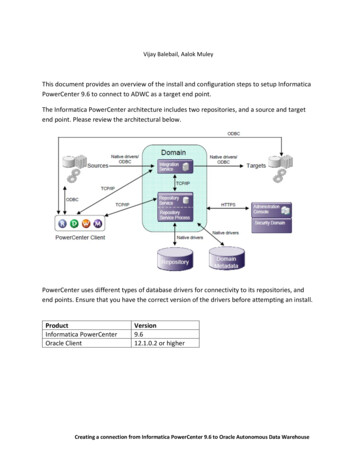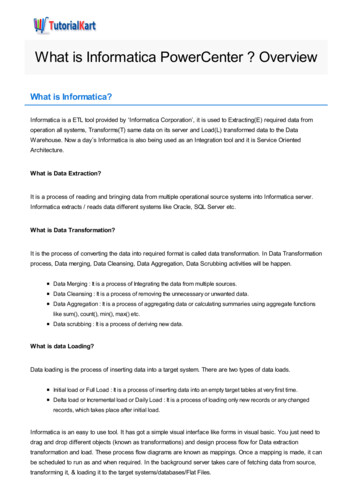
Transcription
Workload SchedulerVersion 8.6Plug-In for Informatica PowerCenterUser's Guide SC27-4374-00
Workload SchedulerVersion 8.6Plug-In for Informatica PowerCenterUser's Guide SC27-4374-00
NoteBefore using this information and the product it supports, read the information in Notices.This edition applies to version 8, release 6 of IBM Tivoli Workload Scheduler for Applications (program number5698-WSE) and to all subsequent releases and modifications until otherwise indicated in new editions. Copyright IBM Corporation 2012.US Government Users Restricted Rights – Use, duplication or disclosure restricted by GSA ADP Schedule Contractwith IBM Corp.
ContentsFigures . . . . . . . . . . . . . . . vTask definition for PowerCenter jobs .Tables . . . . . . . . . . . . . . . viiChapter 8. Customizing the jobexecutor properties file . . . . . . . 23. 19Chapter 1. Overview . . . . . . . . . 1. . . 3Chapter 9. Scheduling and submittingjob streams for PowerCenter jobs . . . 25Chapter 3. Roles and responsibilities . . 5Chapter 10. Checking job results . . . 27Chapter 2. Software requirementsMapping PowerCenter workflow status to job status 27Chapter 4. Installing the plug-in . . . . 7Before installing . . . . . . . . . . . . . 7Structure of the installation DVD or eImage . . . . 7Choosing the installation method . . . . . . . 8Using the installation wizard . . . . . . . . . 8Using the silent installation process . . . . . . . 9Installation results and log files . . . . . . . . 10Chapter 11. Known problems andworkarounds . . . . . . . . . . . . 29Chapter 5. Configuring for SSL . . . . 13Notices . . . . . . . . . . . . . . 33Unsupported installation scenario . . . . . . .Incorrect label for uninstall button . . . . . . .Incorrect worklet status displayed in the job log . .Cannot submit jobs after a Web Services Hub restartTrademarks .Chapter 6. Defining jobs on theDynamic Workload Console. . . . . . 15.29292930. 34Index . . . . . . . . . . . . . . . 37Chapter 7. Defining jobs with composer 19 Copyright IBM Corp. 2012iii
ivIBM Tivoli Workload Scheduler for Applications: Plug-In for Informatica PowerCenter User's Guide
Figures1.Partial details of a plug-in for InformaticaPowerCenter job log. . . . . . . . . Copyright IBM Corp. 2012. 27v
viIBM Tivoli Workload Scheduler for Applications: Plug-In for Informatica PowerCenter User's Guide
Tables1.2.3.Roles and responsibilities in Tivoli WorkloadScheduler for Informatica PowerCenter . . . 5Options to perform a silent installation10Installation log files . . . . . . . . . . 10 Copyright IBM Corp. 20124.5.Required and optional attributes for the jobdefinition of PowerCenter jobs. . . . . .Mapping between job statuses andPowerCenter workflow statuses . . . . . 19. 28vii
viiiIBM Tivoli Workload Scheduler for Applications: Plug-In for Informatica PowerCenter User's Guide
Chapter 1. OverviewThe Tivoli Workload Scheduler Plug-in for Informatica PowerCenter enables you toschedule Informatica PowerCenter workflows and to track their outcomes from theDynamic Workload Console and from the Tivoli Workload Scheduler commandline.You can define, run, and manage these jobs both in a distributed and in a z/OS environment, by selecting the appropriate Tivoli Workload Scheduler or TivoliWorkload Scheduler for z/OS engine in the Dynamic Workload Console.In Tivoli Workload Scheduler environments, the plug-in jobs run on dynamicagents. In Tivoli Workload Scheduler for z/OS environments, the plug-in jobs runon Tivoli Workload Scheduler for z/OS Agents. In both environments the agentrunning the jobs, where a portion of the plug-in is installed, must have a workingconnection with the Informatica Web Services Hub. Copyright IBM Corp. 20121
2IBM Tivoli Workload Scheduler for Applications: Plug-In for Informatica PowerCenter User's Guide
Chapter 2. Software requirementsYou can run the Tivoli Workload Scheduler plug-in for Informatica PowerCenterboth in a distributed and in a z/OS environment. You must install the TivoliWorkload Automation product appropriate for your environment, and InformaticaPowerCenter version 9.1.0 HotFix 3.Distributed To define, run, and manage job types with advanced options forInformatica PowerCenter, install:v The Tivoli Workload Scheduler master domain managerv A dynamic agent connected:– To the master domain manageror– To a dynamic domain manager connected to the master domainmanager.v The dynamic agent running the plug-in must have a working connectionwith the Informatica PowerCenter Web Services Hub.z/OSTo define, run, and manage job types with advanced options forInformatica PowerCenter, install:v The Tivoli Workload Scheduler for z/OS controller.v A Tivoli Workload Scheduler for z/OS agent connected to:– The Tivoli Workload Scheduler for z/OS controller.or– A dynamic domain manager connected to the Tivoli WorkloadScheduler for z/OS controller.v The Tivoli Workload Scheduler for z/OS agent running the plug-in musthave a working connection with the Informatica PowerCenter WebServices Hub.For detailed information about the Tivoli Workload Scheduler supported operatingsystems, see the Detailed System Requirements Document. For detailedinformation about the Informatica PowerCenter supported operating systems andinstallation requirements, see the Informatica PowerCenter documentation. Copyright IBM Corp. 20123
4IBM Tivoli Workload Scheduler for Applications: Plug-In for Informatica PowerCenter User's Guide
Chapter 3. Roles and responsibilitiesIn a typical enterprise, different users contribute to the implementation andoperation of the product. Table 1 describes the roles and responsibilities of allactors in the process model, showing the tasks they perform.Table 1. Roles and responsibilities in Tivoli Workload Scheduler for Informatica PowerCenter Copyright IBM Corp. 2012User roleUser taskInformatica PowerCenteradministratorPerforming the installation of the InformaticaPowerCenter Server.Informatica PowerCenter developerCreating the Informatica PowerCenter workflows.Informatica PowerCenterconfiguratorChapter 8, “Customizing the job executor propertiesfile,” on page 23Tivoli Workload Scheduler ITadministratorPerforming the installation of the Tivoli WorkloadScheduler environment.Tivoli Workload Scheduler jobschedulerChapter 6, “Defining jobs on the Dynamic WorkloadConsole,” on page 15Tivoli Workload Schedulerscheduling operatorChapter 10, “Checking job results,” on page 275
6IBM Tivoli Workload Scheduler for Applications: Plug-In for Informatica PowerCenter User's Guide
Chapter 4. Installing the plug-inThis section describes how to use the Tivoli Workload Scheduler for AdditionalPlug-ins installer to install the plug-in for Informatica PowerCenter.Tivoli Workload Scheduler for Additional Plug-ins is an installation processincluded in the Tivoli Workload Scheduler DVD or eImages that you use to installadditional plug-ins developed by you or provided separately.Before installingBefore you install the plug-in, ensure that the following conditions are satisfied:v You have the following permissions to run the installation:Windows operating systems:AdministratorUNIX and Linux operating systems:rootv The installation process is not already running on the workstation. You canverify it by checking that the setup process is not running.Structure of the installation DVD or eImageThis section describes the file structure you will find in the plug-in installationmedia.The installation files for the plug-in for Informatica PowerCenter are structured asfollows:Aix PLUGIN INSTALLER PLUGIN RESPONSE FILE setup.shHP PLUGIN INSTALLER PLUGIN RESPONSE FILE setup.shHPIA64 PLUGIN INSTALLER PLUGIN RESPONSE FILE setup.shWindows PLUGIN INSTALLER PLUGIN RESPONSE FILE setup.batLinux PLUGIN INSTALLER PLUGIN RESPONSE FILE setup.shLinuxPPC PLUGIN INSTALLER PLUGIN RESPONSE FILE setup.sh Copyright IBM Corp. 20127
zLinux PLUGIN INSTALLER PLUGIN RESPONSE FILE setup.shSolaris PLUGIN INSTALLER PLUGIN RESPONSE FILE setup.shSolaris I386 PLUGIN INSTALLER PLUGIN RESPONSE FILE setup.shwhere, for each operating system, the setup command starts the installationprocess of the plug-in.Choosing the installation methodUse one of the following methods to install the plug-in:Installation wizardInstall the plug-in by running the setup file provided for each supportedoperating system and providing the information requested in theinstallation wizard.Silent installationCustomize a response file by adding all the configuration settings to be usedduring installation. Then, from the command line, run the setup commandwith the silent option. With this procedure, you can run the installationunattended and in the background.Note: Following installation, to successfully use the plug-in, you must first restartWebSphere Application Server and the Tivoli Workload Scheduler agent.Using the installation wizardTo install the plug-in from the installation wizard, do the following steps:1. In the DVD or eImage, go to the directory named after the operating systemwhere you are installing, and run the setup installation command to start theinstallation.2. Select the language in which the wizard is to be displayed, and click OK. TheWelcome panel is displayed.3. Read the welcome information and click Next. The Choose operation panel isdisplayed.4. Select the Install radio button and click Next. The plug-in details panel isdisplayed.5. Select the Tivoli Workload Scheduler instance on your workstation where theplug-in is to be installed.If the installation program does not detect a Tivoli Workload Schedulerinstance, it does not start the installation process.6. Review the plug-in details, and click Next. The plug-in Software LicenseAgreement panel is displayed.8IBM Tivoli Workload Scheduler for Applications: Plug-In for Informatica PowerCenter User's Guide
7. Read the plug-in Software License Agreement information and select the radiobutton to accept the license agreement. Click Next. A summary informationpanel is displayed.8. Review the summary details and click Next. The installation process begins; theprogress panel is displayed showing the status.If you received error messages, analyze the installation log files shown in the tableTable 3 on page 10.Using the silent installation processA silent installation runs according to the parameters set in a response file. Theresponse file includes all the installation information required to run theinstallation without user intervention.To install the plug-in with the silent installation process, you are provided with thecorresponding response file that you need to customize with your preferences. Thefile is located in the operating system/RESPONSE FILE folder in the installationDVD or eImage.When running the installation in silent mode, no messages are displayed. Themessages are written in the silent installation log files listed in “Installation resultsand log files” on page 10. If the silent installation fails, you can verify the messageswritten in the log files, by checking them in the Tivoli Workload Scheduler: Planningand Installation Guide.To run the silent installation, do the following:1. Customize the response file to include the options required to complete theinstallation. For a list of these options, see Table 2 on page 10.The response file must be accessible from the workstation where you want torun the installation. Entries in the response file are in the format option value.Each entry must be written on a separate line.2. From the installation DVD or eImage run the setup command, located in theoperating system folder:On UNIX and Linux operating systems:./setup.sh -i silent -f response fileOn Windows operating systems:setup.bat -i silent -f response fileWhere:-i silentSpecifies that the installation is run unattended, driven by a responsefile.-f response fileIndicates the fully qualified path to the response file that contains theinstallation options. response file can be any text file with the name andextension you choose.The actions performed by the silent installation process are described in section“Installation results and log files” on page 10.Table 2 on page 10 lists the options you can specify to drive the installation.Chapter 4. Installing the plug-in9
Table 2. Options to perform a silent installationOptionUSER INSTALL DIR path RequiredDescriptionYesSpecify the Tivoli WorkloadScheduler installation pathwhere you want to installthe plug-in.ValueA fully qualified path. For example, to install the productunder c:\program Files\IBM\TWA86, specify:USER INSTALL DIR "c:\program Files\IBM\TWA86"On Windows operating systems:The default path is "c:\\Program Files\\IBM\\TWA"On UNIX and Linux operating systems:The default path is/opt/IBM/TWATWSAPPS PLUGIN FILE NAME zipfilename YesSpecify the fully qualifiedpath to the zip file thatcontains the plug-in.The fully qualified path to filecom.ibm.scheduling.agent.powercenter 8.6.0.00.zip on theDVD or eImage.LICENSE ACCEPTED value YesSpecify the boolen value to The value must be set to TRUE.accept the license agreementfor the plug-in.ACTION TYPE value YesSpecify the action thatinstallation processperforms on plug-in. In thiscase the value must be setto DEPLOY.The value must be set to DEPLOY.Installation results and log filesThis section lists the names of the installation logs files.The installation process competes the following actions (in the next sections theTWS home notation stands for the Tivoli Workload Scheduler installation path):v On the master domain manager,– Copies file powercenter 1.0.0.jar in path TWS �� Creates in TWS home\installDataPlugin (/installDataPlugin) a directorycontaining file plugin powercenter.xml.v On the dynamic agent(s):– Copies file powercenter 1.0.0.jar in path TWS home\JavaExt\eclipse\p
Using the installation wizard To install the plug-in from the installation wizard, do the following steps: 1. In the DVD or eImage, go to the directory named after the operating system where you are installing, and run the setup installation command to start the installation. 2. Select the language in which the wizard is to be displayed, and click OK. The
