Transcription
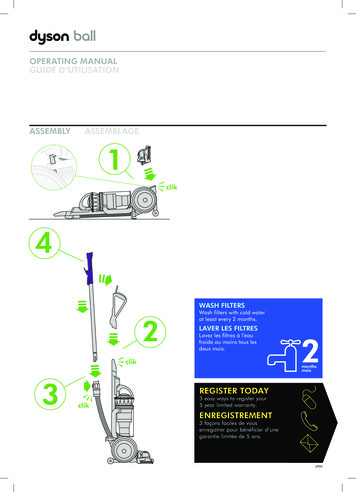
OPERATING MANUALGUIDE D’UTILISATIONASSEMBLYASSEMBLAGEclikWASH FILTERSWash filters with cold waterat least every 2 months.LAVER LES FILTRESLavez les filtres à l’eaufroide au moins tous lesdeux mois.clikREGISTER TODAYclik3 easy ways to register your5 year limited warranty.ENREGISTREMENT3 façons faciles de vousenregistrer pour bénéficier d’unegarantie limitée de 5 ans.UP20
IMPORTANT SAFETY INSTRUCTIONSBEFORE USING THIS APPLIANCE READ ALL INSTRUCTIONS AND CAUTIONARY MARKINGSIN THIS MANUAL AND ON THE APPLIANCEWhen using an electrical appliance, basic precautions should always be followed, includingthe 15.16.17.18.19.20.21.22.2These warnings apply to the appliance, and also where applicable, to all tools, accessories,chargers or mains adaptors.TO REDUCE THE RISK OF FIRE, ELECTRIC SHOCK, OR INJURY:This Dyson appliance is not intended for use by young children or infirm persons with reducedphysical, sensory or reasoning capabilities, or lack of experience and knowledge, unless they havebeen given supervision or instruction by a responsible person concerning use of the appliance toensure that they can use it safely.Do not allow to be used as a toy. Close attention is necessary when used by or near children.Children should be supervised to ensure that they do not play with the appliance.Use only as described in this Dyson Operating Manual. Do not carry out any maintenance otherthan that shown in this manual, or advised by the Dyson Helpline.Suitable for dry locations ONLY. Do not use outdoors or on wet surfaces.Do not handle any part of the plug or appliance with wet hands.Do not use with a damaged cord or plug. If the supply cord is damaged it must be replaced byDyson, its service agent or similarly qualified persons in order to avoid a hazard.If the appliance is not working as it should, has received a sharp blow, has been dropped,damaged, left outdoors, or dropped into water, do not use and contact the Dyson Helpline.Contact the Dyson Helpline when service or repair is required. Do not disassemble the applianceas incorrect reassembly may result in an electric shock or fire.Do not stretch the cable or place the cable under strain. Keep the cable away from heatedsurfaces. Do not close a door on the cable, or pull the cable around sharp edges or corners.Arrange the cable away from traffic areas and where it will not be stepped on or tripped over.Do not run over the cable.Do not unplug by pulling on the cord. To unplug, grasp the plug, not the cord. The use of anextension cord is not recommended.Do not use to pick up water.Do not use to pick up flammable or combustible liquids, such as gasoline, or use in areas wherethey or their vapours may be present.Do not pick up anything that is burning or smoking, such as cigarettes, matches, or hot ashes.Keep hair, loose clothing, fingers, and all parts of the body away from openings and movingparts. Do not point the hose, wand or tools at your eyes or ears or put them in your mouth.Do not put any object into openings. Do not use with any opening blocked; keep free of dust, lint,hair, and anything that may reduce airflow.Use only Dyson recommended accessories and replacement parts.To avoid a tripping hazard wind the cord when not in use.Do not use without the clear bin and filters in place.Do not leave the appliance when plugged in. Unplug when not in use and before servicing.Do not pull or carry by cable or use cable as a handle.Use extra care when cleaning on stairs. Do not work with the appliance above you on the stairs.Turn off all controls before unplugging. Unplug before connecting any tool or accessory.
23. FIRE WARNING – Do not apply any fragrance or scented product to the filter(s) of this appliance.The chemicals in such products are known to be flammable and can cause the appliance tocatch fire.READ AND SAVE THESE INSTRUCTIONSTHIS DYSON APPLIANCE IS INTENDED FOR HOUSEHOLD USE ONLYPOLARIZATION INSTRUCTIONSTo reduce the risk of electric shock, this appliance has a polarized plug (one blade is wider thanthe other). This plug will fit in a polarized outlet only one way. If the plug does not fit fully in theoutlet, reverse the plug. If it still does not fit, contact a qualified electrician to install the properoutlet. Do not attempt to defeat this safety feature and do not change the plug in any way.Do not pull onthe cable.Do not store nearheat sources.Do not use nearopen flames.Do not run overthe cable.Do not pick upwater or liquids.Do not pick upburning objects.Do not use aboveyou on the stairs.Do not put handsnear the brush barwhen the applianceis in use.3
CONSIGNES DE SÉCURITÉ IMPORTANTESAVANT D’UTILISER CET APPAREIL, VOUS ÊTES TENU DE LIRE TOUTES LES INSTRUCTIONS ETMISES EN GARDE CONTENUES DANS LE PRÉSENT GUIDE ET INDIQUÉES SUR L’APPAREILLorsque vous utilisez un appareil électrique, vous devez toujours suivre les précautions debase 13.14.15.16.4Ces avertissements s’appliquent à l’aspirateur et à tous les accessoires, ainsi que, s’il y a lieu,à tout chargeur ou adaptateur d’alimentation principal.AFIN DE RÉDUIRE LES RISQUES D’INCENDIE, DE DÉCHARGE ÉLECTRIQUE OU DEBLESSURE:Cet appareil Dyson ne doit pas être utilisé par de jeunes enfants ni des personnes dont lescapacités physiques, sensorielles ou de raisonnement sont réduites, ou qui manquent d’expérienceou de connaissances, à moins qu’une personne responsable ne les supervise ou leur indiquecomment utiliser l’appareil de façon sécuritaire.Cet appareil n’est pas un jouet. Faire très attention lorsqu’on l’utilise près d’enfants ou si ceux-cis’en servent. Il faut veiller à ce que les enfants ne jouent pas avec l’appareil.Utiliser cet appareil seulement de la façon décrite dans le présent guide. Ne pas effectuer detravaux d’entretien autres que ceux indiqués dans ce guide ou recommandés par le serviced’assistance téléphonique de Dyson.Convient aux surfaces sèches SEULEMENT. Ne pas utiliser à l’extérieur ou sur dessurfaces mouillées.Ne pas toucher la prise ou l'appareil avec des mains mouillées.Ne pas utiliser si la fiche ou le câble est endommagé. Si le câble est endommagé, il doit êtreremplacé par Dyson ou un agent qualifié afin d'éviter des risques d'accident.Si l'appareil fonctionne mal, s'il a reçu un coup violent, s’il a été échappé, endommagé, laisséà l’extérieur ou plongé dans l’eau, ne pas l’utiliser et communiquer avec le service d’assistancetéléphonique de Dyson.Pour toute réparation ou procédure d’entretien, communiquer avec la ligne d’assistance Dyson.Ne pas démonter l'appareil. S’il est réassemblé de manière inappropriée, cela peut causer unincendie ou des décharges électriques.Ne pas étirer le cordon et ne pas exercer de tension sur celui-ci. Garder le cordon à distance dessurfaces soumises à la chaleur. Ne pas tirer le cordon en le faisant passer sur des surfaces ourebords coupants et ne pas le coincer dans une porte. Garder le cordon à distance des aires decirculation et le faire passer à un endroit où il ne risque pas de causer de chutes. Ne pas écraserle cordon en passant dessus.Ne pas débrancher l'appareil en tirant sur le cordon. Pour le débrancher, saisir la fiche et non lecordon. Nous déconseillons l’utilisation d’une rallonge électrique.Ne pas aspirer d’eau.Ne pas utiliser pour aspirer des liquides inflammables ou combustibles, comme de l’essence,ni dans des zones où il peut y avoir de tels liquides ou émanations de leurs vapeurs.Ne pas aspirer d'objets qui brûlent ou qui fument, comme des cigarettes, des allumettes ou descendres incandescentes.Éloigner les cheveux, les vêtements amples, les doigts et toute partie du corps des ouvertures etdes pieces mobiles. Ne pas pointer le tuyau souple, le tube-rallonge ou les accessoires vers lesyeux ou oreilles et ne pas les mettre dans la bouche.Ne placer aucun objet dans les ouvertures. Ne pas utiliser si une ouverture est obstruée; enleverla poussière, les peluches, les cheveux et tout ce qui pourrait réduire la circulation de l’air.Utiliser seulement les accessoires et les pièces de rechange recommandés par Dyson.
17. Lorsqu’il n’est plus utilisé, enrouler le cordon afin de prévenir les chutes.18. Ne pas utiliser sans le collecteur transparent et le filtre.19. Ne pas laisser l’appareil sans surveillance lorsqu’il est branché. Le débrancher s’il n’est pas utiliséou avant d’effectuer des réparations.20. Ne pas tirer l’appareil ni le transporter par le cordon, ne pas utiliser ce dernier commeune poignée.21. Redoubler de prudence dans les escaliers. Lorsque vous passez l’aspirateur dans les escaliers,il ne doit pas se trouver sur une marche plus haute que vous.22. Fermer toutes les commandes avant de débrancher l’appareil. Le débrancher avant d’y fixerun accessoire.23. RISQUE D’INCENDIE – Ne pas mettre de parfum ou de produit parfumé sur les filtres del’appareil. Les produits chimiques contenus dans ce type de produits sont reconnus pour êtreinflammables et peuvent amener l’appareil à prendre feu.LIRE ET CONSERVER CES INSTRUCTIONSCET APPAREIL DYSON EST CONÇU POUR UN USAGE DOMESTIQUE SEULEMENTINSTRUCTIONS DE POLARISATIONAfin de réduire les risques de décharge électrique, cet appareil a été muni d’une fiche polarisée(une broche est plus large que l’autre). Cette fiche peut être branchée à une prise polarisée d’uneseule façon. Si elle n’entre pas entièrement dans la prise, l’inverser. Si cela ne fonctionne toujourspas, communiquer avec un électricien qualifié afin de faire installer une prise appropriée. Ne pastenter de déjouer ce dispositif de sécurité et ne jamais modifier la fiche.Ne pas tirer surle cordon.Ne pas ranger àproximité de sourcesde chaleur.Ne pas utiliser prèsde flammes nues.Ne pas écraserle cordon enpassant dessus.Ne pas aspirerd’eau oude liquides.Ne pas aspirer desobjets qui brûlent.Ne pas laisserl’aspirateur sur unemarche d’escaliersituée plus hautque vous.Ne pas mettre vosmains près de labrosse lorsquel’appareil esten marche.5
g the clear binVidage du collecteur transparentLooking for blockagesVérification de la présence d’obstructions6CarryComml’aspir
Carrying the applianceComment transporterl’aspirateurCarpets or hard floorsTapis ou planchers dursTool attachmentsAccessoires à fixerclikBrush bar – clearing obstructionsBrosse – Élimination des obstructionsx17
Base plate disassemblyDémonter la plaque de baseBase plate reassemblyRemonter la plaque de baseclik8
IMPORTANT! IMPORTANT!WASH FILTERSWash filters with cold water at leastevery 2 months.The filters may require more frequentwashing if vacuuming fine dust.LAVER LES FILTRESLavez les filtres à l’eau froide au moins tous les deux mois.Les filtres doivent être nettoyés plus souvent si l’appareilest utilisé pour aspirer de fines poussières ou de la poudrenettoyante pour tapis et moquettes.AclikBclikclikclikclik9
USING YOUR DYSON APPLIANCEPLEASE READ THE 'IMPORTANT SAFETY INSTRUCTIONS' IN THISDYSON OPERATING MANUAL BEFORE PROCEEDING.ASSEMBLY Lay the appliance on its back.Attach the cleaner head by sliding it on to the connections onthe lower front part of the ball. Ensure the electrical plug on thecleaner head fits into the twin - block connection on the body of theappliance, which is directly above the airway. Push firmly: the cleanerhead will click into place.Stand the appliance up straight.Attach the wand handle by sliding it on to the top of theappliance. The spring clip in the handle will click into place.Ensure the hose is straight. Press the purple button on the hose.Slide the wand into the hose.Ensure the wand and hose sit in the recess of the handle. Slide the endof the wand down into the handle to secure it.Close the wand cap.Slide the tool holder onto the side of the duct as shown.Ensure the cyclone and clear bin unit is secured to the main body ofthe appliance.Attach the tools as shown. In use, the tools can be attached to eitherthe hose or the wand.Wind the cable around the cable hooks. Secure with the clip.OPERATION Unwind the cable.Plug the appliance into the mains electricity supply.To switch ‘ON’ or ‘OFF’ press the purple power button, locatedas shown.To use, recline the handle. The stabiliser stand will automaticallylift up.After use, return the appliance to the upright position, pushing it firmlyinto place. The stabiliser wheels will automatically lower.Then unplug the appliance, coil the cable safely and put theappliance away.Switch 'OFF' the appliance, unplug and ensure it is upright before:––changing or using tools––removing the hose or airway inspection parts.Use the cyclone carry handle to carry the machine.VACUUMING EMPTYING THE CLEAR BIN The brush bar will always default to ‘ON’ (spinning) each time youswitch the appliance ‘ON’ and recline it for cleaning.The brush bar will not rotate when the appliance is upright.To switch the brush bar 'OFF' (e.g. for delicate rugs and delicateflooring):––switch the appliance ‘ON’––recline the appliance––press the brush bar ‘ON/OFF’ button – the brush bar willstop spinning.The brush bar will automatically stop if it becomes obstructed.See ‘Brush bar – clearing obstructions’.Before vacuuming your flooring, rugs and carpets, check themanufacturer's recommended cleaning instructions.Some carpets may fuzz if a rotating brush bar is used whenvacuuming. If this happens, we recommend vacuuming with the brushbar switched 'OFF' and consulting with the flooring manufacturer.The brush bar on the appliance may damage some carpet types. Ifyou are unsure, turn ‘OFF’ the brush bar.Check the brush bar regularly and clear away any debris (such ashair). Debris left on the brush bar may cause damage to flooringwhen vacuuming.ATTACHMENTS 10To release the wand, open the wand cap and pull the purple tube upand away from the handle until it clicks into place.Should you wish to use the hose without the wand, follow the aboveinstruction and press the purple button to release the wand fromthe hose.Empty as soon as the dirt reaches the level of the MAX mark – donot overfill.Switch ‘OFF’ and unplug before emptying the clear bin.To remove the cyclone and clear bin unit, press down on the purplebutton on the top of the carrying handle on the cyclone.To release the dirt, press all the way down on the same purple buttonon the top of the carrying handle on the cyclone.To minimize dust/allergen contact when emptying, encase the clearbin tightly in a plastic bag and empty.Remove the clear bin carefully from the bag.Seal the bag tightly, dispose as normal.To refit:––ensure the airway in the bin base is clear of dust and dirt––close the clear bin base so it clicks into place––push the cyclone and clear bin unit into the main body of theappliance; it will click into place––ensure the cyclone and clear bin unit is secure.CLEANING THE CLEAR BINCARPETS OR HARD FLOORS Do not use without the clear bin and filters in place.Fine dirt such as flour should only be vacuumed in verysmall amounts.Do not use the appliance to pick up sharp hard objects, small toys,pins, paper clips, etc. They may damage the appliance.When vacuuming, certain carpets may generate small static chargesin the clear bin or wand. These are harmless and are not associatedwith the mains electricity supply. To minimize any effect from this(small static charge), do not put your hand or insert any object into theclear bin unless you have first emptied it and cleaned it with a dampcloth (see ‘Cleaning the clear bin’).Do not work with the appliance above you on the stairs. Whencleaning stairs it is recommended that you use a tool on the end of thehose rather than the wand.Do not put the appliance on chairs, tables, etc.Before vacuuming highly polished floors, such as wood or linoleum,first check that the underside of the floor tool and its brushes are freefrom foreign objects that could cause marking.Do not leave the cleaner head in one place on delicate floors. To separate the cyclone unit from the clear bin press the purple buttonto open the clear bin base. This exposes a small silver button behindthe opening mechanism. Press the silver button and separate thecyclone unit from the clear bin.Do not use detergents, polishes or air fresheners to clean theclear bin.Do not put the clear bin in a dishwasher.Do not immerse the whole cyclone in water or pour water intothe cyclones.Clean the cyclone shroud with a damp cloth only.Ensure the clear bin is completely dry before replacing.WASHING YOUR FILTERS Your appliance has two washable filters, located as shown.Check and wash the filters regularly according to instructions tomaintain performance.Switch ‘OFF’ and unplug before checking or removing the filters.The filters may require more frequent washing if vacuuming fine dust.Wash with cold water only. Do not use detergents.Do not put the filters in a dishwasher, washing machine, tumble dryer,oven, microwave or near a naked flame.FILTER A LOOKING AFTER YOUR DYSON APPLIANCE Do not carry out any maintenance or repair work other thanthat shown in this Dyson Operating Manual, or advised by theDyson Helpline.Only use parts recommended by Dyson. If you do not this couldinvalidate your warranty.Store the appliance indoors. Do not use or store it below 3 C (37.4 F).Ensure the appliance is at room temperature before operating.Clean the appliance only with a dry cloth. Do not use anylubricants, cleaning agents, polishes or air fresheners on any part ofthe appliance.If used in a garage, always wipe the base plate and ball with a drycloth after vacuuming to clean off any sand, dirt, or pebbles thatcould damage delicate floors. Remove cyclone and clear bin (see 'Emptying the clear bin').Release the catch on the front of the cyclone handle and then removethe filter.Wash the filter with cold water only. Hold under a tap and run waterthrough the open end until the water runs clear. Turn upside downand tap out.Run water over the outside of the filter until the water runs clear.Squeeze and twist with both hands to make sure the excess wateris removed.Stand the filter on its wide, open end to dry. Leave to dry completelyfor a minimum of 24 hours.Replace the filter into the cyclone. Swing the handle back into place.Ensure the latch clicks to engage and is secure. Fit the cyclone andclear bin unit onto the appliance (instructions above).
BASE PLATE – DISASSEMBLY/REASSEMBLYFILTER B Lie the appliance on its side.To remove filter B:––turn the purple central locking dial on the outer cover of the ballanti-clockwise until the cover is released––lift off the cover––turn the filter one-quarter anti-clockwise to release.Wash the filter with cold water only.Filter B should be rinsed and tapped out until the water runs clear,then tapped out again to ensure all excess water is removed. (Tap onthe plastic rim, not the filter material.) Leave to dry completely for aminimum of 24 hours.It is normal for the filter in the ball to turn grey in colour.To refit filter B:––refit the filter on to the ball––secure the filter by turning it clockwise so the arrows align.When refitting the outer cover of the ball, keep turning the centrallocking dial clockwise. When it starts to click it is locked. BLOCKAGES – THERMAL CUT-OUT This appliance is fitted with an automatically resetting thermal cut-out.If any part becomes blocked the appliance may overheat andautomatically cut-out.If this happens, follow the instructions below in 'Looking forblockages'.NOTE: Large items may block the tools or wand inlet. If this happens,do not operate the wand release catch. Switch ‘OFF’ and unplug.Failure to do so could result in personal injury. DISPOSAL INFORMATION LOOKING FOR BLOCKAGES Switch ‘OFF’ and unplug before looking for blockages. Failure to doso could result in personal injury.Leave to cool down for 1-2 hours before checking the filters orfor blockages.Clear any blockage before restarting.Look for blockages in the wand, airways and cleaner head.To release the hose from the machine, you will need to removethe wand.Open the wand release cap.Pull the wand up and away from the handle.Press the purple release button in the connecting collar and removethe wand from the hose.Remove the clear bin and cyclone unit. Then release the hose from theappliance by pressing the silver tab on the base of the hose – you cansee it from the front of the appliance.Check for blockages in the hose.Beware of sharp objects when checking for blockages.To refit the hose, align the guides on the base of the hose with thechannels in the neck of the airway. Ensure the silver tab faces the frontof the appliance. Push the hose on. It will click into place. To refit thewand follow the instructions in the ‘Operation’ section.To remove the base plate to access an obstruction, see ‘Base plate –disassembly/reassembly’.To look for blockages in the front airway between the ball and thecleaner head you will need to remove the cleaner head: see ‘Baseplate – disassembly/reassembly' on how to do this.To look for blockages in the rear airway between the ball and thecleaner head you will need to release the hose. Hold and slidethe silver cuff out. Check thoroughly for blockages and slot backinto place.Beware of sharp objects when checking for blockages.To look for blockages in the ball, open the clear plastic inlet onthe top.Refit all parts securely before using.Clearing blockages is not covered by your warranty.Switch ‘OFF’ and unplug before proceeding. Failure to do so couldresult in personal injury.Lay the appliance on its front.Detach the silver ‘C’ clip which is on the connection between thecleaner head and the appliance. It is quite firm, but do not pull it offroughly. Use a constant, firm pressure.Pull the cleaner head away from the appliance. Use a constant,firm pressure.At each end of the cleaner head there are 2 silver levers:––swing them out at right angles––hinge the base plate open.Beware of sharp objects when clearing obstructions.To refit the base plate, hinge it closed.To secure the base plate push both silver levers back into position sothey are flush with the surface of the cleaner head.Refit the silver ‘C’ clip onto the cleaner head. The flatter edge of theclip fits against the cleaner head. It is easier to slide one lug into itsslot before the other.Lay the appliance on its back.Attach the cleaner head by sliding it on to the connections onthe lower front part of the ball. Ensure the electrical plug on thecleaner head fits into the twin - block connection on the body of theappliance, which is directly above the airway. Push firmly: the cleanerhead will click into place.Dyson products are made from high grade recyclable materials.Recycle where possible.ONLINE SUPPORT For online help, general tips, videos and useful informationabout ncanada.ca/supportBRUSH BAR – CLEARING OBSTRUCTIONS If your brush bar is obstructed, it may shut ‘OFF’. If this happens, youwill need to remove the blockage.Switch ‘OFF’ and unplug before proceeding. Failure to do so couldresult in personal injury.Beware of sharp objects when clearing obstructions.If you still cannot clear the obstruction, please follow the instructionsbelow to remove the base plate. This gives more access to theobstruction. Alternatively, contact a Dyson expert on the DysonHelpline or visit the website. Clearing brush bar obstructions is notcovered by your warranty.11
DYSON CUSTOMER CARE If you have a question about your Dyson appliance, call the DysonHelpline with your serial number and details of where and when youbought the appliance.Most questions can be solved over the phone by one of our DysonHelpline staff.If your Dyson appliance needs service, call the Dyson Helpline so wecan discuss the available options. If your Dyson appliance is underwarranty, and it is a covered repair, it will be repaired at no cost. PLEASE REGISTER AS A DYSONAPPLIANCE OWNER WARRANTY LIMITATIONS AND EXCLUSIONSTHANK YOU FOR CHOOSING TO BUY A DYSON APPLIANCETo help us ensure you receive prompt and efficient service, pleaseregister as a Dyson appliance owner. There are three ways to do this:Online at www.dysoncanada.caTelephone the Dyson Helpline at 1-877-397-6622.Complete the enclosed Warranty Form and mail it to us.This will confirm ownership of your Dyson appliance in the event of aninsurance loss, and enable us to contact you if necessary.By registering online or by phone you will:Protect your investment with a five year parts and labour warranty.Receive helpful tips on using your appliance.Get expert advice from the Dyson helpline.Be the first to hear about our latest inventions.Registering only takes a few minutes and all you need is yourserial number.LIMITED 5 YEAR WARRANTY WARRANTY SERVICE TERMS AND CONDITIONS OF THE DYSON 5 YEARLIMITED WARRANTY. Your Dyson appliance is warrantied against original defects inmaterials and workmanship for a period of 5 years from the date ofpurchase, when used for normal domestic purposes in accordancewith the Dyson Operating Manual. Please retain your proof ofpurchase. If you do not have your proof of purchase, your warrantywill start 90 days after the date of manufacture, according to Dyson’srecords. This warranty provides, at no extra cost to you, all labourand parts necessary to ensure your appliance is in proper operatingcondition during the warranty period. The replacement of any part ofyour appliance under warranty will not extend the period of warranty.Any parts which are returned to Dyson will become the propertyof Dyson. Please call the Dyson Helpline at 1-877-397-6622 formore information.This limited warranty is subject to the following terms:WHAT IS NOT COVERED 12Dyson Canada Limited shall not be liable for costs, damages orrepairs incurred as a result of, due to, or from:Purchases of appliances from unauthorized dealers.Careless operation or handling, misuse, abuse and/or lackof maintenance or use not in accordance with the DysonOperating Manual.Use of the appliance other than for normal domestic purposes withinCanada, e.g. for commercial or rental purposes.Use of parts not in accordance with the Dyson Operating Manual.Use of parts and accessories other than those produced orrecommended by Dyson.Faulty installation (except where installed by Dyson).External sources such as weather, electrical outages or power surges.Repairs or alterations carried out by unauthorized parties or agents.Clearing blockages from your appliance or washing of the filter.Normal wear and tear, including normal wearing parts, such as clearbin, filter, brush bar, and power cord (or where external damageor abuse is diagnosed), carpet or floor damage due to use not inaccordance with Dyson's Operating Manual or failure to turn thebrush bar off when necessary.Damage as a result of use not in accordance with the rating plate.Use of this appliance on rubble, ash, plaster, drywall, liquids, orwet surfaces.Additionally, this limited warranty does not apply to any appliancethat has had the serial number altered or removed.If you are in any doubt as to what is covered by your warranty, pleasecontact the Dyson Helpline.Please fill out and return the Warranty Form or register online at www.dysoncanada.caBefore service can take place, the terms of the warranty require thatyou contact the Dyson Helpline with your model name/number, serialnumber, date and place of purchase.Please keep your purchase receipt in a safe place to ensure you havethis information.All work will be coordinated by Dyson Canada Limited or itsauthorized agents.Any replaced defective parts will become property of Dyson.Service under this warranty will not extend the period of this warranty.If your appliance is not functioning properly, please call the DysonHelpline at 1-877-397-6622. Most issues can be rectified over thetelephone by our trained Dyson Helpline staff. If this is not possibleDyson Canada Limited will arrange for your appliance to be repairedand returned in full working order at no extra cost to you.WHEN REGISTERING YOUR DYSON APPLIANCE:WHAT IS COVERED Any implied warranties relating to your appliance including butnot limited to warranty of merchantability or warranty of fitnessfor a particular purpose, are limited to the duration of thiswarranty. This limitation is not allowed by some Provinces and/orTerritories and so this limitation may not apply to you.Your remedy for breach of this warranty is limited to the warrantyservice described above.Dyson Canada Limited will not be liable for any consequentialdamages or incidental damages you may incur in connection withyour purchase and use of your appliance.This limited warranty gives you specific legal rights. You may alsohave other rights which vary by Province and/ or Territory.This limited warranty is not transferable.This limited warranty is only available in Canada. You will need to provide us with basic contact information to registeryour product and enable us to support your warranty.When you register, you will have the opportunity to choose whetheryou would like to receive communications from us. If you opt-in tocommunications from Dyson, we will send you details of special offersand news of our latest innovations. We never sell your informationto third parties and only use information that you share with us asdefined by our privacy policies which are available on our website.www.dysoncanada.caPRODUCT INFORMATIONPlease note: Small details may vary from those shown.Your serial number can be found on your rating plate which is behind the clear bin.Note your serial number for future reference.This illustration is for example purposes only.
UTILISATION DE VOTRE APPAREIL DYSONVEUILLEZ LIRE LES « CONSIGNES DE SÉCURITÉ IMPORTANTES »DANS CE GUIDE D'UTILISATION DYSON AVANT DE POURSUIVRE.ASSEMBLAGE Mettez l’aspirateur sur le dos.Fixez la tête de nettoyage en l’insér
Do not pull on the cable. Do not store near heat sources. Do not use near open flames. Do not run over the cable. Do not pick up water or liquids. Do not pick up burning objects. Do not use above you on the stairs. Do not put hands near the bru