Transcription
Deluxe Art aselASSE:MBL Y INSTRUCTIONSHave aquestionor need help?Give us a call!1-800-284-3948We about your comments. Please coll us! so.,.,&.Do 1·800·284·3q48www.MelissoAndDoug.comMelissa & Doug products meet or exceed U.S. testingstandards and pass our high quality requirements. Melissa & Doug, LLC, P.O. Box 590, Westport, CT 06881MADE IN CHINA& WARNING:CHOKING HAZARD Small Parts.Not for children under 3 years.& CAUTION:ADULT ASSEMBLY REQUIRED.
TI--IANK YOU!Thank you for choosing the Melissa & Doug Deluxe Art Easel! It's a terrific way to help nurturea child's creativity and imagination, and to inspire artistic exploration for years to come.NOW IT'S TIME TO PUT IT TOGETI--IER!Don't worry-assembling your new easel is simple, and we're here to help. It may go a littlefaster with a partner to lend a hand, but we've made it so one person can assemble the easel.Here are a few tips before you begin: Read through all the instructions first. We've included everything you need. All parts are labeled with a lettered sticker (A-K).Clear a flat, covered space (carpeted is best) to lay out all the materials so everything isclose at hand. The instructions include lots of helpful pictures-we show you, step-by-step, exactly howto align pieces and parts for speedy and accurate assembly. Note that hardware neededfor each step is shown in the upper right corner of the page, each piece being added in agiven step is highlighted in gray, and the "assembled view" (what it looks like when thestep is completed) is included in the lower right corner of every page. In the instructions, the name of a part is followed by a letter in parentheses. This lettercorresponds to the sticker on the part, as well as the picture of the part shown on page 2. l-lelpful hints are highlighted with a large exclamation point:IMPORTANT: f-lelpful hints are found here. If you have any questions, we're here for you! Give our customer service team a call at1-800-284-3948!Melissa & Doug Customer Service: 1-800-284-39481
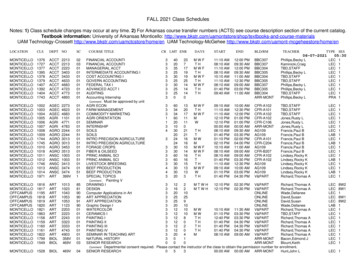
PARTS - Be Smart-Sort Your PartsBefore you begin assembly, make sure you have all theparts listed below. When directed, use the Allen wrench(part 0) to attach the bolts to bolt caps.TOPTOPQGG) upper hinged legs (2);Jpaper guide/cutter,.G(9 lower legs (4) ) chalkboarddry-erase board \G) paper roll dowel0blue plastic tray0red plastic trayupper art board frame with logoIo ':'. 11 o ';:' l I::: 00lower art board frames (2)leg braces (2) ARDW ARE & TOOLSWe about your comments.Please can us! (1,,2.Do 1·800·284·3q48www.MelissaAndDoug.comMeis&a & Doug products meet or exceed U.S. s.C Melis&a& Doug, LLC, P.O. Box 590, Wesiport, CT06881(:) Allen wrenchQplastic clips (4)GC, short bolts (20)2Bolt Caps (26)
STEP 1 - Get a Leg Up Stack 2 lower legs (C) on top of each other,then align them with the holes on theupper hinged leg (D). Make sure numberson the upper legs and lower legs match andface each other for proper assembly.Repeat on the opposite side.short Using 8 short bolts (M) and 8 bolt caps (P),attach lower legs to upper hinged legs.x8x8IMPORTANT:Make sure hingesare on the insidefacing each other.IMPORTANT: On bothsides, match the numbers.(D.-.(DQ).-.Q)Assembled ViewMelissa & Doug Customer Service: 1-800-284-39483
RollingnopeeKSTtP 2(P),2 b o lt c a p sdna)(MsboltgUsing 2 s h o rt(1-l) to th e lelewodllroe papera tt a c h th(I).braces0sh or tX2X20M ak e su reIMPORTANT: facing th ereU-channe/s a n .otiecirdsa m e4A ss e m b le d View
STEP 3 - Brace YourselfSlide the leg brace assembly (H & I) intoplace. Using 2 long bolts (N) and 2 bolt caps(P), fasten one end of the leg braceassembly to both sides of the easel. -------longx2x2- GAssembled ViewMelissa & Doug Customer Service: 1-800-284-39485
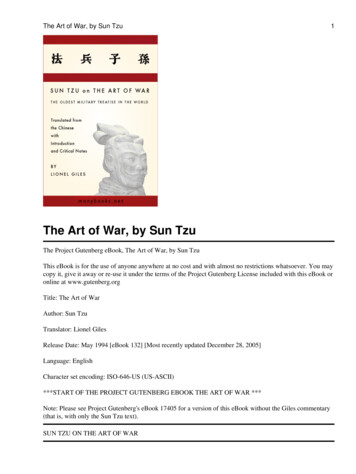
HtfmallSSNIOTStGGHT SUGor Tall?justed as youngadeblysieancaselchild.e Deluxe Art E:as best for yourrkoThe height o f thwtaththgeioose the hartists grow. Chthe3r d hole fromtopChild's he ig ht isless th an 40in ch es (1 02 cm)2nd hole fromthe to ptoTypical Age 3dolsar4 yeChild's he ig ht isbe tw ee n 40 -4 8cm)in ch es (1 02 -1 22to 6Typical Age 5dolsarye1st holeChild's height isgr ea te r th an 48in ch es (122 cm)Typical Age 7ye ar s an d ol de rce th e tr ayIMPORTANT: Plae ar t panel.thone hole below6
If you want to position the art boards in the middle or lower positions, skip now to Step 5STEP 4 - Top Notch Stand the easel up and slightly openthe legs. Insert 2 long bolts (N) into thehighest position holes on the easel's legs.This side will hold the dry-erase board.shortX2 long Insert 2 short bolts (M) into the highestposition holes on the easel's back legs.This side will hold the chalkboard.IMPORTANT: Refer to l-leightSuggestions (page 6) to determine inwhich position to attach the dry-eraseboard and chalkboard.Melissa & Doug Customer Service: 1-800-284-39487x2
ingdnatStuOsSTtP),n d 2 b o lt c a p s (Plong b o lt s (N) as too f th e leg b ra c esedsiginnaima tt a c h reth e ea se l' s legs.Using 2longX2X2--- D---- G8A ss em bl ed View
ST P 6 - Never Be "Board" Using 2 long bolts (N) (already in placeif mounting in highest position) and 2bolt caps (P), attach top of dry-eraseboard (A) and paper guide/cutter (E::) toeasel. Using 2 short bolts (M) and 2 bolt caps(P), attach bottom of dry-erase boardand a lower art board frame (G) toeasel.0 VX2 shortlongGc(D,,.-- - .:.:--.:----G D X2Gc(D-------------eIMPORT ANT: Make sure"TOP" on the back ofthe dry-erase board isfacing up.dry-erase board-------Melissa & Doug Customer Service: 1-800-284-3948G--{(]Assembled View9X4
STEP 7 - Start With a Clean Slate Using 2 short bolts (M) (already in place if mounting inhighest position) and 2 bolt caps (P), attach top ofchalkboard (B) and upper art board frame (I ) to easel. v0shortGX4X4 Using 2 short bolts (M) and 2 bolt caps (P), attach bottomof chalkboard and a lower art board frame (G) to easel.--,--------------------··.·.·e ::.··· . . .··. . : .·. :-.·.: . ·.··. :.h·.· :l·k··. b··.· .: .d·· . :. .c a. oat · . ·IMPORTANT: Make sure"TOP" on the back ofthe chalkboard is facingup.00Assembled View10
STEP 8 - "Tray" Bien! It's the End Using 2 short bolts (M) and 2 bolt caps (P}, attach bluetray (J) to dry-erase board side of the easel. Using 2 short bolts (M) and 2 bolt caps (P}, attach redtray (K) to the chalkboard side of the easel.0G vshortX4X40--,i?IMPORTANT: Place the tray onehole below the art panel.Melissa & Doug Customer Service: 1-800-284-3948Assembled View11
YOU DID IT!Now the real fun begins-it's time to paint, draw, and create! Here are some tips formaking the most of the Deluxe Art Easel:DRY-ERASE BOARD Only use markers (not included) specially formulated for use on dry-erase surfaces.Permanent markers will damage the dry-erase surface. Clean the board with a felt eraser or dry paper towel. OLD LAT OR STORAGE Unscrew the bolt caps to remove the paper roll. Reattach the dowel to the easel. Lift leg brace assembly to fold easel.TI--IERE ARE LOTS O WAYS TO PLAY!I--IERE ARE A EW IDEAS: Use the clips to hang paintings to dry or to display artwork! Give clues and have the child draw what you describe, and then switch and draw whatthe child describes to you-get ready for some silliness! Draw a shape on the dry-erase board while the child draws a shape on the chalkboard.Switch sides. Add a shape or line to the child's drawing while the child adds a shape orline to yours. Continue switching sides adding to each other's drawings until you bothagree the masterpieces are complete! Play drawing games, such as tic-tac-toe or hangman. Play a guessing game, where oneperson thinks of a movie, book, place, or phrase, then tries to draw it (no lettersallowed!) while the other person tries to guess what it is. Use the easel to play school! Have the child be the "teacher" and set up dolls or stuffedanimals as "students." He or she can use the chalkboard to teach the class the ABCs,simple math problems, or to write "homework" assignments!12
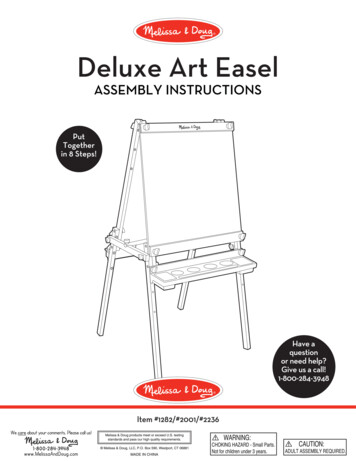
ADDING PAPERThe Deluxe Art Easel holds easelpaper rolls up to 18 inches wide.STEP1Unscrew the bolt caps (P) between the artboards to remove the paper roll dowel (1-1).STEP 2 Slide paper roll (not included) onto the dowel (1-1). Reattach dowel to easel.Melissa & Doug Customer Service: 1-800-284-394813
STEP3 Feed the paper up between the art boardsand back down the front between thedry-erase board and the paperguide/cutter. Use the plastic clips (L) at the top and thebottom to hold the paper in place.ACCESSORIZEThe Melissa & Doug Easel Accessory Set (#4145)has everything needed to get started with theDeluxe Art Easel.It includes poster paints, paintbrushes, spill-proof paint cupswith lids, dry-erase marker, jumbo chalk sticks, felt eraser,and an easel paper roll.For this and other art essentials, such as paper rolls, smocks, drop cloth,crayons, markers, paints, and much more, visit us at MelissaAndDoug.com!14
ADDING PAPER The Deluxe Art Easel holds easel paper rolls up to 18 inches wide. STEP1 Unscrew the bolt caps (P) between the art boards to remove the paper roll dowel (1-1). STEP 2 Slide paper roll (