Transcription
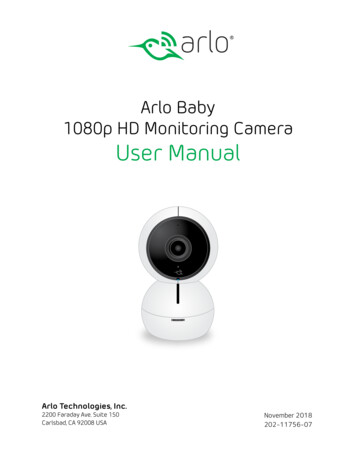
Arlo Baby1080p HD Monitoring CameraUser ManualArlo Technologies, Inc.2200 Faraday Ave. Suite 150Carlsbad, CA 92008 USANovember 2018202-11756-07
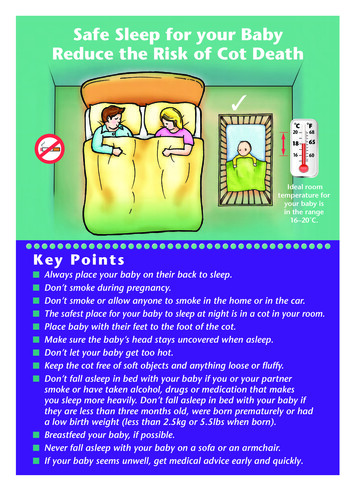
SupportFor product updates and web support, visit http://www.arlo.com/en-us/support/.Trademarks Arlo Technologies, Inc. Arlo, Arlo logo, and Every Angle Covered are trademarks of Arlo Technologies, Inc. Other trademarks arefor reference purposes only.ComplianceFor regulatory compliance information including the EU Declaration of Conformity, visit www.arlo.com/about/regulatory/.See the regulatory compliance document before connecting the power supply.Safety InstructionsWARNING Heed all warnings in this manual and warning labels attached to the camera, cords, andaccessories. Failure to do so could result in injury. STRANGULATION HAZARD – Children have STRANGLED in cords. Keep cord out of the reach of children(more than 3ft (0.9m) away).NEVER place the camera or cord in or near crib or playpen. Secure the cord at least three feet awayfrom crib or playpen.NEVER mount the camera directly above crib or playpen to avoid the risk of injury.NEVER use extension cords with AC adapters. Only use the AC adapters provided.CHOKING HAZARD – This product contains small parts which may cause choking. Keep small parts awayfrom children.ELECTRIC SHOCK WARNING - Never use this device near water, including near a bathtub, sink, laundrytube, wet basement, etc.This product and accompanying accessories are NOT toys. Do not allow children to play with them.This product is NOT intended to replace proper supervision of children. You MUST check your child’sactivity regularly.This product is not intended for use as a medical camera and its use should not replace adult supervision.Only a battery pack of the same type should be inserted by an authorized Arlo Technologies servicecenters. There is a risk of explosion if the battery is replaced by an incorrect type.Unplug product during lightning storms.Recommended Safe Use It is essential that you check the operating range and condition of the camera on initial installation, andon a regular basis after thatCheck reception regularly. Test the camera before use and after changing camera location.Some adult assembly or installation is required. Keep small parts away from children when assembling.This product is intended for indoor use only.Clean the camera with dry cloth only.Do not block any ventilation openings.Do not install near any heat sources such as radiators, heat registers, stoves, or other devices thatproduce heat.Only use attachments and accessories specified by the manufacturer.Only use with the stand, mount, and mounting screws specified by the manufacturer, or sold with thedevice.Unplug this device when unused for long periods of time.Do not touch the plug contacts with sharp or metal objects.This product should only be serviced by authorized Arlo Technologies service centers. Contact ArloSupport at arlo.com/support for RMA information.2
ContentsSafety Instructions.21.Set Up Arlo Baby6Plug in Your Camera.6Get the App.6Get a New Account or Log In.7Place Your Camera.7Camera Position.8Select a Good Location for Your Camera 9Charge Your Arlo Baby Camera.9Turn the Arlo Baby Battery Power Off and On 10Camera LED Guide.112.View Live Video and Recordings12View the Camera Image Status.12Access Your Live Camera Images.13Record Clips From Live Video.14Take a Snapshot From Live Video.14Talk and Listen.14Manage Your Cameras and Devices.15Cloud Recording.17View Recordings and Snapshots.17Share and Manage Library Recordings 193.Do More With Arlo Baby22Always Listening.22Play Sounds and Music.22Manage the Playlist.23Set the Music Timer.273
Play a Single Track on a Loop.28Shuffle the Tracks in the Playlist.29Use the Night Light.29Air Sensors.32View Live Sensor Data.33View Air Sensor Data History.34Edit the Temperature Sensor Settings 34Edit the Humidity Sensor Settings.35Edit Air Quality Data Collection and Notification 36Arlo Baby Character Sets.364.Personalize Your Camera38Name Your Camera.38Profile Settings.38Grant Access to Friends.405.Modes, Rules, and Smart Alerts43Change Motion Sensitivity.44Automatically Stop Recording When Motion Stops 45Change Audio Sensitivity.46Manage Alerts.46Set Up Geofencing.47Geofencing With Multipe Mobile Devices 49Geofencing Accuracy.50Geofencing First In Last Out.51Create a Schedule.51Add a Mode.52Motion Detection Activity Zones.546.Settings56Connect Arlo Baby to a Different WiFi Network 56Change the Time Zone.574
Change the Video Resolution.57Turn Night Vision On and Off.58Turn the Microphone Off and On.58Change the Speaker Settings.59View Device Information.60Update the Firmware.60Restart the Camera.61Reset the Camera to Its Factory Settings 62Remove a Camera From Your Account 627.Manage Your Subscription Plan64Subscription Plans.64Upgrade to a Paid Subscription Plan.648.Continuous Video Recording65View the Timeline.65Navigate Through the Timeline.65View the Timeline Calendar.669.Arlo Connect67Use Arlo Baby With HomeKit.67Use Arlo With IFTTT.68Use Arlo With Stringify.6810. Troubleshooting71Arlo Baby Is Not Streaming on a Mobile Device 71Cannot View Arlo Live Streaming in a Web Browser 71Not Receiving Push Notifications.71Recalibrate the Air Sensors.735
1. Set Up Arlo BabySetting up your Arlo Baby camera involves a few simple steps. Your Arlo account letsyou view videos from any Internet-connected computer or mobile device. You canuse the same Arlo app to set up and manage Arlo Baby and other Arlo cameras. YourArlo Baby camera uses a WiFi link to your home network to stream video to your Arloaccount in the cloud.Plug in Your Camera1. Connect one end of the USB power cable to the port on the camera.2. Plug the other end of the USB cable into the adapter.3. Plug the USB power adapter into a wall socket and wait for the camera LED toblink amber.Get the AppFor the best experience, download the Arlo app by scanning this QR code orsearching for Arlo in the app store.Note: If you already use the Arlo app, make sure that you are using the latest version. Tofind out if an update is available, go to the app store and search for Arlo6
Set Up Arlo BabyGet a New Account or Log InCreate a New Arlo Account¾¾ To create a new Arlo account:1. Launch the Arlo app from your smartphone, tap New to Arlo?, and select ArloBaby.If you are using a computer, enter https://my.arlo.com/#/login in the address barof a browser.2. Follow the onscreen instructions.Log in and Add Your Arlo Baby Camera¾¾ To add an Arlo Baby camera to an existing Arlo account:1. If you already set up an Arlo account, log in and click or tap Add Device.2. Follow the onscreen instructions.Place Your CameraYou can place your camera on a flatsurface or mount it on the wall.Note: Do not cover or obstruct the inlet holesfor the air quality sensors.¾¾ To mount the camera on a wall:1. Place the wall plate and secure it with the included screws.7
Set Up Arlo Baby2. Align the wall plate with the holes on the base of the camera and rotate thebase until it snaps into place.3. Use Arlo Baby’s tilt and swivel functions to position the camera so that itcaptures the area that you want to monitor.Camera PositionWhen placing your camera, keep these tips in mind: Avoid placing the camera in an area that gets a lot of light shining directly intothe camera lens. Infrared lights can reflect off walls and negatively impact video quality. Try toaim your camera away from walls. You can move and zoom the field of view. Arlo Baby provides a 110-degree viewing angle as the default. You can changethe field of view to 90, 100, 110, 120 or 130 degree field of view in the CameraSettings. Position your camera so that the space that you want to monitor iswithin the camera’s field of view. To help with placing your camera, do a live stream from the Arlo Baby camera.Aim the camera while watching the video feed on your Arlo smartphone app tomake near-real-time adjustments to the camera’s position.8
Set Up Arlo BabySelect a Good Location for Your CameraPlace your Arlo Baby camera out ofreach of children in a location with aclear, unblocked field of view and witha good signal to the WiFi router.Note: Your wireless range variesdepending on environmental factors,including physical obstructions,construction materials, and wirelessinterference.Charge Your Arlo Baby CameraThe Arlo Baby battery is partially charged when it leaves the factory.¾¾ To charge the battery:1. Connect the smaller end of the USB power cable to the port on the camera.2. Plug the larger end of the USB cable into the power adapter.3. Plug the USB power adapter into a wall socket.You must use an Arlo Baby power cable and adapter to charge the camerabattery. Do not try to power the camera or charge the camera battery with anypower adapter other than the one provided with the Arlo Baby camera.The battery’s charge percentage displays in the Settings page for your ArloBaby. To access the Settings page, launch the Arlo app. Then tap or clickatthe upper right of the camera image and select Device Settings.9
Set Up Arlo BabyTurn the Arlo Baby Battery Power Off and OnYour Arlo Baby camera has a rechargeable battery. You can place the camera inlocations where you cannot connect it to an AC wall outlet. Arlo Baby can work forseveral hours at a time using the rechargeable battery.To avoid draining the battery, switch the battery off if you are not using Arlo Babyor if you are moving the camera to a new location.¾¾ To turn the Arlo Baby battery power off and on:1. Rotate the character feet and pull them off to remove them.2. Use the switch on the bottom of the camera to power Arlo Baby camera’sbattery off and on.The camera’s battery is on when the green color displays.3. To install character feet, align the foot plate with the holes on the bottom ofthe camera and rotate the foot plate until it clicks into place.10
Set Up Arlo BabyCamera LED GuideThe Arlo Baby camera LED lights in different colors to indicate how the camera isoperating.Camera LED GuideSolid amberThe camera is booting.Solid blueThe camera powered on and isconnected to the Internet.Solid purpleThe camera is connected to aWiFi network. However, it is notconnected to the Internet.Double blink amber every 10secondsThe battery charge is low.Slow blinking blueThe camera is attempting toconnect to the InternetBlinking purpleThe camera is too far away fromthe router.Fast blinking amberThe camera is not connected to aWiFi network.Fast blinking blue for threesecondsThe camera was justconnected to a charger.Blinking blue and amberA firmware update is in progress.DO NOT TURN OFF THECAMERA.Off. The camera is powered offor the battery has less than 10%charge.11
2. View Live Video and RecordingsYou can access your live camera images at any time to view the feed and talk andlisten to your baby. You can also manage the Arlo Baby music player, night light, andcheck the air conditions. Arlo Baby securely stores recorded videos and snapshots in alibrary in the cloud. You can view your recordings, mark them as favorites, and searchusing the filter.View the Camera Image StatusWhen you launch the Arlo app, the Devices page displays camera images.Unviewed recordingsCamera nameShortcut menuCamera statusCamera imageSettingsSelect devicesRecordingslibraryCameraStatus IconsDetectionmodesDisplay is based on the mode and camera setupWhen this icon is orange, it means that the camera is seeing motion.When this icon is orange, it means that the camera is hearing soundWiFi signalBattery12
View Live Video and RecordingsAccess Your Live Camera ImagesYou can access your live camera images at any time to view the video feed and talkand listen to your baby. You can also manage the Arlo Baby music player, night light,and check the air conditions.¾¾ To access live camera images:1. Tap the Arlo iconon your mobile device.If you are using a computer, enter https://my.arlo.com/#/login in the address barof a browser.The Devices page displays. .2. To view and listen to a live , tap or click Live on the camera feed image.Always ListeningSound and musicAir sensorinformationNight LightLive Feed ControlArlo BabyIconsDescriptionLive ControlIconsDescriptionNon-stop audio monitoring evenwhen your phone is locked.Pause.Night light.Record video manually.Music player.SnapshotAir sensor informationBrightness.Microphone. Start using Talk and Listen.Full screen.13
View Live Video and RecordingsRecord Clips From Live Video¾¾ To record clips from live video:1. Tap the Arlo iconon your mobile device.If you are using a computer, enter https://my.arlo.com/#/login in the address barof a browser.The Devices page displays.2. Tap or click Live in the camera image.The camera image icons display at the bottom of the camera image.3. Tap or click Record Video.This icon turns red to indicate that you are recording the live feed.4. To stop recording, tap or click Record Video.Take a Snapshot From Live Video¾¾ To take a snapshot from live video:1. Tap the Arlo iconon your mobile device.If you are using a computer, enter https://my.arlo.com/#/login in the address barof a browser.The Devices page displays.2. Tap or click Live in the camera image.3. Tap or click Snapshot.The snapshot is saved in your library.Talk and Listen¾¾ To talk and listen:1. Tap the Arlo iconon your mobile device.If you are using a computer, enter https://my.arlo.com/#/login in the address barof a browser.14
View Live Video and RecordingsThe Devices page displays.2. Tap or click Live in the camera image.3. Tap or click Microphone.A microphone button displays.4. Wait for the button to turn bright green.This can take up to five seconds. When the button is bright green, Talk andListen is ready.5. Tap and hold or click and hold the microphone button and speak.Manage Your Cameras and DevicesIf you use more than one camera, you can change the order in which the cameraimages are displayed on the Devices page. You can also zoom, invert, or rotate thecamera image.Change the Camera Order¾¾ To change the camera order on the Devices page:1. Tap the Arlo iconon your mobile device.If you are using a computer, enter https://my.arlo.com/#/login in the address barof a browser.The Devices page displays.2. Tap or click Settings.The Settings page displays.3. Under System, tap or click Camera Order.A list of cameras displays in the order that they display on the Devices page.4. Tap or click Edit at the top of the page.A list icon displays.5. Tap and hold or right-click the list icon and drag the camera to the correctposition on the list.6. Tap or click Done.15
View Live Video and RecordingsYour settings are saved.Zoom a Camera ImageTo zoom a camera image:1. Tap the Arlo iconon your mobile device.If you are using a computer, enter https://my.arlo.com/#/login in the address barof a browser.The Devices page displays.2. Tap or click Settings My Devices.A list of cameras displays.3. Tap or click the camera.The camera settings display.4. Tap or click Video Settings.5. Under Activity Zones, tap or click Zoom.6. Resize and position the image box as necessary.7. Tap or click Save.Your settings are saved.Note: To zoom an image temporarily while a camera is streaming, pinch the camera screenon your mobile device.Rotate a Camera ImageYou can invert the video feed image.¾¾ To rotate the camera image:1. Tap the Arlo iconon your mobile device.If you are using a computer, enter https://my.arlo.com/#/login in the address barof a browser.The Devices page displays.16
View Live Video and Recordings2. Tap or click Settings.The Settings page displays.3. Tap or click My Devices.A list of cameras displays.4. Tap or click the camera.The settings for the camera display.5. Tap or click Video Settings.The Video Settings page displays.6. Tap or click Rotate Image.7. The camera image is inverted.Cloud RecordingWith cloud recording, everything the Arlo Baby camera records is sent to the cloudfor secure storage in your library. You can access these recordings from anywhereyou are using a mobile device, or on a Windows or Mac computer. All recordingsare encrypted with the user name and password that you create. No one else canaccess your recordings.We provide free cloud storage for the life of the Arlo Baby cameras. We store arolling 7 days of recordings that are created when the Arlo Baby camera detectsmotion or sound. You can pay to store recordings in the cloud for 14 days or30 days. You can download recordings and save them to your mobile device orcomputer for long-term storage.View Recordings and SnapshotsYour Arlo Baby camera stores recordings and snapshots in the library. You can usethe filter and the calendar to find and view specific recordings.Use the LibraryYou can use the library to find and view recordings based on the date.¾¾ To use the library:1. Tap the Arlo iconon your mobile device.If you are using a computer, enter https://my.arlo.com/#/login in the address barof a browser.17
View Live Video and RecordingsThe Devices page displays.2. Tap or click Library.A calendar displays on the top of the page and your most recent recordingsdisplay.3. If it is more than one month since you started recording, use the arrows oneither side of the month to choose a month to view.Days on which a video clip was recorded are indicated with a green circle.4. Tap or click a highlighted date.Recordings from that date display below the calendar.Use the FilterYou can use the filter to find and view recordings based on criteria that you select.¾¾ To use the filter to view your library:1. Tap the Arlo iconon your mobile device.If you are using a computer, enter https://my.arlo.com/#/login in the address barof a browser.The Devices page displays.2. Tap or click Library.3. Tap or click the Filter iconin the upper left corner of the page.The filter page displays.4. Tap or click filtering criteria.5. To remove filtering, tap or click Reset.18
View Live Video and Recordings6. Tap or click Done.The Filter iconbecomes solid green to show that you are using filtering.Recordings that match your filter selections display. Dates with recordings arehighlighted in dark green.Turn Off the FilterThe Filter iconon the Library page is solid green when you are using filtering.When filtering is used, only the recordings in your library that match your filtercriteria display. You can turn off filtering.¾¾ To turn off filtering for your library:1. Tap the Arlo iconon your mobile device.If you are using a computer, enter https://my.arlo.com/#/login in the address barof a browser.The Devices page displays.2. Tap or click Library.3. Tap or click the Filter iconin the upper left corner of the page.The Filter page displays.4. Tap or click Reset at the bottom of the page.Filtering is turned off. The Filter iconfiltering is not in use.becomes an outline to show thatShare and Manage Library RecordingsDownload Recordings¾¾ To download clips from the library:1. Tap the Arlo iconon your mobile device.If you are using a computer, enter https://my.arlo.com/#/login in the address barof a browser.The Devices page displays.2. Tap or click Library.19
View Live Video and RecordingsThe Library page displays.3. Tap or click a snapshot or video.4. Tap or click.5. Tap or click OK to confirm.The file you selected is downloaded.Create a Favorite Recording¾¾ To create a favorite recording:1. Tap the Arlo iconon your mobile device.If you are using a computer, enter https://my.arlo.com/#/login in the address barof a browser.The Devices page displays.2. Tap or click Library.The Library page displays.3. Tap or click a snapshot or video.4. Tap or click.Share Recordings¾¾ To share recordings:1. Tap the Arlo iconon your mobile device.If you are using a computer, enter https://my.arlo.com/#/login in the address barof a browser.The Devices page displays.2. Tap or click Library.The Library page displays.3. Tap or click a snapshot or video.4. Tap or click.5. Share the file.20
View Live Video and RecordingsDonate Recordings for ResearchYou can donate video or snapshot files to Arlo Technologies to use for researchand development of Arlo products.¾¾ To donate recordings:1. Tap the Arlo iconon your mobile device.If you are using a computer, enter https://my.arlo.com/#/login in the
November 2018 202-11-0 Arlo Technologies, Inc. 2200 Faraday Ave. Suite 150 Carlsbad, CA 92008 USA User