Transcription
Building an AquaponicsSystem
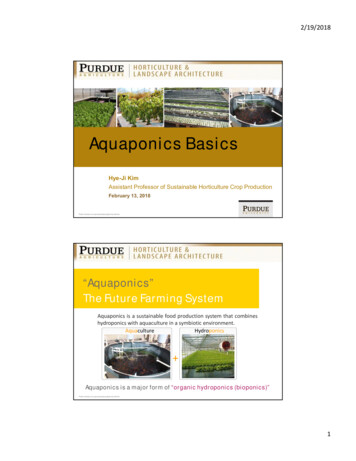
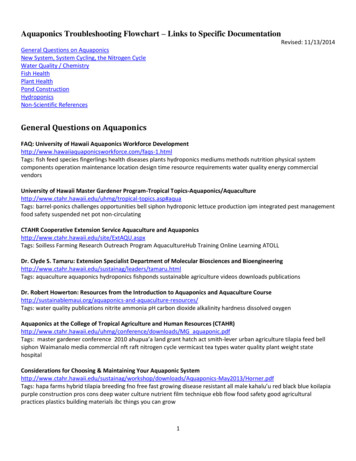
Building an aquaponics system is very easy once youhave a sound design.Grow bed 4’ x 20’Key: valveWater pumpAir pump2” pvc1 ½” pvcAir lineSump 1Bio FilterSump 2Radial FilterFish tanks (100 gal ea)
System Overview This is a dual loop system with:– 2 100‐gallon fish tanks– a radial filter– a bio filter– two sump tanks– 2 water pumps– 2 air pumps with 8 airstones– 4 ft x 20 ft grow bed.
System Overview The complete materials list, includingsupplier and cost, is found in a handout. The entire system will cost about 2,000and is very easy to do. We built it in 4‐5 hours
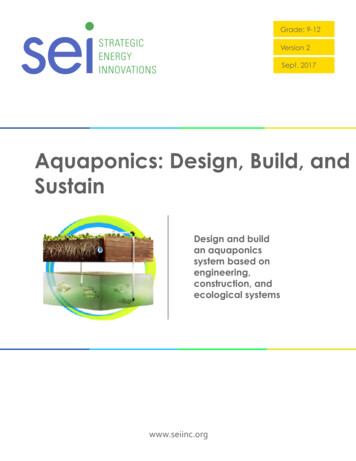
Dual Loop System One of the primary benefits of a dual loopsystem is that it enables you to separate, ifneed be, the hydroponics from theaquaculture systems. This is important forthe following reasons:1. If you need to spray or otherwise treat theplants you can do so without killing the fish.2. If you need to treat the fish or the fish die,then you can supplement the nutrient needsof the plants while you are bringing the fishback online.
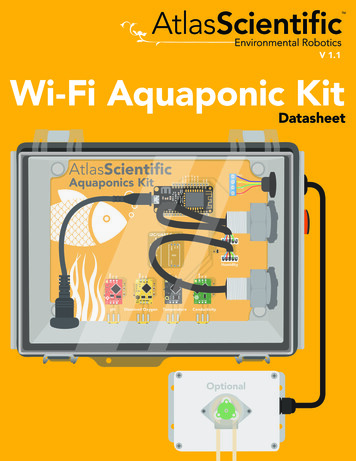
HydroponicsGrow bed 4’ x 20’AquacultureSump 1Bio FilterSump 2Radial FilterFish tanks (100 gal ea)
Dual Loop System The aquaculture loop is comprised of thetwo fish tanks, the radial filter, the biofilter and Sump 1. The hydroponics system is Sump 2 and thegrow bed. The dual loop system requires theaddition of a second water pump as wellas various valves to control the directionof the water flow.
Dual LoopAquaculture 2 fish tank Radial filter Biofilter Sump tank 1Hydroponics Sump tank 2 Grow Bed
Description of Components,Order of Construction andSystem Flow
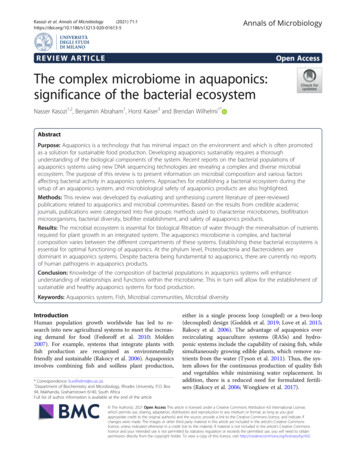
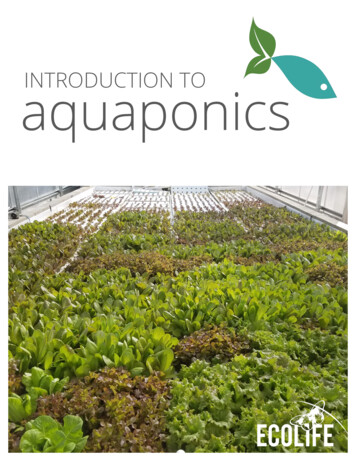
Fish Tanks Two food‐grade 100‐gallon Rubbermaid stockwater tanks were set up on cinder blocks to beat the highest point of the entire system. Tanks were laid out and area for the grow bedsmeasured to make sure everything is spacedproperly and would fit.
Close up3 layers high : tank 12 layers high: tank 21 layer: sump tanksCascadingeffect
Fish Tanks One item not included in this system, but isnecessary, is the cover for the fish tanks. Covers are important for at least tworeasons:– First, you do not want your water exposed to thesun because it will produce algae.– Second, you do not want fish jumping from onetank to another nor do you want them gettinginto your raft system where they will eat theplant roots.
Grow Bed or Trough Construction The inside dimensions of the grow beds are 49.25inches wide by a little over 20 ft long.– The floating boards are 4 ft wide.– The extra 1.25 “ width allows for some movement ofthe boards. Total width (outside to outside) is 52.25”.– This single trough was constructed using 2x12pressure treated lumber.– Treated lumber is okay to use because the food gradeliner used in the trough protects the plants from anychemical leaching from the treated lumber.– The 2x12 sections were joined together on theinterior corners using galvanized brackets and on theexterior by splicing with 1x4 treated wood.– The corners were reinforced using galvanized cornerpieces and 1 1/4" deck screws.
Hole for return water pipe
1x4 wood splicebracket
Grow Bed or Trough Construction Once the lumber is assembled, lay down theliner and cut it to length.
Grow Bed or Trough Construction The Ultra Scrim R20WW liner comes as a roll of6.167 ft x 100 ft and is FDA approved as foodsafe. Pond liner works just as well and is cheaper,but is not certified as food grade so it cannot beused if you are selling your product.– The Ultra Scrim only comes in two widths, 6.167 ftand 12 ft so that tends to determine the width ofthe grow beds.– The 6.167 ft width is perfect for 4 ft wide bedswith sides that are under a foot high with 2x12wood boards.
Grow Bed or Trough Construction Once laid out and cut to length, the liner wasstapled to the top of the 2x12 frame.
Grow Bed or Trough Construction After the liner is installed, 1x2 treated lumberwas nailed on top to further secure the linerand finish the troughs. Predrill theholes so thatthe stripsdon’t split.
Tips on folding the liner The corners were folded over one another (thinkhospital bed) inside the tank and then the corner lipswere cut along a 45 degree diagonal to facilitatestapling to the top of the frame.
Bulk Head Fitting The bulk head fitting is installed through theliner by cutting an X in the liner and fitting itthrough the liner and the trough wall.
Bulk Head Fitting Tighten down as much as possible to avoidleaks and fit the PVC pipe into it using ahammer and screwdriver to tighten.
Water Return Pipe The pipe is constructed of two 10 ft long, 2 inchSchedule 40 PVC pipe, cut to size using a sawzall bladeand joined together with a 2 inch slip coupling.
Water Return Pipe The intake is at the end of the growing bed andhas a filter to keep solids from recirculating. The filter is constructed of hardware net andblack pet screen, 2” PVC end cap, and 2 clamps.
Water Return Pipe The completed return pipe is leveled using acouple of scrap pieces of PVC pipe. Note: plumbing fixtures in the water need notbe glued together because leaking is not aconcern.
Grow Bed or Trough Construction The final step is to drive sixteen 3/4“ x 36"round steel stakes in with a sledge hammerand secured to the outside all of the grow bedby screws to keep the walls of the grow bedfrom bulging when filled with water.
End Filter All filters are constructed in the same fashion. Lay down a PVC pipe and an end cap, spacedabout 6" apart, and roll the hardware net toget the appropriate size and cut it. Do the same with the black pet screen Join the pieces together with clamps. Trim excess net from end.
Plumbing of Fish Tanks The two fish tanks are plumbed to createa cascading water flow. Holes were cut through the sides using ahole saw.
Radial Filter A hole that is the same size as the pail(excluding the lip) is then cut in the top of the30 gallon container using a jigsaw. The pail is then fitted into the hole, the lip ofthe edge catching on the cover of the 30 galloncontainer.
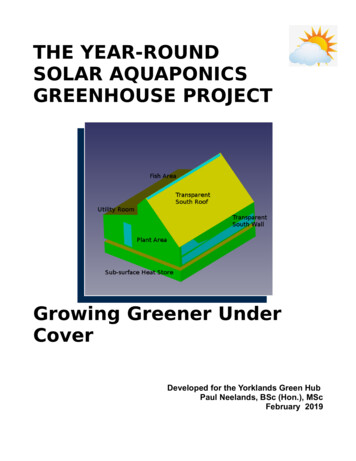
Radial Filter Using a hole saw, two holes are cut in thebarrel making certain to avoid seams. Install an elbow and a piece of PVC to the inletpipe at the bottom.The hole closer tothe top is theoutlet leading tothe bio filter.The hole at thebottom is the inletwhere the waterenters from thefish tank.
Radial Filter The top of the PVC pipe should be at a levellittle below the outlet line.
Radial Filter The PVC pipe from the inlet pipe should alsocome up in the middle of the pail. The outlet pipe is outside of the pail so thatsolids are forced down by gravity.Inlet Pipe
Radial Filter This should prevent most solids from exitingthe radial filter into the bio filter.Overview of plumbing from the outside.Out to bio‐filterIn from the fish tank
Radial Filter A third hole is cut in the bottom of the tank todrain out accumulated fish waste solids. Solids can be put into worm bins forcomposting or wicking beds or in the vegetablegarden.Parts consist of:¾” Bulkhead fitting¾” ball valve
Bio-filter Next, water flows to the bio‐filter. It is simply a 30 gallon container with a lid thatcontains two to three packages of bird nettingscrunched up into the container.
Bio‐filter The purpose of the netting is to provide a largesurface area for the bacteria to colonize andtransform ammonia (toxic to fish) into nitritethen nitrate which is nutritious to plants. You don’t need to do anything to add thebacteria as they are all around us. If you want to speed up the process, you canspike your bio‐filter with store‐boughtbacteria.
Bio‐filter The 30 gallon container is plumbed with two 2"holes, sawed with a hole saw. The inlet brings water from the radial filterand the outlet is to sump #1.IN from Radial FilterBio‐filterOUT to Sump #1
Bio‐filter The outlet is at a level that is essentially levelwith the top of Sump #1. This prevents backflow from the sump into theradial filter.Sump #1
Bio‐filter Similarly, to prevent backflow from the biofilter to the radial filter, the intake from theradial filter needs to be a little higher than theoutlet to the sump.Inside ViewOutside View
Bio‐filter The intake to the radial filter has an elbowdown so that the water is forced to percolatethrough the bird netting.Elbow
Sump Tanks Two sumps are only necessary if you use a dualloop system. Otherwise you can run directly from the biofilter into the grow beds. It is recommended you have 1 sump tank afterthe bio filter which serves a dual purpose: anadditional settling tank and a degassing tank.
Sump Tanks In normal operation, the valve leading to sump#2 and the pump that feeds it are closed andthe valve that leads back to the pump that re‐circulates the water to the first fish tank isopen
Floating Rafts The final stage of construction is theconstruction of the floating rafts.
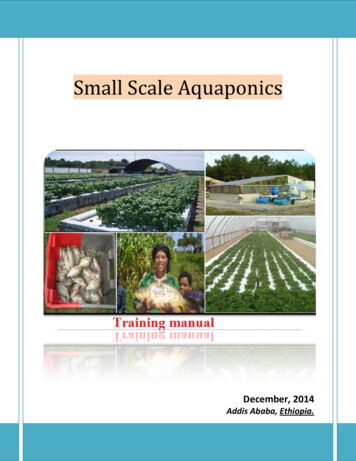
Floating Rafts A template for hole spacing for the floatingrafts is a 2 ft x 4 ft with 2 1/8" holes in it on apattern with holes 4" apart. This design gives122 holes withthe 2 ft x 4 ft template.
Floating Rafts It is recommended to cut the Styrofoam boardin half to make 2 ft x 2 ft pieces to make iteasier to work with.
Floating Rafts Another template (2.5 ft x 4 ft) has holes ofsimilar diameter (2 1/8”) but are spaced 8"apart and therefore result in 24 holes.
Floating Rafts Holes spaced 8" apart are perfect for maturegreens (lettuce). The holes spaced 4" apart are perfect forseedlings. Both the 2 ft x 4 ft with holes spaced 4" apartand the 2.5 ft x 4 ft raft with holes spaced 8"apart weigh about 30 lb when full, which isworkable for most people.
Floating Rafts Some people create an intermediate spacing (6" apart)for plants that are between seedling and full maturity. Alternatively, you can use the same 4" spacing, but notfill up all of the holes. If you choose this latter course you do want some plugto put in the empty holes as any exposure of the waterto light will produce algae, which you want to avoid. Also note that while the template has holes that are 21/8" in diameter, use a 2" hole saw blade to cut therafts. The extra 1/8" in the template is to make it so that the2" saw blade will fit inside the template walls, making itmuch easier to work with.
Conclusion From a commercial standpoint, aquaponics worksif you can sell the fish to cover your costs and youcan minimize your supplemental inputs andmaximize your income by growing greens(lettuces, microgreens, kale, etc.) and sell torestaurants and farmers markets. Plants harvested are still alive since you harvestthem roots and all so their shelf‐life is muchlonger. For example, you can harvest lettuce, keeping theroot ball in a bag, and replant it a week later andit will continue to grow.
Conclusion Generally speaking, you will not find itprofitable to produce tomatoes and otherfruiting plants in a floating raft bed becausethey take up too much space in your system(e.g. one tomato plant takes up 2 sq. ft. vs. 2lettuces in 1 sq. ft.) relative to their price andyou cannot supply the additional nutrients(potassium and phosphorous) efficiently incomparison to other methods.
Conclusion Separate the aquaculture system from thegreenhouse hydroponics system so that youdon’t use valuable greenhouse space to raisefish that prefer a dark environment. The biggest cost to the system will be thegreenhouse and the heating/cooling thereof.
Conclusion You need to decide, up front, whether you needcertification of our system for the sale of fishand/or vegetables and build accordingly as itwill not be profitable to take the system apartand outfit it with food safe materials later. The fish side of the aquaponics system is notvery profitable so you need to determinewhether the cost of the fish harvested forpersonal use is at a satisfactory cost.
Dual Loop System The aquaculture loop is comprised of the two fish tanks, the radial filter, the bio filter and Sump 1. The hydroponics system is Sump 2 and the grow bed. The dual loop system requires the addition of a second water pump as well as v