Transcription
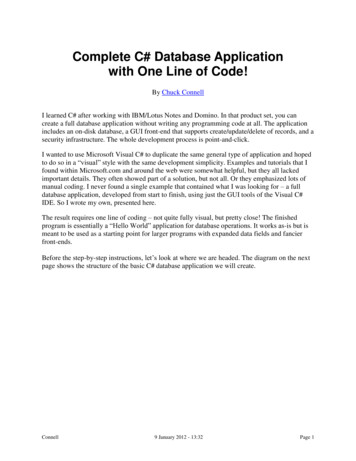
Complete C# Database Applicationwith One Line of Code!By Chuck ConnellI learned C# after working with IBM/Lotus Notes and Domino. In that product set, you cancreate a full database application without writing any programming code at all. The applicationincludes an on-disk database, a GUI front-end that supports create/update/delete of records, and asecurity infrastructure. The whole development process is point-and-click.I wanted to use Microsoft Visual C# to duplicate the same general type of application and hopedto do so in a “visual” style with the same development simplicity. Examples and tutorials that Ifound within Microsoft.com and around the web were somewhat helpful, but they all lackedimportant details. They often showed part of a solution, but not all. Or they emphasized lots ofmanual coding. I never found a single example that contained what I was looking for – a fulldatabase application, developed from start to finish, using just the GUI tools of the Visual C#IDE. So I wrote my own, presented here.The result requires one line of coding – not quite fully visual, but pretty close! The finishedprogram is essentially a “Hello World” application for database operations. It works as-is but ismeant to be used as a starting point for larger programs with expanded data fields and fancierfront-ends.Before the step-by-step instructions, let’s look at where we are headed. The diagram on the nextpage shows the structure of the basic C# database application we will create.Connell9 January 2012 - 13:32Page 1
apterDatabaseTableThe diagram shows the following parts: ConnellA Visual C# project is an overall programming task and all its associate pieces.A form is a visible interface that users can see when the application runs.9 January 2012 - 13:32Page 2
DataGridView is UI tool built into Visual C# that allows for the display and update ofdata records.BindingSource is a class that connects visible data to its underlying source.DataSet is a class that instantiates an internal data table, similar to an external database,but existing only in-memory at runtime.TableAdapter is a class that connects DataSets to on-disk databases.A database is a set of external data records that exist apart from the application. In thiscase, we use an SQL Compact database, although the application supports other storagemethods also.A table is a set of related records within a database. A database can contain multiple,possibly unrelated, tables.The example creates a database of music selections including song title, artist name, release dateand comments. Of course, you can modify the topic and fields to suit your needs.Install the development environment onto a Windows computer 1. I used Microsoft Visual C# 2010 Express, available at the link below. Note that there aretwo downloads available – the free Express version and a trial of the Pro version. Thedownload page is somewhat confusing about which is which. I used s/products/2010-editions/visual-csharpexpress2. During installation, you may be asked if you want to also install SQL Server Express.Answer YES.Create the application 1. From the Start page, press New Project / Windows Form Application / Name MyMusic.2. Expand the default form (Form1) so it fills most of the design pane, by dragging thelower-right corner of the form. (See Figure #1 at end of article.)Create the database 1.2.3.4.Expose the Database Explorer window, with View / Other Windows / Database Explorer.Right-click in the explorer pane, Add Connection.Set Data Source Microsoft SQL Server Compact, Data Source My Computer.Press Create. Set Filename C:\Users\your-name\Documents\MyMusic, Collation default, Encryption default (unencrypted), OK.5. Press Test Connection, then OK, to create the database on disk.6. You should see MyMusic.sdf in the C# Database Explorer window. (And in your regularWindows Documents folder.)Connell9 January 2012 - 13:32Page 3
Create a table within the database 1.2.3.4.Expand the database using the blue triangle. You should see Tables and Replication.Right click on Tables, Create Table.Table Name MyMusic.Define four columns by clicking and typing in the column definition table. Leave alldefaults except as noted below.5. Column Name Song Title, Allow Nulls NO, Unique YES, Primary YES.6. Column Name Artist.7. Column Name Release Date, Data Type DATETIME.8. Column Name Comment, Length 1000.9. Press OK to save the column definitions.10. In the Database Explorer window, you should be able to expand MyMusic.sdf / Tables /MyMusic / Columns, and see the four columns you created.Add some data records to the database, using the built-in manual tool for doing so 1. In the Database Explorer window, right click on the MyMusic table, Show Data Table.2. Type some data into the table, such as below. (See Figure #2.) Note that a record is notsaved until you advance the cursor to the next line.a. Title Help!, Artist The Beatles, Date 8/6/1965b. Title Come As You Are, Artist Nirvana, Date 3/2/1992c. Title No Line On The Horizon, Artist U2, Date 2/27/20093. You can test the column attributes by trying to enter duplicate song titles, or an emptysong title, or an invalid date. All should be disallowed.4. Save your work, with File / Save All.Verify that you have a permanent database and that it contains the records you specified 1. Exit from C# completely, and then restart it.2. Choose the same project and go back to the data table above.3. You should see the sample data you entered.Create a DataGridView that connects to your on-disk database 1. Go to the form design pane, by choosing “Form1.cs [Design]” from the horizontal tabsnear the center of the screen.2. Make sure the designer toolbox is visible, with View / Other Windows / Toolbox.3. Expand the Data category of tools.4. Drag a DataGridView onto Form1.5. You should see the DataGridView tasks box. If not, open it with the small right arrow onthe DataGridView.6. Choose Data Source Add Project Data Source.7. Set Data Source Type Database.8. Database Model Dataset.9. Data Connection MyMusic.sdf.Connell9 January 2012 - 13:32Page 4
10. Copy the file to your project and modify the connection No. (The default is Yes, whichmeans to create another copy of your database within the project folders. But this can beconfusing during testing since there are two versions of the database file.)11. Save connection as MyMusicConnectionString.12. Choose database objects select all.13. DataSet name MyMusicDataSet.14. Press Finish, to create the connection.15. Close the DataGridView tasks box, using the small left arrow, leaving all the defaults.16. You should see the MyMusic table that you defined earlier, within the DataGridViewwithin Form1.17. Expand the DataGridView, by dragging its lower-right corner, so you can see all fourdata columns. (See Figure #3.)18. Save your work, with File / Save All.19. Test the program, with Debug / Start Debugging.20. You should see Form1 pop up, with the data rows that you entered earlier. You should beable to modify the data in the table, although your changes will not be saved. (See Figure#4.)Add a button to save data changes entered at runtime .1.2.3.4.Make sure the designer toolbox is visible, with View / Other Windows / Toolbox.Expand the Common Controls category of tools.Drag a Button onto Form1 below the DataGridView.Show the button properties box if it is not visible, with View / Other Windows /Properties.5. Set (Name) saveButton.6. Set Text Save Changes.7. Save the button changes, with File / Save All.8. Expand the button size if necessary to show the full text, by dragging its lower-rightcorner.9. Double click on the Save Changes button to show its programming code.10. There should already be a routine named saveButton Click. Add this single line of codeinto its body, which says to update the TableAdapter (and therefore the on-disk database)with the data from the in-memory icDataSet.MyMusic);Test the program within Visual C# .1.2.3.4.File / Save All.Debug / Start.Make some changes to the database, including adding a new song.Press the Save Changes button. Close the program window using the X in the upper-rightcorner.5. Exit completely from C#, and then restart it.Connell9 January 2012 - 13:32Page 5
6. Choose the same project, then Debug / Start.7. You should see that the change you made to the database, verifying that they werepermanent. (See Figure #5.)Publish the program so it runs outside of the Visual C# IDE . (These steps assume a standardprogram release for local installation. As you proceed, you will see options for web and fileshare publication also.)1.2.3.4.5.6.7.8.9.Project / Publish.Location c:\temp\MyMusic\.How will users install From a CD.The application will not check for updates Enabled.Press Finish to publish the application.Stop Visual C# completely.Go to c:\temp\MyMusic\.Run Setup.exe to install and run the program.MyMusic will be added to the Windows Start menu and an uninstaller will be added toControl Panel / Programs and Features.You have written a complete database application, with one line of manual coding!Chuck Connell is a senior software architect, programmer and team leader. He wrote the bookBeautiful Software and has taught software engineering at Boston University. See his full list ofservices and contact information at chc-3.com.Connell9 January 2012 - 13:32Page 6
Figure #1Figure #2Connell9 January 2012 - 13:32Page 7
Figure #3Figure #4Connell9 January 2012 - 13:32Page 8
Figure #5Connell9 January 2012 - 13:32Page 9
Create a DataGridView that connects to your on-disk database 1. Go to the form design pane, by choosing “Form1.cs [Design]” from the horizontal tabs near the center of the screen. 2. Make sure the designer toolbox is visible, with View / Other Windows / Toolbox. 3. Expand the Data