Transcription
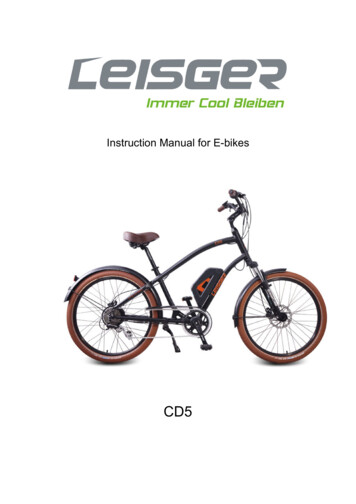
Instruction Manual for E-bikesCD5
Table of contents1. Your E-Bike3—41.1 Introduction1.2 General presentation of the vehicle2. Function Display5—122.1 Normal operation2.2 Error code table3. Using the bike13—163.1 Riding the bike3.2 Quick-release devices3.3 Adjusting the height of the seat3.4 Precautions required prior to each use3.5 Lubrication3.6 Routine maintenance.4. The battery.17—184.1 Installing and removing the battery4.2 Charging the battery4.3 Battery autonomy and lifespan4.4 Battery safety instructions5. Safety maintenance and recommendations.18—205.1 Safety recommendation5.2 Maintenance6. Accessories.207. Warranty.202
1. Your E-Bike1.1) IntroductionWe would like to thank you for your e-bike purchasing. The e-bike, equipped withpedals and an auxiliary electric motor, cannot be propelled exclusively by means ofthis auxiliary electric motor. You will thoroughly enjoy riding this new and electricalpower- assisted bike.Riding an e-bike means that you’re helping preserve the environment, since any CO2or other polluting gases will not be released. For your safety and for the safety ofothers, we recommend that you obey all road regulations and wear a protectivehelmet. For optimal, safe and enjoyable use of the e-bike, make sure you thoroughlyread this user guide before you first use it.Use the e-bike according to the user guide, or it may shorten the life cycle.Have a pleasant ride!1.2) General presentation of the vehicle1.2.1) General informationWeight of bike without battery: 20.36KGMaximum assistance speed: 25KM/HThe dimensions of the bike (MM): L 1860 x W230 x H1020 (95% package)L 1540 x W240 x H740 (75% package)Maximum total weight: 120KG (includes the bike, battery and rider)CD53
1.2.2) Spare parts specSpare parts nameCD5-650MotorDAS-KIT, RX2C, 36V, 350WDAS-KIT,D5-3613SBattery36V13AH SAMSUNG CELLS, with usb portDisplayFront forkDAS-KIT, C6BBTRST, NEON-TNLTEKTRO,Hydraulic, Auriga E-COMPE-Brake LeverTEKTRO,Hydraulic, Auriga COMPDisc BrakeDerailleurSHIMANO ,Acera, Single speed 8TireSCHWALBE, Big Ben 26*2.15** Charging time: 3-6 hours for 100% charge** Autonomy: between 40 to 100 KM, depending on the assistance level and roadcondition.** 2 charge indicators: 1 is located on the display; 1 is located on the side of battery.** Weight: 3 KG4
2. Function Display2.1) NORMAL OPERATION5
FULL VIEW AREANORMAL VIEW AREAWith the display on ,the default indicators are riding speedlevel、trip 2、PAS、battery indicator as shown in fig below. Press SET to switch the displayinformation.Section 1: ON/OFFPress ON/OFF then the display is activated. The display will provide power forthe controller. Press ON/OFF again to open the backlight. With display on,press ON/OFF for 3 seconds to turn off power. With the display off, there is nobattery power consumption. The leakage current is no more than 2µA.6
※The panel will automatically power-off when speed is 0km/h for 5minutes.Section 2:2.1) CURRENT INDICATORIt represents the discharging current of the controller currently, each segmentis 2A, six segments are 12A.2.2) RIDING MODE SELECTIONThere are three modes for riding mode selection, including POWER,NORMAL and ECO. The default option is POWER.Section 3:3.1) SPEED INDICATOR7
,The speed indicator is as below user can select KM/H or MPH in SET 3.3.2) KM/H & MPHSelect KM/H or MPH for measurement, the display will indicate the matchedspeed and mileage.3.3) BACKLIGHT INDICATORWith the display power on, click ON/OFF can turn on the backlight. Click itagain can turn off the backlight.Section 4:4.1) PAS LEVEL SELECTIONClick UP or DOWN to change the PAS level and change the output power, thedefault mode is mode 0 and its output power ranges from level 0 to level 6.8
4.2) ERROR CODE INDICATORIf there is something wrong with the electronic control system, the display willflash at 1 HZ and show the error code automatically. Different error coderepresents different fault information, the details of Error code table are asrepresented on the Page 12.※The display cannot return to normal status until the problem is solved. Ande-bike will not run before solving the problem.4.3) SET OPEARATIONHold the SET for 2 seconds and enter into the setting interface, then Number0 keeps lighting, the display will flash at 1 HZ. Click the SET to switch from 0to 4 circularly to set interface, click UP or DOWN to select the needed9
parameter, and press the SET for 1 second will exit the setting interface.4.3.1) SET0: Riding mode selectionThere are three modes for selection: POWER NORMAL、、ECO.4.3.2) SET1: Reset trip1 distanceClick the DOWN to reset the trip1, then the TRIP1 icon will flash at 1 HZ,meanwhile the trip 1 will be cleared.4.3.3) SET2: Wheel diameter settingSelect the accurate wheel diameter value to ensure the accuracy of speedand mileage on the display.4.3.4) SET3: KM/H & MPHSelect KM/H or MPH for measurement, the display will indicate the matchedspeed and mileage.4.3.5) SET4: Quantity of speed magnetic steel selectionSelect the quantity of speed magnetic steel to know how many speed signalsthe magnetic sent in one circle.Section 5:5.1) BATTERY INDICATOR5.1.1) Battery residual capacity indicator10
The battery capacity viewing area have five segments, each segmentrepresent 20% battery capacity. When the capacity is full, the five segmentsare all light up. If the battery capacity is low, the battery viewing area will flash,it indicates that the battery is severely insufficient and need to be rechargedimmediately.Low battery flash5.1.2) Battery voltageIt displays the current voltage of the battery.5.2) POWER OFFAUTOMATICALLY AFTER 5 MINUTESWhen the riding speed is 0 km/h for 5 minutes, the system will power offautomatically.Section 6:6.1) DISTANCE INDICATORWith the display on, press SET to switch the mode to select ODO, trip 1andtrip 2.6.1.1) ODOThe ODO records the driving mileage from start using, the accumulated valuecannot be cleared.6.1.2) Trip1When the riding mileage 500km, trip 1 will be reset automatically. The11
value will be accumulated without resetting.6.1.3) Trip2Trip 2 represents the last driving distance for 30 s after turning on the display,it can be reset automatically and start to record the current distance.6.2) TRIP TIME INDICATORThe riding time parameter is automatically reset after shutdown.2.2 ERROR CODE TABLEThe error code is corresponding with the fault definition.Error CodeDefinition0normal1Current error or MOS damaged2Throttle error(detection after turning on)3motor without phase position4Hall error5Brake error(detection after turning on)6Under voltage7Motor stalling8communication controller receiving error9communication display receiving error12
3. Using the bike3.1) Riding the bikeBefore taking off, make sure that youactivate the battery by pressing on thebutton located on the side of battery.The 4LEDs located on the side of thebattery which indicate the charge level.Turn on the display unit which is on thehandlebars. Select your neededassistance level and start to pedal.You’ll find that the engine starts assoon as you start pedaling.When you use the brakes, the contactor located within these brakes will haltthe engine’s assistance immediately.The left brake lever controls the rear brake. The right brake lever controls thefront brake.You can also use the bike without electric assistance by turning off the battery(switch off the button or by adjusting the assistance level on 0). The enginewill then feature zero resistance: you’ll be freewheeling. Select the appropriategear by activating the 7-speed gear lever.3.2) Quick-release devicesTighten the adjusting nut by hand and move the quick release lever to theclosed position. You should feel considerable resistance while moving thelever. If not, re-open and re-tighten the lever, then move it to the closedposition so it is in line with the frame.13
3.3) Adjusting the height of the seatUnlock the lever (open), adjust the seat height to the desired position withoutever exceeding the mark carved onto the seat’s tube, lock the lever (LOCK).The seat’s height must be set so that your leg is stretched out when thecorresponding pedal is in the lower position.14
3.4) Precautions required prior to each useVerify that the brakes and the front & rear lights are all working properly. Also,check the pressure of the tires.On derailleur geared bicycles the rear derailleur automatically tensions thechain.Make sure that the hinges on your bike are properly locked. Indeed, whenusing the bike on a regular basis, the tension of the hinges’ adjustment andlocking systems can change slightly. Whenever necessary, adjust the tensiononce again.This bike is not designed for rough usage condition, such as jumps, riding upor off of pavements, and riding on unpaved roads. For your own safety, do notmodify the bike.Please note: if you use the bike frequently, it is recommended that youinspect the state of the fork, the frame, the suspension and thefasteners. The materials and components may be subject to differentreactions to usage and wear.If you have any doubts, contact your dealer, who will proceed with the necessaryinspection.3.5) LubricationFrequency ComponentLubricantHow to LubricateWeeklyChainDerailleur PulleysDerailleursBrake CalipersBrake LeversChain Lube or Light OilChain Lube or Light OilOilOilOilBrush On or SquirtBrush On or SquirtOil Can3 drops from oil can2 drops from oil canMonthlyShift LeversLithium Based GreaseDisassembleEvery SixMonthsFreewheelBrake CablesOilLithium Based Grease2 squirts from oilcanDisassembleBottom BracketPedalsDerailleur CablesWheel BearingsHeadsetSeat PostLithium Based GreaseLithium Based GreaseLithium Based GreaseLithium Based GreaseLithium Based GreaseLithium Based DisassembleDisassembleYearlyNote: The frequency of maintenance should increase when using in wet ordusty conditions. Do not over lubricate - remove excess lubricant to preventdirt build up. Never use a degreaser to lubricate your chain.15
3.6) Routine maintenance3.6.1) Recommended values of the nut torque.Front Wheel Nuts22-27 Newton Meters16.2- 19.8 ft.-lb.Rear Wheel Nuts24-29 Newton Meters17.5- 21.3 ft.-lb.Seat Binder Nut12- 17 Newton Meters8.8- 12.5Seat Pillar Clamp Nut15- 19 Newton Meters11.0-14.0 ft.-lb.Brake Anchor Nut7- 11 Newton Meters5.1- 8.1Handlebar Clamp Nut17- 19 Newton Meters12.5- 14.0ft.-lb.Head Stem Expander Nut17-19 Newton Meters12.5- 14.0ft.-lb.Crank Cotter Pin Nuts9-14 Newton Meters6.6- 10.3 ft.-lb.Brake Centre Bolt2-17 Newton Meters1.5- 12.5 ft.-lb.ft.-lb.ft.-lb.3.6.2) Service checklistFrequencyTaskBefore every ride Be sure batteries are fully chargedCheck tire pressureCheck brake operationCheck wheels for loose spokesAfter every rideBe sure to fully charge batteriesQuick wipe down with dampWeeklyLubrication as per schedule 3.7MonthlyInspect wiresInspect connectorsCheck derailleur adjustmentCheck brake adjustmentCheck brake and gear cable adjustmentCheck tire wear and pressureCheck wheels are true and spokes tightCheck hub, head set and crank bearings for loosenessCheck pedals are tightCheck handlebars and stem are tightCheck seat and seat post are tight and comfortably adjustedCheck frame and fork for truenessLubrication as per schedule 3.7Perform safety checkEvery six months Lubrication as per schedule 3.7Check all points as per monthly serviceCheck and replace brake pads, if requiredCheck chain for excess play or wearYearlyLubrication as per schedule 3.716
4. The battery4.1) Installing and removingthe batteryTo remove the battery, unfasten thelock which is located along thebattery’s box. Remove the battery bypulling it out.To put the battery back into place,insert the battery along to the guiderail. Push it closely against thecontroller box. Fasten the lock.4.2) Charging the batteryNever let a battery be chargedunattended.The battery’s voltage is indicated by the 4 LED lights located on the side of thebattery, and also on the display unit located on the handlebar.Your battery must be charged in an ambient temperature, on a non-flammable anddry surface, away from any sources of heat, humidity or flammable materials. Also, itmust not be covered.Here are the steps to be followed when charging your battery:Step 1Turn the battery off. The LED lights will be off.Step 2Plug the charger (which is off) into the socket and then insert thecharger’s plug into the battery, which is also off.Step 3the charger’s LED indicators lit up in the following manner: The red LED lights on: the battery is being charged.(A) The red LED light becomes green:the battery is full charged; you can unplug the charger. (B)(A)(B)It takes 3 - 6 hours for the battery to be fully charged when using the standardcharger that’s supplied with your bike.4.3) Battery autonomy and lifespan4.3.1) AutonomyThe bike's autonomy ranges from 40 to 100 kilometers, as it depends on manydifferent factors (degree of assistance used, topology, rider’s weight, frequentstops/start-ups, hills, tire pressure, etcP)17
4.3.2) BatteryYour battery is just like a household battery. It contains a limited amount of energy,which diminishes as it is being used. When the available autonomy no longercorresponds with your needs, you need to buy a new one from your dealer.4.3.3) MaintenanceIf you don’t use your bike for a period of time exceeding 2 months, store it in ahumidity-free area to protect the electronic components and make sure that thebattery is neither completely charged nor completely discharged (2 LEDs lit up)Note: Never store a completely discharged battery as it might result in permanentdamage.During the winter or long storage periods, it is recommended that you chargethe battery halfway every 2 months. Don’t forget to switch it off. Store yourbattery at a temperature between 15 and 25 .4.4) Battery safety instructionsYour bike's battery is an electric component made up of chemical elements. For yoursafety, it is imperative that you obey the following rules:Always handle with great careAlways keep it away from childrenDo not take it apart or hit, pierce or submerge itKeep it away from temperatures exceeding 60 Never create a connection between the contactslocated at the bottom of the batteryNever let the battery charge unattendedNever sleep near a battery that is chargingOnly use the charger that came with your bikeor that was supplied by your dealerIf your battery is damaged, do not use it and take itback to your dealer as soon as possible5. Safety and maintenanceRecommendations5.1) Safety recommendations5.1.1) HelmetFor safe riding, use a bicycle helmet.5.1.2) TiresInspect the wear of your tires on a regular basis and verify the tire pressureat least once a month. Tire pressure: 40-65 PSI depending on the weight ofthe user.5.1.3) Wheel-rimsTake care of any risk of damage in case of defective wheel-rims. Swap them18
immediately when the rim is worn out.Important: braking distance increases on humid or slippery ground.5.1.4) GearsLike the chain, the freewheel must be kept clean and well lubricated. If the chainhas become worn and need to be replaced, then it is likely that the freewheel willalso have become worn and should also be replaced. Take the chain off thefreewheel and rotate it with your hand. If you hear a grinding noise or thefreewheel stops suddenly after spinning it, it may need to be adjusted or to bereplaced.The nexus gear does not require any sort of maintenance.5.1.5)Signaling deviceThe bike is silent. In order to alert others as to your presence, you have anapproved signaling device located on the left brake lever: Use it only whenabsolutely necessary, don’t abuse it!5.1.6) BatteryCf. Chapter. 4WARNING: As with all mechanical components, the bicycle is subjected to wearhigh stresses. Different materials and components may react to wear or stressfatigue in different ways. If the design life of a component exceed, it maysuddenly fail possibly causing injuries to the rider. Any form of crack, scratches orchange of color in highly stressed areas indicate that the life of the componentreach and it should be replaced.5.2) MaintenanceCaution:Bike maintenance and repair require specific skills and appropriate tools. Do notrepair your bike or change any of its settings if you have the slightest doubtregarding your ability to correctly proceed with such work. Contact your dealer.Any adjustments or repairs that are not properly done can damage the bike andlead to accidents resulting in extensive injuries. Use only genuine replacementparts for safety-critical components.5.2.1) CleaningAlways remove the battery when cleaning. Use soapy water or water mixed witha gentle detergent, and then rinse it with clean water. Make sure that thecontroller located behind the battery compartment is not exposed to humidity as itcontains electronic components. Do not use a high pressure washer!5.1.2) MaintenanceMake sure your bike is safe for the environment. Used parts must be disposed ofin appropriate selective sorting recycling bins. A battery which no longer worksmust be returned to your dealer so that he may pass it to a recycling company.Replacing the rear light batteries: remove the screw to access the batteries.(It is recommended that you need to replace them every year)Engine: the engine does not require any sort of maintenance.19
Chain:It is recommended that you lubricate your bike’s 7 speed gearwheels and chainon a regular basis using appropriate products (ask your dealer for advice).6. AccessoriesMudguards (Place the mudguard assembly between the stays, make sure themudguard bracket holes line up with those in the frame. Tighten all bolts andscrews until snug.)Helmet, baskets and storage pouch are not provided with the vehicle.To order these accessories, get in touch with your dealer.Using only genuine replacement parts for safety-critical components.7. WarrantyYou are provided with a warranty for one year since the day you buy the bike.Details regarding your bike’s warranty coverage terms are available from yourdealer.Have a pleasant ride!Note: The pattern of bicycle’s reflector on the carton shipping mark is according toGerman standard, physical pattern of reflector is different in different countries, pleaseprevail in kind.20
BB-Leisger International GmbHADD: Walsroder Straße 75 , D-30851 Langenhagen/Hannover , GermanyTel: 49-511-899 4343 0E-Mail: info@leisger.comwww.leisger.com21
1. Your E-Bike 1.1) Introduction We would like to thank you for your e-bike purchasing. The e-bike, equipped with pedals and an auxiliary electric motor, cannot be propelled exclusively by means of this auxiliary electric motor. You will thoroughly e