Transcription
READ THIS MANUAL CAREFULLY!It contains important safety information.Keep it for future reference.ProphetOwner’s Manual Supplement118063.PDFCONTENTSGENERAL SAFETY INFORMATION . 2Changing the Rear Shock Position .18Rear Derailleur Hanger Replacement .2012 mm Thru Axle Replacement .21Thru Axle Wheel Truing Tool . 22About This Supplement . 2Special Manual Messages . 2Prophet Intended Use . 3Building Up A Frameset . 3About Freeriding . 4GEOMETRY . 23SPECIFICATIONS . 24TECHNICAL INFORMATION . 6REPLACEMENT PARTS .25Front Triangle .6Swingarm . 7Head Tube. 8MAXIMUM FORK LENGTH .9Sag. 10Selecting Rear Shocks . 10Tire Selection .11Line/Cable Frame Protection .12Right Chainstay Protection .12Housing Guides and Cable Stops . 13Bottom Bracket Cable Guide . 13OWNER NOTES . 26MAINTENANCE & ADJUSTMENT .14Item Schedule.14About Cleaning . 15Tightening Torques . 15Swingarm Pivot Assembly. 16Please note that the specifications and information in this manual is subject to change forproduct improvement without notice. For the latest product information, go to http://www.cannondale.com/bikes/tech/.1
Special Manual MessagesGENERAL SAFETYINFORMATIONIn this manual, information which affectsyour safety is emphasized in the followingways:The Safety Alert Symbol: “ATTENTION.BECOMEALERT,SAFETY IS INVOLVED.”About This SupplementCannondale Owner’s Manual Supplementsprovide important model specific safety,maintenance, and technical information.They are not replacements.meansYOURWARNINGA WARNING indicates a potentiallyhazardous situation which, if not avoided,can result in serious injury or death.This supplement may be one of several foryour bike. Be sure to obtain and read all ofthem.WARN000If you need a manual or supplement, or havea question about your bike, please contactyour Cannondale Dealer immediately, orcall us at one of the telephone numberslisted on the back cover of this manual.CAUTIONA CAUTION Indicates a potentiallyhazardous situation which, if notavoided, can result in serious damageto the product. The matters describedunder CAUTION may, if not avoided, leadto personal injury, or results dependingon the situation and degree of damage.Important matters are described inCAUTION (as well as WARNING), so besure to observe them.You can download Adobe Acrobat PDFversions of any Cannondale Owner’sManuals or Supplements from our website.Go to: http://www.cannondale.com/bikes/tech This manual is not a comprehensive safetyor service manual for your bike. This manual does not include assemblyinstructions for your bike.CAUT000 All Cannondale bikes must be completelyassembled and inspected for properoperation by a Cannondale Dealer beforedelivery to the owner.NOTE:A NOTE provides helpful information ortips intended to make the informationpresented clearer.* * IMPORTANT * *This manual may include proceduresbeyond the scope of general mechanicalaptitude.Special tools, skills, andknowledge may be required.If you have any doubt about your abilityto properly inspect, adjust, or serviceyour bicycle, do not attempt to performthe work described; please take the forkto a Cannondale Dealer.2
118063.PDFProphet Intended UseBuilding Up A FramesetAll-Mountain Riding: All–Mountain ridingis a term used in to describe bicycles andframesets that are more heavy duty thana cross country bike, but less heavy dutythan a Freeride bike. All-Mountain bikesare lighter and more nimble than Freeridebikes, making them more suitable for trailriding and riding uphill. All-Mountain bikesare heavier and have more suspensiontravel than a cross country bike, allowingthem to be ridden in more difficult terrain,over larger obstacles and moderate jumps.All-Mountain bikes are intermediate insuspension travel and use components thatfit the intermediate intended use.Consult with your Cannondale Dealer andthe component manufacturers and franklydiscuss your riding style, ability, weight, andinterest in and patience for maintenance.Generallyspeaking, lighterweightcomponents have shorter lives. In selectinglightweight components you are making atrade-off, favoring the higher performancethat comes with less weight over longevity.If you choose more lightweight componentsyou must inspect them more frequently.If you are a heavier rider or have a rough,abusive or “go for it” riding style, buy heavyduty components.Make sure the components chosen arecompatible with your bike and intended foryour weight and riding style.While more heavy duty than a cross countrybike, an All-Mountain bike is not a Freeridebike and should not be used for extremeforms of jumping/riding such as hardcoremountain, Freeriding, Downhill, NorthShore, Dirt Jumping, Hucking etc. Justbecause these bikes are called All-Mountaindoes not mean that you have the skills toride “All” terrain.Read and follow the componentmanufacturers warnings and instructions.For your safety we urge you to read“About Freeriding” (on page 4) in thismanual.WARNINGUsing yourhazardous.bicycleimproperlyisWARN0013
About FreeridingWARNINGFREERIDING AND OTHER FORMS OF “EXTREME RIDING” ARE EXTREMELY DANGEROUS. YOU CAN BE SEVERELYINJURED OR KILLED IN A SERIOUS ACCIDENT.Freeriding, jumping, hucking, dirt jumping, mountaincross, downhill, slalom, urban or street riding or otherevolving forms of extreme or hard core mountain biking are inherently dangerous and can lead to seriousaccidents. Wear all safety gear and be sure your bike is in excellent condition. Follow all the instructions andwarnings below. These steps will reduce, but not eliminate, the inherent risks. Even with state of the artprotective safety gear you could be seriously injured, paralyzed or killed. If you do not want to take theserisks, do not engage in this type of riding.Fundamental RiskFreeriding, jumping, hucking, dirt jumping, mountaincross, downhill, slalom, urban or street riding. It seemsthat everywhere you look, from Mountain Dew commercials to the X-Games , riders are grabbing big air andsticking sick drops. And it sure looks fun.But what the videos and bike magazines and ads don’t always tell you is that extreme riding takes anamazing amount of skill. Some of the riders you see are well-paid pros who have gradually built up theirskills through endless hours of practice, and who have also had their share of stitches, concussions andbusted bones (and bikes). Others are daredevils who have chosen to accept or ignore the risks. Would youallow anyone to say that you are so weak in the head, and have such poor judgment that you copy those yousee in the media without thought of the serious risks?Product LimitationsProblems of pilot error aside, hard-core riding also beats the heck out of your equipment. Although webuild and test our bikes to make them tough, there’s no way that we can guarantee they’ll survive yourumpteenth six-foot drop. For starters, there is no industry “jumping” standard. The many circumstances oftakeoff, landing, speed, rider technique, etc. are unique. The judgment, lack of judgment or insanity of a riderwho may ride a Cannondale bicycle cannot be completely predicted, so it’s flat-out impossible to predict howanyone’s equipment is going to hold up.Let’s get another thing straight. Buying a Freeride bike does not make you any better. Do not confuse thebuilt-in capabilities of equipment with your own capabilities, which must be learned.Keeping your bike and all its components in good working order is critical, and it’s up to you to maintain andinspect it. Even so, your sweet rig isn’t going to last forever. Nothing does, particularly bikes and parts thatare built to minimize weight and then are subjected to abuse. Cannondale frames carry a warranty, but that’sto cover issues with workmanship and/or materials. (See the Cannondale Warranties section of the Owner’sManual.) It doesn’t mean that they’re going to last forever. They’re not. It certainly doesn’t mean that thebicycle will last forever or can in any way protect you from injury.In ConclusionIf you’re going hard-core, be smart about it. Always wear a full face helmet, body armor, full-finger glovesand protective clothing. Choose a bike that’s right for you, your riding and terrain, and check it often for signsof fatigue or other trouble. (Your dealer can help you on both fronts.) Read the Mountain Bike Riding sectionof this Cannondale Owner’s Manual. And most importantly, know your limitations. Practice. Stay in control,and carefully, gradually expand your limits – but ride within them.WARN0024
118063.PDFThis page has been left blank intentionally.5
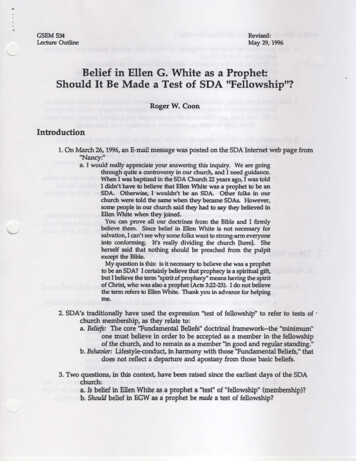
TECHNICAL INFORMATIONFront igure 11.Top Tube - Formed and tapered to increase impact strength.2.Delta Tube - Tapered wall to increase shock mount support. Interrupted top tube forincreased stand-over clearance, steering precision and strength.3.Head Tube - Externally butted for headset bearing reinforcement.4.Down Tube - Variable wall to strengthen pivot and bottom bracket.5.Seat Tube - Butted tube with integrated E-type derailleur mount.6
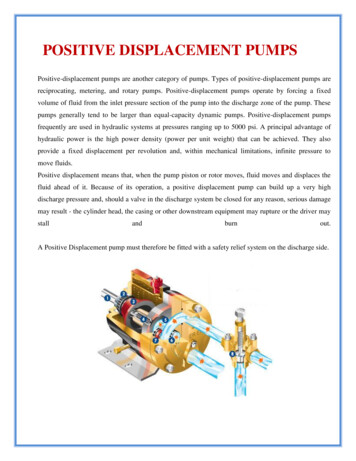
118063.PDFSwingarm231Figure 21.Chainstays - The custom-formed and tapered chainstays are optomized for lateralstiffness. Tuned for vertical compliance, they distribute stress evenly under extremelanding loads.2.Hot Box Pivot - Constructed as a welded, Hollow-Core swingarm pivot. It is designedfor maximum stiffness and minimum lateral flex. It’s CNC - forged hollow core providesa tremedous stiffness-to-weight ratio, boosting stifness by up to 30% which preventswagging and increases pedal efficiency. The rear derailleur cable is routed internallythrough the Hot box and within the chainstays, delivering a clean look and no ghostVERTICALshifting.3.Pivot Assembly - This assembly features a precision pivot shaft and renewable sealedcartridge bearings.TOIONRSVERTICALLATERALLATERAL7LATERALL
Head Tube & Headshok HeadsetThe head tube accepts Cannondale HeadShok System Integration headsets (shown), andOnePointFive 1.5 (38.1mm) headsets.123137.7mm134.6mm4.5”32Cannondale Kit # QHDST/EBO/Includes two cups (3) and onebearing (2).Cannondale Kit # HD169/Includes two bearings (2).Cannondale Kit # QSMSEAL/one seal (1).Figure 3 SI Head Tube Headshok HeadsetParts Identification (Figure3)1. SI Upper Bearing Seal2. SI Bearing3. SI Bearing Cup8Headshok ForkInstallation ToolCannondaleKit # HDTL149/
118063.PDFMAXIMUM FORK LENGTHYour Cannondale bike frame was designed and tested to a specific MAXIMUM FORKLENGTH. It is an important specification to observe when selecting aftermarket andreplacement forks. See the “SPECIFICATIONS” in this manual for THE MAXIMUM FORKLENGTH information for your model bike.2.Measure the distancefrom the bottom of theframe head tube to thecenterline of the wheelaxle.MAXIMDO NOT MEASURE FROMTHE BOTTOM OF HEADSETBEARING CUPS OR HEAD TUBEADAPTERS, IF ANY.Warning LabelLocationRK LEA fork must be installedand fully extended.UM FO1.NGTHHow to measure:Figure 1WARNINGDO NOT INSTALL FORKS WITH A MAXIMUM FORK LENGTH LONGER THAN THESPECIFICATION FOR YOUR FRAME. A longer fork can overload the frame causing it tofail (break) while riding. You can be severely injured, paralyzed or killed in an accident.WARN0039
SagSelecting Rear ShocksSag is the distance the bike suspensioncompresses with a rider (wearing allappropriate gear) mounted in a normalriding position (seated, hands on handlebarand feet on the pedals) on flat ground.The recommended sag for your bike isintended to maximize the bike’s suspensiontravel and it is usually specified as apercentage (%) of the fork or shock’s totaltravel. See the “Specifications” section inthis manual.Maintaining the recommended sag in boththe front and rear suspension helps assurethat the fork and shock travel operatesnormally without the excessive top-outor bottom-out that can lead to difficulthandling or damage.CAUTIONWARNINGSELECT ONLY COMPATIBLE SHOCK/FORKS FOR YOUR BIKE. DO NOT MODIFYYOUR BIKE IN ANY WAY TO MOUNT ONE.HAVE YOUR SHOCK OR FORK INSTALLEDBY A PROFESSIONAL BIKE MECHANIC Riding with the wrong rear shock candamage the frame. You could have aserious accident. Make sure that the totaltravel, eyelet-to-eyelet length, and strokelength of the rear shock you select meetsthe specifications listed in this manual. When selecting different shocks or forksfor your bike, make sure that the shockor fork you select is compatible with yourbike’s design and how you will use yourbike.WARN004Please read the fork/shock manufacturer’sowner’s manual or the instructionsprovided before attempting any set-up oradjustment.CAUT001Small adjustments to sag are performed byadjusting preload of the shock or fork. Thisis done by adding or removing spring shims,adjusting the installed length of the springwith a preload adjusting ring, or with airsprings, changing air pressure settings.Larger adjustments to sag are requirechanging the installed springs in the forkor shock. Changing the spring may be asimple task or very complex dependingon the design of the fork or shock. Ingeneral: increasing preload decreases sag,decreasing preload increases sag.Finding a suitable sag setting within thesuspension fork or rear shock range isa matter of personal preference takingbody weight and how you ride intoconsideration.10
118063.PDFTire SelectionWhen selecting replacement tires, be surethat the properly installed and inflatedtire does not contact any part of theswingarm, frame, or fork and throughoutfull suspension travel. The U.S. ConsumerProduct Safety Commission (CPSC) requiresat least 1/16” (1.6 mm) tire clearance fromany part of the bike. Allowing for lateral rimflex and for untrue (wobbly) rims will likelymean choosing a rear tire that provideseven more clearance than the CPSCrecommends. Your choice of a new fronttire should be made only after consideringthe clearance guidelines contained in yourfront suspension fork owner’s manual. Ifyour manual contains no such guidelines,or if don’t have a manual, consider thatRock Shox requires at least 1/4” (5 mm)clearance between the tire and the forkcrown or bridge when the fork is completelycompressed. Be aware that completelycompressing the fork may involve removingthe spring stack, letting the air out of thefork, or both.WARNINGSELECT PROPERLY SIZED/ FITTED TIRESFOR YOUR BIKEMounting the wrong size tires on yourbike can increase the chances that youwill have an accident where you can beseverely injured, paralyzed, or killed. If thetires touch the frame or fork when riding,you can lose control of your bike. If the amoving tire is stopped because it touchesthe frame or fork, you can be thrown offthe bike. You can be severely injured orkilled.Do not mount oversized tires, ones thatrub or touch the frame, ones that resultin too little clearance with the frame, orones that can touch the frame or forkwhen the suspension is fully compressedor when riding.Take care that the tires you select arecompatible with your bike’s frame design.Also, be sure to follow the manufacturer’srecommendations of your front fork andrear shocks.Ask your Cannondale Dealer for theright tires for your bike and its particularcomponents!WARN00511
Line and Cable FrameProtectioncontinue to ride. Replace the guards ifthey wear out.Normal line and cable movement againstthe frame can wear away painted finishesand decals. Overtime, cable rubbing canwear into the frame itself causing veryserious frame damage.Check over your bike after your first fewrides.Apply a clear adhesive guardmaterial in areas where rubbing is found.When applied correctly, clear guards aregood protection for your bike.PLEASE NOTE: Damage to your bike causedby cable rubbing is not a condition coveredunder your warranty. Also, adhesive frameguards are not a fix for incorrectly installedor routed cables or lines. If you find thatapplied guards are wearing out very quickly,consult with your Cannondale Dealer aboutthe routing on your bike.Right Chainstay ProtectorAn adhesive chainstay protector is locatedon the underside of the right chainstay. Thisguard protects the chainstay from damagecaused by the chain. Check the conditionof the right chainstay protector periodicallyand replace it when it is worn or missing.CannondaleKit # KF103 (8 PK)Figure 13 Typical LocationCannondaleKit # KF078To apply the guard material (included withyour bike):1.Clean the frame with a mild detergentand wipe dry with a clean towel. Donot use solvents or harsh chemicals toclean the frame. OPTIONAL: Trim theadhesive guard material to the shaperequired.2.Remove the backing and position theguard under the cable/ line.3.Rub the guard firmly against the framewith your fingers to fix it in place.4.Periodically,recheck the guardsand other areas of the frame as youFigure 1412
118063.PDFHousing Guides and Cable StopsLines and cables on your bike are routedthrough frame guides using cable stops (1)and /or cable thru guides (2).Periodically, you should check to make surethe stops and guides are in good conditionand seated properly in the frame guides.Bottom Bracket Front DerailleurCable GuideThis snap in rear derailleur cable guide ismounted on the lower bottom bracketshell.For stops, make sure the stop is seatedsecurely in the frame guide and the housingis fixed within the stop.CannondaleKit # KF085/CannondaleKit # KF014/(2 PK)Figure 161CannondaleKit # KF086/(10 PK)(a)2Figure 15 Cable Stop and Housing Guide13
MAINTENANCE & ADJUSTMENTThe following table includes supplemental maintenance items for your bike. Pleaseconsult your Cannondale Bicycle Owner’s Manual for more information on basic bikemaintenance. And, so you may create a complete maintenance program best suited to youand your riding style, please talk to your Cannondale Dealer. Also, remember to follow themaintenance recommendations given by the component manufacturers for the variousnon-Cannondale parts of your bike.Item ScheduleHOW OFTENYou/ProfessionalCheck lines/ cables for rubbing, install guardmaterial.Before and After1st RidesYOUClean and visually inspect entire bike frame/swingarm for cracks or damageBefore and AfterEach RideYOUEvery 25 hoursYOU orProfessionalAs neededYOUEvery 10 hoursYouWHAT TO DOSWINGARM PIVOT ASSEMBLY:DISASSEMBLE, CLEAN, INSPECT, RE-GREASESWINGARM CHAINSTAY PROTECTOR:Replace if necessaryCheck condition/ attachment of cable stops andhousing guides.WARNINGANY PART OF A POORLY MAINTAINED BIKE CAN BREAK OR MALFUNCTION. AND,THAT CAN LEAD TO AN ACCIDENT WHERE YOU CAN BE KILLED, SEVERELY INJURED ORPARALYZED.Please ask your Cannondale Dealer to help you develop a complete maintenance program,a program which includes a list of the parts on your bike for YOU to check regularly.Frequent checks are necessary to identify the problems that can lead to an accident.WARN00614
118063.PDFAbout CleaningWhen cleaning your bike , use only a mild soap and water solution. A clean water and acommon dish washing liquid will work best.Be sure to cover adjustment knobs and air filter (if equipped) with a clean plastic bagsecured temporarily with a rubber band or masking tape.Before wiping away dirt, use an ordinary water hose to gently spray off heavy soils anddirt.CAUTIONDO NOT power wash or spray water under high pressure to clean. Power washing willforce contaminants into parts where they will promote corrosion, immediately damage,or result in accelerated wear.DO NOT use compressed air to dry.DO NOT use abrasive or harsh chemical cleaner/solvents which can damage the finish orattack and destroy both the outside and internal parts.When rinsing, avoid directing the spray directly at shock/fork adjusters or bearings.CAUT017Tightening TorquesComponent-specific values (for crank bolts, rotor bolts, do not appear below becausethey will vary based on the spec-level of the bike; please consult the manufacturer of thecomponent in question for the correct torque value.ItemLoctite #N mIn LbsShock mounting bolts242544Swingarm pivot nut242544Rear derailleur hanger mounting bolt2421311512mm Thru Axle clamp bolts24254412mm Thru axle bolt26212106Seat Post Clamp BoltConsult seat postspecification15
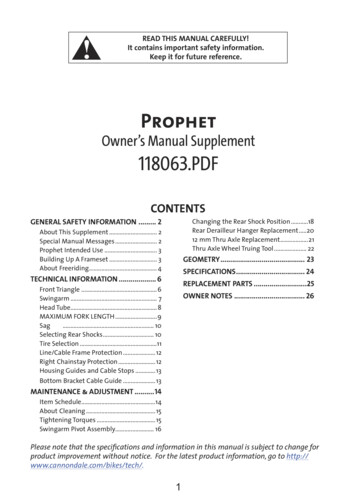
Swingarm Pivot AssemblyThe pivot shaft, bearings, and bearingshields are subject to wear. How muchthey wear, depends on use, conditions,and maintenance. Periodic disassembly,cleaning, and regreasing will extend timebetween necessary renewal.HOW TO PERFORM A QUICK FIELD CHECKOF THE PIVOT ASSEMBLYBearingsThe swingarm pivot bearings are asealed cartridge type and do not requirelubrication.A film of grease applied to the faces of thebearing can be applied to help to repeldamaging moisture.To check the bearings:1.Place the bike in a work stand andremove the rear wheel.2.Remove the rear shock.3.Stand behind the bike holding theswingarm by the dropouts.Lift it up and down. The pivot shouldmove smoothly without stickingallowing the swingarm to fall under itsown weight. Be careful, don’t let theswingarm slam against the frame.Next, still holding the dropouts, tryto detect any excessive play side-toside. Excessive side-to-side play can becaused by a loose pivot nut or damageto the bearings or other pivot parts.If you find the swingarm movement roughor gritty or detect excessive side-to-side play,the pivot assembly should be inspected.An inspection will require, disassembly,cleaning and parts inspection. Replacementof worn part may be necessary. Have thisservice performed by your Cannondaledealer.Swingarm Pivot Shaft & NutThe pivot must always be installed the headon the drive side (right) of the frame.The pivot can not be removed with removingthe crankset.When the pivot nut is removed the pivotwill slide out easily. However, before itis removed the weight of the swingarmshould be supported to prevent it droppingsuddenly causing injury or damage.With the pivot out, rotate the inner bearingrace with your finger tip to confirm smoothrotation. Replace bearings if the rotationfeels rough or gritty. When necessary,replace bearings as a new set. Drive out theold bearings carefully and install new onesusing proper bearing installation tools.SpacersThe spacers are located between thebearings and frame. The smooth roundedside of the spacer faces the frame while theflatter side of the spacer fits against thebearing.To check the spacers, remove them andlook for any uncharateristic wear, deepgrooves, cracks or other damage. Be sureto check the frame hole surfaces as well asa rough surface can accelerate wear. If thespacers are in good shape, clean them andregrease before reinstallation. Make surethey go back in the right way. See the nextfigure.Parts Identification (Figure6)1. Pivot2. Bearings3. Spacers4. NutA - Rounded side of spacer faces frameB - Flat side of spacers fits into bearing16
118063.PDF242GREASE21m8m keynAlleGREASE419 mm12 N m(106 In Lbs)3CROSS SECTION332241AFRAME BOREBABFigure 6CAUTION: Whenever you remove the pivot, remove the rear wheel to lessen wieght and supportthe swingarm from dropping. or falling against the seat tube. Clean the pivot and frame hole and regrease both with a light film before reassembly.But, remember, too much grease will collect damaging grit.17
Changing the Rear Shock Mounting PositionChange the shock mounting position between holes marked “XC” or FR” to slightly changethe headtube and seat tube angles of the bicycle for different riding characteristics.FRXCFRXC9 667.5Figure 7XCCross-country feel. Steeper head tube and seat tube angles- quicker turning, handling, and better climbing.FRFreeride style riding. Slack head tube seat tube angles- more stability- slightly better for attacking bumps.1.Place in a bike work stand. Support the rear wheel to prevent it from dropping. Place atowel or other soft material between the seat tube and swingarm to prevent contactwhen shock is released.2.Loosen and remove the rear shock swingarm mounting bolt.3.Support the swingarm and slide out the larger bolt from the right side of the bike.The bolt should slide out easily. If it is difficult to remove, it may be an indicationof a damaged bolt, rear shock bushings or frame mounts. Have a Cannondale Dealerexamine your bike to be sure. Before reinstalling the bolt, clean it and apply a film ofgrease to the outside of the bolt to provide lubrication to the inner bushing diameter.4.Align the swingarm to the FR or XC hole and reinstall the bolt.18
118063.PDF5.Apply a fresh drop of Loctite 242 to the smaller bolt. Hold the larger bolt with a 5mmAllen key and tighten the smaller to 5.0Nm (44 In Lbs).GREASE35 mm27.4 mm45 mm37.4mm242GREASE 69 67.5XC FR 8 mm5 mmAllen key5 N m (44 In Lbs)Bolt replacementCannondale Kit # KF101/(all 4 pieces)Obtain replacement shock bushings from shock manufacturer.Figure 8WARNINGKEEP YOUR HANDS AND FINGERS OUT OF PINCH POINTS. Your fingers or hands can bepinched or crushed if they are caught between the heavy swingarm and frame whenthe rear shock is released.WARN007CAUTION:TO PREVENT SERIOUS FRAME DAMAGE - Mount the shocks so the physical shape(including any reservoir and adjustments features) will not cause interference withnormal travel or contact the frame, frame mounting points, or the swingarm at any pointin the full suspension travel. See our website TECH CENTER (http://www.cannondale.com/bikes/tech/) for more on how to mount the shocks for your bike.19
Rear Derailleur Hanger ReplacementsWhen installing replacements, be sure to throughly clean and inspect the dropout for anydamage. Do not install a replacement hanger onto a damaged dropout.2425 mmAllen key5 N m (44 In Lbs)CannondaleKit # KF051/GREASE MATINGSURFACESFigure 17Before re- installing (same or new):Clean surfaces and apply a light film of bike grease between the hanger and dropoutto minimize any noise or “creaking” that might result from very slight movementbetween the dropout and hanger during movement of the derailleur.Apply Loctite and tighten the hanger nut/bolt to the specified torque.Be sure to check alignment of derailleur following remounting.Be sure to readjust wheel quick release so it is very tight.20
118063.PDF12 mm Thru Axle & Derrailleur HangerReplacement kits are available for 12 mm Thru Axle type derailleur hangers. Wheninstalling replacements, be sure to throughly clean and inspect all other parts. Do notinstall a replacement hanger onto a damaged dropout.ALIGNCannondaleKit # KF076/OVALALIGN2623BNOGAPC2DA222 5.0 N m (44.2 In Lbs), Loctite 2423 12.0 N m (106.0 In Lbs)1CannondaleKit # KF077/Be sure to follow the tightening order shown here; bring each fastener to finaltorque before moving to the next.TIGHTENING ORDER ABCDFigure 1821
Thru Axle Wheel Truing Tool (For 4x models)This special tool is needed to mount the 12 mm Thru axle wheels in truing stands.32CannondaleKit # KF0791Figure 191. Shaft2. O-ring3. Cap22
KWBTRFigure 20PROPHET, PROPHET 4-CROSSTeam Replica 4-Cross, Prophet 4000 , Prophet 2000, Prophet 1000, Prophet 800, Prophet 600STLTTHTTAHTASTASOWBFCSIZESeat Tube Length (cm/in)Top Tube Horizontal (cm/in)Top Tube Actual (cm/in)Head Tube Angle (degree)Seat Tube Angle (degree)Standover at Top Tube Midpoint (cm/in)Wheel Base (cm/in)Front Center Distance (cm/in)BBH Bottom Bracket Height (cm/in)BBD Bottom Bracket Drop 67.5 [69.0]73.5 [75.0]74.0/29.1106.0/41.764.0/25.233.0/13.0 34.9/13.7]0.0/0.0 - 20.0/7.95.0/2.0SMALLMEDIUM40.5/15.9 43.0/16.957.5/22.6 60.0/23.653.2/20.9 55.8/22.0 74.4/29.3 74.5/29.3109.0/42.9 111.7/44.067.0/26.4 69.7/27.4X-LARGE53.0/20.965.0/25.662.8/24.7 75.9/29.9117.9/46.475.9/29.9 Chainstay Length (cm/in) Head Tube Height (cm/in) Fork Rake (cm/in) Fork Trail (cm/in) Rear Travel (cm/in) Shock Eye-to-Eye (cm/in) Shock Stroke (cm/in) Recommended Sag 25%* All dimensions are given with suspension fully extended in FR and [XC] position.23LARGE48.0/18.962.5/24.659.0/23.2 75.0/29.5114.8/45.272.8/28.7
SPECIFICATIONSITEMSPECIFICATIONModelFrame materialSizesRecommended sagMaximum tire widthHead tubeHead tube heightMaximum Fork LengthSeat post diameterRear shock bushing width (frame mount)Rear shock bushing width (swingarm)Rear shock eyelet-to-eyelet lengthRear wheel travelRear shock stroke lengthRear shock leverage ratioFront derailleurBottom bracket shell (width, thread type)Chain LineDropout SpacingRear hub spacingRear axleRear brake mount600, 800, 1000,4X1000Z, 2000, 40006061-T6, Tig welded, Aluminum AlloyS,M,L,XL25%inHeadshok, OnePointFive52 cm530mm570mm27.2 0.1 mm27.4 0.1 mm37.4 0.1 mmBolt diameter 8.1 0.5 mm200 mm140 mm50 mm3:1 Regressive31.8mm Bottom Pull, Traditional Swing68 mm, English E-Type47.5 mm135 mm135 mmQuick Release12mm Thru AxleInternational Standard,8” or 6”Recommended Sag% of shock travelXC25 - 30FR30 - 4024
118063.PDFREPLACEMENT PARTS (KITS)CANNONDALE KIT NO.DESCRIPTIONKF014/Kit, Cable Stop Inserts-2KF086/Kit, Guides, Hydr.Brake.,10pcsKF085/Kit, Guides, BB Cable,SingleKF012/Kit, Rivnuts, Bag of 5KF100/Kit, Pivot Swingarm ProphetKF101/Kit, Hware,Shock Mounting, ProphetKF102/Kit, Guide,
118063.PDF 3 Prophet Intended Use All-Mountain Riding: All–Mountain riding is a term used in to describe bicycles and framesets that are more heavy duty than a cross country bike, but less heavy duty than a Freeride bike. All-Mountain bikes are lighter and more nimble than Freeride bikes, making