Transcription
XAML
XAMLAbout the TutorialWelcome to the XAML tutorial for beginners. This tutorial puts greater emphasis on realtime implementation of the concept rather than discussing just the theory part.The primary objective of this tutorial is to provide you a better understating of what youcan do with XAML development irrespective of the platform you are using.AudienceThis tutorial has been designed for all those readers who want to learn XAML and to applyit instantaneously in different type of applications.PrerequisitesBefore proceeding with this tutorial, you should have a basic understanding of XML, WebTechnologies, and HTML.Disclaimer & Copyright Copyright 2018 by Tutorials Point (I) Pvt. Ltd.All the content and graphics published in this e-book are the property of Tutorials Point (I)Pvt. Ltd. The user of this e-book is prohibited to reuse, retain, copy, distribute, or republishany contents or a part of contents of this e-book in any manner without written consentof the publisher.We strive to update the contents of our website and tutorials as timely and as precisely aspossible, however, the contents may contain inaccuracies or errors. Tutorials Point (I) Pvt.Ltd. provides no guarantee regarding the accuracy, timeliness, or completeness of ourwebsite or its contents including this tutorial. If you discover any errors on our website orin this tutorial, please notify us at contact@tutorialspoint.comi
XAMLTable of ContentsAbout the Tutorial . iAudience . iPrerequisites . iTable of Contents . ii1.XAML – OVERVIEW . 1How XAML Works . 1Advantages of XAML . 12.XAML – ENVIRONMENT SETUP . 3Installation . 3First Step towards Implementation . 73.WRITING XAML APPLICATION ON MAC OS . 11XAML – C# Syntax. 11Syntax Rules for Object Element . 124.XAML VS C# CODE . 135.XAML VS. VB.NET. 176.XAML – BUILDING BLOCKS. 21Objects . 21Resources . 21Styles . 21Templates . 22Animations and Transformations . 237.XAML – CONTROLS . 25Button . 27Calendar . 34ii
XAMLCheckBox . 39ComboBox. 45ContextMenu . 50DataGrid. 57DatePicker . 66Dialog Box . 71GridView . 74Image . 80ListBox . 84Menu . 89PasswordBox . 94Popup. 98ProgressBar . 101ProgressRing . 105RadioButton . 109RichEditBox . 115ScrollViewer . 123SearchBox . 129Slider . 133TextBlock . 138TimePicker . 141ToggleButton. 146ToolTip . 149Window . 1528.XAML – LAYOUTS. 157Stack Panel . 157Wrap Panel . 160iii
XAMLDock Panel . 163Canvas Panel . 167Grid . 170Nesting of Layout . 1759.XAML – EVENT HANDLING . 17710. XAML – DATA BINDING. 184One-Way Data Binding . 184Two-Way Data Binding . 18711. XAML – MARKUP EXTENSIONS . 18912. XAML – DEPENDENCY PROPERTIES. 19313. XAML – RESOURCES . 197Resource Scope . 198Resource Dictionaries . 19914. XAML – TEMPLATES. 202Control Template . 202Data Template . 20415. XAML – STYLES . 210Control Level . 214Layout Level . 215Window Level . 216Application Level . 21816. XAML – TRIGGERS . 221Property Triggers. 221Data Triggers . 223iv
XAMLEvent Triggers . 22517. XAML – DEBUGGING . 228UI Debugging Tools for XAML . 23118. XAML – CUSTOM CONTROLS . 234User Control . 234Custom Controls . 238v
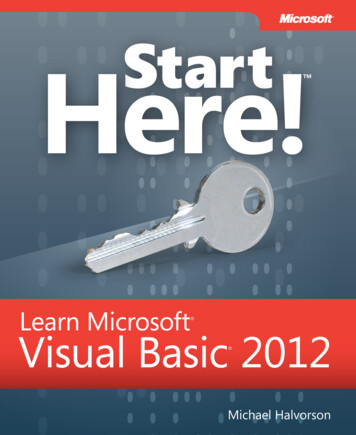
1. XAML – OVERVIEWXAMLXAML stands for Extensible Application Markup Language. It’s a simple and declarativelanguage based on XML. In XAML, it very easy to create, initialize, and set properties of an object withhierarchical relations. It is mainly used for designing GUIs. It can be used for other purposes as well, e.g., to declare workflow in WorkflowFoundation.XAML can be used in different platforms such as WPF (Windows Presentation Foundation),Silverlight, Mobile Development, and Windows Store App. It can be used acrossdifferent .Net framework and CLR (common language runtime) versions.How XAML WorksXAML is a declarative language in the sense it defines the WHAT and HOW you want todo. XAML processor is responsible for the HOW part to find out. Let's have a look at thefollowing schema. It sums up the XAML side of things:The figure illustrates the following actions: The XAML file is interpreted by a platform-specific XAML processor. The XAML processor transforms the XAML to internal code that describes the UIelement. The internal code and the C# code are linked together through partial classesdefinitions and then the .NET compiler builds the app.1
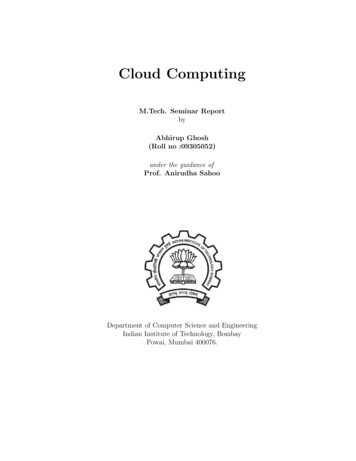
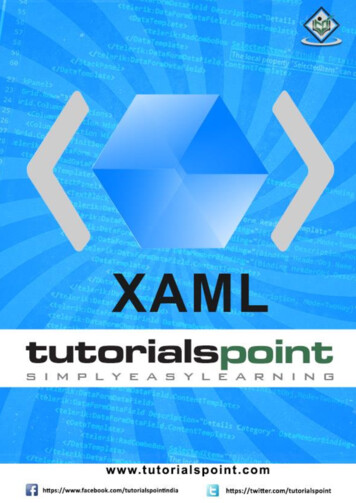
XAMLAdvantages of XAMLOne of the longstanding problems that all of us face with GUI design can be solved byusing XAML. It can be used to design UI elements in Windows Forms applications.In the earlier GUI frameworks,looks like and how it behaves.language, e.g. C# or VB.net,implement both the UI and thethere was no real separation between how an applicationBoth the GUI and its behavior were created in the samewhich would require more effort from the developer tobehavior associated with it.Earlier GUI FrameworksWith XAML, it is very easy to separate the behavior from the designer code. Hence, theXAML programmer and the designer can work in parallel. XAML codes are very easy toread and understand.XAML Framework2
2. XAML – ENVIRONMENT SETUPXAMLMicrosoft provides two important tools for XAML: Visual Studio Expression BlendCurrently, both the tools can create XAML, but the fact is that Visual Studio is used moreby developers while Expression Blend is still used more often by designers.Microsoft provides a free version of Visual Studio which can be downloaded ownload-visual-studio-vs.aspxNote: For this tutorial, we will mostly be using WPF projects and Windows Store App. Butthe free version of Visual Studio doesn’t support Windows Store App. So for that purpose,you will need a licensed version of Visual Studio.InstallationFollow the steps given below to install Visual Studio on your system:1. After downloading the files, run the installer. The following dialog box will bedisplayed.3
XAML2. Click on the Install button and it will start the installation process.4
XAML3. Once the installation process completes successfully, you will see the followingscreen.5
XAML4. Close this dialog box and restart your computer if required.5. Now open Visual studio from the Start Menu which will show the following dialogbox. It will take some time for the first time, only for preparation.6
XAMLOnce all is done, you will see the main window of Visual Studio.7
XAMLFirst Step towards ImplementationLet us start with a simple implementation. Follow the steps given below:1. Click on File New Project menu option.8
XAML2. The following dialog box will be displayed:3. Under Templates, select Visual C# and select WPF Application. Give a name to theproject and click the OK button.9
XAML4. In the mainwindow.xaml file, the following XAML tags are written by default. Youwill understand all these tags later in this tutorial. Window x:Class "FirstStepDemo.MainWindow"xmlns entation"xmlns:x s:d 8"xmlns:mc ility/2006"xmlns:local "clr-namespace:FirstStepDemo"mc:Ignorable "d"Title "MainWindow" Height "350" Width "604" Grid /Grid /Window By default, a grid is set as the first element after page.Let's add a button and a text block under the Grid element. This is called object elementsyntax, a left angle bracket followed by the name of what we want to instantiate, forexample a button, then define a content property. The string assigned to the Content willbe displayed on the button. Now set the height and width of the button as 30 and 50respectively. Similarly initialize the properties of the Text block.Now look at the design window. You will get to see a button. Now press F5 to execute thisXAML code. Window x:Class "FirstStepDemo.MainWindow"xmlns entation"xmlns:x s:d 8"xmlns:mc ility/2006"xmlns:local "clr-namespace:FirstStepDemo"mc:Ignorable "d"Title "MainWindow" Height "350" Width "604" Grid Button Content "First Button" Height "30" Width "80"/ TextBlock Text "Congratulations you have successfully build your firstapp"Height "30" Margin "162,180,122,109" / /Grid 10
XAML /Window When you compile and execute the above code, you will see the following window.Congratulation! You have designed your First Button.11
XAML3. WRITING XAML APPLICATION ON MAC OSXAML applications can be developed on Mac as well. On Mac, XAML can be used as iOSand Android applications. To setup the environment on Mac, go to xamarin.com. Click onProducts and select the Xamarin Platform. Download Xamarin Studio and install it. It willallow you to develop applications for the various platforms.XAML – C# SyntaxIn this chapter, you will learn the basic XAML syntax/rules to write XAML applications. Let’shave a look at a simple XAML file. Window x:Class "Resources.MainWindow"xmlns entation"xmlns:x e "MainWindow" Height "350" Width "525" Grid /Grid /Window As you can see in the above XAML file, there are different kinds of tags and elements. Thefollowing table briefly describes all the elements. WindowIt is the opening objectcontainer of the root.x:Class "Resources.MainWindow"It is the partial class declaration whichconnects the markup to the partial classcode behind defined in it.xmlns entation"Maps the default XAML namespace for WPFclient/frameworkxmlns:x "http://schemas.microsoft.com/winfx/2006/xaml"XAML namespace for XAML language whichmaps it to x: prefix Grid End of object element of the root. /Grid elementorStarting and closing tags of an empty gridobject.12
XAMLClosing the object element /Window Syntax Rules for Object ElementSyntax rules for XAML is almost similar to XML. If you take a look at an XAML document,then you will notice that actually it is a valid XML file. However, an XML file cannot be avalid XAML file. It is because in XML, the value of the attributes must be a string, while inXAML, it can be a different object which is known as Property element syntax. The syntax of an Object element starts with a left angle bracket ( ) followed bythe name of the object, e.g. Button Define some Properties and attributes of that object element The Object element must be closed by a forward slash (/) followed immediately bya right angle bracket ( ).Example of simple object with no child element: Button/ Example of object element with some attributes: Button Content "Click Me"Height "30"Width "60"/ Example of an alternate syntax to define properties (Property element syntax): Button Button.Content Click Me /Button.Content Button.Height 30 /Button.Height Button.Width 60 /Button.Width /Button Example of Object with Child Element: StackPanel contains Textblock as child element StackPanel Orientation "Horizontal" TextBlock Text "Hello"/ /StackPanel 13
4. XAML VS C# CODEXAMLYou can use XAML to create, initialize, and set the properties of objects. The same activitiescan also be performed using programming code.XAML is just another simple and easy way to design UI elements. With XAML, it is up toyou to decide whether you want to declare objects in XAML or declare them using code.Let’s take a simple example to demonstrate how to write in XAML: Window x:Class "XAMLVsCode.MainWindow"xmlns entation"xmlns:x e "MainWindow" Height "350" Width "525" StackPanel TextBlock Text "Welcome to XAML Tutorial" Height "20" Width "200"Margin "5"/ Button Content "Ok" Height "20" Width "60" Margin "5"/ /StackPanel /Window In this example, we have created a stack panel with a Button and a Text block and definedsome of the properties of button and text block such as Height, Width, and Margin. Whenthe above code is compiled and executed, it will produce the following output:14
XAMLNow look at the same code which is written in C#.using System;using System.Text;using System.Windows;using System.Windows.Controls;namespace XAMLVsCode{/// summary /// Interaction logic for MainWindow.xaml/// /summary public partial class MainWindow : Window{public MainWindow(){InitializeComponent();// Create the StackPanelStackPanel stackPanel new StackPanel();this.Content stackPanel;15
XAML// Create the TextBlockTextBlock textBlock new TextBlock();textBlock.Text "Welcome to XAML Tutorial";textBlock.Height 20;textBlock.Width 200;textBlock.Margin new Thickness(5);stackPanel.Children.Add(textBlock);// Create the ButtonButton button new Button();button.Content "OK";button.Height 20;button.Width 50;button.Margin new hen the above code is compiled and executed, it will produce the following output. Notethat it is exactly the same as the output of XAML code.16
XAMLNow you can see that how simple it is to use and understand XAML.17
5. XAML VS. VB.NETXAMLIn this chapter, we will write the same example in VB.Net so that those who are familiarwith VB.Net can also understand the advantages of XAML.Let’s take a look at the the same example again which is written in XAML: Window x:Class "XAMLVsCode.MainWindow"xmlns entation"xmlns:x e "MainWindow" Height "350" Width "604" StackPanel TextBlock Text "Welcome to XAML Tutorial with VB.net" Height "20"Width "220"Margin "5"/ Button Content "Ok" Height "20" Width "60" Margin "5"/ /StackPanel /Window In this example, we have created a stack panel with a button and a Text block and definedsome of the properties of the button and the text block such as Height, Width, and Margin.When the above code is compiled and executed, it will produce the following output:18
XAMLNow look at the same code which is written in VB.Net:Public Class MainWindowPrivate Sub Window Loaded(sender As Object, e As RoutedEventArgs)Dim panel As New StackPanel()panel.Orientation Orientation.VerticalMe.Content panelDim txtInput As New TextBlocktxtInput.Text "Welcome to XAML Tutorial with VB.net"txtInput.Width 220txtInput.Height 20txtInput.Margin New Thickness(5)panel.Children.Add(txtInput)Dim btn As New Button()btn.Content "Ok"btn.Width 60btn.Height 20btn.Margin New Thickness(5)19
XAMLpanel.Children.Add(btn)End SubEnd ClassWhen the above code is compiled and executed the output is exactly the same as theoutput of XAML code.You can now visualize how simple it is to work with XAML as compared to VB.Net.In the above example, we have seen that what we can do in XAML can also be done inother procedural languages such as C# and VB.Net.Let’s have a look at another example in which we will use both XAML and VB.Net. We willdesign a GUI in XAML and the behavior will be implemented in VB.Net.In this example, a button is added to the main window. When the user clicks this button,it displays a message on the message box. Here is the code in XAML in which a ButtonObject is declared with some properties. Window x:Class "MainWindow"xmlns entation"xmlns:x e "MainWindow" Height "350" Width "604" Grid Button Name "btn" HorizontalAlignment "Center" Width "60" Height "30"Content "Click Me" / 20
XAML /Grid /Window In VB.Net, the button click event (behavior) is implemented. This event displays themessage on the messagebox.Public Class MainWindowPrivate Sub btn Click(sender As Object, e As RoutedEventArgs) Handles btn.ClickMessageBox.Show("Button is Clicked")End SubEnd ClassWhen the above code is compiled and executed, it will display the following screen:Now click on the above button that says "Click Me". It will display the following message:21
XAML22
6. XAML – BUILDING BLOCKSXAMLThis chapter will describe some of the basic and important building blocks of XAMLapplications. It will explain how to create and initialize an object, an object can be modified easily by using resources, styles, and templates, to make an object interactive by using transformations and animations.ObjectsXAML is a typically declarative language which can create and instantiate objects. It isanother way to describe objects based on XML, i.e., which objects need to be created andhow they should be initialized before the execution of a program. Objects can be Containers (Stack Panel, Dock Panel) UI Elements / Controls (Button, TextBox, etc.) Resource DictionariesResourcesResources are normally definitions connected with some object that you just anticipate touse more often than once. It is the ability to store data locally for controls or for the currentwindow or globally for the entire applications.StylesXAML framework provides several strategies to personalize and customize the appearanceof an application. Styles give us the flexibility to set some properties of an object andreuse these specific settings across multiple objects for a consistent look. In styles, you can set only the existing properties of an object such as Height,Width, Font size, etc. Only the default behavior of a control can be specified. Multiple properties can be added into a style.In the first diagram, you can see the same height and width properties are set for all thethree button separately; but in the second diagram, you can see that height and widthwhich are same for all the buttons are added to a style and then this style is associatedwith all the buttons.23
XAMLTemplatesA template describes the overall look and visual appearance of a control. For each control,there is a default template associated with it which gives the appearance to that control.In XAML, you can easily create your own templates when you want to customize the visualbehavior and visual appearance of a control.In the following screenshot, there are two buttons, one is with template and the other oneis the default button.24
XAMLNow when you hover the mouse over the button, it also changes the color as shown below.With templates, you can access more parts of a control than in styles. You can specifyboth existing and new behavior of a control.Animations and TransformationsAnimations and transformations inside the Windows Runtime can improve your XAMLapplication by building interactivity and movement. You can easily integrate the interactive25
XAMLlook and feel in your XAML application by using the animations from Windows Runtimeanimation library. Animations are used to enhance the user interface or to make it more attractive. to attract the attention of the user to a change.In the following screenshot, you can see a square:When you hover the mouse over this square, it will expend in all directions as shownbelow.26
7. XAML – CONTROLSXAMLThe XAML User Interface framework offers an extensive library of controls that supportsUI development for Windows. Some of them have a visual representation such Button,Textbox, TextBlock, etc.; while other controls are used as containers for other controls orcontent, for example, images. All the XAML controls are inherited fromSystem.Windows.Controls.Control.The complete inheritance hierarchy of controls is as follows:Here is the list of controls which we will discuss one by one in this chapter.Sr.No.123Controls & DescriptionButtonA control that responds to user input.CalendarRepresents a control that enables a user to select a date by using a visualcalendar d
the free version of Visual Studio doesn’t support Windows Store App. So for that purpose, you will need a licensed version of Visual Studio. Installation Follow the steps given below to install Visual Studio on your system: 1. After downloading the files, run the installer. The following dialog box will b