Transcription
The Thinking Person's Reality ShowADVENTURE ACTIVITY GUIDE
ACKNOWLEDGEMENTSFor WETADirector of Outreach and EducationFerne C. BarrowEducational materials producedby the New York Hall of ScienceEditorial CoordinatorKaren ZillDirector of Public Programs& Special EventsMarcia Rudy, Ph.D.DesignerCynthia AldridgeDirector of EducationPreeti GuptaIllustratorChristopher ZacconeEditorBarbara deBoinvilleExecutive ProducersDalton DelanJeff BieberFor the BBCExecutive ProducersKaren O’Connor (Episodes 101-106)Andrew Law (Episodes 107-110)Series ProducersSteve Evanson (Episodes 101-106)Paul Manners (Episodes 107-110)Project AdvisorsAngela BirchImperial College of Science,Technology and MedicineLondon, UKMike BullivantThe Open UniversityMilton Keynes, UKKimberlie McCueMissouri Botanical GardenSt. Louis, MODennis SchatzPacific Science CenterSeattle, WAKendall StarkweatherInternational Technology Education AssociationReston, VAPeter TaylorThe Open UniversityMilton Keynes, UKDirector of ScienceMartin Weiss, Ph.D.Manager of Public ProgramsSylvia PerezSupervisor of Public Programs& Science TheaterMarcos StafneManager of Science ProgramsFrank SignorelloScience Program AssistantGrace JoseExhibit DeveloperRita HoffstadtWeb siteLook for more information aboutRough Science on the World Wide web:www.pbs.org/roughscience.To purchase videotapes or DVDs ofRough Science programs, contact:Bullfrog FilmsP.O. Box 149Oley, PA 195471-800-543-3764Order online at www.bullfrogfilms.comcc Closed captioned for viewers whoare deaf or hard of hearing.All photos courtesy BBC.
INTRODUCTIONEverywhere you look you can see the fruits of scientific effort and technological innovation—from mobile phones to medicines, from the clothes we wear to the foods we eat. In thenatural world, science has shed much light on the value and function of plants andanimals and the interplay of various life forms andhabitats. Scientists have opened our eyes to a startling, exciting and sometimes bewildering universe,and technology has given us a host of practical usesfor the discoveries of science.Yet, in spite of the ubiquitous nature of science,many people find the subject daunting and inaccessible. The Rough Science television series hopes tochange that. By showing how science can be put touse in everyday life, Rough Science helps viewersunderstand that science is a process involving someKate Humble samples homemade toothpaste.basic knowledge, a good dose of curiosity, a littleguesswork, trial and error, and a bit of elbow grease to find solutions.The Rough Science Adventure Activities Guidebook is a companion to the Rough Sciencetelevision series. The guide provides science and technology activities that encouragecollaborative learning and experimentation in an informal setting. Although written formuseum professionals, the guide presents activities of interest to teachers, parents, andstudents. The activities could be completed not only in a museum but also at school orat home. The activities that were chosen for the guide reinforce the scientific methodand inquiry skills, provide interactive, hands-on learning experiences for school agechildren to adults, and make science and technology fun and engaging.To request a Guidebook, please write to Rough Science Guidebook, WETA, 2775 SouthQuincy Street, Arlington, VA 22206 or email us at eod@weta.com.From left, series host Kate Humble, Ellen McCallie, Mike Leahy, Kathy Sykes, Jonathan Hare and MikeBullivant admire their map-making handiwork.ROUGH SCIENCE ACTIVITY GUIDE1
WHAT IS ROUGH SCIENCE?Television SeriesA thinking person’s reality show, Rough Science is a ten-part series produced for the OpenUniversity in the United Kingdom by the BBC and presented on American television by WETAWashington, D.C. In the half-hour programs,each one set over a three-day period, the castof British and American scientists must complete specific tasks using only basic tools andequipment and the raw materials they find ontheir island location. The first six episodeswere filmed on Carriacou in the Caribbean;the final four were filmed on the Italian islandof Capraia in the Mediterranean. The fiveengaging scientists in each episode representthe fields of chemistry, botany, physics, virologyand biology. See page 18 for biographicalsketches of the scientists. A synopsis of eachepisode is on the inside back cover. The sciencetopics covered in the television series andrelated activities include weather andorienteering; chemistry, biology, and botany;electricity; astronomy; and physics.With the intent of creating a celebratory sound, Kate Humble andJonathan Hare prepare to manufacture the big bang.OutreachThe Rough Science television programs serve as a springboard for the education andoutreach activities described in this guidebook. Called Rough Science Adventures, theseactivities give viewers the chance to experience challenges similar to those faced bythe scientists in the programs. Because the activities are based on the NationalScience Education Standards, science and technology teachers may find them avaluable source of enrichment in the curriculum. Public television stations aswell as other community organizations can also offer Rough Science Adventuresto their constituents. Thetelevision series and theGuidebook are innovativemeans of involving people ofall ages and backgrounds inhands-on science in friendly,recognizable environments.Web siteThe companion Web site,www.pbs.org/roughscience,contains descriptions of eachprogram, biographiesof the scientists, their production diaries, resources foreducators, and additionalchallenges that viewers cantry on their own.Kathy Sykes is hard at work onan island map constructedfrom leaves.
Rough Science Adventures at the MuseumThis guidebook was written for museum professionals to use with differentaudiences: young people in elementary school, middle school, and highschool, adults, families and groups of mixed ages. It covers a wide arrayof science and technology topics that touch on everyday living, and theactivities can be adapted to all ages and skill levels. They also can betailored to enhance current museum exhibits and programs. For example,the activities can be used at a variety of multi-day or one-time only eventssuch as: school group visitsafter-school programssummer camp programsscout badge programssleepovers at the museumdiscovery daysfamily nights member and corporate events teacher professional development days holiday programs for the general publicwith drop-in workshops outreach with community organizations,libraries, or schools field trips to natural habitatsRough Science ActivitiesThe activities selected for inclusion in the guidebook are similarto activities already used in museums with multi-age visitors. Like thetelevision series, the activities have an island theme. They have beengrouped into eight scenarios: Water Quality Control Center, WeatherStation, Island Power Plant, Island Observatory, Island Restaurant, TropicalIsland Day Spa, and Tropical Island Party. (An additional scenario, IslandGeneral Store, appears on the Rough Science Web site.) These scenarioscan serve as the starting point for a variety of museum or communityevents described earlier.Each scenario begins with a brief, scene-setting statement. This introductoryparagraph can be used by the educator as a script to involve theparticipants. Feel free to ad lib or embellish as appropriate. Approachedin order, the scenarios provide cumulative learning for participants, buteach is designed to stand-alone. The order of activities may be changedand activities added from other scenarios. For example, the making soapactivity presented in the Tropical Island Day Spa can be used for IslandGeneral Store, Island Restaurant or Tropical Island Party.After the introductory paragraph, each scenario issues several“challenges,” explains the science behind the activity, lists theneeded supplies, and describes step-by-step how to proceed.Note: A list of scientific supply companies can be found on the RoughScience Web site, www.pbs.org/roughscience, under Discover More.You may choose to substitute activities that you have developed for yourparticular audience or that complement other aspects of your programming.Alternatively, you may choose to issue some of the challenges to yourparticipants, provide them with the appropriate materials, tools, andequipment, and let them come up with a variety of solutions to eachchallenge, providing only as much guidance as they need.Ellen McCallie employs fire to aidin the creation of sunscreen.How to OrganizeRough ScienceEventsPlan to screen one or moreof the Rough Scienceepisodes as part of yourevent. (Tapes can be purchased from Bullfrog Films;see inside front cover.)Engage participants inchallenges similar to thoseportrayed in the series.(See Rough ScienceAdventure Scenarios sectionstarting on page 4.)Take participants on fieldtrips to natural habitats andinvolve them in activitiesthat relate to the geology,flora and fauna of the area.Draw on the resourcesthe museum already has:educators, scientists,engineers, volunteers, andtechnology experts on staff.If possible, invite localscientists, technologyteachers, and engineerswho may complement yourskills and knowledge.Connect challenges withcurrent exhibits andpermanent collectionswhenever possible.ROUGH SCIENCE ACTIVITY GUIDE3
WATERQUALITYCONTROLCENTERThat tropical water reallylooks inviting! Looks canbe deceiving. Before youjump in for a swim, do alittle rough science tocheck if that water’s aspure as it looks.The Challenges!To determine if thewater is polluted, testthe acidity of the water.To determine if the waterhas a high or low mineralcontent, test the hardnessof the water in a soapsolution.To see what organismsare in the water, make amicroscope.To make sure that yourdrinking water is safe,design and build awater filter.Test the Acidity of WaterWe want to know if the water on yourisland is acidic or basic (alkaline).Strongly acidic or strongly alkalinewater can be a sign of pollution andcan be harmful to plants and animalsand hazardous to drink. Carry out thefollowing test to check your water.You needa red cabbagemedium-size bowlgraterstrainersmall plastic or glass pitcher5 clear plastic cupsbaking sodalemon juicevinegarcoladistilled water“island” water (spiked withsomething acidic like vinegar)teaspoonWhat you doGrate one cup of red cabbage into amedium-size bowl and cover it with 1/2cup cold distilled water. Let it sit for 45minutes. When the water turns red, strainthe cabbage juice into a plastic pitcher.Use the cabbage juice to test for acids orbases. Acids will make the cabbage juiceturn different shades of red, and baseswill make it turn different shades of blue.Pour an equal amount of cabbage juiceinto five plastic cups. Add 1 teaspoon ofbaking soda (which is a base) to four ofthe cups. The stronger the acid, the lessliquid you’ll use to get the original colorback. The fifth cup is your control. Thecolor of the juice in the cup with just thebaking soda is the color that you want toget all of your mixtures to match.Add the lemon juice, 1 teaspoon at atime, to your first cup. How much lemonjuice did you have to add to get thecabbage juice back to its original reddishcolor? In the second cup repeat forvinegar, and cola in the third cup. Theliquids you need to use the least of arethe most acidic. The liquids you need touse the most of are the least acidic. Theliquids that don’t change the color at allare bases. Now that you have a range ofreactions for comparison, test islandwater in the fourth cup. What is yourconclusion? Is it acidic or basic?What’s going on?Red cabbage juice is an indicator. Whenit comes into contact with a base, likebaking soda, it turns blue/purple. Whenit’s mixed with an acid, like vinegar, itstays red/pink. Pure water is neutral —neither acidic nor basic.Test the Hardness of WaterWater can be “hard,” eventhough it’s a liquid. Hard watercontains lots of minerals (such asmagnesium and calcium) thatleave deposits in pans and waterpipes. Hard water also makes itdifficult to lather up with soap.Are you concerned about the lackof lather when you soap up onthe island? Test your water tosee how hard it is.What you doIn the small jar mix a teaspoon ofthe liquid soap with 1/2 cup of thedistilled water to make a soapsolution. In the tall glass dissolve1 teaspoon of Epsom salts in 2cups of distilled water to makehard “island” water. Pour distilledwater into one screw-top jar andthe same amount of “island”water into the other. Use thedropper to put one drop of soapYou needsolution into the jar of islandtall drinking glass water. Screw the lid on tight and“island” watertwo screw-top jars distilled watershake. If the water doesn’t foam,liquid soapteaspoonadd another drop of solution,Epsom saltseye dropperscrew on the lid, and shake itmeasuring cupsmall open jaragain. Repeat until the water4ROUGH SCIENCE ACTIVITY GUIDEfoams. Count how many drops ofsoap solution you need. Repeatthe experiment using the screwtop jar of distilled water. Whichwater needed more drops of soapsolution to make it foam?What’s going on?Distilled water is “soft.” Wecan use it as a measure of thehardness—the mineral content—of the “island water.” In hardwater the salts (magnesium andcalcium) interact with soap toform a scum that will not formbubbles (soap foam). Therefore,the amount of lather is relatedto the hardness of the water.
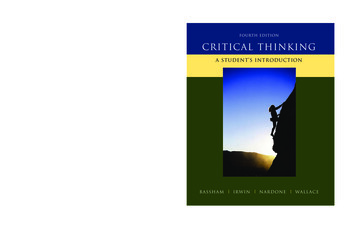
Build a Water FilterMake a MicroscopeWorried about the quality ofdrinking water on the island?Filtering is one of the bestmethods of making water safeto drink. This filter will removesmall particles from dirty water.Make your own filtered waterusing this method.what each layer has taken out ofthe water. Experiment by puttingthe filter materials into thebottle in a different order eachtime. What difference does theorder of the layers make? Cleanthe bottle halves thoroughlybefore you use them again.You needWhat’s going on?2-liter soda bottle with capserrated knifenapkins or paper towelsgravel, sand, charcoal, andcotton balls for the filterdirty water (if your“island” water looks tooclean, add cooking oil,food coloring, piecesof paper, or tinypieces of Styrofoam)What you dopapertowelDifferent materials filter differentsubstances from the water. Theslower the water travelsthrough a material, thegravel,sand,more impurities arecharcoal& cotton ballsremoved. Here the(insidepaper towel)cotton fibers andsand create a longerpath for the waterand impurities topass through andsolids get trapped.Charcoal particlesare charged (like aglass rod rubbedwith a silk cloth)and they attractsodabottleoppositely chargedbottomimpurities.Remove the plasticsheath from the outsideof the soda bottle andscrew on the cap. Cutthe bottle in half. Putsodabottletopthe top half of the bottleupside-down (like a funnel)into the bottom half. Linethe upside-down half-bottleWater FilterFor more activities, seewith a napkin or paper towel.the Rough Science Web site:Put layers of gravel, sand, charwww.pbs.org/roughscience.coal, and cotton balls inside thetop half of the bottle. (Ask participants to predict what theythink each of the filter materialslook herewill remove from the water.)Remove the bottle cap. Pour thewater dropdirty water through the filter.vaseline(Ask participants to comment onany changes they notice and howtheir observations fit with theirplasticpredictions.) Now scoop out eachtapelayer of the filter and examineobjectWater is full of plants andanimals that are too small to seewith the naked eye. Make asimple microscope to see if youcan detect any tiny organismsswimming around in the water.You needempty matchboxpiece of thin, transparent plastic(e.g., from a plastic bag orplastic wrap)matchstickpetroleum jelly or lip balmdropperscissorstransparent tapewater samples(e.g. from an “island” pond)What you doCut out most of one of the largesides of the matchbox sleeve. Becareful not to cut it all out sincethe sleeve still needs to holdtogether. Next cut a piece of thin,transparent plastic the same sizeas the end of the sleeve (wherethe tray slides in). Tape the plasticacross the end of the sleeve, taking care to keep the tape right tothe edges. Cut a hole in the sideof the sleeve to allow light toenter. With the plastic-coveredend up, slide the sleeve onto thetray of the matchbox (as if toclose the matchbox) with the holeon the open side. Using thematchstick, draw a circle of petroleum jelly on the plastic. Use thedropper to place a single drop ofwater in the circle. Put anotherdrop of water (pond water) onthe end of the tray and look at itthrough your magnifying waterdrop. Very carefully, slide thesleeve up or down to focus yourmicroscope. This matchbox setupcan also be used to view otheritems like small insects.What’s going on?matchboxsleevematchboxtrayMicroscopeThis is a simple type of lightmicroscope that bends lightreflected by an object to make alarger magnified image.Activity adapted from How toBuild a Mini Microscope,http://physics.about.com.
WEATHERSTATIONThe weather in the tropicscan be unpredictable. Andthere’s no radio or TV stationto turn on and get a reliableforecast. That’s why you’llneed a weather station tofigure out what changes lieahead. You’ll want advancewarning if that big storm ison the way. And you’ll wantto know which direction it’scoming from.The Challenges!To calculate the moisturecontent of the air, find thedew point.To predict changes in theweather, make a barometer.To find out which way isNorth, construct a compass.To determine the winddirection, build a wind vane.Find the Dew PointThe island climate is completely different from theone you’re used to. How do you avoid getting caughtin a torrential storm or a thick fog? The dew pointis the temperature at which moisture in the airbegins to form dew. It is a way of gauging the air’shumidity. Here’s a way to calculate it.You needtin canthermometertablespoonice cubesWhat you doMike Bullivant devises a rain meteras part of the island weather station.Crush the ice cubes in the paper towel using theback of the tablespoon. Fill the bowl halfway withcrushed ice. Make sure the outside of the tin can is completely dry. Fill thecan with cold water. Place the thermometer in the can. Add one tablespoonof crushed ice and stir. Continue adding ice until a layer of dew is visible onthe outside of the can. Immediately read the thermometer to find the dewpoint temperature. If it’s high, beware! The humidity is high also.What’s going on?All air contains water vapor. As air cools (when it comes in contact with thecold can), the water vapor begins to condense. This is why glasses holdingcold drinks “sweat” in the summertime. The dew point is the temperatureat which moisture in the air begins to form dew. The higher thedew point temperature, the higher the moisture content ofthe air at a given temperature.Activity adapted from Robert Wood. Science for Kids:39 Easy Meteorology Experiments.TAB Books, 1991.Make a BarometerA barometer shows changes in airpressure. High pressure indicatesgood weather, low pressureindicates possible storms. Byconsulting your barometer everyday, you’ll be able to makepredictions about weather changes.(This can be a multi-day activity tocompare the daily differences inair pressure.)You needtall glass or jarbowl4 paper clipspenwaterWhat you doSlide the paper clips onto the rim ofthe glass and space them equally6paper towelbowlwateraround the rim. Fill the glass abouttwo-thirds full with water. Place thebowl upside down over the glass.Carefully turn the bowl and the glassover so that the glass sits upsidedown in the bowl. Some of thewater will run out of the glass butmost will stay inside it. With a penmark the level of the water in theglass at the beginning of the activity.Take your barometer outside intothe open air. Look for changes in thewater level in the glass over time.(This may take several hours or evenlonger than a day.)What’s going on?When the atmospheric pressureof the air rises, the water in thebowl will be forced downwardsby the weight of the air on theROUGH SCIENCE ACTIVITY GUIDEwater. This, in turn, will cause thewater in the glass to rise. A barometermeasures the weight of the amountof air between the surface of theearth (the water in the bowl) and thetop of the atmosphere.Activity adapted from RobertWood. Science for Kids: 39 EasyMeteorology Experiments. TABBooks, 1991.
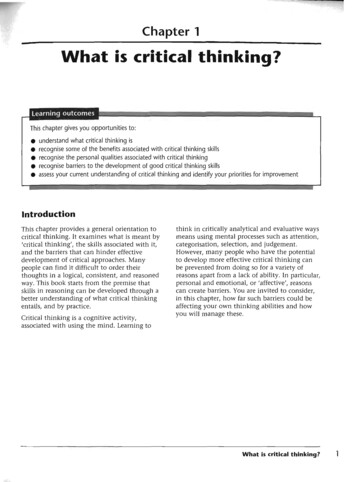
Make a CompassBuild a Wind VaneMake a compass to determine the differentdirections: North, South, East, and West.A change in wind direction often indicates animminent change in the weather. Be preparedfor sudden change by making this wind vane.(You can also use the compass you made in theprevious activity to identify thedirection of the wind.)You needneedlemagnetplastic containera cork (1/4” to 1/2 “ thick)penwaterWhat you doFill the plastic container with water. Stroke oneend of the magnet along the needle in onedirection at least 50 times to magnetize theneedle. Lay the needle on the cork, with one endof the needle in the center. Tape the needledown. Float the cork in the container of water.The needle will bob around until it points North,towards the Earth’s magnetic north. When theneedle settles in position, mark North on theside of the container. Now you can determinethe other directions and label them East on theright, South on the bottom and West on the left.What’s going on?The Earth’s core is thought to consist largely ofmolten iron, which crystallizes into a solid.Convection caused by heat radiating fromthe core, along with the rotation of the Earth,causes the liquid iron to move in a rotationalpattern. It is these rotational forces in the liquidiron layer that lead to weak magnetic forcesaround the axis of spin. The magnetized needlein a compass can detect very slight magneticfields. No matter where you stand on Earth, youcan hold a compass in your hand and it willpoint toward the North. This is amazingly helpfulbecause you can tell which way to go no matterwhat the weather or time of day.You needa long tackscissorsmodeling claya plastic pot orcontainer, e.g.,from take-out foodrulerglue stickthin, colored carddrinking straw2 pencils with erasercompassWhat you doTurn the plastic container upside down. Make ahole in the center by inserting the pencil, sharpend first. Make sure that it is firmly in place.With another pencil and a ruler, draw two largetriangles and four small ones on the colored card.Then cut out the shapes. Glue the small trianglesto the base of the plastic container at equaldistances and on opposite sides from each otheras on a compass. One point of each small triangleshould overlap the edge of the pot, with thepencil in the middle. Cut short slits in each end ofthe straw and insert one large triangle in eachend to make an arrow-shaped “vane.” Push thetack through the center of the straw and into theeraser on the pencil sticking out of the pot.Secure the other end of the pot to a surface witha ring of modeling clay. Take the vane outside orto a simulated windy weather area and watch itswing in the wind. Finally, use your compass todetermine East, West, North and South, and thenlabel the small triangles accordingly. Now you cantell which direction the wind vane is pointing.What’s going on?The direction in which the vane points indicates thedirection from which the wind is blowing. Forinstance, in a westerly wind, the vane points “West.”Activity adapted from Neil Ardley. 101 GreatScience Experiments. Dorling Kindersley, 1993,pp. 14-15.CompassROUGH SCIENCE ACTIVITY GUIDE7
IslandPowerPlantOnce you’ve taken careof basics like food andwater, you’ll want toexperiment with waysto create your ownelectricity andelectrical gadgets.Why don’t you employa little rough science tocreate a power planton your island?The Challenges!To power things, makeyour own battery.To drive a paper windmill to create a breeze,build an electric motor.To see things at night,make your own flashlight.Make a BatterySome kinds of batteries produce electricity by a chemical reaction betweentwo different metals (electrodes)immersed in acid (electrolyte).Figure out how to make your ownbatteries in case the limited supply onthe island runs out.You needtwo wires with theends stripped offaluminum foilscissorssmall bowlwarm watersalttape6 pennies (copper coins)paper towels1.5 volt penlight lightbulba paper platepaper circles, build alternate layers.Then tape the other end of the wire tothe last coin and put it on top. This isyour battery.Test the battery with the light bulb.Attach the end of one wire to themetal terminal end of the light bulb.Wrap the end of the other wirearound the metal shaft of thelight bulb. Can you see thebulb light up?What’s going on?What you doPartially dissolve 1 tablespoon of salt in1 cup of warm water. Some salt shouldstill be evident in the bottom of thebowl. Place a penny on the aluminumfoil and draw around it. Repeat fivetimes. Do the same thing with thepaper towel. Cut out the circles. Youshould have six foil circles and sixpaper ones. Tape the end of one wireto a foil circle. Dip a paper circle in thewarm, salty water. Place the foil circlewith the wire on the plate, and put awet paper circle and a penny on top ofit. Using all the foil, pennies, andThe metal atoms in the foildissolve into the electrolyte(the warm, salty water) andelectrons are left behind.Electricity is created whenthe electrons flow through acircuit (the foil circles andpaper circles soaked in warm,salty water). When the metalseventually dissolve completelyinto the electrolyte, no more electronsare formed and the battery stopsworking. The first battery (Volta’s Pile)was developed about 1860 by AlessandroVolta. He stacked discs of copper, zinc,and cardboard soaked in salty waterin alternate layers and measured anelectronic current.Activity adapted from Neil Ardley. 101Great Science Experiments. DorlingKindersley, 1993. For instructions oncreating a similar battery, seehttp://isaac.exploratorium.Make a FlashlightWhen you’re on the island, you can’t just flick a switch and turnon a light. There isn’t a constant electricity supply. But with a flashlight,you’ll be able to see around your room at night and even venture outside fora walk — moonlight orno moonlight.You needsharp pencilscrewdriveraluminum foilplastic tape8ROUGH SCIENCE ACTIVITY GUIDE3 pieces of wire with bare endsempty dishwashing liquid bottle2 batteries with 1.5 volts each2 brass paper fastenersa light bulb in a bulb holderpaper clipscissorscotton
What you doCut the top off the empty dishwashing liquid bottle. Tape foil shiny side up to the inside of the bottle top. Use the pencil to make two smallholes in the side of the bottle near the bottom.One hole should be about an inch below the other.Firmly attach two pieces of wire to the bulb holder. Tape the top of one battery to the bottom ofthe other to make one long battery. Tape the thirdpiece of wire to the bottom of the battery. Tapeone of the wires from the bulb-holder to theexposed terminal on the battery. Put the long battery in the bottle, carefully threading the wirefrom the bottom battery through the lower hole.Stuff cotton in the space between the batteriesand the walls of the bottle to keep the batteries inplace. Thread the wire from the bulb-holder throughthe top hole in the bottle. Attach paper fasteners tothe two wires poking through the holes and push inthe fasteners.Put the bulb-holder on top of the battery and tapethe center of the bottle top over the bulb. In otherwords, put the bottle top on back-to-front so thatthe aluminum foil is visible. Bend the paper clip andfit one end under the lower paperfastener to make a switch. (When the switch isturned, current flows from the battery along thewires to the bulb.) Press the other end of the paperclip against the top fastener and see the flashlightlight up.What’s going on?There is a thin wire (a filament) inside the bulbthat glows white-hot when current flows throughit. The light reflects off the foil to produce abright beam of light.For more activities, see the Rough Science Website: www.pbs.org/roughscience.Build an Electric MotorIt’s hard to sleep at night because of the heat.How would you go about building a simple motorto turn a paper windmill and create a breeze?When a current passes through a coil of wire itturns the wire into an electromagnet whichinteracts with a permanent magnet to make thecoil spin. The spinning coil is a basic motor.You need5 small magnets (available atelectronics stores)2 large paper clipsplastic, paper, or foam cup2 feet of solid insulated 20-gaugecopper wire (non stranded)masking tapea 1.5 volt D cell battery in a battery holder2 alligator clip leads (available atelectronics stores)wire strippersbroomWhat you doWind the copper wire around the end of a broomhandle to create a coil with a 1-inch diameter.Take each end of the wire and wrap it aroundthe coil to hold the coil together. Leaving about2 inches of wire sticking out from each end, stripthe insulation off these two ends using wirestrippers. Attach three magnets to the bottom ofthe cup with masking tape. Turn the cup upsidedown and lay two magnets on top. (The magnetsunderneath create a strong magnetic field andkeep the magnets on top in place with no tape.)Unfold one end of a paper clip and tape it toone side of the cup so that the rest stands upabove the cup. Unfold the other paper clip, andtape it to the other side of the cup. The paperclips will form a cradle for the coil. Attach oneend of the coil to one paper clip and the otherend of the coil to the other paper clip. Spin thecoil and adjust the height of the paper clips tomake sure that there is around 1/16 of aninch between the coil and the top of the magnets.Adjust the clips to make sure the coil staysbalanced and centered. Put the battery andbattery holder beside the cup. Attach one endof an alligator clip to a battery terminal and theother to a paper c
The Rough Science Adventure Activities Guidebookis a companion to the Rough Science television series. The guide provides science and technology activities that encourage collaborative learning and experimentation in an informal setting. Although written for museum professionals, the guide