Transcription
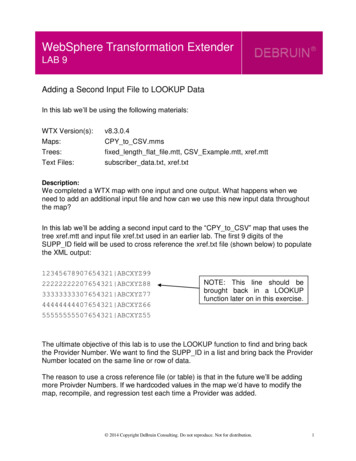
WebSphere Transformation ExtenderLAB 9Adding a Second Input File to LOOKUP DataIn this lab we’ll be using the following materials:WTX Version(s):Maps:v8.3.0.4CPY to CSV.mmsTrees:fixed length flat file.mtt, CSV Example.mtt, xref.mttText Files:subscriber data.txt, xref.txtDescription:We completed a WTX map with one input and one output. What happens when weneed to add an additional input file and how can we use this new input data throughoutthe map?In this lab we’ll be adding a second input card to the “CPY to CSV” map that uses thetree xref.mtt and input file xref.txt used in an earlier lab. The first 9 digits of theSUPP ID field will be used to cross reference the xref.txt file (shown below) to populatethe XML output:12345678907654321 ABCXYZ9922222222207654321 ABCXYZ8833333333307654321 ABCXYZ7744444444407654321 ABCXYZ6655555555507654321 ABCXYZ55NOTE: This line should bebrought back in a LOOKUPfunction later on in this exercise.The ultimate objective of this lab is to use the LOOKUP function to find and bring backthe Provider Number. We want to find the SUPP ID in a list and bring back the ProviderNumber located on the same line or row of data.The reason to use a cross reference file (or table) is that in the future we’ll be addingmore Proivder Numbers. If we hardcoded values in the map we’d have to modify themap, recompile, and regression test each time a Provider was added. 2014 Copyright DeBruin Consulting. Do not reproduce. Not for distribution.1
Steps:1. From the Outline View in the Map Navigator find the Executable Map namedCPY to CSV. Right click on Input Card and select Add:2. Use the xref.mtt tree with the following options: 2014 Copyright DeBruin Consulting. Do not reproduce. Not for distribution.2
3. Drag and drop the new input card “object” from the card to the Mapping Rule Baras shown below: 2014 Copyright DeBruin Consulting. Do not reproduce. Not for distribution.3
4. To be able to use the data where we need it (bank account nbr) we will need tobring the second input file into the functional maps named f Each Dependentand f Each Request.Since we already have functional maps built we will not want to use the functionalmap wizard in this case. Instead we can copy input card #2 named XRef as aninput card in the functional maps.TIP: Use keyboard shortcuts in Outline View for faster development.Expand the functional maps f Each Dependent and f Each Request to showthe Input Cards as follows:5. In order to copy the card from the executable map CPY to CSV to the functionalmaps f Each Dependent and f Each Request do the following:1. Highlight the input card named XRef.2. Use the keyboard shortcut Ctrl-C to copy the card.3. Highlight “Input Cards” under f Each Dependent andf Each Request.4. Use the keyboard shortcut Ctrl-V to copy the card. 2014 Copyright DeBruin Consulting. Do not reproduce. Not for distribution.4
Now your maps should appear as follows: 2014 Copyright DeBruin Consulting. Do not reproduce. Not for distribution.5
6. Build the map and you’ll see the following error message: 2014 Copyright DeBruin Consulting. Do not reproduce. Not for distribution.6
7. Double click the functional map f Each Request:We see that the XRef input card is available as an input, but it is not beingpassed to the functional map f Each Dependent. Since we’ve copied this inputcard to the functional map we need to make sure the inputs within the functionalmap match the objects that we pass to them.NOTE: If you do not see two input cards your map setting may need to beupdated. Select Window Preference to increase the number of input cards: 2014 Copyright DeBruin Consulting. Do not reproduce. Not for distribution.7
8. Drag and drop the XRef card to the rule bar (shown below), press enter tocommit the rule, save the map, and build the map. We’ll see that the map errorshave disappeared and we can continue with our development: 2014 Copyright DeBruin Consulting. Do not reproduce. Not for distribution.8
9. The ultimate objective of this lab is to use the LOOKUP function to find theProvider Number. We want to find the SUPP ID in a list and bring back theProvider Number located on the same line or row of data.We’ll use the rule below to achieve this result: LOOKUP( Provider Number Field:Record:xref,LEFT(Subscriber ID Field:Record:xref, 9) LEFT(SUPP ID Field:SUBSCRIBER:In2, 9)) 2014 Copyright DeBruin Consulting. Do not reproduce. Not for distribution.9
10. Save, Build, and Run the map:The map ran, but when we open the output we see that the SSN Field has notbeen populated in the output.11. By running the trace we find that the SUPP ID is left justified in the input dataand, therefore, we need to TRIMLEFT spaces. The default is to trim spaces, sowe can simply add TRIMLEFT as show in this rule: LOOKUP( Provider Number Field:Record:xref,LEFT(Subscriber ID Field:Record:xref) , 9) LEFT(TRIMLEFT (SUPP ID Field:SUBSCRIBER:In1) , 9)) 2014 Copyright DeBruin Consulting. Do not reproduce. Not for distribution.10
12. The Provider Number has now been mapped successfully to the second SSN.However, the first SSN is blank.13. If we review the data we see that there will not be a match and, therefore, thefirst SSN will not be populated. We can “default” to the input SUPP ID value byusing the EITHER function: EITHER(LOOKUP( Provider Number Field:Record:xref,LEFT(Subscriber ID Field:Record:xref, 9) LEFT(TRIMLEFT(SUPP ID Field:SUBSCRIBER:In1), 9)),SUPP ID Field:SUBSCRIBER:In1) 2014 Copyright DeBruin Consulting. Do not reproduce. Not for distribution.11
14. Our final output: 2014 Copyright DeBruin Consulting. Do not reproduce. Not for distribution.12
WebSphere Transformation Extender LAB 9 Adding a Second Input File to LOOKUP Data In this lab we’ll be using the following materials: WTX Version(s): v8.3.0.4 Maps: CPY_to_CSV.mms Trees: fixed_length_flat_file.mtt, CSV_Example.mtt, xref.m