Transcription
Wood FlooringInstallation Guidelines and Methods111 Chesterfield Industrial Boulevard Chesterfield, MO 63005800.422.4556 (USA & Canada) 636.519.9663 (International)1National Wood Flooring Association 2007 l Revised 09.2012
NoticeThe National Wood Flooring Association assumes no responsibility and accepts no liability for the principles ortechniques contained in these guidelines/methods.These guidelines/ methods for the installation and sand & finish of wood flooring were developed by the NWFATechnical Publications Committee, using reliable installation principles, with research of all available wood flooringinstallation data and in consultation with leading industry authorities. The methods are not intended to apply tounrelated wood floor issues absent in a causal connection.While every effort has been made to produce accurate and generally accepted guidelines, the principles andpractices described in this publication are not universal requirements. The recommendations in thispublication are directed at the North American market in general, and therefore may not necessarily reflect themost accepted industry practices in your geographic area. Some installation methods and materials may not besuitable in some geographic areas because of local trade practices, climatic conditions or construction methods. Allwood flooring installations must conform to local building codes, ordinances, trade practices and climaticconditions.In addition, manufacturers’ recommendations for installation and sand & finish of specific products should alwayssupersede the recommendations contained in this publication.It is recommended that all wood flooring products be installed in accordance with the NWFA InstallationGuidelines and all applicable manufacturer guidelines by an NWFACP Certified Installer, NWFA Member, orequivalent.1National Wood Flooring Association 2007 l Revised 09.2012
AcknowledgementThe National Wood Flooring Association would like to gratefully acknowledge assistance with information for theseguidelines/ methods by the following: Hardwood Plywood Veneer Association – www.hpva.orgMaple Flooring Manufacturers Association – www.maplefloor.orgAmerican Plywood Association – www.apawood.org2National Wood Flooring Association 2007 l Revised 09.2012
NWFA Involved PartiesGeneral DefinitionsManufacturer: Any individual or entity that physically manufacturers the wood flooring product.Specifier: Any individual or entity (including, but not limited to, architects, builders, consultants, design centers,designers/decorators, end users, general contractors, flooring contractors, sales professionals) that recommends,specifies, or in any way advises the buyer prior to ordering, purchasing, and/or installing the wood floor products.Supplier: Any individual or entity (including, but not limited to, distributor, importer) that receives product from amanufacturer and supplies the wood flooring products to a seller or buyer.Seller: Any individual or entity (including, but not limited to, retail stores, big box stores, internetsales, interior designers, direct sales) that physically supplies/sells the wood flooring products to the buyer.Buyer: Any individual or entity (including, but not limited to distributors, homeowners, installers, flooringcontractors, general contractors) that is the first to use/handle/possess/receive/deliver the wood flooring materialprior to installation of the wood flooring product.Installer: Any individual or entity that physically installs and places into service the wood flooring product.End‐User: Any individual or entity that physically receives and puts to use the final wood flooring product.3National Wood Flooring Association 2007 l Revised 09.2012
Section IGeneral GuidelinesChapter 1Chapter 2Chapter 35Jobsite ConditionsAcclimation and Conditioning of Wood FlooringMoisture Guideline Testing and Vapor RetardersPage6811National Wood Flooring Association 2007 l Revised 09.2012
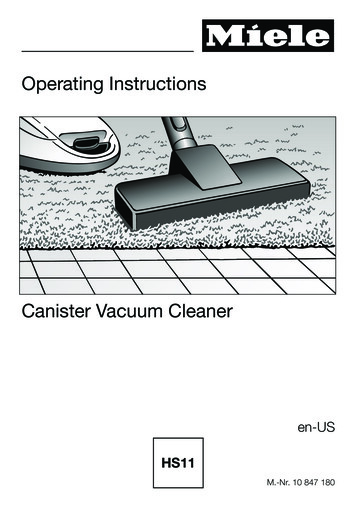
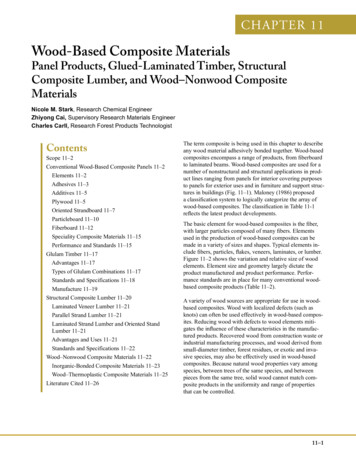
Chapter 1Jobsite ConditionsWood flooring by design is not to be used to strengthen/stiffen a subfloor and will not do so. If movement of thesubfloor occurs prior to installation and is not corrected, that same movement will occur after installation iscomplete.Part IMinimum Jobsite RequirementsA. Wood flooring should be one of the last jobs completed on the construction project. Limit foot traffic onfinished wood flooring.B. Evaluate the jobsite for potential problems before installation begins, and before wood flooring is delivered tothe jobsite.C. Installation constitutes acceptance of flooring material, subfloor/substrate, the jobsite itself including theambient temperature and relative humidity at the time of installation, and all impacting variables that mayaffect a wood floor. For warranty and/or hold harmless agreements, check with legal counsel.1. Exterior surface drainage should direct water away from the building.2. Do not deliver wood flooring to the jobsite or install wood flooring until the building is enclosed.3. If heating and/or air conditioning is in operating condition, it needs to be operating. If it is not possible forthe permanent heating and/or air conditioning system to be operating before, during and afterinstallation, a temporary heating and/or dehumidification system that mimics normal temperature andhumidity conditions can enable the installation to proceed until the permanent heating and/or airconditioning system is operating.4. Do not deliver wood flooring to the jobsite or install wood flooring until appropriate temperature andhumidity conditions have been achieved. Appropriate temperature and humidity conditions are definedas those conditions to be experienced in the building after occupancy.5. Do not deliver wood flooring to the jobsite or install wood flooring until all concrete, masonry, plastering,drywall, texturing and painting primer coats are completed.6. Basements and crawl spaces must be dry. If power washing is required in the basement, do so beforewood flooring is installed and allow subfloor and basement to dry before installing wood flooring.7. Crawl space should be a minimum of 18” (457mm) from ground to underside of joists.8. Crawl space earth (or thin concrete slab) should be covered 100 percent by a vapor retarder of blackpolyethylene (minimum 6 mil) or any recommended puncture-resistant membrane, such as Class C,meeting ASTM D1745. See Figure 1-1. Check local codes.9. Crawl Space Conditionsa. Where a proper ground covering is in place andwhen venting is required by local building codes,the crawl space should have perimeter ventingequal to a minimum of 1.5 square feet per 100square feet of crawl space square footage,unless local building codes differ from thisspecification. Note: Local building codes maydiffer. Follow local building codes.b. For crawl spaces without ventilation openings,vapor retarder joints must overlap a minimumof 6 inches and be sealed or taped. The vaporretarder should also extend at least 6 inches upthe stem wall and be attached and sealed to thestem wall. Continuously operated mechanicalexhaust and perimeter wall insulation orconditioned air supply and insulation must beprovided.6National Wood Flooring Association 2007 l Revised 09.2012
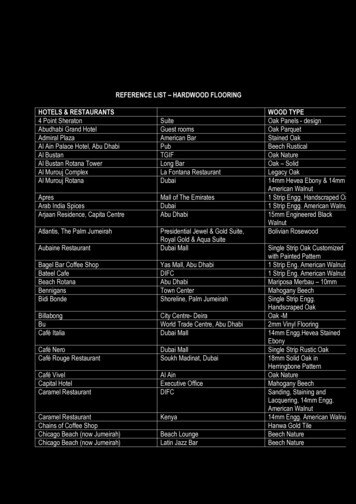
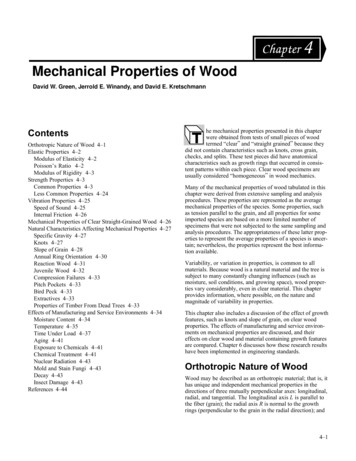
10. Note the grade level so that the correct type offlooring and system can be specified for the job.Engineered and floating floors can be appropriatefor above-grade, on-grade and below-gradeinstallations. Solid wood flooring can be appropriatefor above-grade and on grade installations, but notfor below grade installations. If the soil surroundinga structure is 3 inches or more above the floor of anylevel, consider that level below grade. This includeswalk-out basements. In addition, the surroundingsoil should be sloped away from the structure. SeeFigure 1-2.11. Subfloors (wood or concrete) should be checked byan appropriate method for establishing moisturecontent. Average subfloor moisture content shouldbe within the range as specified for the product bythe product manufacturer. See Chapter 3, MoistureTesting. See Figure 1-2.12. Where the minimum jobsite conditions are present,the flooring can be delivered and stored in therooms in which it will be installed. See Chapter 2,Acclimation and Conditioning of Wood Flooring.Figure 1-2Part IIAdditional Jobsite Conditions for Factory-Finished FlooringA. All finished wall coverings and painting should be completed. Note: Base and shoe mold may be installed afterthe flooring installation.B. After installation, if you choose to protectively cover the floor, cover the floor completely, since some speciesare light-sensitive and uncovered areas may change color. However, covering a glue-down application may notallow some adhesives to properly cure. Follow the flooring and adhesive manufacturer’s recommendations.Use a covering material with a vapor permeance (perm rating) of 1 perm or more (tested in accordance withASTM E96) to avoid trapping moisture/vapor on or within the floor. Any covering should be taped, using a lowadhesion tape, to base or shoe moldings. Do not tape to finished flooring. When taping paper or sheetstogether, tape them to each other, not to the floor.As in all installations, at completion of job, inspect flooring from a standing position.Part IIIJobsite ChecklistSee Appendix M.Part IVRemodel InstallationsBe aware of the most current EPA regulations for lead paint dust as well as asbestos (www.epa.gov).7National Wood Flooring Association 2007 l Revised 09.2012
Chapter 2Acclimation and Conditioning of Wood FlooringAlways follow the manufacturer’s recommendations regarding how and whether to acclimate wood flooring.Part IGeneral Acclimation/Conditioning GuidelinesDefinitions:Acclimation: The process of adjusting (conditioning) the moisture content of wood flooring to the environment inwhich it is expected to perform.Equilibrium Moisture Content: The moisture content of wood when in equilibrium with its environment. Whenwood is neither gaining nor losing moisture, equilibrium moisture content (EMC) has been reached.A. Storage and Conditions1. Do not store wood flooring at the jobsite under uncontrolled environmental conditions. Garages, andexterior patios, for example, are not acceptable areas to store wood flooring.2. Ideal interior environmental conditions vary from region to region and jobsite to jobsite. It is the flooringprofessional’s responsibility to know what the “ideal” climate conditions are and customize the flooraround those conditions.a. Determine what the expected seasonal change of wood moisture content is for your geographicallocation. For a general view of moisture‐content averages by region, See Appendix D and Appendix E.b. Upon delivery, check wood flooring moisture content with a moisture meter to establish a baselinefor acclimation. Check the moisture content of multiple boards. A good representative sample istypically 40 boards for every 1,000 square feet of flooring. Calculate what the optimal wood moisturecontent is (baseline) by dividing the high season and low season. Example: If your region has anexpected EMC from a low of 6% to a high of 9%, the baseline MC of the wood would be 7.5%. If woodflooring is delivered and recorded to its baseline MC for the geographical location and proper relativehumidity conditions are maintained, no acclimation may be required. If the moisture content of theproduct received is well outside of the range of optimal moisture content, it will be very difficult toacclimate the product properly without substantial dimensional change, distortion, and structuraldamage. Example: If the moisture content of the delivered wood is 12% and the optimal range is 6%,excessive shrinkage, bowing, cupping and other physical anomalies would be expected during theacclimation process. The wood flooring should not be accepted.c. Optimal wood moisture content represents only a base line to begin from and does not represent thefinal EMC required for the interior environment. Acclimation is often required to customize themoisture content of the wood flooring to the interior environment in which it is expected to perform.B. GeneralNote: Some manufacturers do not require acclimation for certain products prior to installation. If themanufacturer recommends that the wood flooring be acclimated before installation, proceed as follows:1. Ensure that the building is enclosed.2. Verify that the building is maintained at normal living conditions for temperature and humidity.3. Where building codes allow, permanent heating and/or air conditioning systems should be operating atleast five days preceding installation to promote proper acclimation and should be maintained during andafter installation. For radiant heat, see Appendix H.4. If it is not possible for the permanent heating and/or air conditioning system to be operating before,during and after installation, a temporary heating and/or dehumidification system that mimics normalliving (occupied) conditions can enable the installation to proceed until the permanent heating and/or airconditioning system is fully operational.5. Acclimate the wood flooring as necessary (see Chapter 2, Part II, Acclimation).8National Wood Flooring Association 2007 l Revised 09.2012
6.Note: Not properly acclimating wood flooring may cause excessive expansion, shrinkage, dimensionaldistortion or structural damage. The worst‐case scenario is one in which wood flooring is stored at thejobsite in an uncontrolled environment, then immediately installed. This is especially true when thematerials are stored in an area that is subject to excessive moisture and humidity conditions. Acclimationoutside of the area in which the wood is to be installed does no good at all; in fact, it is likely harmful tostore wood flooring at the jobsite under conditions that don’t reflect expected normal environmentalconditions.Prior to installation, ensure that wood flooring is within acceptable range of moisture content with thewood subfloor. For solid strip flooring (less than 3” wide), there should be no more than 4 percentmoisture content difference between properly acclimated wood flooring and subflooring materials. Forwide‐width solid flooring (3” or wider), there should be no more than 2 percent difference in moisturecontent between properly acclimated wood flooring and subflooring materials.Part IIAcclimationWood flooring is a hygroscopic material subject to dimensional change as a result of variations in moisture,temperature and humidity within the surrounding environment. Wood flooring simply needs to reach moisturecontent level in equilibrium with the surrounding environment (EMC) in which it will be installed, at or near normalliving conditions. The process of reaching this equilibrium is defined as acclimation, which allows the wood toproperly adjust itself to the normal living conditions within the structure; that is, the temperature, humidityconditions and moisture content that will typically be experienced once the structure is occupied.A. The Process of AcclimationIf the manufacturer recommends that the wood flooring be acclimated before installation, proceed as follows:1. Acclimation can be facilitated by breaking the floor units into small lots and/or opening the packaging. Acommon practice is to cross‐stack the materials with spacers (¾” to 1” sticks) between each layer offlooring to allow air circulation on all sides of all boards.2. Most recommendations state that the materials need to acclimate from a minimum of 3 days up to nogiven maximum. While it takes time to acclimate a product, the most important aspect is that thematerials reach a moisture content that is in equilibrium with its expected use. Acclimate the materials aslong as necessary to accomplish this task, taking the necessary moisture readings to indicate when thematerials have reached the proper moisture content and when no further changes occur.a. For site‐finished wood flooring, after installation and before sanding and finishing takes place, allowthe flooring to acclimate (settle‐in) to the controlled environment, and to stabilize for a period oftime. Some flooring professionals suggest 5 to 7 days. Engineered flooring installed using an adhesiveapplication system may require a longer post‐installation acclimation period to allow all residualoff‐gassing to occur prior to application of a finish. Follow adhesive manufacturer’srecommendations.b. Tropical imported species generally require more time in order to properly acclimate the woodflooring. Some tropical species lose moisture or gain moisture at faster or slower rates than domesticspecies due to higher overall density, oil and resin content and interlocking cell structure. In addition,the resins and oils make accurate MC readings more difficult. Resistance (pin type) meters requiremultiple readings of multiple boards in order to arrive at a more accurate average MC reading. Pinlessmeters that include multiple depth level adjustments may offer faster and more-accurate internalreadings.c. Engineered and solid factory finished flooring follows specific manufacturer’s recommendations andsome may not require acclimation. Follow manufacturer’s guidelines to retain all warranty coverage.Warranty coverage generally requires that jobsite conditions be maintained between 30% to 50%relative humidity and that those conditions must be maintained before, during and after installationfor the life of the floor. Failure to comply with these manufacturer’s requirements may result inirreversible structural damage and void related warranties.9National Wood Flooring Association 2007 l Revised 09.2012
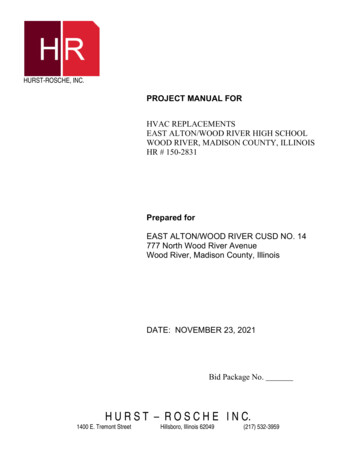
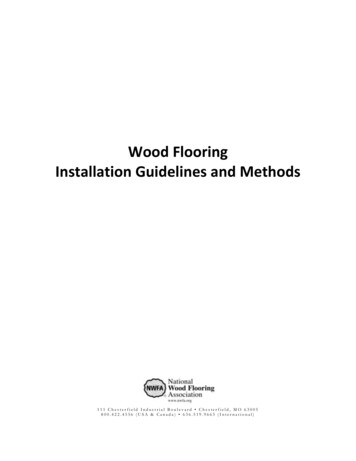
B. Wood’s Comfort Zone1. As a general rule, with geographic exceptions, wood flooring will perform best when the interiorenvironment is controlled to stay within a relative humidity range of 30 to 50 percent and a temperaturerange of 60 to 80 Fahrenheit. (In some climates, the ideal humidity range might be higher or lower, 25 to45 percent or 45 to 65 percent, for example.)2. The chart below indicates the moisture content wood will likely have at any given combination oftemperature and humidity. Note the equilibrium moisture content in the recommendedtemperature/humidity range (shaded area) coincides with the 6‐to‐9 percent range used by most flooringmanufacturers during the manufacturing/shipping process. Although some movement can be expectedbetween 6 and 9 percent, wood flooring can shrink or swell more dramatically outside this range. Whenwood is neither gaining nor losing moisture, equilibrium moisture content (EMC) has been reached.Equilibrium Moisture Content of Solid Wood Species at Various Temperatures and Relative Humidity ReadingsWood flooring has a comfort level too. Wood flooring will perform best when the interior environment iscontrolled to stay within a relative humidity range of 30% to 50% and a temperature range of 60 to 80 Fahrenheit. Fortunately, that’s about the same comfort range most humans enjoy. The chart below indicates theequilibrium moisture content of wood flooring at various temperatures and humidity conditions. The left columnindicates temperature in degrees Fahrenheit and Celsius. The bottom row indicates percent relative humidity. Thevalues in the chart indicate the equilibrium moisture content (EMC) for any given combination of temperature andhumidity. For example, at 70 Fahrenheit and 40% relative humidity, the equilibrium moisture content is 7.7%. Theshaded area indicates the generally recommended range for wood flooring – 6% - 9% EMC, which occurs whentemperature is 60 - 80 Fahrenheit or 15 - 26 Celsius, and 30% - 50% relative humidity.Coefficients of Change: How Moisture Affects Wood FlooringSee Chapter 9, Solid Strip and Plank Flooring Installation.10National Wood Flooring Association 2007 l Revised 09.2012
Chapter 3Moisture Guideline Testing and Vapor RetardersReference to ASTM Standard revisions: ASTM Standards listed are most recent revisions or use ASTM Standard ineffect at time of installation.Part IMoisture Testing for Wood Flooring and Wood SubfloorsDetermining moisture content is an essential part of quality control within the flooring installation process.Flooring Installers must know the moisture content of the wood flooring, as well as the subfloor.A. The most accurate measurement for moisture content in wood is the oven‐bake‐out method. However, it isnot widely used because the cost and difficulty of performing the test on‐site is not practical.B. Hand‐held electrical tools, called moisture meters, should be part of the toolbox of every flooring contractorfor measuring moisture in subfloors and floors. Moisture meters have many purposes. They can be used todetermine if floor boards are dry enough for an installation to proceed, they can check subfloors and concretefor high moisture levels, they can determine when a second coat of finish can be applied and they can assesswater damage.There are two main types of meters for testing wood: probe and pinless.1. The probe type measures electrical resistance across opposed sets of pins, which are pushed into thewood. All probes should be inserted parallel with the grain or as instructed by the meter manufacturer.An advantage of probe type meters is that those with insulated pins are able to measure moisture contentat varying depths; for example, you can determine whether the moisture content near the bottom of theboard is higher than near the top.2. The pinless, dielectric type employs signal penetration at one inch or more for both hardwood andsoftwood. The meter can be moved across the surface to identify pockets of moisture. It is relativelyunaffected by temperature. Rough surfaces have very little effect on the reading. Measurements can alsobe taken through coatings, varnish or paint without damage to the surface. Newer pinless meters can beadjusted to depth desired. Older models may read deeper into flooring systems and not give an accuratereading of wood flooring only.3. Follow the meter manufacturer’s recommendations to get an accurate reading from the wood floor. Oneeffective testing method is to remove a sample board and get a reading with air space beneath it.4. It is important that the meter you chose offers the following:a. A wide moisture content range from at least 6 percent to 30 percent.b. The necessary adjustment tables, conversion charts or settings for various species.Test for moisture at several locations in the room – a minimum of 20 per 1,000 square feet – and average theresults. Document all results. A high reading in one area indicates a problem that must be corrected. Payspecial attention to exterior and plumbing walls.Part IIMoisture Testing for Concrete SlabsNote: All tests give a result – at the time the test is done – and in general give you the ability to start or not start ajob. These tests do not give a permanent condition of your substrate, but merely a “at the time the test wasperformed” indication.A. Testing RequirementsBefore moisture testing begins, the concrete slab must be a minimum of 30 days old.B. Qualitative Moisture Tests – Electrical Impedance Test and Electrical Resistance Test (Moisture Meter)Follow meter manufacturer’s instructions.1. Use moisture meters designed specifically for concrete moisture testing.2. Test within the body of the slab (electrical resistance), as well as at the surface (electrical impedance).11National Wood Flooring Association 2007 l Revised 09.2012
3.C.These testing methods are not recognized by any standard and should not be used for the purpose ofaccepting or rejecting a floor. These electronic tests are useful survey tools to broadly evaluate therelative moisture conditions of a slab and to select locations for quantitative moisture tests.4. If the moisture meters indicate the presence of excessive moisture, as per wood flooring or metermanufacturer’s recommendations, further testing is required using relative-humidity testing (ASTMF2170), calcium chloride testing (ASTM F1869) or calcium carbide (CM) testing (ASTM D4944 and MilSpecCRD-C154-77).Quantitative Moisture Tests1. ASTM F1869 – Standard Test Method for Measuring Moisture Vapor Emission Rate of Concrete Subfloorusing Anhydrous Calcium Chloride.a. This test method covers the quantitative determination of the rate of moisture vapor emitted frombelow-grade, on-grade, and above-grade (suspended) bare concrete floors.2. ASTM F2170 – Standard Test Method for Determining Relative Humidity in Concrete Floor Slabs using inSitu Probes.a. This test method covers the quantitative determination of percent relative humidity in concrete slabsfor field or laboratory tests.3. ASTM F2659 – Standard Guide for Preliminary Evaluation of Comparative Moisture Condition of Concrete,Gypsum Cement and Other Floor Slabs and Screeds Using a Non-Destructive Electronic Moisture Meter.a. This guide focuses on obtaining the comparative moisture condition within the upper 1” (25.4 mm)stratum in concrete, gypsum, anhydrite floor slabs and screeds for field tests. Due to the widevariation of material mixtures and additives used in floor slabs and screeds, this methodology maynot be appropriate for all applications. See 1.2 through 1.8 and Section 11 of ASTM F2659. Whereappropriate, or when specified, use further testing as outlined in Test Methods F1869, F2170 orF2420 before installing a resilient floor covering.4. ASTM F2420 – Standard Test Method for Determining Relative Humidity on the Surface of Concrete FloorSlabs Using Relative Humidity Probe Measurement and Insulated Hood.a. This test method covers the quantitative determination of percent relative humidity above thesurface of concrete floor slabs for field or laboratory tests.5. Relative Humidity Testing – ASTM F2170 (Standard Test Method for Determining Relative Humidity inConcrete Floor Slabs Using In Situ Probes).a. Select test locations to provide information about moisture distribution across the entire concretefloor slab. For slabs on grade and below grade, include a test location within three feet of eachexterior wall.b. Perform three tests for the first 1,000 square feet and one test for every additional 1,000 square feetthereafter.c. At least 48 hours before test is placed, concrete floor slabs should be at the same temperature andhumidity that is expected during service conditions.d. Use a rotary hammer-drill to drill holes in the concrete slab; 40% depth of slab is required for theholes when concrete is drying from one side and 20% when drying from both sides. Followmanufacturer’s instructions provided with test kits.e. Allow 72 hours to achieve moisture equilibrium within the hole before making relative humiditymeasurements. Follow manufacturer’s instructions provided with test kits.f. ASTM F710 provides installation guidelines for acceptance of hardwood flooring using relativehumidity testing. Typical limits for wood and wood-based products are 75% relative humidity. Whengetting readings over 75%, you must use a proper vapor retarder, based on the flooringmanufacturer’s recommendations, or wait for further concrete curing.6. Calcium Chloride Test – ASTM F1869 (Test Method for Measuring Moisture Vapor Emission Rate ofConcrete Subfloor Using Anhydrous Calcium Chloride).a. Select test locations to provide information about moisture distribution across the entire concretefloor slab.b. Perform three tests per 1,000 square feet of surface area. Add one additional test for each 1,000square feet thereafter.12National Wood Flooring Association 2007 l Revised 09.2012
c.7.At least 48 hours before test is placed, concrete floor slabs should be at the same temperature andhumidity expected during service conditions.d. The actual test area shall be clean and free of all foreign substances. Use approved OSHA workpractices for removal of all existing flooring materials and debris.e. Blast or grind a minimum area of 20 inches by 20 inches and let stand for a minimum period of 24hours prior to setting test.f. Follow manufacturer’s instructions for properly placing tests onto concrete.g. Tests are to be covered and left in place for 60 to 72 hours. Follow manufacturer’s instructions forlabeling and recording time and date of test.h. Send the test to a certified laboratory for results and documentation, or perform the measurementsas per ASTM F1869.i. Always follow the flooring manufacturer’s guidelines and specifications to determine when theconcrete slab is ready for installation.j. ASTM F710 provides installation guidelines for acceptance of hardwood flooring using alciumchloridetesting. Typical limit for direct glue-down wood flooring is 3lbs/1000sf/24hr. When getting readingsover 3lbs and up to 7lbs, you must use a vapor retarder. A reading over 7lbs may not be acceptablefor wood flooring installation. Follow the wood flooring manufacturer’s recommendations. In thecase of a glue-down installation, the adhesive manufacturer may also have recommendations.Note: For information on the tests listed above, contact your distributor or call NWFA at800.422.4556 (USA or Canada) or 636.519.9663 for the source nearest you.Calcium Carbide (CM) Test – ASTM (modified) D4944, MilSpec CRD-C154-77.a. The calcium carbide test, also known as the CM test or calcium carbide bomb, is more widely used inEurope than in the United States. It is a gas-pressure test in which moisture in the concrete reactswith calcium carbide crystals to create acetylene gas, and the gas pressure produced is measured toprovide a moisture content reading, expressed as a percentage of moisture. Follow the directionsprovided by the test-kit manufacturer. A reading of more than 2.5% requires use of a vapor retarder.A reading of more than 4% may not be acceptable for wood flooring installation. Follow the woodflooring manufacturer’s recommendations. In the case of a glue-down installation, the adhesivemanufacturer may also have recommendations.Part IIIAcceptable Vapor R
1 National Wood Flooring Association 2007 l Revised 09.2012 Notice The National Wood Flooring Association assumes no responsibility and accepts no liability for the principles or techniques contained in these guidelines/methods. These guidelines/ methods for the installation and sand & finish of