Transcription
Recycled Shopper ToteBONUS PROJECT FROMWhen Bad Things Happento Good Quiltersby Joan Ford
Can’t get enough of Joan Ford?Check out her website at www.hummingbird-highway.com.Subscribe to her newsletter for another free pattern!This work is dedicated to Karen, my niece. She caught the quilty “bug” whilemaking her very first quilt block only recently. Even though many miles separate us, we managed to share her first quilt project, start to finish, together.Text and Designs 2015 Joan FordPhotographs 2015 by The Taunton Press, Inc.Illustrations 2015 by The Taunton Press, Inc.All rights reserved.PpThe Taunton Press, Inc., 63 South Main Street, PO Box 5506, Newtown, CT 06470-5506e-mail: tp@taunton.comExecutive editor: Shawna MullenAssistant editor: Tim StobierskiTechnical editor: Jodie DavisCopy editor: Betty ChristiansenIndexer: Barbara MortensonOriginal cover design: Alison WilkesCover illustrator: Peter HorjusOriginal interior design: First edition design by 3 Co.; revised and updated edition designby Rita Sowins/Sowins DesignInterior illustrators: William Michael Wanke and Joan FordLayout: Rita Sowins/Sowins DesignLayout coordinator: Amy GriffinPhotographers: Burçu Avsar (p. 51, 53, 56); all others, Scott PhillipsThe following names/manufacturers appearing in When Bad Things Happen to Good Quilters aretrademarks: Band-Aid , Kwik Klip , Quiltsmart , Velcro , Wisk , ZigZapps! Library of Congress Cataloging-in-Publication DataFord, Joan, 1961When bad things happen to good quilters : survival guide for fixing & finishing any quilting project / author, Joan Ford.pages cmIncludes index.ISBN 978-1-62710-393-01. Quilting. 2. Patchwork--Patterns. 3. Quilts--Repairing. I. Title.TT835.F66773 2014746.46--dc232014037710Printed in the United States of America10 9 8 7 6 5 4 3 2 1Note: The templates in this book may be copied and enlarged for personal use only.3 Recycled Shopper Tote
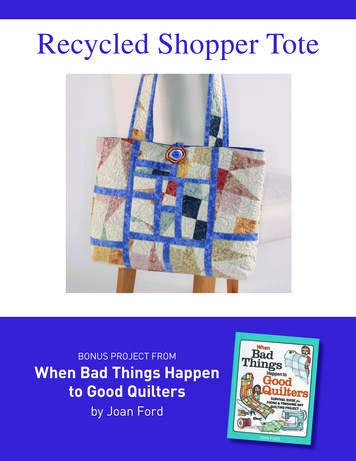
Recycled Shopper ToteIt happens to the best of them.As time goes by, they all start toshow their age. Some look a littleolder than others, and some onlyseem to show wear and tear in oneor two spots. Some get unsightlywrinkles that just won’t go away;treatments and detergents don’thelp. A tuck here, a fold there, astitch or two, and everything lookslike new again . . . for a while.The scars simply don’t heal easily anymore. The years can beunkind. Pass the rotary cutter and let’s do some surgery . . . onyour well-used quilt. What were you thinking?If you don’t have a quilt to cut up, dig out the practice quiltsandwiches, the quilt that didn’t quite turn out the way youplanned, the garage sale find, prequilted fabric by the yard.Make a new quilt for the bed and recycle the old one into anew-to-you project!4 Recycled Shopper Tote
FINISHED SIZE 14 in. by 19 in. by 3 in.FABRICS Any quilted quilt, lap size or larger, or 2 yd.of 42-in.-wide prequilted fabric off the bolt. 1 2/3 yd. accent fabricADDITIONAL SUPPLIES 1½ yd. 20-in.-wide nonwoven fusibleinterfacing or décor bond, optional Walking foot 1¾-in.-diameter buttonCutting: Cut through blocks and pieced quiltelements at odd angles. Since the quilt sandwich islayered and quilted, there will be some stretch alongthe edges, but the quilting will help stabilize thecut-up quilt pieces.Cut the following from one or more quilts: Two 2-in. by 30-in. strips One 5½-in. by 8½-in. rectangle Five 5½-in. by 8-in. rectangles Two 5½-in. squares One 5-in. by 5½-in. rectangleTIP:Interfacing or décor bondadds structure to the lightweightquilting cotton lining fabric, sothe bag will stand up nicely whenplaced on a horizontal surface.Compare your options: fusible batting or lightweight fusible woven ornonwoven interfacing. If you aren’tsure which product is right for you,ask for some assistance at yourlocal quilt shop. One 4-in. by 12-in. rectangle Three 4-in. by 8-in. rectangles One 4-in. by 9½-in. rectangle One 4-in. by 7-in. rectangle One 4-in. by 6-in. rectangle One 4-in. by 6½-in. rectangle One 4-in. by 5½-in. rectangle One 4-in. by 4½-in. rectangle One 3½-in. by 5½-in. rectangle One 3-in. by 6-in. rectangle One 3-in. by 4-in. rectangle One 2½-in. by 4-in. rectangle Three 2-in. by 3-in. rectangles5 Recycled Shopper Tote
TIP:A walking foot isrecommended for all thesewing on this project.6 Recycled Shopper Tote5½” x 8”4” x 8”4” x 8”5½” x 8”FIGURE 1With the raw edges aligned, sew an accent fabricstrip to the right side of the 5½-in. by 8-in. block onthe left and each 4-in. by 8-in. block in the centerusing a ¼-in. seam. (2)5½” x 8”FOLD4” x 8”FOLDFIGURE 24” x 8”PREPARE THE LINING FABRICFuse the interfacing pieces onto the wrong side ofthe corresponding bag lining and pocket fabric pieces.Set aside.If you decide to include a lining on the straps,fuse the interfacing pieces to the wrong side of theoptional strap lining strips. Abut the 2-in. short edgesof a 20-in. and 10-in. interfacing piece to extendacross the 30-in. strap length.From the pressed 2-in.-wide accent fabric, cross-cutthree 8-in. strips. On your worktable, arrange a5½-in. by 8-in. quilt block, two 4-in. by 8-in. quiltblocks, and a 5½-in. by 8-in. quilt block, forming arow of four blocks as shown. (1)FOLDOPTIONAL INTERFACINGCut one 19-in. by 28-in. rectangle for bag lining.Cut one 8-in. by 19-in. rectangle for inside pocketlining.Cut one 6-in. by 8-in. rectangle for outside pocketlining.Cut three 2-in. by 20-in. strips for straps; cutone strip in half and combine a 20-in. and a 10-in.interfacing strip for each handle (optional).MAKE THE INSIDE POCKET5½” x 8”ACCENT FABRICCut one 19-in. width-of-fabric strip, then cut one19-in. by 26-in. bag lining.Cut one 8-in. width-of-fabric strip, then cut one8-in. by 19-in. inside pocket lining and one 6-in. by8-in. outside pocket liningCut five 2¼-in. width-of-fabric strips for pocket andstrap binding. Press each strip in half lengthwise andset aside.Cut seven 2-in. width-of-fabric strips for piecing.Press each strip in half lengthwise and set aside.Cut two 2-in. width-of-fabric strips, then cut two2-in. by 30-in. pieces for strap lining (optional).
FIGURE 35½” x 8”4” x 8”FOLDFOLDFOLD4” x 8”5½” x 8”Sew a blanket or zigzag stitch along thefold to secure the first block to the second blockAbut the 5½-in. by 8-in. block with the adjacent4-in. by 8-in. block. Carefully turn the folded edgeof the accent fabric over the intersection of the twoblocks and onto the 4-in. by 8-in. block and secure theaccent fabric fold with pins as shown. Sew the fold tothe 4-in. by 8-in. block with a blanket or zigzag stitch,stitched in-the-ditch, removing pins as you sew. (3)In a similar fashion, connect all four blocks in a row.For aesthetics, blanket-stitch or zigzag in-the-ditchon the second side/fold of each accent fabric strip.The inside pocket is 8 in. by 19 in. (4)Layer the inside pocket lining and the pocket wrongsides together and pin around the perimeter with rawedges aligned. Cross-cut a 19-in. strip from a folded2¼-in. binding strip. With the raw edges aligned,secure the binding strip with pins to the wrong sideof the top edge of the pocket as you would a binding.Sew through all the layers using a 1/4-in. seam.Turn the folded edge of the binding to the front of thepocket. Pin to secure. Instead of sewing the fold to thefront of the pocket as you might with a quilt binding,match the decorative stitches on the sashing stripsand sew the fold to the pocket with a blanket or zigzagstitch in-the-ditch through all layers, removing thepins as you sew. (4)FIGURE 4Binding8”Blanket or zigzag stitchalong both folds19”7 Recycled Shopper Tote
FIGURE 519”3½”ASSEMBLE THE BAG LININGRetrieve the lining fabric set aside earlier, and lay itflat on your worktable. From the 2-in.-wide pressedaccent fabric, cross-cut one 19-in. strip.Place the top edge of the inside pocket 3½ in. awayfrom one 19-in. edge of the lining. Secure the pocketto the lining with pins. (5)With the raw edges of the accent strip and the bottom of the pocket aligned, sew the 19-in. accent fabricstrip to the bottom of the pocket panel using a 1/4-in.seam. Sew through all the layers, including the lining.Turn the folded edge of the accent fabric over the raw8 Recycled Shopper TotePocket divisionsedge of the pocket and onto the lining fabric. Securethe accent fabric fold with pins and sew the fold to thelining with a blanket or zigzag stitch. Sew a blanket orzigzag stitch along the remaining accent seam. (5)Topstitch in-the-ditch along two of the verticalaccent fabric seams to divide the pocket into threesmaller sections. Start at the bottom of the pocketand sew along the accent fabric seam, over the pocketbinding, and just onto the lining (stitching shown inred). Double-backstitch at each end of the seam, pullthe thread ends to the wrong side of the lining, andknot the threads with a square knot. (5)
MAKE THE OUTSIDE POCKETFIGURE 7FOLDFOLDFrom the 2-in.-wide pressed accent fabric, cross-cuttwo 6-in. strips, one 3-in. strip, and one 2-in. strip. Onyour worktable, arrange the 2-in. by 3-in., the 3-in. by4-in., the two 2-in. by 3-in., and the 3-in. by 6-in. quiltblocks as shown. (6)With the raw edges aligned, sew an accent fabricstrip to the top of the 3-in. by 4-in. block and the top ofthe lower 2-in. by 3-in. block using a 1/4-in. seam. (6)FOLD2” x 3”3” x 4”FOLD3” x 6”2” x 3”2” x 3”FIGURE 6Abut one 2-in. by 3-in. block with the 3-in. by 4-in.block. Carefully turn the folded edge of the accentfabric over the intersection of the two blocks and ontothe 3-in. by 4-in. block and secure the accent fabricfold with pins. Sew the fold to the 3-in. by 4-in. blockwith a blanket or zigzag stitch, removing the pins.Repeat the steps to sew the other two 2-in. by 3-in.blocks together. Blanket-stitch or zigzag the secondseam on each accent fabric. The resulting blockswill be 3 in. by 6 in. and 2 in. by 6 in., respectively.Replace the sewn blocks back into the pocket blockarrangement.With the raw edges aligned, sew an accent fabricstrip to the right side of the pieced 3-in. by 6-in. and2-in. by 6-in. blocks using a ¼-in. seam. Sew the threeblocks next to each other in a row using the two 8-in.9 Recycled Shopper Toteaccent strips. Blanket-stitch or zigzag the secondaccent seam. The pocket is 6 in. by 8 in. (7)Layer the lining and pocket wrong sides togetherand pin around the perimeter. Cross-cut an 8-in. stripfrom a folded 2¼-in. binding strip. With the raw edgesaligned, secure the binding strip with pins to thewrong side of the top edge of the pocket. Sew throughall layers using a ¼-in. seam. Turn the folded edge ofthe binding to the front of the pocket. Pin to secure.Sew the fold to the front of the pocket with a blanketor zigzag stitch, removing pins as you sew. Set theoutside pocket aside. (8)FIGURE 8Binding6”8”
MAKE THE BAG EXTERIORArrange the cut-apart quilt blocks on your worktableas shown. (9)From the 2-in.-wide pressed accent fabric, cutstrips in the following quantities and lengths: Two 28-in. strips One 18½-in. strip One 9½-in. strip One 8-in. strip Seven 5½-in. strips Four 4-in. stripsFIGURE 9Place each 5½-in. and 4-in. cut accent stripsinto the block arrangement at the top edge of itscorresponding-width quilt block with raw edgesaligned. Sew the blocks into vertical rows. Makeouter vertical rows that are 5½-in.by 28-in. first (Aand B), then sew the center vertical row into fourvertical sections, two that are 4-in. by 9½-in. and twothat are 4-in. by 18½-in. Follow the same sequenceused to construct the pockets in the two previoussections: Sew the ¼-in. seam, turn the accent fabricover the intersection, and secure both accent fabricfolds with a blanket or zigzag stitch. (9)CAB4” x 7”FOLDFOLD4” x 9½”5½” square5½” x 8½”2½” x 4”5” x 5½”FOLD4” x 12”5½” x 8”4” x 8”5½” x 8”FOLDFOLDFOLD4” x 5½”FOLD5½” x 8”4” x 6”FOLDFOLD5½” square4” x 4½”10 Recycled Shopper Tote4” x 6½”FOLDFOLD3½” x 5½”
To complete the center panel (C), connect the toptwo sections with the 9-½-in. accent strip placedvertically between the two sections. Sew the ¼-in.seam, turn the fabric over the intersection, andsecure both accent fabric folds with a blanket orzigzag stitch.Connect the lower two sections of the center panelwith the 18-½-in. accent strip following the sameprocess.Place the outside pocket on the bottom of the upperpanel, as shown, with the raw edges aligned and thewrong side of the pocket facing the right side of thepanel. Pin the pocket around the edges to secure it.With the raw edges aligned, sew an 8-in. accentfabric strip to the top edge of the lower center panelusing a ¼-in. seam.Abut the upper center panel with the lower centerpanel. Carefully turn the folded edge of the accentfabric over the intersection of the two panels,including the bottom raw edge of the pocket, andsecure the accent fabric fold with pins. Sew the foldto the upper center panel through all layers with ablanket or zigzag stitch. Blanket-stitch or zigzag thesecond seam on the accent fabric. (10A)To connect the three panels, with the raw edgesaligned, sew a 28-in. accent fabric strip to the rightside of the left panel. Similarly, sew a 28-in. accentfabric strip to the left side of the right panel. Asbefore, abut the adjacent panels and turn the foldededge of the accent fabric over the intersection of thetwo panels and onto the center panel. Pin and sew theaccent fabric as before. As you sew the folded edgeof the accent strips across and onto the center panel,you’ll be incorporating the pocket sides. The externalpanel is 19 in. by 28 in. (10B)FIGURE 10FOLDBBA19”11 Recycled Shopper ToteFOLD
FOLD6½”FOLDFrom the 2¼-in.-wide pressed accent binding strips,cross-cut four 30-in. strips.If you are adding a lining to the strap, place thequilted strap and the strap lining wrong sidestogether, and pin along the center to secure them toeach other before adding the binding. With the rawedges aligned, sew the binding strip to the wrong sideof each 30-in. edge of each strap with a ¼-in. seam.Turn the folded edge of the binding to the front of thestrap. Pin to secure, and sew the fold to the strap witha blanket or zigzag stitch. Make two 2-in. by 30-in.straps.FIGURE 11FOLDMAKE THE STRAPSMAKE THE BUTTON LOOPCross-cut one 6½-in. strip from the 2¼-in.-widefolded binding fabric. Open the middle fold and foldboth 6½-in. edges so they meet in the center. Fold theloop in half lengthwise on the original fold. Edgestitchalong both sides. (11)FIGURE 12ASSEMBLE THE BAGPin each strap to the top edge of the external panelwith raw edges aligned, right sides together, andstrap centered over the accent strip on the externalpanel. Take care that the strap isn’t twisted. (12)Fold the button loop in half and pin it to the centeraccent strip on the exterior panel. Be sure the buttonloop is pinned to the end of the panel without thepocket. (12)Bag exterior,right side upLoop12 Recycled Shopper Tote
Fold the exterior panel in half, right sides together;Sew a ¼-in. seam along each side. (13)To make the box pleat, open the seam at the bottomcorner and flatten, centering the side seam.Measure 1½ in. from the point, and draw a lineperpendicular to the side seam. Sew on the line, andtrim the excess bulk. Repeat for the other bottomcorner. Turn the bag exterior right side out. (14)FIGURE 13Pins holding straps and button loop in placeSewFIGURE 14RIM OF BAGSide Seam andSeam AllowanceWrong side of the lining fabricat the bottom cornerSEWCUT13 Recycled Shopper Tote1½”
Similarly, fold the lining assembly right sidestogether, and sew a ¼-in. seam along each side,leaving an 8-in. gap in the sewing on one side of thelining. Add box pleats to the lining, but do not turn thelining right side out.Place the bag exterior inside the lining with rightsides facing. Pin around the rim, making sure thatthe straps and the button loop are tucked betweenthe bag exterior and the lining. Sew a ¼-in. seamallowance around the top edge of the bag. (15)Turn the bag inside out through the opening in thelining. Tuck the lining seams in and secure them withpins; edgestitch along the opening to close it. Tuckthe lining in the bag, then edgestitch around the rim.Center and secure the button on the front of the bag(the side with the outside pocket) about 1 in. awayfrom the bag rim.FIGURE 15Bag ExteriorBag Lining(right sides together)Straps and Button Loop are pinnedbetween the bag exterior and liningBag lining,wrong side out14 Recycled Shopper Tote
If you like this project, you’ll loveWhen Bad Things Happen to Good Quiltersby Joan FordWhenBadThingsHappen toGoodQuilterssurvival guide forfixing & finishing anyquilting projectJOAN FORDWhen Bad Things Happen to Good QuiltersProduct #071489, 24.95ORDER NOW!Also available by Joan Fordyou can make the beautiful quiltsyou’ve dreamed about?Enter Joan Ford, quilt designerand clutter-clearer supreme whoCut the Scraps!7 Steps to Quilting Your Way through Your StashNew Patterns to Quilt Through Your Stash with EaseIrrrris a tried-and-true method fore bags, pillows, table runners, and more.Innovative quilt designer JOAN FORD foundedthe ScrapTherapy program in 2006 as a way toesIstI ble20pr7 Steps to Quilting Your Waythrough Your Stashback to quilting! ScrapTherapy nd turning it into gorgeous quilts and Scraps Plus One!not only feels your pain but hasjust the program you need to getscraptherapyTMIa way to get it all organized soCut the Scraps!taking over? Like you’ll never findTMEver feel like your fabric stash isscraptherapyr Stash in 7 Steps!scraptherapyesIstI ble20proj e ct soj e ct sJoan Fordhelp quilters get organized and cope with theclutter of fabric collected over the years. Shelives in Syracuse, N.Y. Find more information ather website, www.scrap-therapy.com.FordsiteUS 24.95ISBN 978-1-60085-333-352495FnL1 00 0000Taunton Product #071321Taunton9 781600 853333SJoan FordScrapTherapy Cut the Scraps!Paperback, Product #071321, 24.95ORDER NOWScrapTherapy Scraps Plus One!Paperback, Product #071430, 24.95ORDER NOWScrap Quilting the ScrapTherapy WayOnline Workshop, Product #065217, 49.95LEARN MOREShop for these and other great craft books online at www.tauntonstore.comSimply search by product number or call 800-888-8286 with code MF800114Call Monday-Friday 9AM-9PM ET and Saturday 9AM-5PM International customers, call 203-702-2204See all our Taunton Workshop classes at TauntonWorkshops.com
zigzag stitch along the remaining accent seam. (5) Topstitch in-the-ditch along two of the vertical accent fabric seams to divide the pocket into three smaller sections. Start at the bottom of the pocket and sew along the accent fabric seam, over the pocket binding, and
