Transcription
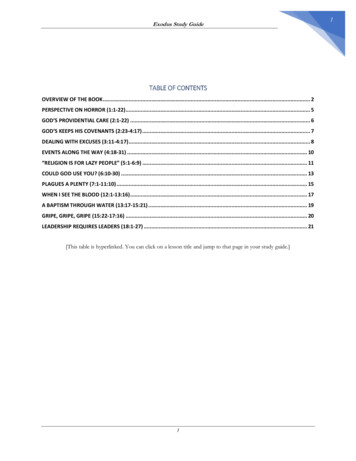
IThe ExodusBlueprints: noneAUDIO LOGS: NoneNEW ENEMIESFor more detailed information and combat tips versus each newenemy type, check out the Unit Stats section in Chapter 2: Data.SoldierRocket TrooperProtagonist: BUMBLEBEELocation: Ark“As the Ark rockets toward a wormhole in space, BUMBLEBEE fights against DECEPTICONseager to board and destroy the AUTOBOTS’ last hope.”The ExodusAs our story begins, the AUTOBOT Ark glides away from thedisintegrating planet of Cybertron. The great AUTOBOT leader,OPTIMUS PRIME, escorts his ally BUMBLEBEE through theship’s corridors onto the bridge. There he points out the great“portal” ahead, a wormhole that promises to propel all survivingAUTOBOTs away from destruction—but into an uncertain future.Unfortunately, as the craft closes the distance to the portal, amassive DECEPTICON warship overtakes the Ark and piercesthe hull section with a tow cable. As DECEPTICON Soldiers startpouring in through the breach, OPTIMUS PRIME gives the order:“All hands to combat!” An explosion knocks BUMBLEBEE senselessfor a moment. When he recovers, you are in control of his actions.
PART 3: Campaign Walkthrough01LEGENDStartEnd02Teletraan StoreBlueprintAudio LogMoney Crate0603Weapon PickupEnergon (Health)I The ExodusRecreatorHeavy AmmoPrimary Ammo04Follow the Retinal Scanner05This first mission is essentially a tutorial,presenting a simple set of objectives thatintroduce you to basic gameplay controls.First, use the controller stick designated asyour Camera control to move the onscreenreticule over AUTOBOT RATCHET’s retinalscanner-bot hovering above your head. Onceyou center the reticule over the scanner threetimes, you complete this first objective.Defend the BridgeA trio of DECEPTICON Soldiers appears behind AUTOBOT RATCHET, the AUTOBOT medic,who deploys the scanner-bot to blur the enemy units’ optics. Use the Camera control againto target a Soldier and then pull your Fire Weapon trigger to blast the intruder into scrapwith the automatically equipped Neutron Assault Rifle. Repeat the attack on the other twoDECEPTICON Soldiers.Next, a flying drone drops a clip of Primary Weapon Ammo (the blue-highlighted item) in front of you (01). Use your Move control to walkthrough the clip—a standard pickup item that you see often in the game—and snag it. Press your Reload button as instructed. Now you’re readyfor some gun-slinging action. Slide from side to side to avoid taking hits as you blast the DECEPTICON squad assaulting the bridge.27
Once you’ve cleared the bridge, OPTIMUSPRIME accesses the ship’s central computer,Teletraan 1, for a situation update. The systemreports a firewall breach and unauthorizedaccess and then MEGATRON himself appearsin the holo-viewer! The DECEPTICON overlordannounces that he plans to shatter the Arkbefore it can reach the portal.28Reports also come in from engineering:the forward shield has been breached andDECEPTICON troops are swarming the enginedeck. OPTIMUS PRIME heads for that battleand directs you to defend the bridge. Secondslater, the ship-wide Teletraan system fails andyou learn the Ark’s pulse cannons are dead.Without them, OPTIMUS PRIME has nochance. AUTOBOT RATCHET points out a fuseand tasks you with using it to manually rebootthe system.Reactivate the Service LiftPART 3: Campaign WalkthroughI The exodusFollow the blue, diamond-shaped objectivemarker that appears onscreen to approachthe console next to AUTOBOT RATCHET.BUMBLEBEE automatically grabs theMoleculon Fuse that appears. Now turn andfollow the AUTOBOT Soldier who takes pointand leads you from the bridge through adoorway (02).Head around the corner where a row ofcrates (03) is strewn across the corridor. Hityour Jump button as you approach the cratesto leap over them. Repeat the action in thenext corridor. Continue until you reach thenext passageway where an AUTOBOT holdsopen the door (04). Press your Dash buttonto quickly slide through the opening.Now AUTOBOTRATCHET pointsout the service liftjust ahead. Proceeddown the hallwaytoward the threeAUTOBOT soldiersuntil anotherDECEPTICON towcable slams throughthe hull on the right.The breach almostsucks BUMBLEBEEinto space and leaves a torn gap in the corridor. Move toward the gap (05), punch your Jumpbutton, then press your Jump Dash button to glide across the gap and land on the far side.Distance to ObjectiveThe onscreen objective marker includes adistance callout—the number underneaththe blue diamond—that indicates howfar you are from the objective location.Note that the most direct route to amarked objective isn’t always passable.Sometimes you must veer up sidepassages or even backtrack to find a wayto your next destination.
PART 3: Campaign WalkthroughI The exodusKeep following the blue-diamond objective marker down the hallwayuntil you reach the service lift’s control podium (06). Approach it andpress the button indicated onscreen to install the Moleculon fuse.This sends a pulse of Energon surging through the power tubesleading to the lift.Destroy the Lift LocksThe lift is locked, and AUTOBOT RATCHET warns that quarters aretoo close here to fire your weapon safely—you have to literally punchthrough the safety locks. Step into the lift chamber, approach eachlock (indicated by red markers), and press your Melee control tosmash it to smithereens. Now the lift activates and starts to rise.Good job!Reactivate the defense grid08070929
Get Closer to the Second Warp Cannon66Avoid the red targeting beacon that appears on the ground justbefore the Warp Cannon launches a strike at the spot. Fight yourway across the plaza toward the temple’s pillared entrance (39) tothe left of the crashed Dropship. Once inside, help Warpath movethe massive stone head of Omega Supreme (40) that blocks thepassage beyond. After you move the head, go around behind it tofind an Audio Log stuck in the back. Listen to the tale of OmegaSupreme, guardian of the gateway to Cybertron’s Core, and of hisepic face-off with MEGATRON.Audio Log 2-6: Omega SupremePart 3: Campaign WalkthroughIII Metroplex heeds the callProceed down the corridor (41) to join Warpath and his team and fight through the next courtyard (42). Gun down enemy troopers, but beready for the arrival of a DECEPTICON Dropship. When it appears above, immediately tag it with your targeting system so METROPLEX canblast it from the sky. Once the area is clear, target the second Warp Cannon for METROPLEX. Two down, one to go!
Follow the objective marker into the next structure. At the fork, go left first, into the blue-lit hall, to find a stash of Energon Shards (43). Thencome back to take the other fork (the yellow-lit hall) and pry open the door at the end (44). Follow the corridor beyond until you suddenlyencounter a crew of Leapers (45). They seem to have you cornered in this narrow space, and the situation looks grim—until METROPLEXhammers them with one punch.Part 3: Campaign WalkthroughProceed to the Final Warp CannonIII Metroplex heeds the callSoundwave4645474867
When a Titan deploys these shield drones,don’t waste ammo on the Titan itself. Focusyour fire on the drones—the sphereshovering around the Titan, connected by ablue energy strand. Once both are destroyed,the shield dissipates and the Titan can bedamaged once again. You can also shootthe Titan’s explosive tracking drones beforethey reach you, or swat them down with amelee attack if you time it right. Keep movingand sliding around the nearby pillars, gettingin a few shots at the Titan or drones beforeducking behind the pillar to cut off the Titan’sreturn fire.114Defeat the TitanPart 3: Campaign WalkthroughVI death from aboveBut the defenses aren’t finished yet. Before you can destroy the support, an imposing unitcalled a Titan rises up a lift and opens fire at you. As the last Audio Log explained, the Titan’sattack is a frightening thing, with its heavy machine gun and a mighty melee punch that hitshard. It can also release flights of explosive tracking drones, three in each flight. The Titan’shuge health reserve makes it resilient already, but when it sustains damage it can also deploya pair of shield generator drones that create an impenetrable force field.
When the Titan finally falls, approach the bridge support and plant a thermal-core Detpak on it (28). This triggers a quick scene: the support isdestroyed, and the bridge starts to DECEPTICON rumble. Uh oh Part 3: Campaign WalkthroughSet Charge Device on Final SupportVI death from aboveGet Clearof the Bridge!Now a “Bridge Collapse Timer” appears onscreen. You must get free of the bridge before the timer dwindles to zero. Immediately switch to VehicleForm and start boosting hard. Follow your objective marker as it leads you through tunnels filled with explosions, flaming vents, twirling energybeams (29), and collapsing debris. When you finally get clear (30), watch as the bridge falls.Mission accomplished, Combaticon!115
190Bowels: First FloorHHHHCHHHHCCHHAmmoHealthPart4:rMultiplayerPat 4: M u lt i p la ye rBOWELSBowels: Second FloorEnergonRechargerHHUltraPower odeHHHead HunterNode
raPower CoreIntercoolerAutobotFlagPart4: MultiplayerPart4: M ult i p laye rConvoy: First FloorDecepticonFlagCConquestNodeHHHead HunterNodeConvoy: Second Floor191
the left of the crashed Dropship. Once inside, help WarPath move the massive stone head of OMEGa SuPrEME (40) that blocks the passage beyond. after you move the head, go around behind it to find an audio Log stuck in the back. Listen to the tale of OMEGa SuPrEME, guardian of the gateway to