Transcription
Caverna is a development strategy game for 1 to 7 players aged 12 and up.The playing time is about 30 minutes per player.Uwe Rosenberg advises:You can play this game with up to 7 players. For your firstplay, we recommend you only play with 5 players at mostto reduce downtime.Game ideaIn this game, you take the roles of adventurous dwarfs living reclusively in caves where you dig for ore and rubies and furnish cavernsto become living and working areas. You need ore to craft weapons to undertake expeditions in search of adventure and loot. Rubiesare a valuable and highly flexible good: you can trade them for other goods and landscape tiles at any time. Outside your caves, youwill look after your sustenance by felling trees, raising farm animals and doing some agriculture.At the end of the game, the wealthiest dwarf will win.ComponentsWooden & acrylic playing pieces20 light brown Dog tokens35 white Sheep tokens30 grey Donkey tokens30 black Wild boar tokens30 brown Cattle tokens45 brown Wood tokens25 grey Stone tokens45 black (acrylic) Ore gems20 red (acrylic) Ruby gems40 yellow Grain tokens35 orange Vegetable tokens1 yellow Starting player token7x3 Stables in different colors7x5 Dwarf discs in different colors16 Game boards7 large Home boards (Forest on theleft, Mountain on the right)1 small basic game board with 3preprinted Action spaces and Roundspaces 1 to 31 large basic game board with Round spaces 4 to 121 two-sided basic game board with preprinted Action spaces for 1to 3 players on one side (and for 4 to 7 players on the other side)1 large additional game board (with additional Action spaces for5 players on one side and for 6 to 7 players on the other side)1 small additional game board (with additional Action spaces for3 players on one side and for 7 players on the other side)4 longish supply boards to organize the Furnishing tilesEntry-level dwellingRoom for 2 Dwarfsand 1 pair ofanimalsOn counter sheets20 Gold coins labeled “1”24 Gold coins labeled “2”5 Gold coins labeled “10”1 “Additional dwarf” marker88 “1 Food” markers7 round Harvest markers52 Weapon strength markers(1x “1”, 1x “2”, 4x each of “3” to “13”, and 6x “14”)8 Multiplication markers “4x”(on the other side: Begging markers “-3 Gold”)8 Goods markers (“8 Sheep”, “8 Donkeys”, “8 Wild boars”,“8 Cattle”, “10 Wood”, “10 Stone”, “10 Ore”, “5 Rubies”)2 “8 Animals” markersFurnishing and landscape tiles17 identical “Dwelling” Furnishing tiles47 other unique Furnishing tiles8 single tiles “Tunnel” (on the other side: “Cavern”)16 single tiles “Ruby mine” (on the other side: “Field”)16 single tiles “Meadow” (on the other side: “Smallpasture”)29 Playing cards1 “Harvest events” card12 Action space cardswith Action spaces for rounds 1 to 127 Overview cards “Rubies, Harvest time”Ore mine24 twin tiles “Ore mine/Deep tunnel”(on the other side: “Large pasture”)40 twin tiles “Cavern/Tunnel”(on the other side: “Cavern/Cavern”)40 twin tiles “Meadow/Field”(on the other side: Small pasture/Field)Wish for childreneitherorfurnisha DwellingDwellingRoomfor1DwarfRound 47 Overview cards “Expedition loot”(values 1 to 8 on one side and 9 to 14 on the other side)2 Dwarf cards for the solo and 2-player gamealsoscoring padbags to organize the components24 page rule book8 page appendix with details on Expeditions,the Furnishing tiles and the Action spaces1
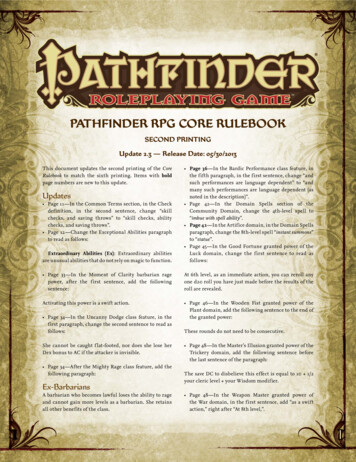
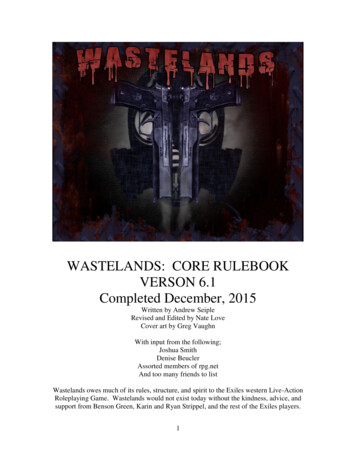
SetupWe will explain the game for 2 to 7 players first. The solo rules will be explained on the last page.Your personal playing areasEach player chooses a color and takes the Homeboard and the 5 Dwarfs and 3 Stables of that color.Harvest time1.) Field phaseEntry-level dwellingPlace 2 of the 5 Dwarfs side by side in the “Entrylevel dwelling” on your Home board. Keep theremaining 3 Dwarfs and Stables next to your Homeboard as your personal supply.Expedition2.) Feedingph aseRoom for 2 Dwarfsand 1 pair ofanimalsperper3.) Breedingph ase(Return the Dwarfs, Stables and Home boards of theleftover colors to the game box.)furnisha CavernThen take one of each of the 2 different Overviewcards.Randomly determine the player who gets theStarting player token. The Starting player and theplayer to his left each get 1 Food. The third playergets 2 Food. Each other player gets 3 Food.lootafter Exp edition all Weapons 1StablesYour first two Dwarfs live together in theentry-level room of their cave.We recommend you cover the Dwarfs in yoursupply with Stables to avoid using them byaccident before you are allowed to.in clockwise orderStarting player2nd player3rd player5th player4th player6th player7th playerPlayers get a different number of Food depending on their position in the turn order.Ruby miningThe game boards with Action spaces2PLAYERSPlace the two single-sided basic game boards withRound spaces 1 to 3 and 4 to 12 next to each other.Shuffle the 7 Harvest markers and place themface-down (with the grey rune symbol facingup) on the Round spaces 6 to 12, one marker perspace. Place the “Harvest events” card next to thegame boards.Round 4with 2 playersonly fromround 3 onStage 2Round 1Stage 1if you haveat leastRuby mineremember:use additional game boardsin games with 3 and 5 to 7 playersno harvestHouseworkand / orfurnisha CavernWish for childreneitherRound 4Round 7Round 10Stage 3Stage 4orfurnisha DwellingWohnhöhlePlatzfür1Zwergpay 1 Foodper DwarfRound 2Round 5Round 8Round 11Stage 1Stage 2Stage 3Stage 4Round 3Round 6Round 9Round 12Stage 1Stage 2Stage 3Stage 4no harvestSlash-and-burnNo harvestand then / orup to 2 new Grain and2 new Vegetable fieldsScoringPay 1 Foodper Dwarfinstead ofharvestSkip theField phaseor theBreeding phaseThe 7 harvest markersare put face-down onthe game boards.In a 2-player game, remove one of the Harvest markers with a green leaf from the game. Then distribute theremaining 6 markers among the Round spaces 6 to 12 leaving space 9 empty.Place the third basic game board to the left of the first two. Turn it to the appropriate side dependingon the number of players (1 to 3, or 4 to 7 players).Strip miningThere are two additional game boards.Large depotIn games with 5 to 7 players, the larger additional game board is used. Turn it to the appropriateside depending on the number of players (5, or 6 to 7 players).The smaller additional game board is used in games with 3 or 7 players.Place the required additional game boards to the left of the basic ones.Imitation24pay 4 Food to usean Action space that isoccupied by an opponent(except: Starting player)Imitation
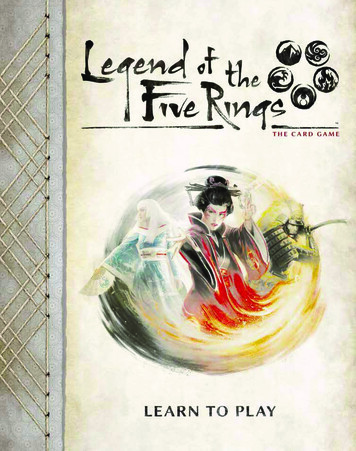
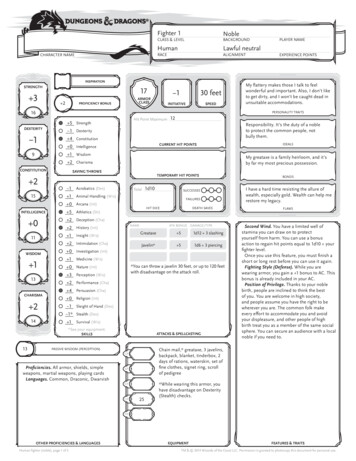
supply boardsPlace the supply boards for the Furnishingtiles near the other game boards.Strip miningRound 4with 2 playersonly fromround 3 onStage 2basic game boardsRound 1additionalgameboardImitationThis is the setup for a 3-player game.Especially in a 3-player game, playerstend to forget about the additionalgame board. Place the supply boardsnear the other game boards as yousee fit.Ruby miningStarting playerExcavationDrift mining4Wish for childreneitherStage 1and / orand / orif you haveat leastRuby mineremember:use additional game boardsin games with 3 and 5 to 7 playerspay 4 Food to usean Action space that isoccupied by an opponent(except: Starting player)and / orfurnisha CavernRound 7Round 10Stage 3Stage 4WohnhöhlePlatzfür1Zwergpay 1 Foodper Dwarfno harvestHouseworkOre miningSuppliesLoggingRound 4orfurnisha DwellingRound 2Round 5Round 8Round 11Stage 1Stage 2Stage 3Stage 4Round 3Round 6Round 9Round 12Stage 1Stage 2Stage 3Stage 4and then / orfor eachOre mineno harvestForest explorationWood gatheringSlash-and-burnSustenanceClearingNo harvestand then / orand / orand / orPay 1 Foodper Dwarfinstead ofharvest“Harvest events” cardup to 2 new Grain and2 new Vegetable fieldsSkip theField phaseor theBreeding phaseScoringThe supply boards and Furnishing tilesWhen playing with 6 or 7players, we recommendthat you start with the Fullgame to make sure thatthere is a sufficient numberof Furnishing tiles in play.The supply boards are double-sided. One side is used in the Introductorygame, the other side is used in the Full game. The Full game comes witha larger variety of Furnishing tiles. (Put the unused Furnishing tiles backinto the game box when playing an Introductory game.)Place the Furnishing tiles on the appropriate spaces on the supply boards. There is more than one ordinary“Dwelling” tile. Place some of them on the appropriate space on the supply board and keep the rest next to it asa reserve.There is a sufficient number of ordinary “Dwelling”tiles (costing 4 wood and 3 stone). You do not need toput all of them on the supply board. Replenish themincrementally from time to time when llingSimple dwellingRoom for 1 DwarfRoom for 1 DwarfRoom for 1 DwarfRoom for 1 DwarfRoom for 1 DwarfRoom for 1 DwarfRoom for 1 DwarfSimple dwellingCuddle roomBreakfast roomRoom for 1 DwarfRoom for as manyRoom forup toas you haveStubble roomyou may keep1 Farm animal oneach empty FieldThe Action space cards2PLAYERSShuffle the 12 Action space cards. Keep them face-down while shuffling.In the 2-player game, only 11 Action space cards are used. Remove the “Exploration” card with the “Level4 expedition” from the game. (Cover the unused Round space 9 with a Dwarf card.)Rearrange the shuffled Action spacecards into a face-down stack as followswithout looking at them.The 12 Action space cards rearrangedafter shuffling. You can fan them out orkeep them in a stack.Wish for childreneitherRound 4orfur nisha DwellingDwellingRoomfor1DwarfO re min ePut the three stage 4 cards at the bottom of the stack, on top of them the three (or two) stage 3 cards, and on top of thosethe two ordinary stage 2 cards.Put the card for round 4 on top of these. (This card says “Wish for children” on one side and “Urgent wish for children”on the other side. Right now it does not matter which side faces up.)Finally, put the three stage 1 cards on top of the stack.The landscape tilesSort the landscape tiles by type and put them in separate stacks.There are 3 types of both, single tiles and twin tiles.The building materials, animalsand Weapon strength markersSeparate the remaining components and keep them in separatepiles next to the game boards. All the animals may be kept inone pile and all the building materials in another. You do notneed to sort the Weapon strength markers by number.Ruby min eYou will place single and twin tiles on your Homeboards during the course of the game. Fields andMeadows (which can be further upgraded to Pastures)can be placed on Forest spaces; Caverns and Tunnels(which can be further upgraded to Mines) can beplaced on Mountain spaces.3
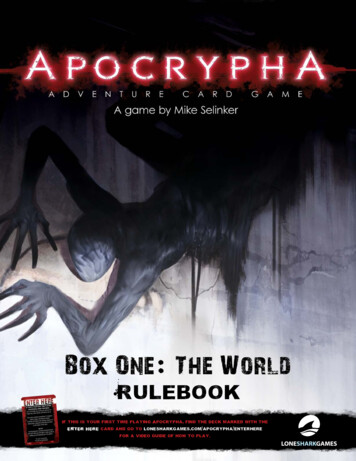
Goal of the gameYour Home board consists of two parts (see below). On the left side, there is a Forest that youwill cut down during the course of the game. On the right side, there is a Mountain with anentrance to your cave system, which currently consists of two Caverns. One of these is the“Entry-level dwelling” and has been furnished for 2 Dwarfs and a pair of animals. The otherCavern is still empty, but is ready to be furnished.empty CavernCaverns can be furnished like the oneYour first two Dwarfs live in the entry-level room of at the bottom of this illustration or theyyour cave system. If you want to grow your Dwarf can be empty like the one at the top.family, you will need to add more Dwellings. There Dwellings are special types of furnishedare Furnishing tiles for this purpose as you have Caverns. There are a lot of other ways tofurnish a Cavern.already seen during setup.Each of your Dwarfs may take one action per round – the available actions are displayed onthe game boards. You will place your Dwarfs, one at a time, in clockwise order on Actionspaces until all players have placed their Dwarfs on the game boards.The goal of your actions is to collect Food for your Dwarfs and to develop your Home boardto be worth a lot of Gold points at the end of the game. Let us have a look at what you can dowith your Home board and what you get Gold points for.Entry-level dwellingRoom for 2 Dwarfsand 1 pair ofanimalsWhen placing your Dwarfs on the game boards, you will eventually get in one another’s way. EachAction space may only be occupied by a single Dwarf. The Dwarfs only return home after they haveall been placed. Then they are placed again in the next round.While reading the rules, you may come back to the following section every now and then to get abetter view of the context. This section is not required for understanding the rules. Any informationfound here is also explained elsewhere in the rule book.To get a grasp of what happens on your Home boardsYou cut the Forest on your Home board to get Wood and cut through the Mountain to get Stone. You need these buildingmaterials to furnish the hollowed out spaces of your Mountain. Outside the Mountain, you can use the cleared Forest landto do agriculture and raise Farm animals to feed your little family.Cut the Forest to make room forFields and Meadows.Meadows can be fenced in toform Pastures for your Farm animals: simply turn the “Meadow/Field” twin tile to the other side.A fenced space can hold a pair ofanimals.Expand your cavesystem by placing“Cavern/Tunnel” and“Cavern/Cavern” twintiles in the Mountain.Collect Rubies to buy single“Field” and “Meadow” tiles for1 Ruby each.Entry-level dwellingRoom for 2 Dwarfsand 1 pair ofanimalsThese are Rubies.4Place your first “Meadow/Field”tile on the Forest spaces in frontof your cave entrance.Or expand your cave system withsingle tiles bought with Rubies:a single Tunnel costs 1 Ruby, asingle Cavern costs 2 Rubies.(Rubies have many other uses aswe will see later.)Your “Entry-level dwelling” is a Dwellingfor your very first couple of Dwarfs. Youcan also keep a pair of animals there.
There are more ways to keep animals than shown on the previous page.You can place a “Large pasture” on two adjacent Meadow spaces to keep your animals moreefficiently. You can even double its capacity bybuilding a Stable on it. You can keep up to 8animals of the same type on a Large pasture witha Stable.You can place Furnishing tiles inthe Caverns of your cave system.These tiles can be beneficial toyou during the course of the gameor at its end.You can place a Stable ona Forest space (that youhave not cleared, yet): AForest stable can hold 1Wild boar, but no otheranimals.Blacksmithing parlorat any timebefore scoringRuby mineRuby mineYou can also build aStable on a Meadowspace. A Meadowstable can hold1 animal of any type.There are ordinaryTunnels, and Deeptunnels in Ore mines.You can place aRuby mine on anyof these Tunnels. Ifyou place one on aDeep tunnel, you willimmediately gain1 Ruby.Ore mineEach Mine can hold1 Donkey.Entry-level dwellingRoom for 2 Dwarfsand 1 pair ofanimalsYou can grow Grain andVegetables on your Fieldsand harvest them later.You canplace anOre mineon twoadjacentTunnels.This table displays how tofeed your family.Weapons and ExpeditionsExpedition lootVeteran “Agricola” players may be highly interested in what the Weapons are for. In Caverna, your Dwarfsgather Ore to forge Weapons. The strength of a Weapon is determined by the amount of Ore used in theprocess and is increased by 1 after each Expedition. Depending on its level, an Expedition may yield 1 to 4 lootitems. What these items will be depends on the strength of the Weapon that has been used (see the Overviewcard). A newly forged Weapon can only have an initial strength equal to or lower than 8. This strength can beincreased over the course of the game to the maximum strength value of 14.Blacksmithingafter Expedition all Weapons 1furnisha Cavern:The available loot itemsup to a strength of 8.This Dwarf gets the best Weapon he can get via forging.and then / orThe special thing about the ‘Cave Farmers’ is the two groups that emerge when playing with a lot ofplayers: one group goes after Weapons, the other one pursues the peaceful route. Members of thesame group, of course, will compete for the same resources. Be vigilant about the competition withinyour group, so you do not lose against the other one.Number of componentsThe only components that are purposely limited in number (apart from the uniqueFurnishing tiles) are the 5 Dwarfs and 3 Stables of each player. Any other components areconsidered to be unlimited. If you run out of any such component, use the Multiplicationmarkers or improvise. Put a good token on a Multiplication marker to indicate 4 tokens ofthat type.There are markers depicting 8 animals of a specific type. These can be used on Largepastures with a Stable. Also, there are markers for 10 units of a specific type of buildingmaterial or for 5 Rubies.You can “multiply” animalsas well. This Large pasture iscurrently holding 4 Wild boars.5
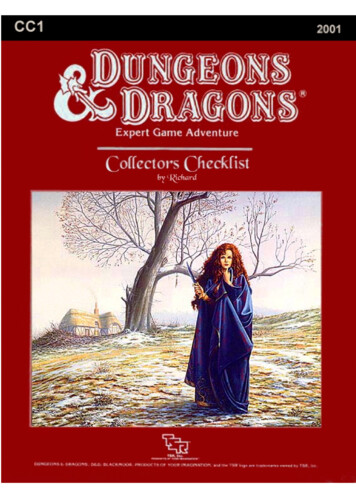
Let us have a look at the scoring padAt the end of the game, the player with the most Gold points wins. In the following example, we will have a look at the waysyou can score points. The numbers in parentheses are the points gained in the example.Each animal is worth 1 Gold point. There areDogs, and the Farm animals Sheep, Donkeys,Wild boars, and Cattle. (2 4 2 3 10 21)21Furnishing tiles are worth the number of pointsprinted on them. (2 2 2 6, and 3 3 6 for theDwellings that have been built during the game)You lose 2 points for each type of Farmanimal that you are missing. (This Homeboard is not missing any type of animals.)Pastures are worth thenumber of points printedon them. (2 4 6)Breeding caveRuby supplierBlacksmithing parlorfor 1/2/3/4newborn animals:at the beginningof the next 4 roundsat any timebefore scoring12You lose 1 point foreach unused space ofyour Home board.Ruby mine-1-3-16Ruby mineMines are worth thenumber of pointsprinted on them.(4 3 4 11)DwellingVegetables, Rubies andGold are each worth 1Gold point.(4 1 13 18)18The player in this example hasgot a total of 80 Gold points.Grain is worth ½ Goldpoint (rounded up)regardless of whetherit has been alreadyharvested or not.Room for 1 DwarfOre mine-1Entry-level dwellingDwellingRoom for 2 Dwarfsand 1 pair ofanimalsRoom for 1 Dwarf5Each Dwarfis worth 1Gold point.Fodder chamberper4113FarmanimalsSome Furnishing tiles mayaward additional points.(The “Fodder storage”awards 6 Gold points for 19Farm animals.)680A score of 80 Gold points is arealistic one. Advanced playerswill easily crack 100 points.Flow of playThis section consists of two parts. At first, we will look at the course of a round. Then we will explain the actions.The course of a round26PLAYERSEach of the 12 rounds goes through five phases thatare played one after another in the order described here.In the 2-player game, there areonly 11 rounds to play.Players who have already played ‘Agricola’only need to read the brown sentences.All the other rules are the same in both‘Caverna’ and ‘Agricola’.
Overview of the course of a roundThe five phases of a round are:Ruby miningAt the beginning of each round, turn over the topAction space card and put it on the appropriate spaceon the basic game boards.with 2 playersonly fromround 3 on1. Add a new Action spaceThis is where you will place the firstAction space card in Round 1.if you haveat leastRuby mineRound 1Stage 1remember:use additional game boardsin games with 3 and 5 to 7 playersno harvestHousework2. Replenish accumulating spacesPlace goods from the general supply on the andAction/ orspaces that require them. These Action spacesfurnishshowa Cavernan arrow.Ruby miningRound 2Stage 1with 2 playersonly fromround 3 onThe accumulation arrowno harvestSlash-and-burnRuby miningIn clockwise order, take turns to place 1 Dwarf perturn on an Action space on the game boards.Thenand then / orcarry out the actions on that space. Each Action spacemay only be occupied by a single Dwarf.Blacksmithingwith 2 playersonly fromround 3 on3. Work phaseup to 2 new Grain and2 new Vegetable fieldsRuby mineif you haveat leastRuby mineif you haveRound3at leastRoundStage 11use ain gamesStage 1and then / orremember:use additional game boardsin games with 3 and 5 to 7 playersHouseworkThis Dwarf is forging a Weapon.no harvestHousework4. Return homeand / orAfter all Dwarfs have been placed on Action spaces,and / orreturn your Dwarfs to their Dwellings.furnishfurnisha CavernRound 2Stage 1a CavernHarvest time1.) Field phase5. Harvest timeAt the end of most of the rounds, there is a Slash-and-burnharvest:collect Grain and Vegetables, feed your family, andbreed your animals.no harvest2.) Feeding phaseperper3.) Breeding phaseSlash-and-burnRound 3and then / orStage 1up to 2 new Grain and2 new Vegetable fields1. Add a new Action spaceBlacksmithingTurn over the top Action space card from the stack and put it on the empty Roundspace with the lowest number. (The Round spaces are numbered 1 to 12.)The new Action space adds to the number ofavailable actions. It can be used by any player inthe Work phase of this and all subsequent rounds.From the start of round 6, you must also turn theHarvest marker on the Round space where the newAction space card is placed face-up. Leave themarker on the grey rune space.There is a grey rune symbol on the backside of each Harvest marker, and a greenleaf or red question mark on the front side.The first Roundspace reminds youto check if you needadditional gameboardsand then / orRuby miningup to 2 new Grain and2 new Vegetable fieldswith 2 playersonly fromround 3 onand then / orRound 1Stage 1if you haveat leastRuby mineremember:use additional game boardsin games with 3 and 5 to 7 playersno harvestHouseworkIf the Harvest marker shows a green leaf,there will be a normal harvest at the end/ or 9).of the round (seeandpageRound 2furnisha CavernStage 1If it shows a red question mark, the harvestwill be played differently (see “Whichno harvestrounds end with a harvest?”, page 10).Slash-and-burn7
Example: A red question mark has been revealed: The“Harvest events” card determines whichevent will affect the coming harvest. In thisexample, it will be the event at the top of thecard.orRuby mineNo harvestRound 6Round 9Stage 2StagePay3 1 FoodOre mineper Dwarfinstead ofharvestSkip theField phaseor theBreeding phaseIf you like the element of surprise, werecommend you reveal the Harvest markeronly at the end of a round.Family lifeSpecial cases when adding a new Action spaceWish for childrenWish for childreneitherUrgentWish for childrenRound 4Urgentwish for childreneitherRound 4Dwelling2PLAYERSThe “Wish for children” Action space card will always come intoplay in round 4. Initially, place it with the “Wish for children”side facing up on the game board. Turn it to the other side thatsays “Urgent wish for children” as soon as you add the “Familylife” Action space card in stage 3.and / or:furnisha DwellingorRoomfor1Dwarfand thenfurnisha DwellingDrift miningDwellingRoomfor1Dwarforup to 2 new Grain and2 new Vegetable fieldsIn the 2-player game, the last round of stage 3 – round 9 – is skipped,as the “Exploration” Action space card was removed from the game (see“Setup”, page 3).That’s the way it is with small/ or forfamilies: Over time aandwishchildren will become an urgent wish.2. Replenish accumulating spacesOn many Action spaces, there is a special arrow and a background illustration indicatingthat this space has to be replenished with goods every round. These Action spaces are called“accumulating spaces”.Accumulating spaces have to be replenished even if there are goods left on them from previousrounds. “3 Wood” and an arrow, for instance, indicate that you put 3 Wood on that Action spaceevery round.LoggingThis is an accumulating space.and then / orThere is an exception: “3 (1) Wood” and an arrow, for instance, indicate that you put 1 Wood on that Action space everyround – unless that Action space is empty, in which case you put 3 Wood on it. Read the icons of other Action spacesaccordingly. “1 Grain (1 Vegetable)” on the “Sustenance” Action space, for instance, means you have to put 1 Grain on thatWood gatheringspace if it is empty, and 1 Vegetable instead if not.Details on replenishing accumulating spacesWhen replenishing, take the required goods from the general supply.There is no upper limit for the number of goods on an accumulating space.If you run out of a specific good, use the Multiplication markers or improvise (see page 5)3. Work phaseBeginning with the Starting player and in clockwise order, take turns to pick up a single Dwarf from your cave andplace it on an unoccupied Action space. Then carry out the depicted action immediately. Play continues until allDwarfs of all players have been placed in this fashion.Please note the play order of Dwarfs: You have to place your Dwarfsin ascending order of their Weapon strength, beginning with yourunarmed Dwarfs (i.e. those without a Weapon) and followed by yourarmed ones (i.e. those bearing a Weapon).Each Action space can only be used by one Dwarf in a round.These Dwarfs have to be played in the indicated order.Whenever you take building materials, Grain, Vegetables, Food or Rubies, thetokens are placed in your personal supply in view of the other players. Animals maynot be placed in your supply; they must be placed directly on your Home board. (Seepage 20 for the animal husbandry rules that we have already addressed briefly onWood, Stone and Ore are building materials.page 5.)8
Details on the Work phaseAnimals that you gain during the Work phase but that you cannot or do not want toaccommodate on your Home board may be converted into Food immediately (accordingto the conversion table on your Home board and on page 11).You can only place Dwarfs from your cave. You may not use the Dwarfs in your personalsupply (as they have not been born yet, if you will, but they can be introduced later, see“Family growth” on page 15).On your turn, you can only ever place one Dwarf at a time.You may not place a Dwarf on an Action space without performing at least one of itsactions.Due to the “Family growth” action (see page 15), some players may have fewer Dwarfsthan others in their caves. If a player runs out of Dwarfs during a round, this player isskipped. Only the players that have Dwarfs left in their caves continue to play them oneby one as described.On some Action spaces you have to choose one out of several options (“either or”).Other Action spaces allow you to take any number of the available actions (“and/or”,“and then/or”).There are two Action spaces that have a mandatory primary action and an optionalfollow-up action (“and then”). In case of the “Urgent wish for children” Action space,you have to use the first action in order to use the second one at all.Urgentwish for childreneitherfurnisha DwellingRound 4DwellingRoomfor1Dwarfand thenorAdventureand then / orand then4. Return homeRemove your Dwarfs from the game boards and return them to their Dwellings.Details on returning homeIt does not matter how you distribute the Dwarfs among theDwellings in your cave system.You may never have more Dwarfs in play than available room inyour cave. This is why each of your tired Dwarfs will always find aplace to sleep.It is best to place your Dwarfs side by side in your cave so that youropponents can easily see which of your Dwarfs have a Weapon andwhat strengths these Weapons have.Entry-level dwellingDwellingRoom for 2 Dwarfsand 1 pair ofanimalsRoom for 1 DwarfDwellings are indicated by the orangebackground color of their name tag.5. Harvest timeDuring the Harvest time, players have to sustain their families. Some rounds donot end with a harvest, others do (see “Which rounds end with a harvest?” onpage 10). A harvest goes through three sub-phases that are played in the followingorder (see the “Harvest time” Overview card).Sub-phase 1: The Field phaseRemove 1 Grain or Vegetable token from each sown Field on your Home boardand place it in your personal supply. (See page 14 for information on how togrow crops.)It’s time for the harvest!Sub-phase 2: The Feeding phaseIn the Feeding phase, you have to feed your Dwarfs by paying 2 Food per Dwarf in your cave. Offspring that were bornduring the current round from a “Family growth” action only consume 1 Food for this round, but will require 2 Food infuture harvests. (See page 15 for details on Family growth.)If you do not have enough Food, you may convert goods into Food (according to the conversion table on page 11) or youwill have to take Begging markers.9
Begging markersIf you cannot or do not wish to produce the required Food, you must take 1 Beggingmarker for each missing Food. You may not give up Dwarfs to avoid the need to feedthem. (At the end of the game, you will lose 3 Gold points for each Begging marker.There is no way to return Begging markers once you have taken them.)Sub-phase 3: The Breeding phaseIf you have at least 2 Farm animals of the same type, you get exactly1 additional (baby) animal of that type – but only if the new animal can beaccommodated on your Home board. (Baby animals and parent animalsmay not be converted into Food immediately after the birth. You have toaccommodate them on your Home board first.)Details on breedingYou get all of your baby animals at the same time, not one by one.You can only get at most one animal per type in each harvest.Dogs are not considered Farm animals. They do not breed.The animals breed regardless of where the parent animals are placedon your Home board. The parents may be in separate areas.Entry-level dwellingRoom for 2 Dwarfsand 1 pair ofanimalsThe player in this example has builta Stable in the Forest just outside hiscave. Now he is able to keep up to 3Wild boars. (Animal husbandry willbe explained in detail on page 20.)Therefore, his Wild boars can breed apiglet (despite the fact that they currentlydo not seem to be interested in eachother at all).Which rounds end with a harvest?Rounds 1 to 4In the first four rounds, there is only one harvest: at the end of the third round. The first two rounds do not have aharvest at all. At the end of round 4, there is no harvest but instead you have to pay 1 Food per Dwarf in your cave(even for offspring Dwarfs). The
24 page rule book 8 page appendix with details on Expeditions, the Furnishing tiles and the Action spaces You can play this game with up to 7 players. For your first play, we recommend you only play with 5 players at most to reduce downtime. 1 Caverna is a dev