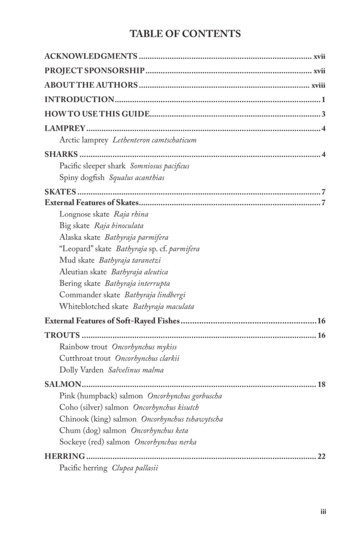
Transcription
SFC-TM-4165STAR FLEETOFFICERS ACADEMYTRAINING MANUALVolume 1Star Fleet CommandUnited Galactic Alliance
DEDICATIONThis manual is dedicated to the memory of the Challenger seven, whogave their lives on January 28,1986 while helping us reach for the stars.Dick Scobee, CommanderMike Smith, PilotJudy Resnik, Mission SpecialistEl Onizuka, Mission SpecialistRon McNair, Mission SpecialistGreg Jarvis, Payload SpecialistChrista McAuliffe, Teacher
STAR FLEETOFFICERS ACADEMYTRAINING MANUALVolume 1Additional Instructions ForSTAR FLEET I„The War Begins!'„Version 2.1bytnteotelcorporation
WARNINGThis software and documentation are both protected byU.S. Copyright Law (Title 17 United States Code).Unauthorized reproduction and/or sales may result inimprisonment of up to one year and fines of up to 10,000 (17 USC 506). Copyright infringers may besubject to civil liability.NOTESTAR FLEET I is not copy protected, but it is copy righted. We ask that you treat STAR FLEET I as youwould a book; that is, you may loan (or give) it to otherindividuals, but you may not copy and distribute it.Failure to observe the Copyright Law will result in theabove severe legal penalty and may cause irreparabledamage to your conscience.Comments about this program or documentation should be sent to:Interstel CorporationP.O. Box 57825Webster, TX 77598Tel: (713) 333-3909Printed in the United States of America, Earth, Sol System.Information in this document is subject to change without notice.0Copyright Interstel Corporation, 1985,1986All rights reservedFirst Printing, February 1985Second Printing, February 1986Third Printing, August 1986
CONTENTSPageSECTION IMessage from the CommandantPART A.PART B.1ACADEMY LESSON 1:TECHNICAL INFORMATION ANDBASIC TECHNIQUES3Getting Started and Common ProblemsDefensive Energy ShieldsCollisions and Hyperspace MovementRepairing Damaged SystemsDeep Space Reconnaissance ProbesPrimary Life Support System567788ACADEMY LESSON 2:ADVANCED TECHNIQUES AND TACTICS9IntroductionZaldron HuntingShield Control OptionsCancelLowerBattle Entry ConfigurationMaximum Strength ConfigurationTotal StrengthIndividual (Manual Setting)Example #1Example #2Example #3Example #4The Shields/System Damage ConnectionBypassing Shield ControlThe Auto Alert SwitchStarbasesBoarding/Capturing/Delivering Enemy ShipsIntruders/Security ControlMines and Extra TorpedoesTactical Movement and iii
CONTENTSPagePhasers vs TorpedoesWeapons' Auto vs Manual Firing ModesThe Target CalculatorProjected Efficiency RatingHazards of Space TravelSpace DiseasesIon StormsStrategy and Tactics for High RanksPARTC.2930333537373739ACADEMY LESSON 3:A SAMPLE MISSION41Log of Captain Wallace43SECTION IIPART A.THE ALLIANCE ANDSTAR FLEET COMMANDWarships of the AllianceOrganization of Star Fleet CommandOrganization of the AcademyThe Academy CurriculumThe Starship Flight Training ProgramThe Starship Command Training CollegePART B.515255565859THE ENEMY EMPIRESThe Empire of Henri Zae IVKrellan BreedingKrellan ReligionThe Zaldron Empire63656667INDEX68iv
TABLESTableTitlePageIRelationship Between Shields and SystemVulnerability19IIStar Fleet Ship Types51IIIOccupied Planets of the Krellan Empire64IVOccupied Planets of the Zaldron Empire67v
Message From the CommandantWelcome aboard! I wish to congratulate you on being accepted into the StarFleet Officers Academy. It is here you will learn the basics of commandingthe most sophisticated spaceships in the known universe. After completingthe required classroom instruction, you will be given an assignment aboardthe cadet training ship, U.G. A.S. REPUBLIC.When you have finished your training, you will be a highly trained officerin the finest peace-keeping force in the galaxy. I hope you will be given theassignment and responsibilities ofyour choice.This manual has been written to provide you with more information which,when combined with the Officer's Manual, provides a strong background tohelp you get started on your career as an officer in Star Fleet. Section IParts A and B provide technical information and starship commandtechniques, plus a brief introduction to combat strategy. Part C is anexcerpt from the ship's log of Captain Wallace during one of his missionswhile in command of the Prince of Wales. This mission was selectedbecause it provides an excellent example of how the basic techniques ofcombat can be combined with the awesome power of a starship. CaptainWallace has since been promoted to Commodore. Section II Part A givesgeneral information about Star Fleet and this Academy. Part B wascompiled by the Intelligence Division of Star Fleet Command and gives youa brief description of the Alliance's most threatening adversaries.On behalf of the Academy, I hope you enjoy your stay with us. This manualis intended as an introduction to Star Fleet and the Academy. You willlearn much more during your regular studies. As a prerequisite tostudying this mdnual, I suggest that you read the Star Fleet Officer'sManual, Volume One.Regards,Vice Admiral Robert L. WinkierCommandant,Star Fleet Officers AcademySTAR FLEET I Officers Academy Training Manual1
STAR FLEET COMMANDUNITED GALACTIC ALLIANCEORDERS FOR: Lt. Commander PendergrassDate:1600.0I.Effective immediately, you are to assume command of the U.G.A.S.DUKE OF YORK. After relieving Captain Bertsch, you will proceeddirectly to the ANTARES III Region.II.You are hereby ordered to seek out and engage the forces of theKreilan and Zaldron Empires which have invaded Allianceterritory.In so doing, you are to deplete the enemy fleetsufficiently so that our main battle fleet can be assembled anddefeat them before they can reach our colonies.III.You must eliminate at least 24 enemy warships within 30 days.IV.There will be four starbases located in your region.V.Your mission sequence number is 377.Bon voyage and good luck, Lt. Commander!2STAR FLEET I Officers Academy Training Manual
SECTION I - PART AACADEMY LESSON 1TECHNICAL INFORMATION & BASICTECHNIQUESSTAR FLEET I Officers Academy Training Manual
t4STAR FLEET I Officers Academy Training Manual
GETTING STARTED & COMMON PROBLEMSFor mission levels one and two, your mission will begin in a quadrant atcondition GREEN, i.e., no hostile enemy vessels present. This is an excel lent time to familiarize yourself with your surroundings, and test theavailable commands. Take advantage of the lower ranks and learn how touse the commands, as things will get very hectic from mission level sixand up. Some of these items might not be applicable to your computer.Clarification is provided for the following items that most often givecadets trouble. All coordinates are in row, column; counting from the upper leftcorner of the quadrant and region. In response to a query by the program, the following rules apply:t If the program is looking for a letter answer, you should NOTpress ENTER after typing the letter. Pressing ENTER without any input will either cancel the command or cause you tobe asked again for a response. If more than one option is availableto the query (such as in Shield Control), then pressing C willcancel the command.tIf a numerical answer is expected, pressing ENTER after typ ing the number(s) is required to execute the command. Pressing ENTER without any input will either cancel the command orcause zero to be read by the program. In two cases, you can press A for "All". This applies only toPhaser and Mine Controls. When asked for a course and C-Factor by Navigation Control, youshould make both entries on the same line separated by a comma (e.g.,270,3.5). If you enter only one number, your computer will ask youagain for a course and C-Factor. To cancel the command, press ENTER without any input or type a course followed by a negativeC-Factor (e.g., 270,-3.5).Remember that in STAR FLEET I, the C-Factor is actually adistance. A C-Factor 1.2 will move you 12 sectors, while a C-Factor of0.3 will move you three sectors. The items course, heading, and bearing are all the same. These aresimply different terms used to describe the direction of movement ordirection from your ship to a given target. Each mission time cycle increases your Mission Elapsed Time (MET)by 0.15 0.05 days. This means each command that uses time willincrease your MET by between 0.10 and 0.20 days. Some activitiesalso use time (e.g., movement, probes) above the normal time cycle.STAR FLEET I Officers Academy Training Manual5
DEFENSIVE ENERGY SHIELDSYour ship's structure can absorb only limited energy before it fails. Forthis reason, your ship is protected by four independent defensive energyshields. These four shields absorb and dissipate the energy blast fromenemy weapons.Your shield orientation depends on your ship's current bearing. Shieldone always covers the front of your ship, regardless of your currentbearing. The other shields are numbered counterclockwise from the front.Thus, to determine which shield will be hit by the enemy, you must takeinto account your bearing, then count left, rear, and right (or port, aft, andstarboard) from there to find your other shield positions. You can also usethe target calculator to determine which of your shields is facing theenemy.Always be aware of your shield strength and orientation in a battle,because if a shield is penetrated by a hit, you will suffer damage andcasualties. Do not be afraid to change your shield allocation, since theenemy will not shoot at you when you use Shield Control unless one dayhas passed since you were last fired upon. Explore the options availableand make use of them (more on the shield options is found in Lesson Two).Battle Entry Configuration is a favorite to use when entering into a hos tile quadrant, because it reinforces your front shield, which will (prob ably) face the enemy, at the expense of your rear shield, which is notneeded if you stay on the edge of the quadrant facing in. The other optionsare more optimum for different situations.Your ship's defensive shields use power at the rate of one unit per 1000units of total shield power per game cycle.NOTEIt is strongly suggested that you do not touch yourAuto Alert Switch (AAS) during your firstmissions.This switch automatically raises/lowers yourshields when you go to condition RED/GREEN.This switch will be discussed further in LessonTwo. To turn this switch off without knowingwhat you are doing can be fatal!6STAR FLEET I Officers Academy Training Manual
COLLISIONS & HYPERSPACE MOVEMENTIf your navigation computer is working and you collide with an object(e.g., star system, starbase, etc.), your ship will be stopped automaticallyby your navigation computer in time to avoid any damage. However, ifyour navigation computer is damaged, manual shutdown is used instead(which is slower) and your ship may suffer damage.If you collide with an enemy vessel, your navigation computer will helpprevent any damage resulting from the collision. However, the enemy ismost likely to fire at you and, if your shields are not up, you will sufferdamage from the resulting hit.When you travel at C-Factors greater than 2.0, you ship enters a specialstate called hyperspace. While in hyperspace, your ship will not collidewith any objects, but it is still subject to ion storms (see pg. 37).Your ship will not immediately enter hyperspace when you start yourmovement. Hyperspace travel requires a ten-sector length accelerationdistance and a ten-sector length deceleration distance. In thisacceleration/deceleration region, your ship is subject to collision as men tioned previously. If there are Krellans in the adjacent quadrant at thebeginning of your move, or in the quadrant preceding your target quad rant, you stand the risk of being intercepted and suffering the conse quences. The Auto Alert Switch will provide some protection by strength ening your shields, if required. However, this switch must be turned ONfor your shields to be automatically raised. While in hyperspace, you donot have to worry about the enemy ships. If your navigation computer isdamaged while in hyperspace, you will emerge into normal space andagain be subject to collision at any time.REPAIRING DAMAGED SYSTEMSDamaged ship systems will be repaired by your crew and ship's computer.The number of days required to complete the repairs is the EstimatedRepair Time (E.R.T.), and is shown in the Damage Control report. Thenormal repair rate depends on the number of crew you have left and yourship's alert condition. Systems in condition GREEN will be repaired twiceas fast as those in condition RED.You also have the capability to speed up the repairs on damaged systemsby allocating power from your reserves via computer link to Damage Con trol. As a rule of thumb, 100 units of power per day E.R.T. will completelyrepair the system, irregardless of whether you are in condition RED orGREEN (allocate a little less, say 10-20 units, rather than 100 X E.R.T.,since time is used in carrying out this command). Try and repair criticalSTAR FLEET I Officers Academy Training Manual7
systems first, such as Primary Life Support or Defensive Shields Control.Depending on your situation, less important systems such as Mine orTransporters Control can generally be left to undergo normal repair,DEEP SPACE RECONNAISSANCE PROBESYour ship has three deep space reconnaissance probes which can be usedfor determining what is in the quadrants they pass through. For best useof these probes, get near an edge or corner of the region, and fire them offat an angle that will give them the longest track (e.g., 30 , 45 , or 60 fromthe lower left corner of the region). Being one quadrant diagonally infrom the corner to launch your probes is actually more efficient, becauseyour long-range sensors can scan the outer quadrants of the corner, andless power is required to send the probe across the region. Allocating 80units of power will take a probe across the diagonal length of the region;whereas 60-65 units will take a probe across the width. No probereplacements are available from starbase.If a probe passes through a hostile quadrant, there is a chance theKrellans will destroy it. The probability of the probes being destroyed isdirectly related to the number of Krellans in the quadrant.PRIMARY LIFE SUPPORT SYSTEMWARNINGIf at all possible, never let a damaged primarylife support system go unrepaired.Your ship has a backup life support system which takes over when theprimary is damaged. However, if your ship suffers further damage whichknocks out your backup system, then your entire crew is killed and yourship is disabled! If you leave it unrepaired, you do so at your own risk.There may be situations when you have no choice but to allow the primarylife support system to undergo normal repair. For example, if you findyourself low on power on your way to starbase, you must accept the risk oftraveling with the system out. As in many combat situations, you mustuse judgement as to when to let the system go unrepaired.8STAR FLEET I Officers Academy Training Manual
SECTION I - PART BACADEMY LESSON 2ADVANCED TECHNIQUES AND TACTICSSTAR FLEET I Officers Academy Training Manual9
6g 5" ocv 7---\sai:\\L * , *'' f ' A10STAR FLEET I Officers Academy Training Manual
INTRODUCTIONNow that you have experienced flying several missions, we can examinesome of the more detailed information, techniques, and tactics that can beused to successfully complete your future missions.In any war, the victor usually wins by acquiring some advantage over hisadversary. This advantage could be weapons, troops, better equipped andtrained forces, intelligence, position, etc. In short, there are many waysone can gain an advantage over one's opponent. STAR FLEET I is noexception.In the Officer's Manual you will find descriptions of your weapons, ship'ssystems, mines, and other means by which you can attack your opponent.Not knowing how to use these "weapons" properly, or efficiently, canmake even the most superior weapon useless. You should already knowhow to fire your torpedoes and phasers, use your marines, mines, etc. Nowyou will be given some instruction on advanced tactics within thequadrant to help gain an advantage over your opponent. Through thisdiscussion, you will see why it is better to sometimes use phasers insteadof torpedoes (and vice-versa), how to make use of the torpedo and phaserauto and manual firing modes, and why there are different options inDefensive Shields Control. The techniques and tactics presented here arethe results of the combined experiences of top fleet officers after manybattles with the enemy.Do not be duped into thinking you have such an advantage over theKrellans and Zaldrons that the missions are no challenge (just ask anyexperienced player). The enemy is extremely mobile, sometimes makingyou think torpedoes are completely useless. Their ships will make use ofavailable cover (e.g., star systems and star bases). They gang up on youand, as a group, sometimes move closer or farther away, employing avariety of battle formations and tactics. Then there is always thatdastardly intruder who always seems to damage the most necessarysystem at the most critical point in the battle. However, for each enemyweapon, you have a counter-weapon. How you use your weapons is thekey to a long and rewarding career as a Star Fleet officer.
ZALDRON HUNTINGDifferent tactics have been success fully employed against Zaldron ves sels when they are invisible. Threebasic tactics are presented. Eachtactic can be aided by the fact thatthe sector in the Tactical Displaythat contains the Zaldron mayoccasionally flicker slightly due totheir disturbance of the space-timecontinuum.TACTIC #1 - The first tactic is the most effective at the lower ranks. It con sists of allowing your ship to be hit (e.g., by moving) and noting whichshield(s) are hit by the Zaldron, thus obtaining the general direction to thetarget for firing a spread of torpedoes manually. As your mission rank in creases, this method becomes less effective because the chance of theZaldron moving between the time he fires and the time you can fire in creases. At the higher ranks it may be nearly as effective to simply firetorpedoes in random directions. It is also suggested that this method notbe used if you are getting low on power or torpedoes, and used sparingly ifthere are Krellans present, since it will be harder to determine whichshield was hit by the Zaldron.TACTIC #2 - The second tactic is basically the same as the first, except thatphasers are used instead of torpedoes. Using phaser control manual mode,six separate targets can be entered in an attempt to hit the sector contain ing the Zaldron. As well as determining the direction to the Zaldron bynoting which shield(s) was hit, you can also determine the approximatedistance to the Zaldron by noting the hit magnitudes. Each time that asector is manually targeted, the phaser shoots a five-unit burst to deter mine if anything is in that sector. The same limitations apply to thismethod as to the previous one, except that power is the main limitingfactor rather than available torpedoes.TACTIC #3 - The third tactic uses torpedoes as mines to catch the Zaldronunawares as he streaks about the quadrant. This method is the mosteffective at high ranks because the Zaldrons are much more mobile thanat the lower ranks. A string of mines laid across the quadrant is thus verylikely to damage or destroy the Zaldron. Do not forget that mines are lostonce you leave the quadrant. Unexploded mines can be retrieved to re plenish your stock of torpedoes. Time is the major consideration with thismethod. Remember that the Zaldron will not move unless you execute acommand that uses time.12STAR FLEET I Officers Academy Training Manual
SHIELD CONTROL OPTIONSThe designers of the Invincible class heavy cruiser carefully consideredthe protection of the Alliance's main instrument of defense. To assist acaptain in effectively and quickly adjusting the ship's defensive energyshields, several options were built into Shields Control. These optionsdistribute shield power differently and each was developed with a specificuse in mind.To review, the available options are:CANCELCancels the command.LOWERLowers all shields to zero power.BATTLE ENTRYPlaces shields in Battle Entry configuration.MAXIMUMSTRENGTHPlaces shields in Maximum Strength configuration.TOTALSTRENGTHAllows you to distribute power evenly to all shields.INDIVIDUAL ENTER Allows you to allocate power to each shield individually.We will now discuss each option in more detail.CANCELThis option allows you to cancel the command and leaves your currentshield configuration unchanged. Thus, you can change your mind afterentering Shield Control and exit without having to update your currentshield setting.LOWERThis option lowers ALL four shields to zero and the power from yourshields is placed in your ship's main reserves. This option is ideally suitedfor lowering your shields in a hurry when your ship's power reserves areexhausted, or lowering your shields when the Auto Alert Switch is off.BATTLE ENTRY CONFIGURATIONThis option doubles power to your front shield (#1) at the expense of yourrear shield (#3). This option is most useful when entering a new, hostilequadrant because it reinforces your forward shield, the one most likely tobe hit by enemy weapons. However, since your rear shield is down, youshould stay in the outer row or column facing into the quadrant (e.g.,located in sector 5,1 with a heading of zero degrees) to avoid sufferingSTAR FLEET I Officers Academy Training Manual13
damage from enemy hits that will penetrate your ship's hull in this area.An enemy vessel could also beam aboard an intruder through the loweredshield.MAXIMUM STRENGTH CONFIGURATIONThis option allocates all but 100 units of power (if available) to the shields,with each shield being of equal strength. This places the maximumamount of power into your shields, and leaves 100 units in your ship'smain reserves for weapons, movement, etc. This option is well suited formaneuvering in the central portion of a hostile quadrant with severalenemy vessels present. This is the usual shield configuration for Zaldronhunting.If your total power is less than 200 units, this option will allocate all but25 units to the shields, with each shield being of equal strength. This willgive you the maximum protection, with 25 units in your reserves forrunning away when things get real bad.TOTAL STRENGTHThis option allocates one quarter of the total input power to each of thefour shields. This option is identical to the Maximum Strength configura tion, except here you choose the total shield power. This option providesyour ship with maximum protection from enemy weapons, while leavingas much power in your main reserves as you decide. Thus, you can ma neuver in the central portion of your quadrant with plenty of power avail able for phasers, movement, tractor beam, etc. This is the usual choicewhen you are running low on power, or need maximum protection withlots of power in your reserves in case the enemy gets the better of you.INDIVIDUAL (Manual Setting)This last option allows you to adjust your shields in any configurationwith any power setting (within the shield limitations) you desire. Withthis option you can raise one, two, three, or all four shields to whateverpower setting you input.Now that all the options have been discussed in detail, some examples areprovided on the following pages to illustrate how they can be used.14STAR FLEET I Officers Academy Training Manual
EXAMPLE #1Your current location isSector 6,6 in Quadrant3,4. A long-range sensorscan reveals five Krellansin Quadrant 4,4. Prior tomoving, you should placeyour shields in BattleEntry configuration,then enter a course andC-Factor of -90,. 5 intoNavigation Control. Thisplaces you in Sector 1,6 ofQuadrant 4,4 facing intothe quadrant. Refer tothe tactical displays onthe right. Since you arein the top row and facingin, the enemy cannotattack you on shield # 3 .As long as you stay in thetop row facing in, you cansafely use Battle Entryconfiguration to reinforceyour shields as you sufferhits.Quadrant 3,41 2 3 4 5 6 7 8 9101234567891012345678910* kQuadrant 4,4STAR FLEET I Officers Academy Training Manual15
EXAMPLE #2Your current location is Sector 10,10 of Quadrant 2,3. A long-range sen sor scan reveals five Krellans in Quadrant 2,4. In this situation, you canmake use of a prime tactical location-one of the four corners of the hostilequadrant. Before entering Sector 10,1 of Quadrant 2,4, use the manualoption (by pressing ENTER ) to raise shields #1 and #2 only (refer tothe tactical displays below). You will need to turn the Auto Alert SwitchOFF to prevent having this shield setting ruined the instant you enterQuadrant 2,4. Since you are in the corner, only two shields are needed toprotect your ship. This position allows you to concentrate more power infewer shields, which means more power can be kept in your reserves forother requirements. You also need fewer units of power to protect yourship since you are raising only two shields, rather than three (BattleEntry) or four (Maximum Strength). This option becomes more importantas your available power dwindles.1 2 3 4 5 6 7 8 9123456789101231 2 3 4 5 6 7 8 9. . . *5k k *i810k4k . . . . *9sQuadrant 2 , 31610 SQuadrant 2,4STAR FLEET I Officers Academy Training Manual
EXAMPLE #3Your current location is Sector 3,4 of Quadrant 6,7. An update of the Re gion Map shows three Krellans have entered Quadrant 5,6, bringing thetotal to four. Prior to moving, place your shields in Maximum Strengthconfiguration and target to Sector 5,5 of Quadrant 5,6. Your shieldswere placed in Maximum Strength configuration because it provides themaximum protection for your ship in the center of the quadrant. Refer tothe sample tactical displays below. The Total Strength option could havebeen used as well, allocating all available power to your shields except 100units (this would have resulted in the exact same shield strength as theMaximum Strength option).Quadrant 5,61 2 3 4 512345678910 * k. . . . . . .Tk 6 7 8 9 10k .\ . .\ k. . . . * . . .T. . . . .1 2 3 4 5 6 7 8 9.1234567891010Quadrant 6,7STAR FLEET I Officers Academy Training Manual17
EXAMPLE #4Assume you are in the same situation as in Example #3. However, thistime you want to capture one of the enemy vessels. In this case you shoulduse the Total Strength option, allocating all power to the shields exceptfor a few hundred units to be used for phasers. Being able to control theamount of power left in reserves is the greatest advantage of the TotalStrength option.I18V*o\S %*tf oSTAR FLEET I Officers Academy Training Manual
THE SHIELDS/SYSTEM DAMAGE CONNECTIONSome of your ship's critical systems are located in definite places and areonly vulnerable to hits through a particular shield area(s). The followingtable shows which shield areas are critical to each ship system. Thisinformation can be used to orient your ship so that even if you have aparticular shield penetrated, it will not hurt a system you are trying toprotect. Note that if most of your systems are already damaged, anothershield penetration could knock out a system not normally vulnerable inthat area.Table IRelationship Between Shields and System VulnerabilitySystemVulnerable Shield Areas1.Navigation Computer2.Main Engines2,3,43.Auxiliary Engines2,3,44.Short Range SensorsAll5.Long Range SensorsAll6.Shields ControlAll7.Torpedo Control8.Phaser Control9.Mine Control310.Tractor Beam Control311.Transporters ControlAll12.Primary Life Support SystemAll13.Backup Life Support SystemAllAll1AllSTAR FLEET I Officers Academy Training Manual19
BYPASSING SHIELD CONTROLThere are two ways to bypass an inoperative Shield Control to lower oneor more of your defensive shields and return power to your reserves. Oneof these methods depends on your Chief Engineer, the other on your abil ity to use your ship's tractor beam.With Shield Control out and no power in your reserves, your ChiefEngineer will ask if you want him to attempt lowering one of your shields.If you answer yes, he will then ask which shield you want lowered. Thenhe will rig a bypass circuit in an attempt to lower the shield you selected.There is a chance the attempt will be unsuccessful and additional damageand casualties can occur.If your Chief Engineer is unsuccessful, you can fire him and use yourtractor beam to lower one or more of your shields. In order to use yourtractor beam, a valid target (mine or disabled enemy ship) must be pres ent in your quadrant. To lower your shield(s), lock onto a valid target anddraw it in. Remember: Your backup life support system will only operatefor 0.5 days on batteries, so you must act fast.« « « « « CAUTION mmtm If there are no valid targets in your quadrant for your tractor beam tolock onto, or the object is too far away and requires more power than the shieldbeing lowered has available, or the tractor beam uses up all the power obtained from the loweredshield, or the shield facing the object is already down, or your tractor beam isdamaged, and your Chief Engineer is unsuccessful in his attempts . . .prepare to die!NOTEYour Chief Engineer will make an attempt each0.1 days, so he will make up to five tries beforetime runs out. You can also use your tractorbeam as many times as there are valid targets.One of these methods may work.20STAR FLEET I Officers Academy Training Manual
THE AUTO ALERT SWITCHYour ship is equipped with an auto alert device which monitors your pres ent situation and automatically raises or lowers your shields if the situa tion changes. Two situations where your shields will be raised are whenyour ship enters a new hostile quadrant, or when a Zaldron ship arrives.In either case you might not have enough time to ad
general information about Star Fleet and this Academy. Part B was compiled by the Intelligence Division of Star Fleet Command and gives you a brief description of the Alliance's most threatening adversaries. On behalf of the Academy, I hope you enjoy your stay with us. This manual is intended as an introd