Transcription
unity3d#unity3d
Table of ContentsAbout1Chapter 1: Getting started with unity3d2Remarks2Versions2Examples5Installation or Setup5Overview5Installing6Installing Multiple Versions of Unity6Basic editor and code6Layout6Linux Layout7Basic Usage7Basic Scripting8Editor Layouts8Customizing Your WorkspaceChapter 2: Ads ity Ads Basics in C#13Unity Ads Basics in JavaScript14Chapter 3: Android Plugins 101 - An Introduction15Introduction15Remarks15Beginning with Android plugins15Outline to creating a plugin and terminology15Choosing between the plugin creation methods16Examples16UnityAndroidPlugin.cs16
6Chapter 4: Asset StoreExamples1818Accessing the Asset Store18Purchasing Assets18Importing Assets19Publishing Assets19Confirm the invoice number of one purchase19Chapter 5: les22Common inspector attributes22Component attributes24Runtime attributes25Menu attributes26Editor attributes28Chapter 6: Audio System32Introduction32Examples32Audio class - Play audioChapter 7: Collision3233Examples33Colliders33Box Collider33Properties33Example34Sphere ColliderProperties3434
ExampleCapsule Collider3535Properties36Example36Wheel Collider36Properties36Suspension Spring37Example37Mesh Collider37Properties38Example39Wheel Collider39Trigger Colliders41MethodsTrigger Collider ScriptingExampleChapter 8: Communication with serverExamples4141414343Get43Simple Post (Post Fields)43Post (Upload A File)44Upload A Zip File To ServerSending a request to the serverChapter 9: Coroutines444447Syntax47Remarks47Performance considerations47Reduce garbage by caching YieldInstructions47Examples47CoroutinesExample4749
Ending a coroutine49MonoBehaviour methods that can be Coroutines50Chaining coroutines51Ways to yield53Chapter 10: CullingGroup API55Remarks55Examples55Culling object distances55Culling object visibility57Bounding distances58Visualising bounding distances58Chapter 11: Design Patterns60ExamplesModel View Controller (MVC) Design PatternChapter 12: Extending the Editor606064Syntax64Parameters64Examples64Custom Inspector64Custom Property Drawer66Menu Items69Gizmos73Example One74Example two75Result76Not selected76Selected77Editor Window78Why an Editor Window?78Create a basic EditorWindow78Simple Example78
Going deeper79Advanced topics82Drawing in the SceneViewChapter 13: Finding and collecting GameObjects8286Syntax86Remarks86Which method to use86Going deeper86Examples86Searching by GameObject's name87Searching by GameObject's tags87Inserted to scripts in Edit Mode87Finding GameObjects by MonoBehaviour scripts87Find GameObjects by name from child objects88Chapter 14: How to use asset packagesExamplesAsset packagesImporting a .unitypackageChapter 15: Immediate Mode Graphical User Interface System r 16: Importers and ture postprocessor91A Basic Importer92Chapter 17: Input SystemExamples9696Reading Key Press and difference between GetKey, GetKeyDown and GetKeyUp96Read Accelerometer Sensor (Basic)97
Read Accelerometer Sensor (Advance)98Read Accelerometer Sensor(Precision)98Read Mouse Button ( Left, Middle, Right) Clicks99Chapter 18: LayersExamples102102Layer usage102LayerMask Structure102Chapter 19: Mobile platforms104Syntax104Examples104Detecting Touch104TouchPhase104Chapter 20: MonoBehaviour class implementation106ExamplesNo overridden methodsChapter 21: Multiplatform developmentExamples106106107107Compiler Definitions107Organizing platform specific methods to partial classes107Chapter 22: Networking109Remarks109Headless mode in Unity109Examples110Creating a server, a client, and sending a message.110The Class we are using to serialize110Creating a Server110The Client112Chapter 23: Object PoolingExamples114114Object Pool114Simple object pool116
Another simple object poolChapter 24: Optimization118120Remarks120Examples120Fast and Efficient Checks120Distance/Range Checks120Bounds Checks120Caveats120Coroutine Power120Usage120Splitting Long-running Routines Over Multiple Frames121Performing Expensive Actions Less Frequently121Common Pitfalls122Strings122String operations build garbage122Cache your string operations122Most string operations are Debug messages123String comparison124Cache references124Avoid calling methods using strings125Avoid empty unity methods126Chapter 25: ng a Rigidbody component127Moving a Rigidbody object127Mass127Drag127isKinematic128
Constraints128Collisions128Gravity in Rigid BodyChapter 26: eating prefabs131Prefab inspectorInstantiating prefabs132133Design time instantiation133Runtime instantiation134Nested prefabsChapter 27: Quaternions134138Syntax138Examples138Intro to Quaternion vs Euler138Quaternion Look Rotation138Chapter 28: Raycast140Parameters140Examples140Physics Raycast140Physics2D Raycast2D140Encapsulating Raycast calls141Further readingChapter 29: ResourcesExamples142143143Introduction143Resources 101143Introduction143Putting it all together144
Final Notes144Chapter 30: ScriptableObject146RemarksScriptableObjects with AssetBundlesExamplesIntroductionCreating ScriptableObject assets146146146146146Create ScriptableObject instances through code147ScriptableObjects are serialized in editor even in PlayMode147Find existing ScriptableObjects during runtime148Chapter 31: Singletons in UnityRemarksFurther readingExamples149149149149Implementation using RuntimeInitializeOnLoadMethodAttribute150A simple Singleton MonoBehaviour in Unity C#150Advanced Unity Singleton151Singleton Implementation through base class153Singleton Pattern utilizing Unitys Entity-Component system155MonoBehaviour & ScriptableObject based Singleton Class156Chapter 32: Tags160Introduction160Examples160Creating and Applying Tags160Setting Tags in the Editor160Setting Tags via Script160Creating Custom Tags161Finding GameObjects by Tag:162Finding a Single GameObject162Finding an Array of GameObject instances163Comparing Tags163
Chapter 33: ing and Children166Chapter 34: Unity AnimationExamples168168Basic Animation for Running168Creating and Using Animation Clips1692D Sprite Animation171Animation Curves173Chapter 35: Unity LightingExamplesTypes of Light176176176Area Light176Directional Light176Point Light177Spot Light178Note about Shadows179EmissionChapter 36: Unity Profiler180182Remarks182Using Profiler on different Device182Android182iOS183Examples183Profiler MarkupUsing the Profiler ClassChapter 37: User Interface System (UI)ExamplesSubscribing to event in code183183185185185
Adding mouse listenersChapter 38: Using Git source control with UnityExamplesUsing Git Large File Storage (LFS) with Unity185187187187Foreword187Installing Git & Git-LFS187Option 1: Use a Git GUI Application187Option 2: Install Git & Git-LFS187Configuring Git Large File Storage on your projectSetting up a Git repository for Unity187188Unity Ignore Folders188Unity Project Settings189Additional Configuration189Scenes and Prefabs mergingChapter 39: atic Values191Vector3.zero and Vector3.one191Static Directions192Index194Creating a Vector3194Constructors194Converting from a Vector2 or Vector4195Applying Movement195Lerp and LerpUnclamped195MoveTowards197SmoothDamp198Chapter 40: Virtual Reality (VR)201
ExamplesVR Platforms201201SDKs:201Documentation:201Enabling VR support201Hardware202Credits204
AboutYou can share this PDF with anyone you feel could benefit from it, downloaded the latest versionfrom: unity3dIt is an unofficial and free unity3d ebook created for educational purposes. All the content isextracted from Stack Overflow Documentation, which is written by many hardworking individuals atStack Overflow. It is neither affiliated with Stack Overflow nor official unity3d.The content is released under Creative Commons BY-SA, and the list of contributors to eachchapter are provided in the credits section at the end of this book. Images may be copyright oftheir respective owners unless otherwise specified. All trademarks and registered trademarks arethe property of their respective company owners.Use the content presented in this book at your own risk; it is not guaranteed to be correct noraccurate, please send your feedback and corrections to info@zzzprojects.comhttps://riptutorial.com/1
Chapter 1: Getting started with unity3dRemarksUnity provides a cross platform game development environment for developers. Developers canuse C# language and/or JavaScript syntax based UnityScript for programming the game. Targetdeployment platforms can be switched easily in the editor. All core game code stays same exceptsome platform dependent features. A list of all the versions and corresponding downloads andrelease notes can be found here: sionsVersionRelease DateUnity -01-28https://riptutorial.com/2
VersionRelease om/3
VersionRelease om/4
VersionRelease .4.02011-07-26ExamplesInstallation or SetupOverviewUnity runs on Windows and Mac. There is also a Linux alpha version available.There are 4 different payment plans for Unity:1. Personal - Free (see below)2. Plus - 35 USD per month per seat (see below)3. Pro - 125 USD per month per seat - After subscribing to the Pro plan for 24 consecutivemonths, you have the option to stop subscribing and keep the version you have.4. Enterprise - Contact Unity for more informationAccording to EULA: Companies or incorporated entities that had a turnover in excess ofUS 100,000 in their last fiscal year must use Unity Plus (or a higher license); in excess ofhttps://riptutorial.com/5
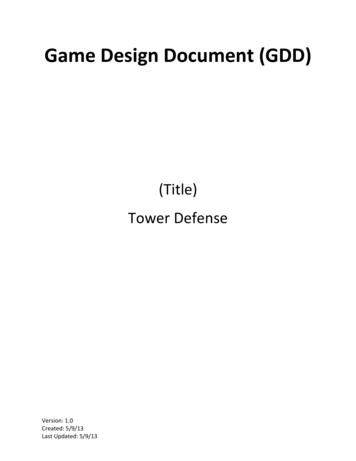
US 200,000 they must use Unity Pro (or Enterprise).Installing1. Download the Unity download assistant.2. Run the assistant and choose the modules you want to download and install, such as Unityeditor, MonoDevelop IDE, documentation, and desired platform build modules.If you have an older version, you can update to the latest stable version.If you want to install Unity without Unity download assistant, you can get the componentinstallers from Unity 5.5.1 release notes.Installing Multiple Versions of UnityIt is often necessary to install multiple versions of Unity at the same time. To do so: On Windows, change the default install directory to an empty folder that you have previouslycreated such as Unity 5.3.1f1. On Mac, the installer will always install to /Applications/Unity. Rename this folder for yourexisting install (e.g. to /Applications/Unity5.3.1f1) before running the installer for the differentversion. You can hold Alt when launching Unity to force it to let you choose a project to open.Otherwise the last project loaded will attempt to load (if available) and it may prompt you toupdate a project you do not want updated.Basic editor and codeLayoutUnity basic editor will look like below. Basic functionalities of some default windows/tabs aredescribed in the image.https://riptutorial.com/6
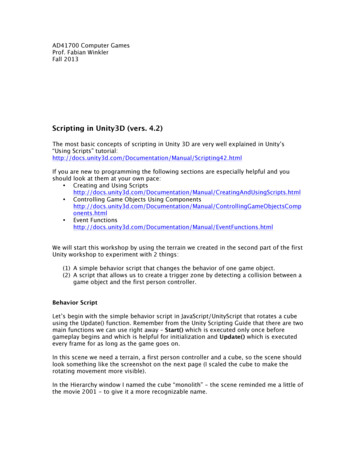
Linux LayoutThere is a little difference in menu layout of linux version, like the screenshot below,Basic UsageCreate an empty GameObject by right clicking in the Hierarchy window and select Create Empty.Create a new script by right clicking in the Project window and select Create C# Script. Rename itas needed.When the empty GameObject is selected in the Hierarchy window, drag and drop the newly createdhttps://riptutorial.com/7
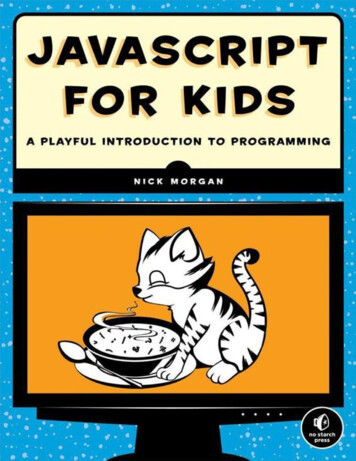
script in the Inspector window. Now the script is attached to the object in the Hierarchy window.Open the script with the default MonoDevelop IDE or your preference.Basic ScriptingBasic code will look like below except the line Debug.Log("helloworld!!");.using UnityEngine;using System.Collections;public class BasicCode : MonoBehaviour {// Use this for initializationvoid Start () {Debug.Log("hello world!!");}// Update is called once per framevoid Update () {}}Add the line Debug.Log("hello world!!"); in the void Start() method. Save the script and go backto editor. Run it by pressing Play at the top of the editor.Result should be like below in the Console window:Editor LayoutsYou can save the layout of your tabs and windows to standardize your work environment.The layouts menu can be found in the upper right corner of Unity Editor:https://riptutorial.com/8
Unity ships with 5 default layouts (2 by 3, 4 Split, Default, Tall, Wide) (marked with 1). In thepicture above, aside from default layouts, there is also a custom layout at the top.You can add your own layouts by clicking "Save Layout." button in the menu (marked with 2):You can also delete any layout by clicking "Delete Layout." button in the menu (marked with 2):https://riptutorial.com/9
The "Revert Factory Settings." button removes all custom layouts and restores default layouts(marked with 2).Customizing Your WorkspaceYou can customize your Layout of Views by click-dragging the Tab of any View to one of severallocations. Dropping a Tab in the Tab Area of an existing window will add the Tab beside anyexisting Tabs. Alternatively, dropping a Tab in any Dock Zone will add the View in a new window.Tabs can also be detached from the Main Editor Window and arranged into their own floatingEditor Windows. Floating Windows can contain arrangements of Views and Tabs just like the MainEditor Window.https://riptutorial.com/10
When you’ve created an editor layout, you can save the layout and restore it any time. Refer tothis example for editor layouts.https://riptutorial.com/11
At any time, you can right-click the tab of any view to view additional options like Maximize or adda new tab to the same window.Read Getting started with unity3d online: startedwith-unity3dhttps://riptutorial.com/12
Chapter 2: Ads integrationIntroductionThis topic is about the integration of third-party advertisement services, such as Unity Ads orGoogle AdMob, into a Unity project.RemarksThis applies to Unity Ads.Make sure that Test Mode for Unity Ads is enabled during developmentYou, as the developer, are not allowed to generate impressions or installs by clicking onads in your own game. Doing so violates the Unity Ads Terms of Service agreement, andyou will be banned from the Unity Ads network for attempted fraud.For more information, read the Unity Ads Terms of Service agreement.ExamplesUnity Ads Basics in C#using UnityEngine;using UnityEngine.Advertisements;public class Example : MonoBehaviour{#if !UNITY ADS // If the Ads service is not enabledpublic string gameId; // Set this value from the inspectorpublic bool enableTestMode true; // Enable this during development#endifvoid InitializeAds () // Example of how to initialize the Unity Ads service{#if !UNITY ADS // If the Ads service is not enabledif (Advertisement.isSupported) { // If runtime platform is supportedAdvertisement.Initialize(gameId, enableTestMode); // Initialize}#endif}void ShowAd () // Example of how to show an ad{if (Advertisement.isInitialized Advertisement.IsReady()) { // If the ads are readyto be shownAdvertisement.Show(); // Show the default ad placement}}}https://riptutorial.com/13
Unity Ads Basics in JavaScript#pragma strictimport UnityEngine.Advertisements;#if !UNITY ADS // If the Ads service is not enabledpublic var gameId : String; // Set this value from the inspectorpublic var enableTestMode : boolean true; // Enable this during development#endiffunction InitializeAds () // Example of how to initialize the Unity Ads service{#if !UNITY ADS // If the Ads service is not enabledif (Advertisement.isSupported) { // If runtime platform is supportedAdvertisement.Initialize(gameId, enableTestMode); // Initialize}#endif}function ShowAd () // Example of how to show an ad{if (Advertisement.isInitialized && Advertisement.IsReady()) { // If the ads are ready tobe shownAdvertisement.Show(); // Show the default ad placement}}Read Ads integration online: egrationhttps://riptutorial.com/14
Chapter 3: Android Plugins 101 - AnIntroductionIntroductionThis topic is the first part of a series on how to create Android Plugins for Unity. Start here if youhave little to no experience creating plugins, and/or the Android OS.RemarksThrough this series, I extensively use external links that I encourage you to read. Whileparaphrased versions of the relevant content will be included here, there may be times when theadditional reading will help.Beginning with Android pluginsCurrently, Unity provides two ways to call native Android code.1. Write native Android code in Java, and call these Java functions using C#2. Write C# code to directly call functions that are part of the Android OSTo interact with native code, Unity provides some classes and functions. AndroidJavaObject - This is the base class that Unity provides to interact with native code.Almost any object returned from native code can be stored as and AndroidJavaObject AndroidJavaClass - Inherits from AndroidJavaObject. This is used to reference classes inyour native code Get / Set values of an instance of a native object, and the static GetStatic / SetStaticversions Call / CallStatic to call native non-static & static functionsOutline to creating a plugin and terminology1. Write native Java code in Android Studio2. Export the code in a JAR / AAR file (Steps here for JAR files and AAR files)3. Copy the JAR / AAR file into your Unity project at Assets/Plugins/Android4. Write code in Unity (C# has always been the way to go here) to call functions in the pluginNote that the first three steps apply ONLY if you wish to have a native plugin!From here on out, I'll refer to the JAR / AAR file as the native plugin, and the C# script as the C#https://riptutorial.com/15
wrapperChoosing between the plugin creation methodsIt's immediately obvious that the first way of creating plugins is long drawn, so choosing your routeseems moot. However, method 1 is the ONLY way to call custom code. So, how does onechoose?Simply put, does your plugin1. Involve custom code - Choose method 12. Only invoke native Android functions? - Choose method 2Please do NOT try to "mix" (i.e. a part of the plugin using method 1, and the other using method 2)the two methods! While entirely possible, it's often impractical and painful to manage.ExamplesUnityAndroidPlugin.csCreate a new C# script in Unity and replace it's contents with the followingusing UnityEngine;using System.Collections;public static class UnityAndroidPlugin {}UnityAndroidNative.javaCreate a new Java class in Android Studio and replace it's contents with the followingpackage com.axs.unityandroidplugin;import android.util.Log;import android.widget.Toast;import android.app.ActivityManager;import android.content.Context;public class UnityAndroidNative 16
Create a new C# script in Unity and paste these contentsusing UnityEngine;using System.Collections;public class UnityAndroidPluginGUI : MonoBehaviour {void OnGUI () {}}Read Android Plugins 101 - An Introduction utorial.com/17
Chapter 4: Asset StoreExamplesAccessing the Asset StoreThere are three ways you can access the Unity Asset Store: Open the Asset Store window by selecting Window Asset Store from the main menu withinUnity. Use the Shortcut key (Ctrl 9 on Windows / 9 on Mac OS) Browse the web interface: https://www.assetstore.unity3d.com/You may be prompted to create a free user account or sign-in if it is your first time accessing theUnity Asset Store.Purchasing AssetsAfter accessing the Asset Store and viewing the asset you'd like to download, simply click theDownload button. The button text may also be Buy Now if the asset has an associated cost.If you are viewing the Unity Asset Store through the web interface, the Download button text mayinstead display as Open in Unity. Selecting this button will launch an instance of Unity and displaythe asset within the Asset Store window.You may be prompted to create a free user account or sign-in if it is your first time purchasing fromthe Unity Asset Store.https://riptutorial.com/18
Unity will then proceed with accepting your payment, if applicable.Importing AssetsAfter the asset has been downloaded in Unity, the Download or Buy Now button will change toImport.Selecting this option will prompt the user with a Import Unity Package window, where the user mayselect the asset files of which they'd like to import within their project.Select Import to confirm the process, placing the selected asset files inside the Assets foldershown in the Project View window.Publishing Assets1. make a publisher account2. add an asset in the publisher account3. download the asset store tools (from the asset store)4. go to "Asset Store Tools" "Package Upload"5. select the correct package and project folder in the asset store tools window6. click upload7. submit your asset onlineTODO - add pictures, more detailsConfirm the invoice number of one purchasehttps://riptutorial.com/19
The invoice number is used to verify the sale for publishers. Many publishers of paid asset orplugin ask for the invoice number upon request of support. The invoice number is also used as alicense key to activate some asset or plugin.The invoice number can be found in two place:1. After you bought the asset, you will be sent an email whose subject is "Unity Asset Storepurchase confirmation.". The invoice number is in the PDF attachment of this email.2. Open sactions, then you can find theinvoice number in the Description column.Read Asset Store online: torehttps://riptutorial.com/20
Chapter 5: AttributesSyntax [AddComponentMenu(string menuName)][AddComponentMenu(string menuName, int ring name, string function)][ContextMenu(string name)][CustomEditor(Type inspectedType)][CustomEditor(Type inspectedType, bool editorForChildClasses)][CustomPropertyDrawer(Type type)][CustomPropertyDrawer(Type type, bool zmo(GizmoType gizmo)][DrawGizmo(GizmoType gizmo, Type drawnGizmoType)][ExecuteInEditMode][Header(string lizeOnLoadMethod][MenuItem(string itemName)][MenuItem(string itemName, bool isValidateFunction)][MenuItem(string itemName, bool isValidateFunction, int priority)][Multiline(int lines)][PreferenceItem(string name)][Range(float min, float max)][RequireComponent(Type alizeOnLoadMethod(RuntimeInitializeLoadType loadType)][SerializeField][Space(float height)][TextArea(int minLines, int maxLines)][Tooltip(string tooltip)]RemarksSerializeFieldUnity's serialization system can be used to do the following: Can serialize public nonstatic fields (of serializable types) Can serialize nonpublic nonstatic fields marked with the [SerializeField] attributehttps://riptutorial.com/21
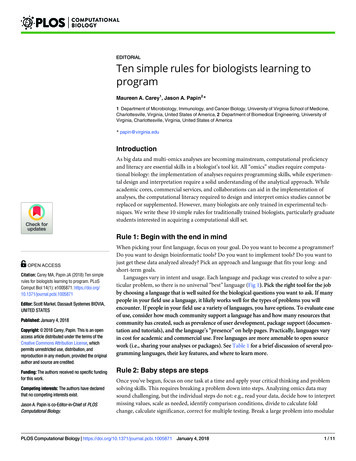
Cannot serialize static fields Cannot serialize static propertiesYour field, even if marked with the SerializeField attribute, will only be attributed if it is of a typethat Unity can serialize, which are: All classes inheriting from UnityEngine.Object (e.g. GameObject, Component,MonoBehaviour, Texture2D) All basic data types like int, string, float, bool Some built-in types like Vector2/3/4, Quaternion, Matrix4x4, Color, Rect, LayerMask Arrays of a serializable type List of a serializable type Enums StructsExamplesCommon inspector attributes[Header( "My variables" )]public string MyString;[HideInInspector]public string MyHiddenString;[Multiline( 5 )]public string MyMultilineString;[TextArea( 2, 8 )]public string MyTextArea;[Space( 15 )]public int MyInt;[Range( 2.5f, 12.5f )]public float MyFloat;[Tooltip( "This is a tip for MyDouble" )]public double MyDouble;[SerializeField]private double myHiddenDouble;https://riptutorial.com/22
When hovering over the label of a field:[Header( "My variables" )]public string MyString;Header places a bold label containing the text above the attributed field. This is often used forlabeling groups to make them stand out against other labels.[HideInInspector]public string MyHiddenString;https://riptutorial.com/23
HideInInspector prevents public fieldsfrom being shown in the inspector. This is useful foraccessing fields from other parts of code where they aren't otherwise visible or mutable.[Multiline( 5 )]public string MyMultilineString;Multiline creates a textbox with a specified number of lines. Exceeding this amount will neitherexpand the box nor wrap the text.[TextArea( 2, 8 )]public string MyTextArea;TextArea allows multiline-style text with automatic word-wrapping and scroll bars if the textexceeds the allotted area.[Space( 15 )]public int MyInt;Space forces the inspector to add extra space between previous and current items -useful indistinguishing and separating groups.[Range( 2.5f, 12.5f )]public float MyFloat;Range forces a numerical value between a minimum and a maximum. This attribute also works onintegers and doubles, even though min and max are specified as floats.[Tooltip( "This is a tip for MyDouble" )]public double MyDouble;Tooltip shows an additional description whenever the field's label is hovered over.[SerializeField]private double myHiddenDouble;SerializeField forces Unity to serialize the field - useful for private fields.Component nent( typeof( Rigidbody ) )]public class AttributesExample : ://riptutorial.com/24
The DisallowMultipleComponent attribute prevents users adding multiple instances of thiscomponent to one GameObject.[RequireComponent( typeof( Rigidbody ) )]The RequireComponent attribute allows you to specify another component (or more) asrequirements for when this component is added to a GameObject. When you add this componentto a GameObject, the required components will be automatically added (if not already present)and those components cannot be removed until the one that requires them is removed.Runtime attributes[ExecuteInEditMode]public class AttributesExample : te static void FooBar(){[.]}[RuntimeInitializeOnLoadMethod( RuntimeInitializeLoadType.BeforeSceneLoad )]private static void Foo(){[.]}[RuntimeInitializeOnLoadMethod( RuntimeInitializeLoadType.AfterSceneLoad )]private static void Bar(){[.]}void Update(){if ( Application.isEditor ){[.]}else{[.]}}}[ExecuteInEditMode]public class AttributesExample : MonoBehaviourThe ExecuteInEditMode attribute forces Unity to execute this script's magic methods even whilethe game is not playing.The functions are not constantly called like in play modehttps://riptutorial.com/25
Update is only called when something in the scene changed. OnGUI is called when the Game View receives an Event. OnRenderObject and the other rendering callback functions are called on everyrepaint of the Scene View or Game View.[RuntimeInitializeOnLoadMethod]private static void FooBar()[RuntimeInitializeOnLoadMethod( RuntimeInitializeLoadType.BeforeSceneLoad )]private static void Foo()[RuntimeInitializeOnLoadMethod( RuntimeInitializeLoadType.AfterSceneLoad )]private static void Bar()The RuntimeInitializeOnLoadMethod attribute allows a runtime class method to be called when thegame loads the runtime, without any interaction from the user.You can specify if you want the method to be invoked before or after scene load (after is default).The order of execution is not guaranteed for methods using this attribute.Menu attributes[AddComponentMenu( "Examples/Attribute Example" )]public class AttributesExample : MonoBehaviour{[ContextMenuItem( "My Field Action", "MyFieldContextAction" )]public string MyString;private void MyFieldContextAction(){[.]}[ContextMenu( "My Action" )]private void MyContextMenuAction(){[.]}}The result of the [AddComponentMenu] attributehttps://riptutorial.com/26
The result of the [ContextMenuItem] attributeThe result of the [ContextMenu] attribute[AddComponentMenu( "Examples/Attribute Example" )]public class AttributesExample : MonoBehaviourThe AddComponentMenu attribute allows you to place your component anywhere in theComponent menu instead of the Component- Scri
Unity provides a cross platform game development environment for developers. Developers can use C# language and/or JavaScript syntax based UnityScript for programming the game. Target deployment platforms can be switched easily in the editor. All core game