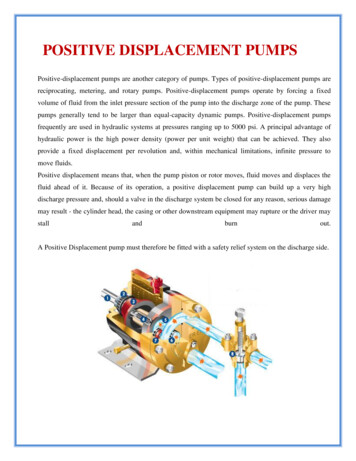
Transcription
THIS INSTRUCTION BOOKLET CONTAINSIMPORTANT SAFETY INFORMATION. PLEASEREAD AND KEEP FOR FUTURE REFERENCE.This manual covers the following brands, models and model numbers:eZip Trailz: EZ-TRZ-BK, EZ-TRZ-RD-W, EZ-TRZ-BL-WeZip Skyline: EZ-SKY-SL, EZ-SKY-WH-WeZip Tri-Ride: EZ-TRIRD-SLIzip E3 Vibe: IZ-VIBE-BK, IZ-VIBE-RD-W, IZ-VIBE-BK-W, IZ-VIBE-BK-K6, IZ-VIBE-RDW-K6Izip E3 Path: IZ-PATH-GY, IZ-PATH-BL-W, IZ-PATH-M-GY, IZ-PATH-L-GYIzip E3 Zuma: IZ-ZUMA-BL, IZ-ZUMA-RD-W, IZ-ZUMA-M-BL, IZ-ZUMA-L-BL, IZZUMA-RD-WIzip E3 Metro: IZ-MET-GY, IZ-MET-GY-W, IZ-MET-M-GYBL, IZ-MET-L-GYBL, IZ-METGYBL-WIzip E3 Ultra: IZ-ULT-BK, IZ-ULT-M-BK, IZ-ULT-L-BK, IZ-ULT-BK-WIzip Compact: IZ-COM-WHCurrie Technologies 9453 Owensmouth Avenue Chatsworth, CA 91311Phone (818) 734-8123 Fax (818) 734-8199www.CurrieTech.comCustomer Service (800) 377-4532Lot number(Buyer to fill out)
!FULLY CHARGE BATTERIES BEFORE FIRST USE - Batteries should be fully charged immediately whenthey are received and immediately after each use for the recommended charge times (see below). Li-Ion (Lithium Ion) batteries 4-6 hours (2-3 hours for Via Urbano) SLA (Sealed Lead Acid) batteries 6-10 hoursWe recommend that you consult a bicycle specialist if you have doubts or concerns as to your experience or ability toproperly assembly, repair, or maintain your bicycle.Additional warning/cautions are in the assembly section of this manualWith proper care and maintenance your Currie Technologies Hybrid Electric Bicycle will provide ease of use and be fun to ride.Below are points that will help you to maximize the enjoyment you get from your new hybrid electric bicycle.Factors To maximize the range of your hybrid electric bicycle Rider Input - the more the rider pedals the further the distance traveled. Continuous riding, as opposed tofrequent stopping and starting, will yield the greatest range possible Elevation Gain - the flatter the road the further the distance traveled Weather - cold weather can adversely affect the battery capacity Wind - traveling with a tailwind will increase distance traveled, traveling into a headwind will decrease distancetraveled Terrain - the smoother the terrain (roadways vs. fireroads, etc.) the further the distance traveled Rider Weight - the lighter the rider, resulting in less drain on the batteries, the further distance traveled Bicycle Maintenance - a properly maintained bicycle will yield the greatest range possible Tire Pressure - properly inflated tires have less rolling resistance and will be easier to pedal Batteries - properly charged and maintained batteries will yield the greatest range possible. Batteries stored incold areas (below 50 degrees Fahrenheit / 10 degrees Celsius) will show reduced range. Batteries that have notbeen kept in optimum condition will show reduced range and run time.2OM 2012Last modified May 25, 2012 2:29 PMHELMETSSAVELIVES!!! ALWAYS WEAR A PROPERLY FITTED HELMET WHEN YOU RIDEYOUR BICYCLE. DO NOT RIDE AT NIGHT. CPSC RECORDS SHOW THAT ABOUT 35% OF BICYCLERELATED DEATHS OCCUR AFTER DARK. AVOID RIDING IN WET CONDITIONS. CPSC RECORDS SHOW THAT ABOUT 65% OF INJURIESHAPPEN TO CHILDREN UNDER 15 YEARS OF AGE. RIDE ONLY WITH ADULT SUPERVISIONCORRECT FITTING - MAKESURE YOUR HELMET COVERSYOUR FOREHEAD.INCORRECT FITTING. FOREHEADIS EXPOSED AND VULNERABLETO SERIOUS INJURY.3
Personal Care from Currie Technologies Congratulations on your new purchase!Our Service Department is dedicated to yoursatisfaction with Currie Technologies and itsproducts. For questions regarding performance,assembly, operation, parts or returns, contactthe experts at Currie Technologies directly bycalling toll freeThe following manual is only a guide to assist you and is not a complete or comprehensive manual of all aspects ofmaintaining and repairing your bicycle. The bicycle you have purchased is a complex object. We recommend that youconsult a bicycle repair specialist if you have doubts or concerns as to your experience or ability to properly assemble,repair, or maintain your bicycle. You will save time and the inconvenience of having to go back to the store if you choose towrite or call us concerning missing parts, service questions, operating advice, and/or assembly questions.SERVICECALL TOLL FREE 1-800-377-4532Monday - Friday 8:00 a.m. to 4:00 p.m. (PST)Serial Number LocationBike Shown Upside Down####1-800-377-4532Monday - Friday8:00 am - 4:00 pm (PST)IMPORTANT – Please activate your warranty byregistering your new Currie product within 10For questions or assistance on assembly contact days of purchase by visiting our web site www.Currie Technologies Customer Servicecurrietech.com and clicking the “Register YourProduct” link.PLEASE DO NOT RETURNTHIS ITEM TO THE STORE.4OM 2012Last modified May 25, 2012 2:29 PMSerial NumberCurrie Technologies 9453 Owensmouth Avenue Chatsworth, CA 91311Phone (818) 734-8123 Fax (818) 734-8199www.CurrieTech.comCustomer Service (800) 377-45325
Please Retain your Sales Receipt as Proof of Purchase.Attach receipt here.PART 2 Before You Ride . . . . . . . . . . . . . . . . . . . . . . . . . . . . . . . . . . . . . . . 16-34PART 3 Electrical Components . . . . . . . . . . . . . . . . . . . . . . . . . . . . . . . . . . 35-58Notes:PART 4 Assembly . . . . . . . . . . . . . . . . . . . . . . . . . . . . . . . . . . . . . . . . . . . . . 59-86DIRECTORYPART 1 Parts Identification and Tools 10-15PART 5 Servicing . . . . . . . . . . . . . . . . . . . . . . . . . . . . . . . . . . . . . . . . . . . . . 87-89PART 6 Detailed Maintenance . . . . . . . . . . . . . . . . . . . . . . . . . . . . . . . . . . 90-115?PART 7 How Things Work . . . . . . . . . . . . . . . . . . . . . . . . . . . . . . . . . . . . 116-125PART 8 Purchase Record . . . . . . . . . . . . . . . . . . . . . . . . . . . . . . . . . . . . . . . . . 126!6OM 2012Last modified May 25, 2012 2:29 PMWarning / Important - Take notice of this symbol throughout this manual and payparticular attention to the instructions blocked off and preceded by this symbol.7
BatteryCare and information . . . . . 42-43Chargers. . . . . . . . . . . 44-48Gauge. . . . . . . . . . . . . . 35Terminal covers . . . . . . . . . 44BrakesExplanation. . . . . . . . . 116-117Lever setup. . . . . . . . . . . 72Parts explosion (linear-pull) . . . 74Setup (disc, Avid BB7). . . . 80-81Setup (disc, Tektro). . . . . . 78-79Setup (linear-pull) . . . . . . 75-77Cables & cable housing . . . . 97Care. . . . . . . . . . . . . 33-34Chain. . . . . . . . . . . 106-107ComponentsRTMB . . . . . . . . . . . . . . 10Enlightened. . . . . . . . . . . 12Folding. . . . . . . . . . . . . . 11RMB. . . . . . . . . . . . . . . 13Tricruiser. . . . . . . . . . . . . 14Crankset . . . . . . . 65, 103-105Currie DriveMaintenance. . . . . . . . . . 108DerailleursFront. . . . . . . . . . . . . . . 82Rear. . . . . . . . . . . . . . . 838FendersFront. . . . . . . . . . . . . . . 84Rear. . . . . . . . . . . . . . . 85Quick releasesFront Wheel . . . . . . . . . 68-69Seatpost. . . . . . . . . . . 66-67FitFrame sizing. . . . . . . . . . . 17Riding position. . . . . . . . 18-19Reflectors. . . . . . . . 25-26, 110ForkAssembly . . . . . . . . . . . . 63Suspension . . . . . . . . 121-122Safety. . . . . . . . . . . . 20-29Fuses . . . . . . . . . . . . . . 51Gears . . . . . . . . See "Shifters","Wheels - Freewheel"HandlebarAssembly . . . . . . . . . . . 60-61Mounted components . . . . . . .See "Brakes", "Throttles", "Shifters","Power switches - Handlebar", "Battery - Gauge", "PAS", "TMM"Headset. . . . . . . . . . . . . 98Maintenance checklists . . 87-88Motor. . . . . . See "Currie Drive"PAS . . . . . . . . . . . . . . . 36Pedals. . . . . . . . . 65, 101-102Power switchesHandlebar . . . . . . . . . . . . 50Standard. . . . . . . . . . . . . 49Saddle. . . .See "Seat & seatpost"Seat & seatpostAssembly . . . . . . . . . . . 64-65Detailed maintenance. . . . 99-100Quick release clamp. . See "Quickrelease"ShiftersAssembly . . . . . . . . . . . . 62Gears (how to operate). . . . 30-32Grip shifters . . . . . . . . . . . 96Shifting (how to). . . . . . 118-119WheelsFront (bolt-on) installation. . 70-71Front (quick release). . See "Quickrelease - Front Wheel"Freewheel. . . . . . . . . . . 109Hub adjustament . . . . . . . . 93Maintenance. . . . . . . . . 90-93Rear (bolt-on) installation . . 70-71Rear wheel removal. . . . . . . 71Tires. . . . . . . . 91-93, 120-121Wiring diagramsRMB (2008) . . . . . . . . . . . 53RMB (2009) . . . . . . . . . . . 54RMB 2010 (with hub motor). . . 57RTMB 2009 . . . . . . . . . . . 55RTMB 2010 (with hub motor) . . 58TMM. . . . . . . . . . . . . . . 55Via Mezza. . . . . . . . . . . . 52POWER SYSTEMSPAS – Pedal Assist - A sensor ring and pickup mounted near the bottom bracket allow the bicycle to sense forward pedaling andapply power. PAS adds a handlebar-mounted control box that allows the rider to select between different levels of assist. Via Urbano (PAS only)TAG – Twist and Go - A rider-controlled system, the motor activates only when the handlebar throttle is turned. Sereno, Tricruiser, Via MezzaPAS/TAG – Pedal Assist or Twist and Go - A handlebar-mounted button allows selection of PAS or TAG modes. PAS /TAGreplaces the button with a handlebar-mounted control box that allows the rider to select between assist levels or switch to TAG. Coastline, Eco Ride, Skyline, Trailz, Via Lento, Via Rapido, Zuma; E3Metro (PAS /TAG)TMM – Torque Measurement Method - A sensor mounted in the rear dropout measures pedaling force and naturally adds motorpower in response to rider effort. Trekking Enlightened, Urban Cruiser Enlightened, UltraBATTERY SYSTEMSStemAssembly (quill) . . . . . . . . . 60Assembly (threadless). . . . . . 61Maintenance. . . . . . . . . 94-95RMB – Rack Mounted Battery with Sealed Lead Acid (SLA) cells - Two SLA battery packs sit vertically in the rack. Coastline, Trailz, Via LentoTerminology . . . . . . . . . . . 9Throttles . . . . . . . . . . . .TERMINOLOGYRTMB – Rack Top Mounted Battery with Lithium Ion (Li Ion) cells - A single Li-Ion battery pack lies horizontally inside the rack. Eco Ride, Via Rapido, Zuma40TMM. . . . . . . . . . . . . . . 37STB – Seat Tube Battery with Sealed Lead Acid (SLA) or Lithium Ion (Li Ion) cells - A single battery pack is mounted behind theseat tube. Tricruiser, Via Mezza, SkylineTorque requirements. . . 124-125Downtube (integrated) – Enlightened series, Lithium Ion (Li Ion) cells - A single Li Ion battery pack is hidden inside theTires. . . . . See "Wheels - Tires"Troubleshooting . . . . . 111-115OM 2012PART 1 - PARTS IDENTIFICATIONINDEXLast modified May 25, 2012 2:29 PMframe's downtube E3Metro, Trekking Enlightened, Ultra, Urban Cruiser Enlightened, Via Urbano9
RTMB (RACK Top mounted battery) Bicycles & Standard bicycle componentsVia Rapido, ZumaStemElectrical components in bold textTop TubeSeatSeat PostHead SetShifterHandlebarThrottle (w/ PAS/TAG selector)Head TubeBrake LeverPower SwitchSeatpost clampDown TubeBatterySeat TubeFolding Bicycles - Super portable, with easy folding design. Perfect for camping, fits in RV's, boats and cartrunks.Handlebar Quick ReleaseBrake Control CablesFront ReflectorRear BrakeSeat StayPAS Sensor(behind chainring)FreewheelCharger portSeat PostHandlebar HingeFront BrakeRear ReflectorForkFront HubBattery PackFrame Hinge & Quick ReleaseFront FenderSpokesRear FenderBottomBracket (inside)RimTireChainCrank ArmHub MotorRear DerailleurPedalChain StayTire ValveChain10*To see detailed spare parts diagrams for each bicycle, please visit www.izipusa.com and click on the page corresponding toyour model.Hub MotorController*To see detailed spare parts diagrams for each bicycle, please visit www.izipusa.com and clickon the page corresponding to your model. See page 10 for common components.11
Enlightened Series - Lightweight, hidden, Li-Ion (Lithium Ion) battery pack in a modern designed frame.Perfect for Commuting and City RidingRMB (RACK mounted battery) bICYCLESPAS/TAG ThrottleControl BoxSealed Lead Acid BatteryCharger PortRMB rackTMM Sensor(TMM models only)Battery Pack(inside)PAS Sensor (behind chainring)Hub Motor12Controller (inside)*To see detailed spare parts diagrams for each bicycle, please visit www.izipusa.com and clickon the page corresponding to your model. See page 10 for common components.Currie Drive Motor*To see detailed spare parts diagrams for each bicycle, please visit www.izipusa.com and clickon the page corresponding to your model. See page 10 for common components.13
TricruiserYour new bicycle was partially assembled in the factory and then partially disassembled for shipping. Youmay have purchased the bicycle already fully assembled and ready to ride OR in the shipping carton in thepartially disassembled form. The following instructions will enable you to prepare your bicycle for years ofenjoyable cycling. For more details on inspection, lubrication, maintenance and adjustment of any area pleaserefer to the relevant sections in this manual. If you have questions about your ability to properly assemble thisunit, please consult a qualified bicycle service specialist before riding. If you need replacement parts or havequestions pertaining to assembly of your bicycle, call the service line direct at:ThrottleSERVICE AND TECHNICAL SUPPORT:1 800 377 4532Fender(rear)Charger portFender(front)Monday - Friday 8:00 a.m. - 4:00 p.m. (PST)Typical Tools Required: Phillips head screw driver 2.5mm, 3mm, 4mm, 5mm 6mm & 8mm Allen keys Adjustable wrench or a 8mm, 9mm, 10mm, 13mm, 14mm,Battery15mm & 17mm open/box end wrenches A pair of pliers with cable cutting abilityWhen working on your bicycle as instructed by thismanual, please refer to the torque values chart onpages 120-121 for detailed torque requirements. Underor over-tightened components may loosen or break,causing a fall.Controller(inside)14!To avoid injury, this product must be properly assembled before use. If your bicycle wasobtained assembled, we strongly recommend that you review the complete assemblyinstructions and perform checks specified in this manual before riding.15
BEFORE YOU RIDEPART 2 - BEFORE YOU RIDEABOUT THIS MANUALIt is important for you to understand your new bicycle. By reading this manual before you go out on your first ride, you’ll knowhow to get better performance, comfort, and enjoyment from your new bicycle.It is also important that your first ride on your new bicycle is taken in a controlled environment, away from cars, obstacles, andother cyclists.GENERAL WARNINGBicycling can be a hazardous activity even under the best of circumstances. Proper maintenance of your bicycle is yourresponsibility as it helps reduce the risk of injury. This manual contains many “Warnings” and “Cautions” concerning theconsequences of failure to maintain or inspect your bicycle. Many of the warnings and cautions say “you may lose control andfall.” Because any fall can result in serious injury or even death, we do not repeat the warning of possible injury or death whereever the risk of falling is mentioned.When selecting a new bicycle, the correct choice of frame size is a very important safety consideration. Most full sizedbicycles come in a range of frame sizes. These sizes usually refer to the distance between the center of the bottom bracketand the top of the frame seat tube.Please note that regardless of frame size, all IZIP bicycles (excluding the Tricruiser) have a weight limit of 240lbs/109 kgincluding rider and luggage.!For safe and comfortable riding there should be clearance of no less than 1 - 2 inches betweenthe groin area of the intended rider and the top tube of the bicycle frame, while the rider straddles thebicycle with both feet flat on the ground.The ideal clearance will vary between types of bicycles and rider preference. This makes straddling the frame whenoff the seat easier and safer in situations such as sudden traffic stops. Women can use a men’s style bicycle to determine thecorrect size women’s model.The following chart and diagram will help you make the correct choice. Rider leg length refers to approximate pant inseam.Frame Sizing GuideA SPECIAL NOTE FOR PARENTSIt is a tragic fact that most bicycle accidents involve children. As a parent or guardian, you bear the responsibility for theactivities and safety of your minor child. Among these responsibilities are to make sure that the bicycle which your child isriding is properly fitted to the child; that it is in good repair and safe operating condition; that you and your child have learned,understand and obey not only the applicable local motor vehicle, bicycle, and traffic laws, but also the common sense rules ofsafe and responsible bicycling. As a parent, you should read this manual before letting your child ride the bicycle. Please makesure that your child always wears an ANSI, ASTM, SNELL approved bicycle helmet when riding.16CORRECT FRAME SIZE1-2in.Approximate Rider LegLengthSuggested Frame Size forRacing/Touring BicycleSuggested frame Size forMountain, Hybrid, Comfort,or Cruiser Bicycle61-69cm / 24-27 inches-37cm / 14.5 inches66-76cm / 26-30 inches-43cm / 17 inches71-79cm / 28-31 inches50cm / 19.5 inches45cm / 18 inches76-84cm / 30-33 inches55cm / 21.5 inches50cm / 19.5 inches79-86cm / 31-34 inches57cm / 22.5 inches52cm / 20.5 inches81-89cm / 32-35 Inches60cm / 23.5 Inches53-56cm / 21-22 Inches86-94cm / 34-37 inches63cm / 25 inches58-60cm / 23-23.5 inches17
RIDING POSITIONHandlebar HeightStem Wedge BoltSeat HeightIn order to obtain the most comfortable riding position and offer thebest possible pedaling efficiency, the seat height should be setcorrectly in relation to the rider’s leg length. The correct saddle heightshould not allow leg strain from over-extension, and the hips shouldnot rock from side to side when pedaling. While sitting on the bicyclewith one pedal at its lowest point, place the ball of your foot on thatpedal. The correct saddle height will allow the knee to be slightly bentin this position. If the rider then places the heel of that foot on thepedal, the leg should be almost straight.Maximum Height /Minimum Insertion Mark(Should not be visible)Arms not overextended!Handlebar stemheight about thesame asseat heightUnder no circumstances should the seat post projectfrom the frame beyond its “Minimum Insertion” or“Maximum Extension” mark. If your seat post projectsfrom the frame beyond these markings, the seat postor frame may break, which could cause you to losecontrol and fall. Prior to your first ride, be sure totighten the seat clamp properly. A loose seat clampor seat post binder can cause damage to the bicycleor can cause you to lose control and fall. Periodicallycheck to make sure that the seat clamp is properlytightened.ReachTo obtain maximum comfort, the rider should not overextend his or herreach when riding.Pedal atbottom position18To adjust this distance, the position of the seat can be altered inrelation to the seat post. (Refer to page 66 on how to adjust the seatclamp.)Handlebar Binder BoltExceeds 2 1/2”(64mm)!Maximum comfort is usually obtained when the handlebar height isequal to or slightly higher than the height of the seat. You may wish totry different heights to find the most comfortable position.Maximum Height/Minimum InsertionMarkThreadless headsets and clamp-on stems are not easily adjustable. Please refer topage 61 for instructions on installation.The stem’s “Minimum Insertion” mark must not be visible above the top of theheadset. If the stem is extended beyond this mark, the stem may break or damagethe fork’s steerer tube, which could cause you to lose control and fall.Failure to properly tighten the stem binder bolt, the handlebar binder bolt, or the barend extension clamping bolts may compromise steering action, which could causeyou to lose control and fall. Place the front wheel of the bicycle between your legsand attempt to twist the handlebar/stem assembly using a reasonable amount offorce. If you can twist the stem in relation to the front wheel, turn the handlebars inrelation to the stem, or turn the bar end extensions in relation to the handlebar. Priorto riding, you must fully tighten the appropriate bolts accordingly.19
USING THE BICYCLE RACKThis page intentionally left blankSafetyPlease consider the following instructions before using any luggage carrier (front or rear rack) attached to your bicycle:! The maximum capacity of rear carrying racks on Currie products is 25kg (including any attached battery).The maximum capacity of front racks or baskets on Currie products is 10kg.Do not use any bicycle luggage carrier as a child seat.Be sure the combined rider and luggage weight of your bicycle does not exceed the bicycle's weight limit.Frequently check that all fasteners related to luggage carriers are fastened securly.Do not modify your luggage carrier.Currie bicycle racks are not designed to pull a trailer; do not attach a trailer to any luggage carrier.Note that bicycle handling (steering and stopping distance) may be different when the racks are carying weight.Ensure that any luggage is securely fitted to the bicycle rack per the manufacturer's instructions, and that nohanging straps can get caught in the wheels. Be sure reflectors or lights attached to your bicycle are not obscured by your rack or attachments. Distribute luggage evenly on either side of the rack for even weight balance.ATTACHMENTThe following hardware should be used to attach a rack to its respective bicycle RMB & RTMB bicycle racks - 4x M6 x 14mm bolts, with lock washer, stainless steel. Torque to 10Nm. Via Urbano rack - 4x M6 x 14mm bolts, with lock washer, stainless steel. Torque to 10Nm. Skyline (optional rack) - 4x M6,14mm bolts, 2x m6 lock nuts. Stainless steel. Torque to 10Nm. Other racks - Use included hardware, tightening attachment bolts to 10Nm.2021
SAFETY CHECKLISTBefore every ride, it is important to carry out the following safety checks:5. Bearings Ensure all bearings are lubricated, run freely and display no excess movement, grinding or rattling.Check headset, wheel bearings, pedal bearings and bottom bracket bearings.6. Cranks and Pedals1. Brakes EnsureEnsureEnsureEnsure front and rear brakes work properly.brake shoe pads are not over worn and are correctly positioned in relation to the rims.brake control cables are lubricated, correctly adjusted and display no obvious wear.brake control levers are lubricated and tightly secured to the handlebar.2. Wheels and Tires Ensure tires are inflated to within the recommended limit as displayed on the tire sidewall.Ensure tires have tread and have no bulges or excessive wear.Ensure rims run true and have no obvious wobbles or kinks.Ensure all wheel spokes are tight and not broken.Check that axle nuts are tight. If your bicycle is fitted with quick release axles, make sure locking levers arecorrectly tensioned and in the closed position.3. Steering Ensure handlebar and stem are correctly adjusted and tightened, and allow proper steering.Ensure that the handlebars are set correctly in relation to the forks and the direction of travel.Check that the headset locking mechanism is properly adjusted and tightened.If the bicycle is fitted with handlebar end extensions, ensure they are properly positioned and tightened.4. Chain 22Ensure chain is oiled, clean and runs smoothly.Extra care is required in wet or dusty conditions.Ensure pedals are securely tightened to the cranks.Ensure cranks are securely tightened to the axle and are not bent.7. Derailleurs Check that front and rear mechanisms are adjusted and function properly.Ensure shift and brake levers are attached to the handlebar, shift and brake.Ensure derailleurs, shift levers and shift and brake cables are properly lubricated.8. Frame and Fork Check that the frame and fork are not bent or broken.If either are bent or broken, they should be replaced.9. Accessories Ensure that all reflectors are properly fitted and not obscured.Ensure all other fittings on the bike are properly and securely fastened, and functioning.Ensure the rider is wearing a helmet.10. Motor Drive Assembly and Throttle Ensure all motor drive components are correctly mounted and functioning properly.11. Battery Pack Ensure the batteries are in good operation condition and kept fully charged.23
HelmetsIt is strongly advised that a properly fitting, ANSI or SNELL approved,bicycle safety helmet be worn at all times when riding your bicycle.The correct helmet should:- be comfortable- be lightweight- have good ventilation- fit correctly- cover foreheadReflectorsYour bicycle is supplied with one front (white), one rear (red), two wheel (white), and four pedal (orange) reflectors. Theseare an important safety and legal requirements, and should remain securely fitted and in good, clean condition at all times.Periodically inspect all reflectors, brackets and mounting hardware for signs of wear or damage. Replace immediately ifdamage is found. Some bicycles will require you to install your reflectors onto your bicycle. Please refer to the following sectionfor instructions on all the types of bicycle reflectors.Fork Mount Reflector Bracket AssemblyFirst insert one washer onto the hex bolt and insert hex bolt through the reflector bracket and thenthrough the fork. Next, insert a second washer onto the bolt and thread a hex nut onto the boltbehind the fork. Tighten bolts until snug, making sure the reflector is in an upright position. Seediagram at the right.Front Reflector Mount with Handlebar Bracket Assembly!24Always wear a properly fitted helmet which covers the forehead when riding a bicycle. Many statesrequire specific safety devices. It is your responsibility to familiarize yourself with the laws of the statewhere you ride and to comply with all applicable laws, including properly equipping yourself and yourbike as the law requires. Reflectors are important safety devices which are designed as an integral partof your bicycle. Federal regulations require every bicycle to be equipped with front, rear, wheel, andpedal reflectors. These reflectors are designed to pick up and reflect street lights and car lights in away that helps you to be seen and recognized as a moving bicyclist. Check reflectors and theirmounting brackets regularly to make sure they are clean, straight, unbroken and securely mounted.Replace damaged reflectors and straighten or tighten any that are bent or loose.First attach the reflector to the reflector bracket with the reflector screw, if not already done. Next,remove the clamp screw and open the reflector clamp bracket. Place reflector clamp bracket aroundthe handlebar. Tighten the clamp screw to hold reflector assembly in place. Finally, adjust thereflector assembly in place and ensure that it is upright and facing away from the bike.25
Seat and Handlebar Mounting ReflectorsFirst attach the reflector to the reflector bracket with the reflector screw, see the topdiagram. Next, remove the clamp screw and open the clamping reflector bracket.Place clamping reflector bracket around the handlebar or seatpost. If the clamp istoo loose, insert a rubber spear inside of the clamp. Tighten the clamp screw to holdreflector assembly in place, see the second diagram. Finally, adjust the reflectorassembly in place and ensure that it is upright and facing away from the bike.RIDING SAFELYGeneral RulesWhen riding obey the same road laws as all other road vehicles, including giving way to pedestrians, and stoppingat red lights and stop signs.For further information, contact the Road Traffic Authority, police department or Department of Motor Vehicles inyour State.Ride predictably and in a straight line. Never ride against traffic.Use correct hand signals to indicate turning or stopping.Ride defensively. To other road users, you may be hard to see.Concentrate on the path ahead. Avoid pot holes, gravel, wet road markings, oil, curbs, speed bumps, drain gratesand other obstacles.Cross train tracks at a 90 degree angle or walk your bicycle across.Expect the unexpected such as opening car doors or cars backing out of concealed driveways.Be extra careful at intersections and when preparing to pass other vehicles.Seatstay Mount Reflector Bracket AssemblyFirst insert one washer onto the hex bolt and insert hex bolt through the reflectorbracket and then through the seatstay bridge. Next, insert a second washer onto thebolt and thread a hex nut onto the bolt behind the seatstay bridge. Tighten bolts untilsnug, making sure the reflector is in an upright position. See diagram at the bottomright.Familiarize yourself with all the bicycle's features. Practice gear shifts, braking, and the use of toe clips and straps,if fitted.If you are wearing loose pants, use leg clips or elastic bands to prevent them from being caught in the chain orgears. Wear proper riding attire and avoid wearing open toe shoes.Don't carry packages or passengers that will interfere with your visibility or control of the bicycle. Don't use itemsthat may restrict your hearing.Do not lock up the brakes. When braking, always apply the rear brake first, then the front. The front brake is morepowerful and if it is not correctly applied, you may lose control and
May 25, 2012 · The following manual is only a guide to assist you and is not a complete or comprehensive manual of all aspects of maintaining and repairing your bicycle. The bicycle you have purchased is a complex object. We recommend that you consult a bicycle repair specialist if you have doubts or concer
