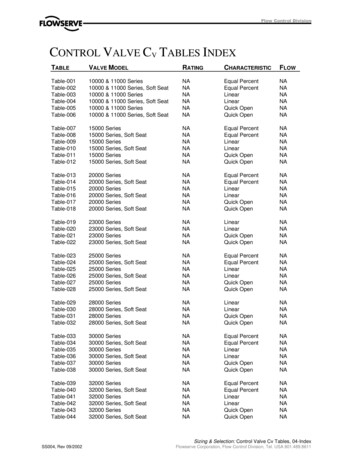
Transcription
Loadbreak ApparatusConnectorsMN650056ENEffective February 2020Supersedes July 2018COOPER POWER600 A, 15, 25, and 35 kV Class Cleer Grounding ElbowInstallation InstructionsSERIES
DISCLAIMER OF WARRANTIES AND LIMITATION OF LIABILITYThe information, recommendations, descriptions and safety notations in this document are based on Eaton Corporation’s(“Eaton”) experience and judgment and may not cover all contingencies. If further information is required, an Eaton salesoffice should be consulted. Sale of the product shown in this literature is subject to the terms and conditions outlined inappropriate Eaton selling policies or other contractual agreement between Eaton and the purchaser.THERE ARE NO UNDERSTANDINGS, AGREEMENTS, WARRANTIES, EXPRESSED OR IMPLIED, INCLUDING WARRANTIESOF FITNESS FOR A PARTICULAR PURPOSE OR MERCHANTABILITY, OTHER THAN THOSE SPECIFICALLY SET OUT IN ANYEXISTING CONTRACT BETWEEN THE PARTIES. ANY SUCH CONTRACT STATES THE ENTIRE OBLIGATION OF EATON. THECONTENTS OF THIS DOCUMENT SHALL NOT BECOME PART OF OR MODIFY ANY CONTRACT BETWEEN THE PARTIES.In no event will Eaton be responsible to the purchaser or user in contract, in tort (including negligence), strict liability orotherwise for any special, indirect, incidental or consequential damage or loss whatsoever, including but not limited todamage or loss of use of equipment, plant or power system, cost of capital, loss of power, additional expenses in the use ofexisting power facilities, or claims against the purchaser or user by its customers resulting from the use of the information,recommendations and descriptions contained herein. The information contained in this manual is subject to changewithout notice.iiInstallation Instructions MN650056EN February 2020
ContentsDISCLAIMER OF WARRANTIES AND LIMITATION OF LIABILITY . . . . . . . . . . . . . . . . . . . . . . . . . . . . . . . . . . . . IISAFETY FOR LIFE . . . . . . . . . . . . . . . . . . . . . . . . . . . . . . . . . . . . . . . . . . . . . . . . . . . . . . . . . . . . . . . . . . . . . . . . . IVSAFETY INFORMATION . . . . . . . . . . . . . . . . . . . . . . . . . . . . . . . . . . . . . . . . . . . . . . . . . . . . . . . . . . . . . . . . . . . . IVSafety instructions. . . . . . . . . . . . . . . . . . . . . . . . . . . . . . . . . . . . . . . . . . . . . . . . . . . . . . . . . . . . . . . . . . . . . . . . . . . . . . . ivPRODUCT INFORMATION. . . . . . . . . . . . . . . . . . . . . . . . . . . . . . . . . . . . . . . . . . . . . . . . . . . . . . . . . . . . . . . . . . . . 1Introduction. . . . . . . . . . . . . . . . . . . . . . . . . . . . . . . . . . . . . . . . . . . . . . . . . . . . . . . . . . . . . . . . . . . . . . . . . . . . . . . . . . . . 1Read this manual first. . . . . . . . . . . . . . . . . . . . . . . . . . . . . . . . . . . . . . . . . . . . . . . . . . . . . . . . . . . . . . . . . . . . . . . . . . . . 1Additional information. . . . . . . . . . . . . . . . . . . . . . . . . . . . . . . . . . . . . . . . . . . . . . . . . . . . . . . . . . . . . . . . . . . . . . . . . . . . 1Acceptance and initial inspection . . . . . . . . . . . . . . . . . . . . . . . . . . . . . . . . . . . . . . . . . . . . . . . . . . . . . . . . . . . . . . . . . . . 1Handling and storage. . . . . . . . . . . . . . . . . . . . . . . . . . . . . . . . . . . . . . . . . . . . . . . . . . . . . . . . . . . . . . . . . . . . . . . . . . . . . 1Quality standards. . . . . . . . . . . . . . . . . . . . . . . . . . . . . . . . . . . . . . . . . . . . . . . . . . . . . . . . . . . . . . . . . . . . . . . . . . . . . . . .1CABLE ISOLATION AND GROUNDING INSTRUCTIONS . . . . . . . . . . . . . . . . . . . . . . . . . . . . . . . . . . . . . . . . . . . 1Equipment required. . . . . . . . . . . . . . . . . . . . . . . . . . . . . . . . . . . . . . . . . . . . . . . . . . . . . . . . . . . . . . . . . . . . . . . . . . . . . . 1Visible break and visible ground using T-OP II or BT-TAP terminations. . . . . . . . . . . . . . . . . . . . . . . . . . . . . . . . . . . . 2Visible break and visible ground using BOL‑T terminations. . . . . . . . . . . . . . . . . . . . . . . . . . . . . . . . . . . . . . . . . . . . . . 4Installation Instructions MN650056EN February 2020iii
!Safety for lifeSAFETYFOR LIFE!SAFETYFOR LIFEEaton meets or exceeds all applicable industry standards relating to product safety in its Cooper Power series products.We actively promote safe practices in the use and maintenance of our products through our service literature, instructionaltraining programs, and the continuous efforts of all Eaton employees involved in product design, manufacture, marketing, andservice.We strongly urge that you always follow all locally-approved safety procedures and safety instructions when working aroundhigh-voltage lines and equipment, and support our “Safety For Life” mission.Safety informationThe instructions in this manual are not intended as asubstitute for proper training or adequate experience in thesafe operation of the equipment described. Only competenttechnicians who are familiar with this equipment shouldinstall, operate, and service it.Safety instructionsFollowing are general caution and warning statements thatapply to this equipment. Additional statements, related tospecific tasks and procedures, are located throughout themanual.A competent technician has these qualifications: Is thoroughly familiar with these instructions.Is trained in industry-accepted high- and low-voltage safeoperating practices and procedures.Is trained and authorized to energize, de-energize, clear,and ground power distribution equipment.Is trained in the care and use of protective equipmentsuch as arc flash clothing, safety glasses, face shield,hard hat, rubber gloves, clampstick, hotstick, etc.Following is important safety information. For safeinstallation and operation of this equipment, be sure to readand understand all cautions and warnings.Hazard Statement DefinitionsThis manual may contain four types of hazard statements:DANGERIndicates an imminently hazardous situation which, ifnot avoided, will result in death or serious injury.WARNINGIndicates a potentially hazardous situation which, if notavoided, could result in death or serious injury.CAUTIONIndicates a potentially hazardous situation which, if notavoided, may result in minor or moderate injury.NOTICEDANGERHazardous voltage. Contact with hazardous voltage willcause death or severe personal injury. Follow all locallyapproved safety procedures when working around highand low-voltage lines and equipment.G103.3WARNINGBefore installing, operating, maintaining, or testing thisequipment, carefully read and understand the contentsof this manual. Improper operation, handling, ormaintenance can result in death, severe personal injury,and equipment damage.G101.0WARNINGThis equipment is not intended to protect humanlife. Follow all locally-approved procedures and safetypractices when installing or operating this equipment.Failure to comply can result in death, severe personalinjury, and equipment damage.G102.1WARNINGPower distribution and transmission equipment mustbe properly selected for the intended application. Itmust be installed and serviced by competent personnelwho have been trained and understand proper safetyprocedures. These instructions are written for suchpersonnel and are not a substitute for adequate trainingand experience in safety procedures. Failure to properlyselect, install, or maintain power distribution andtransmission equipment can result in death, severepersonal injury, and equipment damage.G122.2Indicates a potentially hazardous situation which, if notavoided, may result in equipment damage only.ivInstallation Instructions MN650056EN February 2020
600 A, 15, 25, and 35 kV Class Cleer Grounding ElbowProduct informationIntroductionThe Eaton Cooper Power series Cleer grounding elbow(Figure 1) is a tool used to provide a visible ground onEaton Cooper Power series 600 A, 15, 25, and 35 kV CleerLoadbreak Connector Systems. It is designed to be installeddirectly on the 600 A loadbreak interfaces after the circuitis verified to be de-energized. A Cleer grounding elbowinstalled on the loadbreak bushing interfaces on each endof the cable will isolate and ground the cable. The groundingelbow has a 16 kA 10 cycle through fault rating for 15 kVsystems.All grounding elbow sets supplied with a factory installedferrule and clamp conform to the latest requirements ofASTM F855. When grounding elbow is ordered withoutclamp, it does not meet ASTM F855. It is the user’sresponsibility to install an approved ferrule and clamp. Forall kits not conforming to the latest ASTM F855 Edition, thecable will be terminated with a blunt cable end.Read this manual firstRead and understand the contents of this manual and followall locally approved procedures and safety practices beforeinstalling or operating this equipmentAdditional informationThese instructions cannot cover all details or variationsin the equipment, procedures, or process described norprovide directions for meeting every possible contingencyduring installation, operation, or maintenance. Whenadditional information is desired to satisfy a problem notcovered sufficiently for the user’s purpose, contact yourEaton representative.Acceptance and initial inspectionEach grounding elbow is completely inspected and testedat the factory. It is in good condition when accepted by thecarrier for shipment. Upon receipt of a grounding elbow,inspect the grounding elbow thoroughly for damage andloss of parts incurred during shipment. If damage or loss isdiscovered, file a claim with the carrier immediately.Handling and storageGrounding elbows and accessories should be stored andhandled in a manner as to prevent contamination to theinterfaces. When not in use, grounding elbows shouldbe stored installed on a mating accessory, such as astandoff bushing.Quality standardsISO 9001 Certified Quality Management SystemCable isolation and grounding instructionsCAUTIONThe Eaton Cooper Power series 600 A Cleer GroundedElbow is designed to be operated in accordance withnormal safe operating procedures. These instructions arenot intended to supersede or replace existing safety andoperating procedures. The grounding elbow should beinstalled and service only by personnel knowledgeableof good safety practices and fully trained on theinstallation and application of high voltage electricalequipment.For product applications that require ratings orcharacteristics not shown, contact Eaton for specificrecommendations.Equipment required (2) 600 A Cleer grounding elbows (2) 600 A Cleer standoff bushings (2) 600 A Cleer insulated protective caps Silicone lubricant Clampstick Installation instruction sheetFigure 1. 600 A, 15/25/35 kV Class Cleer groundingelbow shown with six feet of 600 volt fully insulatedcopper ground cable and clampInstallation Instructions MN650056EN February 20201
600 A, 15, 25, and 35 kV Class Cleer Grounding ElbowVisible break and visible ground using T-OP II orBT-TAP terminationsWARNINGVisibly inspect grounding elbows, cables, ferrules, andclamps prior to installation to ensure they are complete,undamaged, and there is no corrosion or breakage.Damaged or worn grounding equipment can result inequipment failure that could cause property destructionor personal injury.WARNINGAll associated apparatus must be de-energized duringinstallation or maintenance.Step 1Clean and lubricate apparatus Clean and lubricate interfaces of protective caps andstandoff bushings using lubricant supplied or Eatonequivalent.Step 2Install standoff bushing WARNINGHigh Voltage. The Eaton Cooper Power series Cleer 600A loadbreak connector system is not designed to beswitched under water. When operating the Cleer 600 Aloadbreak connector system where moisture is present,such as during a rainstorm, take steps to ensure theconnector interfaces stay dry. Failure to comply couldlead to a fault that may result in death or serious injury.WARNINGHigh Voltage. The operator should always use personalprotective equipment (insulated gloves, clampstickand eye protection) whenever operating the connector.The operator should always be in the best possibleoperating position, providing firm footing and enablinga secure grasp of the clampstick positioned to theside of one’s torso, while maintaining positive controlof the connector before, during and immediatelyafter operation. If there is any question regarding theoperator’s operating position, de-energize the connectorbefore operation. The operator should not be lookingdirectly at the connector during the moment of circuitinterruption or connection. Failure to comply couldresult in death or serious injury. Attach a #14 AWG copper drain wire from the standoffbracket ground lug to system ground.Securely fasten a clampstick to the eyebolt on standoffbushing bracket and use the clampstick to position thestandoff in standoff pocket. Tighten eyebolt againstapparatus wall. Step 3Remove “C” Connector WARNINGHigh Voltage. The Cooper Power series Cleer 600 Aloadbreak bushings from Eaton should only be matedwith other Cleer 600 A loadbreak products. Do notattempt to mate 200 A loadbreak or 600 A deadbreakproducts to Cleer 600 A loadbreak bushings. Failure tocomply could lead to a fault that may result in death orserious injury. WARNINGHigh Voltage. Do not close or pull the Eaton CooperPower series Cleer connector slowly onto or off of thebushings during a loadmake or loadbreak operation.Failure to comply could tease the contacts leading toexcessive arcing causing a fault that may result in deathor serious injury.2Area must be clear of obstructions or contaminants thatwould interfere with this operation.Secure connector operating eye firmly onto clampstickand lock.Thrust clampstick forward until the connector movesapproximately 1/4" (5 mm) further onto the bushings.This action will break any surface friction between outersurfaces of bushings and inner surfaces of connectorinterfaces. The yellow latch indicator rings on thebushings should now be visible in the cuff windows ofthe connector.Looking away from the connector, pull the clampstick andwithdraw the connector from bushings with a fast, firm,straight motion. Minimum amount of travel of connectorto break load is 9" (230 mm).Using the clampstick, move the connector away fromthe bushings and place the metallic portion of oneof the probes directly onto a ground plane. This willdischarge any capacitive charge that may still be on theprobes. Alternatively, the “C” connector can be mateddirectly with the Cleer standoff bushing to discharge anycapacitive charge that may still be on the probe.WARNINGHigh Voltage. If the fiberglass contact tube of one orboth loadbreak bushing(s) extends forward, the unitMUST be replaced. Failure to comply could causethermal runaway failure or failure to successfullyfault-close; this may result in serious personal injuryInstallation Instructions MN650056EN February 2020
600 A, 15, 25, and 35 kV Class Cleer Grounding Elbow Install “C” connector on Cleer standoff bushing.BOL-TTERMINATION200 A LOADBREAKPROTECTIVE CAPREMOVE C200 A LOADBREAKREDUCING TAPPLUGT-OP II OR BT-TAPTERMINATIONSOURCELOADSOURCELOADFigure 4. Remove 200 A loadbreak protective capFigure 2. Remove “C” connectorStep 6TestStep 4WARNINGInstall insulated protective cap Attach Cleer loadbreak protective cap drain wire tosystem ground.Using a clampstick, install a Cleer 600 A loadbreakprotective cap on the source-side loadbreak bushing.See Figure 3.Cleer 600 ALOADBREAKPROTECTIVE CAPAll associated apparatus must be de-energized duringinstallation or maintenance.WARNINGDo not ground energized cable. Using appropriate voltage sensing meter, test through200 A interface to verify circuit is de-energized. SeeFigure 5.DIRECTCONDUCTORTESTSOURCELOADFigure 3. Install 600 A loadbreak protective capSOURCEStep 5LOADRemove 200 a protective cap Using a clampstick, remove 200 A loadbreak protectivecap from 200 A loadbreak reducing tap plug. SeeFigure 4.Figure 5. Verify circuit is de-energizedStep 7Re-install 200 A protective cap After circuit has been verified as de-energized, using aclampstick, re-install 200 A protective cap on loadbreakreducing tap plug. See Figure 6.Installation Instructions MN650056EN February 20203
600 A, 15, 25, and 35 kV Class Cleer Grounding ElbowRE-INSTALL 200 APROTECTIVE CAPTurn around and apply a force to the clampstick to pushthe elbow onto the bushing. A popping or snappingsound is often heard when this operation is performed. To check that the elbow is properly latched apply a gentlepull force to the clampstick. When latched properly theelbow will not slide back off of the bushing. As a last operation, push on the clampstick to seat theelbow all the way onto the bushing again. This insuresthat the elbow is latched and was not dislodged duringthe latching check in previous step above. SOURCELOADCleerGROUNDINGELBOWFigure 6. Re-install 200 A protective capStep 8Install cleer grounding elbow Using a clampstick, install Cleer grounding elbow onload-side 600 A loadbreak bushing. See Figure 7.SOURCEWARNINGIf the available fault current is over 16kA, you must useCLEERBAIL and CLEERCHAIN, and the grounding elbowmust be equipped with 4/0 cable.WARNINGThe operator should always use personal protectiveequipment (insulated gloves, clampstick and eyeprotection) whenever operating the elbow. The operatorshould always be in the best possible operatingposition, providing firm footing and enabling a securegrasp of the clampstick, while maintaining positivecontrol of the elbow before, during and immediatelyafter operation. If there is any question regarding theoperator’s operating position, de-energize the elbowbefore operation. The operator should not be lookingdirectly at the connector during the moment of circuitinterruption or connection. Failure to comply couldresult in death or serious injury. 4Area must be clear of obstructions or contaminationsthat would interfere with the operation of the loadbreakelbow.Securely fasten a clampstick to the pulling eye of thegrounding elbow.Place the grounding elbow over the bushing, insertingthe white arc follower of the probe into the bushingapproximately 1-1/2" (38 mm) until a slight resistance isfelt. This will align and stabilize the elbow.Turn your back to the bushing and grasp the clampsticksecurely and obtain good footing. Slam the elbow ontothe bushing with one quick and continuous motion.LOADFigure 7. Install Cleer grounding elbowStep 9Repeat processCAUTIONThis procedure must be performed on both ends of thecable for complete grounding. Repeat Step 1 through Step 8 on the opposite end of thecable.Visible break and visible ground usingBOL‑T terminationsWARNINGVisibly inspect grounding elbows, cables, ferrules, andclamps prior to installation to ensure they are complete,undamaged, and there is no corrosion or breakage.Damaged or worn grounding equipment can result inequipment failure that could cause property destructionor personal injury.WARNINGAll associated apparatus must be de-energized duringinstallation or maintenance.Installation Instructions MN650056EN February 2020
600 A, 15, 25, and 35 kV Class Cleer Grounding ElbowStep 1WARNINGClean and lubricate apparatus High Voltage. The Eaton Cooper Power series Cleer 600A loadbreak connector system is not designed to beswitched under water. When operating the Cleer 600 Aloadbreak connector system where moisture is present,such as during a rainstorm, take steps to ensure theconnector interfaces stay dry. Failure to comply couldlead to a fault that may result in death or serious injury.Clean and lubricate interfaces of protective caps andstandoff bushings using lubricant supplied or Eatonequivalent.Step 2Install standoff bushing Attach a #14 AWG copper drain wire from the standoffbracket ground lug to system ground. Securely fasten a clampstick to the eyebolt on standoffbushing bracket and use the clampstick to position thestandoff in standoff pocket. Tighten eyebolt againstapparatus wall. Step 3Remove “C” connectorWARNING The operator should always use personal protectiveequipment (insulated gloves, clampstick and eyeprotection) whenever operating the elbow. The operatorshould always be in the best possible operatingposition, providing firm footing and enabling a securegrasp of the clampstick, while maintaining positivecontrol of the elbow before, during and immediatelyafter operation. If there is any question regarding theoperator’s operating position, de-energize the elbowbefore operation. The operator should not be lookingdirectly at the connector during the moment of circuitinterruption or connection. Failure to comply couldresult in death or serious injury.WARNINGHigh Voltage. Cooper Power series Cleer 600 A loadbreakbushings from Eaton should only be mated with otherCleer 600 A loadbreak products. Do not attempt to mate200 A loadbreak or 600 A deadbreak products to Cleer600 A loadbreak bushings. Failure to comply could leadto a fault that may result in death or serious injury. Area must be clear of obstructions or contaminants thatwould interfere with this operation.Secure connector operating eye firmly onto clampstickand lock.Thrust clampstick forward until the connector movesapproximately 1/4" (5 mm) further onto the bushings.This action will break any surface friction between outersurfaces of bushings and inner surfaces of connectorinterfaces. The yellow latch indicator rings on thebushings should now be visible in the cuff windows ofthe connector.Looking away from the connector, pull the clampstick andwithdraw the connector from bushings with a fast, firm,straight motion. Minimum amount of travel of connectorto break load is 9" (230 mm).Using the clampstick, move the connector away fromthe bushings and place the metallic portion of one of theprobes directly onto a ground plane. This will dischargeany capacitive charge that may still be on the probes.WARNINGHigh Voltage. If the fiberglass contact tube of one orboth loadbreak bushing(s) extends forward, the unitMUST be replaced. Failure to comply could causethermal runaway failure or failure to successfullyfault-close. Install “C” connector on Cleer standoff bushing.REMOVE CWARNINGHigh Voltage. Do not close or pull the Eaton CooperPower series Cleer connector slowly onto or off of thebushings during a loadmake or loadbreak operation.Failure to comply could tease the contacts leading toexcessive arcing causing a fault that may result in deathor serious igure 8. Remove “C” connectorInstallation Instructions MN650056EN February 20205
600 A, 15, 25, and 35 kV Class Cleer Grounding ElbowStep 4Step 6Install insulated protective capInstall grounding elbow Attach Cleer loadbreak protective cap drain wire tosystem ground.Using a clampstick, install a Cleer 600 A loadbreakprotective cap on the source-side loadbreak bushing.See Figure 9.Cleer 600 ALOADBREAKPROTECTIVE CAPWARNINGAll associated apparatus must be de-energized duringinstallation or maintenance.WARNINGDo not ground energized cable. WARNINGSOURCELOADFigure 9. Install Cleer 600 A loadbreak protective capStep 5Test Using an appropriate voltage sensing meter, test throughthe load side 600 A loadbreak bushing interface to verifycircuit is de-energized. See Figure 10.DIRECTCONDUCTORTESTIf the available fault current is over 16kA, you must useCLEERBAIL and CLEERCHAIN, and the grounding elbowmust be equipped with 4/0 cable.WARNINGThe operator should always use personal protectiveequipment (insulated gloves, clampstick and eyeprotection) whenever operating the elbow. The operatorshould always be in the best possible operatingposition, providing firm footing and enabling a securegrasp of the clampstick, while maintaining positivecontrol of the elbow before, during and immediatelyafter operation. If there is any question regarding theoperator’s operating position, de-energize the elbowbefore operation. The operator should not be lookingdirectly at the connector during the moment of circuitinterruption or connection. Failure to comply couldresult in death or serious injury. SOURCE LOAD Figure 10. Verify circuit is de-energized 6If circuit is de-energized, install Cleer 600 A, 15/25/35 kVgrounding elbow cable to system ground. Installgrounding elbow on load-side 600 A loadbreak interface.See Figure 11.Installation Instructions MN650056EN February 2020Area must be clear of obstructions or contaminationsthat would interfere with the operation of the loadbreakelbow.Securely fasten a clampstick to the pulling eye of thegrounding elbow.Place the grounding elbow over the bushing, insertingthe white arc follower of the probe into the bushingapproximately 1-1/2" (38 mm) until a slight resistance isfelt. This will align and stabilize the elbow.Turn your back to the bushing and grasp the clampsticksecurely and obtain good footing. Slam the elbow ontothe bushing with one quick and continuous motion.Turn around and apply a force to the clampstick to pushthe elbow onto the bushing. A popping or snappingsound is often heard when this operation is performed.To check that the elbow is properly latched apply a gentlepull force to the clampstick. When latched properly theelbow will not slide back off of the bushing.
600 A, 15, 25, and 35 kV Class Cleer Grounding Elbow As a last operation, push on the clampstick to seat theelbow all the way onto the bushing again. This insuresthat the elbow is latched and was not dislodged duringthe latching check in previous step above.Cleer GROUNDINGELBOWSOURCELOADFigure 11. Install Cleer grounding elbowStep 7Repeat processCAUTIONThis procedure must be performed on both ends of thecable for complete grounding. Repeat Step 1 through Step 6 on the opposite end of thecable.Installation Instructions MN650056EN February 20207
!SAFETYFOR LIFEEaton1000 Eaton BoulevardCleveland, OH 44122United StatesEaton.comEaton’s Power Systems Division2300 Badger DriveWaukesha, WI 53188United StatesEaton.com/cooperpowerseries 2020 EatonAll Rights ReservedPrinted in USAPublication No. MN650056ENFebruary 2020Eaton is a registered trademark.All trademarks are propertyof their respective owners.For Eaton‘s Cooper Power series productinformation, call 1-877-277-4636 or visit:www.eaton.com/cooperpowerseries.
Damaged or worn grounding equipment can result in equipment failure that could cause property destruction or personal injury . WARNING All associated apparatus must be de-energized during installation or maintenance . Step 1 Clean and lubricate apparatus Clean and lub