Transcription
cover8/21/034:08 PMPage iiInvisalignClinicalMonitoringGuide This Guide was published on August 8, 2003. As additional Tips & Techniques become available,this Guide will be updated first on the Online Clinical Education Center. An electronic and mostcurrent version of this Guide can be viewed or downloaded from the Online Clinical EducationCenter (www.invisaligncec.com). Please check the website or with your Sales or Customer SupportRepresentative to make sure you have the most recently updated version.D4219
InvisalignClinicalMonitoringGuide This Guide is intended to help the Invisalign practitionersuccessfully monitor Invisalign treatments and address issues thatmay arise between receipt of Aligners from Align to the completionof treatment.Special attention has been given to possible root causes of issuesthat may be encountered, solutions to these issues, and measuresthat can be taken to prevent the issue from re-occurring in thefuture.Invisalign is a technique. Invisalign is more than a setof Aligners; it is the Aligners plus other auxiliaries used to achievedesired results. Just as with fixed appliances, a clinician should carefully monitor, adjust and plan for use of auxiliaries for successfultreatment outcomes with Invisalign.The solutions in this Guide are considerationscollected from your peers. These have not all beentested in clinical trials, but rather are tips and techniques fromInvisalign-experienced colleagues. Some tips have been used onmany cases and some on only a few. We have tried to list these inthe order that clinicians recommend them and feel they work successfully. It is at your discretion to use them where appropriate toget the results you want with Invisalign.Critical steps in the Invisalign processThis Guide was published on August 8, 2003. As additional Tips & Techniques become available,this Guide will be updated first on the Online Clinical Education Center. An electronic and mostcurrent version of this Guide can be viewed or downloaded from the Online Clinical EducationCenter (www.invisaligncec.com). Please check the website or with your Sales or Customer SupportRepresentative to make sure you have the most recently updated version.Invisalign Clinical Monitoring GuideeWe hope you find this Guide useful. Please do not hesitate to contact us with additional Tips & Techniques (tips may be submittedthrough the Online Clinical Education Center at www.invisaligncec.com)that will continue to expand the body of clinical knowledge aroundInvisalign.With best regards,Align Technology, Inc.2Align Technology, Inc.
Intro8/21/033:59 PMPage iiKey considerations for usingInvisalign effectivelycompliance. Simply extending Align wear-time may allow themovement to be expressed more completely. Moving ahead toofast in an Aligner is like changing a wire in fixed that has not fullyexpressed itself.This Guide will help you quickly address issues that you mayencounter during Invisalign treatment.c. Challenging movements—Like fixed appliances, somemovements with Invisalign are more predictable thanothers. Less predictable movements, such as absoluteextrusions, rotation of round teeth and large translations,may require auxiliary appliances (buttons and elastics,sectionals, etc.)When monitoring treatments, from time to time yourpatient’s teeth may not track to plan. In these instances, it isgood to generally keep in mind that this occurs for twofundamental reasons.1. INSUFFICIENT SPACE —Do the teeth have enoughroom to move? Often teeth get tied up due to lack of space,particularly due to contact binding. This may be due toinsufficient interproximal reduction (IPR), other force systemswithin the Aligners, or treatment plans that have not beenthought through sequentially, stage by stage.2. INSUFFICIENT FORCE (Aligner contact with tooth orattachment)—Are the necessary forces present toensure movement? Insufficient force may be due to theprescribed treatment plan or ClinCheck in which certainmovements were not included, lack of attachment engagement, insufficient time for the movement to express,or inherent difficulty overcoming selected movements:a. An unengaged attachment will not provide sufficientforce. Not having an attachment engaged is like havinga wire not fully engaged in the slot of a fixed appliance.b. Time to express—Teeth may “lag” behind theAligner due to differences in bone biology from patientto patient, material stress relaxation, or lack of patientInvisalign Clinical Monitoring GuideCareful monitoring of treatment will help catch issuesbefore they become a problem. To prevent issues from occurring,we have found that thoughtful and successful Invisalign cliniciansperform the following at every patient appointment:1. Have patients arrive with the previous stage Aligner and the current Aligner, so you can evaluate any fit concerns that may arise.2. At each appointment, review 4 things:a. That the current Aligner is a good fit.b. IPR instructions (track the amount of IPR performedaccording to the patient chart).c. The condition and engagement of attachments. Teach thepatient what to look for in attachment fit.d. Evaluate for tight contacts with unwaxed floss and relievewith finishing strips if present.3. Check actual results versus ClinCheck every 4-8 stages. Somedoctors find it useful to print the patient’s ClinCheck and placethese in the patient’s chart. Use this as a guide to track actualversus modeled progress regularly.3iiAlign Technology, Inc.
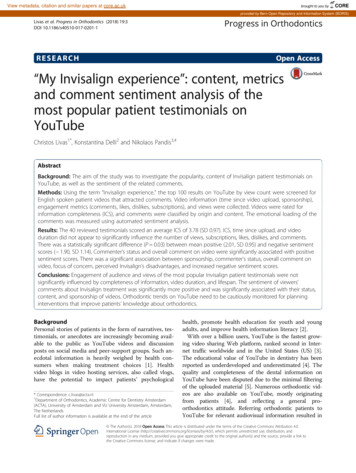
Intro8/21/033:59 PMPage iii4. Use ClinCheck as a tool to educate your patient. Explain whatis occurring and have the patient help monitor treatment (flossingto check for contacts and using a pencil to outline the attachmentsto ensure attachment engagement) [see p. 31].5. Plan to Detail—the adjuncts, tips and chairside tools foundthroughout this Guide will help with final detailing and should cutdown on the need for Refinement and Mid-Course Correction.Refinement and Mid-Course Correction may be used as secondarymethods of achieving desired results. Neither option should beviewed as a failure and in fact may be needed in a portion of treatments, depending on the complexity of the case. [For definitions ofterms used throughout this Guide, see the Glossary, pp. 40–41.]6. After finishing treatment, learn from your results. Review yourfirst ten ClinChecks against the actual results to help you plan treatment more effectively on future cases. There is a learning curve withInvisalign.2. BE DETAILED WHEN TREATMENT PLANNINGa. The more specific you are with your instructions, the betteryour Align technicians will be able to provide an initialsetup that meets your expectations.b. Begin with the end in mind. Depending on the type of caseor movements planned, you may need to plan ahead forthe use of auxiliaries.c. Recognize the default ClinCheck setup standards andknow how to overcome them.You may override this setup by checking The “ClinCheckObjectives” box (Box 13, see below) on the Prescription &Diagnosis form. If you check “Perform less predictable movements to achieve a more ‘ideal’ ClinCheck,” you will overridethe standard setup. When you check this box, less predictablemovements will be included in your treatment plan.While yourdesired goals might be achieved with Invisalign alone, they morethan likely will require auxiliary work that you and your patientshould expect.Finally, always keep in mind that the 4 keys to ensuringconsistent, quality treatment outcomes require that doctors:1. SUBMIT HIGH-QUALITY RECORDS(particularly PVS impressions and photos)The #1 reason for poor Aligner fit is an incomplete or distortedimpression.a. Poor dental data ultimately leads to poor-fitting Alignerswhich lead to sub-optimal outcomes.b. If your office needs help with impression or photo-taking orhas had impressions sent back to you from Align, pleasecontact your Sales Representative or read the guides1 on theOnline Clinical Education Center.Invisalign Clinical Monitoring GuideThe “ClinCheck Objectives” box1 See: PVS 1-step Guide: df;PVS Trouble-shooting Guide: http://www.invisaligncec.com/consistent/pdfs/PVS Troubleshoot.pdf;Photography Guide: graphyGuide.pdf4iiiAlign Technology, Inc.
3. REVIEW CLINCHECK CAREFULLYa. ClinCheck is a virtual representation of a doctor’sintended treatment plan.b. Align Technology is a lab with technicians who interpret thedirections on your treatment plan. The more specific yourcomments and modifications, the closer you will get to yourdesired setup.c. Tips for comments: Be tooth/teeth specific; Specify size (mm)and direction of movement; Avoid non-specific instructionssuch as “align,” “more,” “a little,” “a lot.” Example: Instead of“improve anterior esthetics,” improve communication bywriting: “Add 5 degrees of mesial in rotation to the upperleft central and 10 degrees mesial crown tip to the upperleft canine.”4. MONITOR CAREFULLY AND PLAN TO DETAILa. Invisalign is a technique. Monitoring and detailing are criticalto achieving consistent, quality treatment outcomes, whetheryou use Invisalign alone or with auxiliaries.“I view my role as getting the teeth to fit into each Aligner.”—Ray McLendon, DDS, Houston TXb. Keep this Guide handy to help address issues as they arise,and follow the keys outlined above to reduce the likelihood oftheir occurring in the first place.How to use this GuideEach page in this Guide is designed to assist you in identifying rootcauses and solutions for most of the issues you might encounter during the course of Invisalign treatment. In addition, references to indepth instructional materials are provided in any instance wherethey are available, as well as notes that should help you prevent therecurrence of these issues.Begin on the Contents page (page v), where all the issues addressedin this book are listed in order of frequency of occurrence. Afteridentifying the general issue that best fits your situation, locate thepage upon which your specific issue is presented.The following format is used throughout the book to address thevarious issues:General issueSpecific issue, listedin order of frequencyof occurrencePotential root causes,listed in orderof probabilityPossible solutions,listed in order of likelihoodof effectivenessRelated photos ofissues or techniquesHelpful references,listed to correspondwith order of solutionsPrevention notesPLEASE NOTE: The Invisalign Online Clinical Education Centerto help avoid theis abbreviated throughout this Guide as “Online CEC”. It isrecurrence of eachlocated at www.invisaligncec.com.root cause.Invisalign Clinical Monitoring Guide5ivAlign Technology, Inc.
Contents1. Managing Aligner fit and seatingGeneral fit issues (Aligners are not seating well, 1 mm) .7Aligner popping up when forced down,or anterior/posterior rocking . . . . . . . . . . . . . . . . . . . . . . .9Severe undercut . . . . . . . . . . . . . . . . . . . . . . . . . . . . . . . . .11The Aligners don’t fit at all. . . . . . . . . . . . . . . . . . . . . . . .12Aligners are too tight or can’t be removed (too retentive) 13The Aligners are not retentive enough . . . . . . . . . . . . . . .14Short Aligners . . . . . . . . . . . . . . . . . . . . . . . . . . . . . . . . .15Long Aligners . . . . . . . . . . . . . . . . . . . . . . . . . . . . . . . . . .162. Handling tooth-specific movementsRotations of anterior teeth not occurring . . . . . . . . . . . . .17Rotations of posterior teeth (especially premolars/bicuspids) not occurring . . . . . . . . . . . . . . . . . . . . . . . . . .19Residual crowding . . . . . . . . . . . . . . . . . . . . . . . . . . . . . . .21Residual spaces at the end of treatment . . . . . . . . . . . . . . .22Anterior teeth not level . . . . . . . . . . . . . . . . . . . . . . . . . .24Incomplete extrusions . . . . . . . . . . . . . . . . . . . . . . . . . . . .25Posterior openbite occurring near end of treatment . . . . . .26Black triangles appear . . . . . . . . . . . . . . . . . . . . . . . . . . . .27Incomplete tip at end of treatment . . . . . . . . . . . . . . . . . .28Incomplete torque . . . . . . . . . . . . . . . . . . . . . . . . . . . . . . .29Unintended intrusion is occurring of tooth that I’m tryingto extrude/rotate/expand . . . . . . . . . . . . . . . . . . . . . . . . . .30Unwanted tipping/dumping during large span spaceclosure of extraction spaces . . . . . . . . . . . . . . . . . . . . . . . .31Distalization/Mesialization not occurring . . . . . . . . . . . . . .32Expansion not occurring . . . . . . . . . . . . . . . . . . . . . . . . . .33Intrusion not occurring . . . . . . . . . . . . . . . . . . . . . . . . . . .34Extraction site space not closing . . . . . . . . . . . . . . . . . . . .35Anterior or lateral openbite (rare) occurring . . . . . . . . . . .363. Ensuring Attachments fit and stay bondedAttachments are not fittinginto the Aligner attachment space . . . . . . . . . . . . . . . . . .37Attachments come debonded . . . . . . . . . . . . . . . . . . . . . .384. Addressing Patient concernsPatient has negative reaction to Aligner (rare) . . . . . . . . .39TMD symptoms occurring (jaw hurts or locks—rare) . . . .405. Handling lost or broken AlignersLost or broken Aligner . . . . . . . . . . . . . . . . . . . . . . . . . . .41Glossary . . . .46-47References . .48Index . . . . . . .49-51Credits . . . . .526. Maintaining Aligner AestheticsStaining or discoloration . . . . . . . . . . . . . . . . . . . . . . . . . .42Holes or bubbles . . . . . . . . . . . . . . . . . . . . . . . . . . . . . . . .43Attachments on anterior teeth are not aesthetic . . . . . . . .447. Retainer questionsIs the last Aligner a retainer? . . . . . . . . . . . . . . . . . . . . . . . . . . .45Can I order an Invisalign retainer? . . . . . . . . . . . . . . . . . . . . . . .45Do I have to use an Invisalign retainer? . . . . . . . . . . . . . . . . . . .45
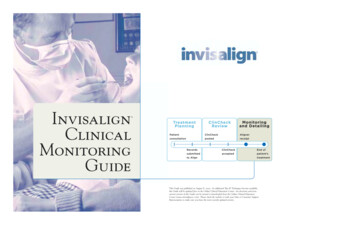
1Managing Aligner fit and seatingGeneral fit issues (Aligners are not seating well, 1 mm)PAGE 1 OF 2If Aligner discrepancy is 1 mm, this is natural deflection that should occur so the Aligner can move the tooth. Continue treatment, continuing to monitor Aligner fit.AAligner seatingpoorly, 1 mmROOT CAUSESSOLUTIONSAttachments may haveBEGINNING TX ONLY:excessive flashRemove excess flashand/or remove andrebond attachmentsREFERENCESGuide to PlacingAttachments (Tips &Techniques on CEC)with template fullyseatedsee fig. C, DPrevention Note 1.1BAligner seating wellDistorted initial impressionBEGINNING TX ONLY:see fig. EMust retake impressions and re-starttreatmentPREVENTION NOTES:PVS Impression Guides(Tips & Techniques onCEC); PVSTroubleshooting Guide(Online CEC)Prevention Note 1.2CScaler used to trimattachment flashas well as checkretention. (Miller)DTo minimizeunwanted flash,drill a small hole( 0.75 mm wide)with a flame-shapedfinishing bur or asharp explorer inthe middle of theattachment templateso that excess composite is expressed out of the hole.EInvisalign Clinical Monitoring GuideDistorted initialimpressionTooth movements may varyExtend weartime ofamong patients due to dif-Aligner;go back oneferences in bone biologystage1.1 Make sure attachment template is properly seatedprior to bonding attachments. Try Aligner #1 tocheck fit, then bond attachments.1.2 Improve quality of initial records. If third molarsare present, decide whether to include in treatmentor not (virtually extract or not).Instruct Staff to thoroughly review patient compliance ( 22 hrs a day); if you feel a patient is notcompliant, extend wear-time of each Aligner stage.Emphasize to your patients never to dispose of theirAligners and instruct them that the Aligners shouldbe fitting well at the end of the 2-week period.1.3and tooth morphology.Non-compliance - patientExtend weartime ofnot wearing Aligners longAligner; go back oneenough for tooth to movestageUse the PatientCompliance AgreementPrevention Note 1.3Section continued on following page.71Align Technology, Inc.
Aligner fit8/21/033:59 PMPage 21Managing Aligner fit and seatingGeneral fit issues (Aligners are not seating well, 1 mm)ROOT CAUSESSOLUTIONSNot enough space due toIPR according toinadequate IPRpatient’s reproxima-PAGE 2 OF 2tion chartWith extraction cases, siteAllow site to healmay need adequate time tolonger (make sureheal to obtain best fit (duepatient wearsto inflamed tissue)interim retainer)Position of teeth affectsSeat AlignerAligner path ofstarting withinsertion/removalarea of greatest(example: Class II Div II)crowding/undercutSevere Undercuts(See SevereUndercuts section,page 5)Lack of extrusion, or(See Incompleteunintended intrusion ofExtrusions, page 19,one toothor UnintendedIntrusion, page 24)Section continued from previous page.Invisalign Clinical Monitoring Guide82Align Technology, Inc.
1Managing Aligner fit and seatingAligner popping up when forced down, or anterior/posterior rockingATrim Aligner withInvisalign EZ-Trimtrimming Bur.ROOT CAUSESSOLUTIONSPotential tissue impingement;Relieve Alignerinflamed gingiva distal to theimpingement by2nd molars (typical in teens);trimming Aligner.inflamed incisal papillaUse Trimming burREFERENCESIPR Guides (Tips &Techniques on OnlineCEC); IPR Video;IPR in ClinicalUpdate, Fall 2001to adjust Aligners.see fig. APrevention Note 1.4BSituation wheredoctor took PVSimpressions for aMid-CourseCorrection and didnot retain patient.IPR being done is less thanIPR according toreproximation form indicates;patient’s reproxima-therefore Aligner is smallertion chartPAGE 1 OF 2PREVENTION NOTES:Assess gingiva in ClinCheck vs. actual gingivaposition. If a discrepancy exists, request modificationsin ClinCheck.1.4than actual arch dimensionFor Pre-PVS IPR or extraction cases, retain teethbetween PVS impression and initial Aligner deliverywith Vacuform retainers. See Guide to Extractions andIPR information (Online CEC.)1.5CAligners weredelivered two weekslater but tooth hadslipped, leading toa need to backtrackin treatment.Teeth drifted due to lack ofMust take new impression and resubmitinterim retention betweento Align with treatment form (Mid-CoursePre-PVS IPR/Extraction/Correction for which doctor will bePVS impression and initialcharged)see fig. B, CAligner delivery (commonwith teens)Prevention Note 1.5Sub-optimal initial PVSBEGINNING TX ONLY:impressionMust retake impressions and re-starttreatment (Mid-Course Correction)Guide to extractions(Tips & Techniques onOnline CEC); IPR (Tips& Techniques on OnlineCEC); IPR Video;See Case Studies"Crowding 1, 2 and 3)on Online CEC1.6Improve quality of initial records.PVS Impression Guides(Tips and Techniques on Online CEC);P V S Troubleshooting Guide(Online CEC)Prevention Note 1.6Short clinical crowns withoutUse detail pliers forundercutsretentionDetail Pliers (Tips &Techniques on OnlineCEC)Section continued on following page.Invisalign Clinical Monitoring Guide93Align Technology, Inc.
Aligner fit8/21/033:59 PMPage 41Managing Aligner fit and seatingAligner popping up when forced down, or anterior/posterior rockingATrim Aligner withInvisalign EZ-Trimtrimming Bur.ROOT CAUSESSOLUTIONSGingiva is simulated inRelieve AlignerBEGINNING TX ONLY:ClinCheck and may bepressure points byCall Align Customerhigher in posterior regiontrimming AlignerSupport. Solutionthan actual anatomywith trimming burmay require photossee fig. Aor additionalPAGE 2 OF 2clarifications.Prevention Note 1.7Change in patient’s dentalMid-Courseanatomy from new restora-Correction with newtions.impressionsPREVENTION NOTES:Assess gingiva in ClinCheck vs. actual gingivaposition. If a discrepancy exists, request modificationsin ClinCheck.1.7(fee charged)Prevention Note 1.8Make sure all dental work is completed prior tobeginning Invisalign treatment. Be sure dentist isaware of the consequences of any change to the dental anatomy mid-treatment.1.8Teeth not intruding(See Intrusion Notas indicatedOccurring section,page 33.)Section continued from previous page.Invisalign Clinical Monitoring Guide140Align Technology, Inc.
Aligner fit8/21/033:59 PMPage 51Managing Aligner fit and seatingSevere undercutROOT CAUSESSOLUTIONSSeverely tipped teethTrim away Aligner in undercut region withtrimming bur so the Aligner will seat. Mayrequire doing this with subsequent Alignersuntil tooth position improves and Alignercan fully seat.Prevention Note 1.9Other Root Causes:Trim Aligner withBridges/Ponticstrimming bur; trySevere Recessionseating Aligner fromFlared Teethdifferent anglePREVENTION NOTES:For severe undercuts, request to have Alignerstrimmed at the CEJ in your treatment planninginstructions to avoid having to trim every Aligner.1.9Periodonticallycompromised teethInvisalign Clinical Monitoring Guide1 51Align Technology, Inc.
1Managing Aligner fit and seatingThe Aligners don’t fit at all.AAligners that do notfit properlyROOT CAUSESSOLUTIONSREFERENCESBEGINNING TX ONLY:BEGINNING TX ONLY:Check to make sure patientTry next Aligner first (read imprint onwas given correct AlignerAligner); otherwise, call Customer Supportsee fig. Bfor additional troubleshooting; may requirenew impressions and Mid-Course CorrectionPrevention Note 1.10BAligner imprintTeeth drifted due to lack ofMust retake impres-interim retention betweensions and re-startPre-PVS IPR/Extraction andtreatment (Mid-initial Aligner deliveryCourse Correction)Prevention Note 1.11Patient’s dental anatomyMust retake impres-changed—e.g., restorations,sions and re-startcrowns, fillingstreatment (Mid-Guide to extractions(Tips & Techniques onOnline CEC); IPR(Tips & Techniques onOnline CEC); IPRVideo; Case Studies,(Crowding 1, 2 & 3)on Online CECPREVENTION NOTES:Make sure you are taking quality initial records,particularly photos and impressions.1.101.11 For Pre-PVS extraction or IPR cases, retain withvacuform retainers after taking impressions whilewaiting for Aligners to arrive. See Guide onExtractions and IPR information (Online CEC.)Make sure patient gets all dental work done priorto PVS impressions.1.12Course Correction)Prevention Note 1.12Patient may not haveVerify that patientreceived or be wearing thewas given thecorrect sequence ofcorrect AlignersAlignersInvisalign Clinical Monitoring Guide1 62Align Technology, Inc.
Aligner fit8/21/033:59 PMPage 71Managing Aligner fit and seatingAligners are too tight or can’t be removed (too retentive)ABGuitar pick to aidwith AlignerremovalSectioning Aligntemplate to applyattachments atsubsequentappointmentsROOT CAUSESSOLUTIONSToo many attachmentsConsider havingConsider not bonding all attachments atSome doctors sug-Consider having thepatient rinse mouthfirst Aligner delivery. Section attachmentgest patient use apatient move to newfirst with warmtemplate into tooth-specific templates,guitar pick to aid instages before goingwater beforeor use the current Aligner as a templateremoval of theto bed. The initialremoving Aligner(NOTE: current Aligner may beAlignermovements are therigid/retentive) and apply attachmentsmost noticeable andat subsequent appointmentcan occur when thesee fig. Bpatient is asleep.He/she can sleepthrough the initialdiscomfort.Prevention Note 1.13Severe UndercutsSevere crowding(See UndercutConsider havingSome doctors sug-section, page 5)patient rinse mouthgest patient use afirst with warmguitar pick to aid inwater beforeremoval of theremoving AlignerAlignerSome doctors sugguitar pick to aid inremoval of theAlignerPREVENTION NOTES:see fig. A1.13 Reduce the number of attachments duringClinCheck review (guideline: try to stay away frommore than four attachments per arch). Considerplacing attachments at stage 2. Teeth may be moremobile and Aligner will be easier to remove whenattachments are placed at this time. See Attachmentprotocol (Tips & Techniques on Online CEC).gest patient use aInvisalign Clinical Monitoring Guidesee fig. Asee fig. A1 73Align Technology, Inc.
1Managing Aligner fit and seatingThe Aligners are not retentive enoughROOT CAUSESSOLUTIONSREFERENCESRetention potentially dueUse Detail Pliers forEnsure that patient’sto short clinical crowns,retentionperiodentition isAThis image is froma case where composite attachmentswere not initiallyplaced for applianceretention. Since thedental crowns aresomewhat short(especially in thelower right), Aligner retention is enhanced by placing pressurepoints in the appliance in the interproximal areas. Points thatare made too deep for complete seating of the appliance canbe flattened using the Eraser Pliers.Aligner withretention dimplessee fig. Ameticulously cleancommon with teensprior to taking initialPVS impressionsPrevention Note 1.14Detail Pliers (Tips &Techniques on OnlineCEC)PREVENTION NOTES:Attachments may haveWhen current stagecome offis completed,Add extra attachments for retention whenmodifying ClinCheck or plan to use Detail Pliers.1.14segment Aligneras an attachmenttemplate to rebondattachments.Invisalign Clinical Monitoring Guide1 84Align Technology, Inc.
1Managing Aligner fit and seatingShort AlignersAShort Aligners onlower anteriorarchDefinition: If the Aligner trim 1 mm from FGM (free gingival margin) in more than 2 consecutive teeth ROOT CAUSESSOLUTIONSSuboptimal initial impressionsBEGINNING TX ONLY:that did not capture fullHave Aligners remade by retaking impres-clinical crownssions and send back to Align along with newsee fig. BREFERENCESphotos and original Aligners that did not fitPVS impression takingtechnique (Tips &Techniques on OnlineCEC), Photo guide(Tips & Techniques onOnline CEC)Prevention Note 1.15BDistorted initialimpressionPREVENTION NOTES:Suboptimal photos wereBEGINNING TX ONLY:submitted that didn’t allowHave Aligners remade by retaking impres-technician to compare clini-sions and send back to Align along with newcal position of gingiva withphotos and original Aligners that did not fitthe virtual gingivaPrevention Note 1.16CAligners of properlength and fitDuring Middle of Treatment:MIDDLE TX ONLY:Improvement in gingivalContinue treatment unless movementshealth may cause gingiva toeffected, in which case Mid-Courseshrink down during treatmentCorrection may be warrantedPVS impression takingtechnique (Tips &Techniques on OnlineCEC), Photo guide(Tips & Techniques onOnline CEC)1.15 Make sure you are taking quality initial records,particularly photos and impressions.1.16 Check position of virtual gingiva in ClinCheckto ensure accuracy.Consider chlorhexidine gluconate rinse for oneweek prior to Invisalign PVS impressions to reduceany effects of gingivitis.1.17which may look like Alignersare shortPrevention Note 1.17Aligners were trimmed tooBEGINNING TX ONLY:short during manufacturingCall Align Customer Support; Ask for(rare)Aligners with repositioned gingival line—do not resubmit impressions—and ask forwarranty replacement Aligners. Submittingphotos are helpful to Align to correct theproblemDuring Middle of Treatment:MIDDLE TX ONLY:Short Aligners caused by(See Tooth-Specific Movement sectionstooth-specific movements[pp. 11–30] in this Guide)not occurring (When toothdoes not track with theAligner the Aligner mayappear short in that area)Invisalign Clinical Monitoring Guide1 95Align Technology, Inc.
Aligner fit8/21/033:59 PMPage 101Managing Aligner fit and seatingLong AlignersATrim Aligner withInvisalign EZ-Trimtrimming Bur.ROOT CAUSESSOLUTIONSSuboptimal initialTrim and polishBEGINNING TX ONLY:impression. Technician hadAlignersIf all Aligners affected, send Aligners backsee fig. A, Bto guess location ofto Align with photos of problem areas togingival line during Alignerhave Aligners remade (warranty Aligner)manufactureBInvisalign Clinical Monitoring GuideEZ-Trim polishingwheel1 106Align Technology, Inc.
2AMouth mirror toprotect the tongue.Single-sided disk isspinning labiallytowards the mirrorat very low RPMs.(Womack)Handling tooth-specific movementsRotations of anterior teeth not occurringPAGE 1 OF 2ROOT CAUSESSOLUTIONSREFERENCESNot enough time for movementExtend weartime ofUse Invisalign DetailDuring Caseto be expressedAligner stage;Pliers to assist withRefinement ask forensure contacts areminor movementsOvercorrectionnot binding on teeth(see Align’sthat are trying toOvercorrectionrotatepolicy, p. 12)IPR Guides (Tips &Techniques on OnlineCEC); IPR Video;IPR in ClinicalUpdate, Fall 2001Prevention Note 2.0BSmooth parallel lineswithout subgingivalledges is the goal.(Womack)Lack of overjet; teeth haveMove teeth fromno place to move withoutopposing arch outinterference from theof the wayopposing archPREVENTION NOTES:IPR Guides (Tips &Techniques on OnlineCEC; IPR Video; IPRin Clinical Update,Fall 20012.0 Always monitor contacts with unwaxed flossduring treatment whether IPR was prescribed or not.If contacts are tight, loosen contacts with a fine diamond strip; verify treatment progress with corresponding ClinCheck stage; if anticipating 3 mm of IPRthen consider doing IPR prior to PVS Impressions(esp. if IPR is in the posterior area); check reproximation form during treatment and keep track ofamount of IPR during treatment.Prevention Note 2.1CMonitor with floss toensure contacts arenot binding.Not enough space for teethComplete the amountto move due to lack of IPRof IPR prescribed;extend Aligner wearwith current Aligner(maybe backtrack 1-2Aligners); continueDThickness gauge toverify the amountremoved in .1 mmincrements.(Womack)IPR Guides (Tips &Techniques on OnlineCEC; IPR Video; IPRin Clinical Update,Fall 2001Prevention Note 2.0treatmentNot enough space for teethMonitor contacts with unwaxed floss duringUse Invisalign Detailto move due to tight contactstreatment whether IPR prescribed or not—ifor Eraser Pliers tocontacts are tight, lightly loosen contactsassist with minorwith a fine diamond strip; verify treatmentmovementssee fig. A,Bprogress with corresponding ClinCheck stagesee fig. C,D,EPrevention Note 2.0EInvisalign Clinical Monitoring GuideUsing diamondstrips to round outline angles and create natural-lookingdental anatomy.(Womack).2.1 In Treatment Plan and ClinCheck review, proc
Aug 08, 2003 · Invisalign is a technique. Invisalign is more than a set of Aligners; it is the Aligners plus other auxiliaries used to achieve desired results. Just as with fixed appliances, a clinician should care-fully monitor, adjust and plan for use of auxiliaries for successful treatment outcomes with Invisalign. The solutions in this Guide ae .


![Welcome [neso ]](/img/18/neso-2019-onsite-program.jpg)