Transcription
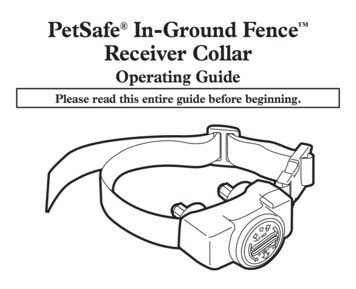
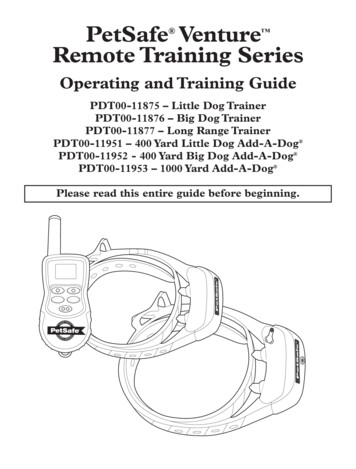
PetSafe VentureRemote Training Series Operating and Training GuidePDT00-11875 – Little Dog TrainerPDT00-11876 – Big Dog TrainerPDT00-11877 – Long Range TrainerPDT00-11951 – 400 Yard Little Dog Add-A-Dog PDT00-11952 - 400 Yard Big Dog Add-A-Dog PDT00-11953 – 1000 Yard Add-A-Dog Please read this entire guide before beginning.
Thank you for choosing PetSafe , the best selling brand of electronictraining solutions in the world. Our mission is to ensure your pet’s safety byproviding you the tools and techniques to successfully train your pet. If youhave any questions, please contact the Customer Care Center or visit ourwebsite at www.petsafe.net.Table of ContentsComponents . 3Other Items You May Need . 3How the System Works . 3Key Definitions . 4Operating Guide . 6Prepare the Remote Transmitter. 6Prepare the Receiver Collar . 7Fit the Receiver Collar. 9Two Dog System .10To Pair Dog 1 Receiver Collar and the Remote Transmitter .12Training Guide .13General Tips .13Teaching Your Pet the Positive Tone.13Find the Best Stimulation Level for Your Pet.13 2 Boost .14Teaching Basic Obedience .14Eliminating Unwanted Behavior .16Frequently Asked Questions .19Troubleshooting.20Test Light Instructions .20Accessories .21Terms of Use and Limitation of Liability .21FCC .21Perchlorate Battery .22Non-Transferrable Limited Warranty .2221-800-732-2677
ComponentsHex WrenchTest LightTool400 Yard Little DogReceiver CollarChargingAdapterRem PetSafTrae Ventinin ureg SeriesOper oteatingPDand PD T00-11TrainPDPDT00875PD T00-11 T00-11 -11876 – LitingT00951tle877–GuidPD -11952 – 400 – LonBig DoDog TraT00- 400 Yardgg Tra inee-11953Yar Lit Ranine rrea– 100 d Big tle Doge Tra rd this0 Yar Do g Ad inerentd Ad g Ad d-Aire-Doguid-A d-A-Dogde bef-Doggorebeginning.RemoteTransmitterPlease400 Yard Big Dog / 1000 YardReceiver CollarLanyardOperating andTraining GuideOther Items You May Need Scissors Non-metallic collar and 10-foot leash for trainingHow the System WorksNow you can experience the difference a Remote Trainer can make. Spend less time training and moretime enjoying your dog. The PetSafe Venture Series Remote Trainers are comfortable for your pet andeasy to use with an advanced digital display that tells you exactly what level of stimulation you are using.The Remote Trainer assists you in controlling your pet without a leash in a range of either 400 or 1000yards. At the push of a button, your remote sends a signal activating your dog’s Receiver Collar. Hereceives a safe but annoying stimulation. He’ll quickly learn the association between his behavior andyour correction; in no time, you’ll have a better-behaved pet. The PetSafe Venture Series RemoteTrainers have been proven safe, comfortable, and effective for both small and large dog breeds.Important: The Venture Series Remote Trainers have a range of up to 400 or 1000 yards. Dependingon the way you hold the Remote Transmitter, the maximum range may vary. Terrain, weather,vegetation, transmission from other radio devices, and other factors will affect the maximum range.Features 400 or 1000 Yard Range 8 levels of correction plus a “Boost” button Every Venture Remote Training system is 2-dog compatible Rechargeable Batteries in both the Remote Transmitter and Receiver Collar Waterproof Remote Transmitter and Receiver Collar Lifetime Limited Warrantywww.petsafe.net3
Key DefinitionsRemote Transmitter: Transmits the radio signal to the Receiver Collar. It is waterproof.Digital DisplayLevel of Stimulation - shows Dog 1 or Dog 2 level of stimulations (Low-1 to High-8). Alsoindicates 2 Boost.Dog 1 - The active collar symbol will display to indicate Dog 1.Dog 2 - Dog 1 and Dog 2 symbols will be displayed (additional purchase required for 2 dog system)Tone - The stimulation level will flash when the Tone button or Stimulation button is pressed.Battery Indicator - The battery indicator provides constant awareness of your battery’s powerlevel. See Battery Indicator on page 7 for more detailed information on the Battery Indicator.1D or 2D - This appears when programming for the 2-Dog mode.Button Definitions (factory default settings for Dog 1 mode)Tone - Upper Left Button (Black): Produces a training tone from the collar. Nostimulation is delivered.Stimulation - Lower Left Button (Black): Delivers continuous stimulation.Stim Up - Upper Right Button (Grey): Adjust the stimulation level UP through a range oflevels. From Low-1 to High-8.Stim Down - Lower Right Button (Grey): Adjust the stimulation level DOWN through arange of levels from High-8 to Low-1. 2 Boost (Red): Delivers continuos stimulation that is 2 levels higher than the currentlyselected level.See Two Dog System on page 10 for Dog 2 modeTransmitter AntennaBelt ClipDigital DispayToneStimulationStim UpStim Down 2 BoostLanyard ClipCharging Jack(with cover)41-800-732-2677
Receiver Collar: Delivers stimulation or tone on a signal from the Remote Transmitter.It is waterproof.On/Off Button: Momentarily pressing and holding this button turns the Receiver Collar on and off.Contact Points: The contacts through which the Receiver Collar delivers Stimulation.Receiver Indicator Light: Indicates when the Receiver Collar has been turned on or off and alsoserves as a low-battery indicator.Charging Jacks: For connecting the charger. Although the Remote Transmitter and Receiver Collarare waterproof without the charger covers, keep the covers in place when not charging to keep debrisout of the openings.Continuous Stimulation: You control when and how long Stimulation is delivered to your dogthrough the Receiver Collar’s Contact Points. When a Continuous Stimulation button is pressed for8 seconds or more, the Remote Transmitter will “time-out.” The button will need to be released andpressed again before additional Stimulation can be delivered.Positive Tone: Use the Positive Tone as a marker to reinforce positive behavior. Again, timing iscritical. Praise or treat the dog immediately following the Positive Tone.400 Yard Little DogReceiver Collar400 Yard Big Dog / 1000Yard Receiver CollarFront ViewFront ViewCharging Jack(with cover)Indicator LightBack/Bottom ViewOn/OffButtonCharging Jack(with cover)Screws forReplaceable CollarIndicator LightBack/Bottom ViewContact PointsOn/OffButtonScrews forReplaceable CollarContact Pointswww.petsafe.net5
Operating GuideStep1Prepare the Remote TransmitterCharge the Remote Transmitter1. Lift the rubber cover protecting the RemoteTransmitter Charging Jack.2. Connect one of the charger connectors to theRemote Transmitter Charging Jack.3. Plug the charger into a standard wall outlet.4. Charge the Remote Transmitter for 5 hours for thefirst charge. Recharges take only 3-4 hours. Note:The Battery Indicator will scroll while charging and willbecome solid when fully charged.5. When charging is completed, replace the rubber cover.Note: Approximate battery life between charges is 40 to 60hours, depending on frequency of use.Chargerconnectorplaced in theHandheldTransmitterCharging JackTurning ON the TransmitterPower up the Transmitter by pressing any button. You will see the display turn on whenyou press any button.Transmitter Digital DisplayThe display stays on for 10 minutes after a button press. After 10 minutes with no buttonpresses, the display shuts off and the transmitter goes into battery conservation mode.Pressing any button will cause the display to turn back on. The various symbols you mightsee on the display are explained below.NumericreadoutShows the chosen stimulation level for Dog 1 orDog 2.Dog 1/ Dog 2The symbol displayed is the active dog receivercollar. See Two Dog System on page 10.Tone orStimulationWhen pressing Tone or Stimulation the Dog 1 orDog 2 symbol will appear in bold or emphasized.BatteryIndicatorThe battery indicator provides constantawareness of your battery’s power level. SeeBattery Indicator on page 7 for more detailedinformation on the Battery Indicator.Note: Factory preset is for Dog 1 mode, you will not see the Dog 2 symbol unless the unit isprogrammed for Dog 2 (see Two Dog System on page 10.)61-800-732-2677
Battery IndicatorBattery is at 2 3 to Full capacity. Transmitter isfully functional.Battery is at 1 3 capacity. Transmitter is stillfully functional.Battery is at 1 6 capacity. Transmitter willoperate the Receiver, but recharge or replaceTransmitter battery as soon as possible.Battery is almost dead. Transmitter is unableto operate the Receiver.When the Battery Indicator shows the low battery symbol (1 6 capacity), recharge yourTransmitter soon. When just the battery outline is displayed, the Transmitter’s batteryis unable to power transmissions to the Receiver. Transmitter must be recharged toregain operation.Remote Transmitter Functions for Dog 1Transmitter FunctionButton ColorDigital Display ResponseUpper Left ButtonBlackTone OnlyLower Left ButtonBlackStimulation OnlyUpper Right ButtonGreyCorrection level UpLower Right ButtonGreyCorrection level downBoost ButtonRed 2 above selected correction levelSee Two Dog System on page 10 for remote transmitter functions in Dog 2 mode.Venture Transmitter Belt ClipTo remove:1. Press down and hold the Release on the Belt Clip.2. Press upward on the Release and slide the belt clip out of the insert.To replace:1. Slide the Belt Clip into the insert until it clicks.Step2Prepare the Receiver CollarCharge the Receiver Collar1. Lift the rubber cover protecting the Receiver Collar Charging Jack.2. Connect the charger connector to the Receiver Collar Charging Jack.3. Plug the charger into a standard wall outlet.www.petsafe.net7
4. Charge the Receiver Collar until the Green Indicator Light comes on and is solid.Recharges take only 3-4 hours.5. When charging is completed replace the rubber cover.400 Yard Little DogReceiver Collar400 Yard Big Dog / 1000 YardReceiver CollarChargerconnectorplaced inReceiverCollarChargingJackChargerconnectorplaced inReceiverCollarChargingJackTo Turn the Receiver Collar On1. Press and hold the On/Off button until the Green LED comes on and the ReceiverCollar beeps low to high.2. Release the On/Off button. The Green LED will flash once every 5 seconds until theReceiver Collar is turned off. The flashing light indicates the Receiver Collar is readyto receive a radio signal from the Remote Transmitter.3. Once the Receiver Collar has been turned on, press the Upper Left button of theRemote Transmitter. Upon pressing, the Receiver Collar should beep for as long as theUpper Left button is pressed. If it does not, see “To Pair the Remote Transmitter andthe Receiver Collar”. Note: To extend the life of the battery, turn the Receiver Collar offwhen it is not in use.400 Yard Little DogReceiver Collar400 Yard Big Dog / 1000 YardReceiver CollarOn/Off ButtonOn/OffButtonTo Turn the Receiver Collar Off1. Press and hold the On/Off button until the Red LED comes on and the ReceiverCollar beeps high to low.2. Release the On/Off button. To extend the life between charging cycles, turn theReceiver Collar off when it is not in use. Approximate battery life between charges is40-50 hours, depending on frequency of use.81-800-732-2677
LED – Function and ResponseReceiver FunctionLED ResponseReceiver BeeperResponseWhen the Receiver is turned “ON”Unit is onLow Battery ConditionGood Tone Signal being receivedWhen the Receiver is turned “OFF”Green light flashes one timeGreen light flashes once every five secondsRed light flashes three times every five secondsGreen light flashesRed LED appearsBeeps low to highNoneNoneGood Tone BeepBeeps high to lowRechargeable Batteries The rechargeable Lithium Ion batteries are not memory sensitive and do not requiredepletion before charging. The batteries come partially charged from the factory, but will require a full charge(4-5 hours) before the first use. Remember—always keep batteries away from flame. When storing the unit for long periods, remember to regularly give batteries a fullcharge (3-4 hours). This should be done once every 4 to 6 weeks. Excessive overcharging can shorten battery life. The Venture Series are equipped witha safety feature to prevent over charging. If your equipment has not been charged for an extended period, you may experiencea decrease in battery life the first few uses. Afterwards, the battery life will return toprevious capacity levels. You should expect hundreds of recharge cycles from your batteries. However, allrechargeable batteries lose capacity over time relative to the number of recharge cyclesthey experience. This is normal. If your operating time drops to half of the original life,contact the Customer Care Center. When a battery needs replacement, contact our Customer Care Center or visit our websiteat www.petsafe.net. Please do not open the Receiver Collar or Remote Transmitter.Step3Fit the Receiver CollarImportant: The proper fit and placement of your Receiver Collar is importantfor effective operation. The Contact Points must have direct contact with yourdog’s skin on the underside of his neck.To assure a proper fit, please follow these steps:3A1. Make sure that the Receiver Collar is turned off.2. Start with your dog standing comfortably (3A).3. Place the Receiver Collar on your dog’s neck close to the ears. Centerthe Contact Points underneath your dog’s neck, touching the skin(3B). Note: It is sometimes necessary to trim the hair around the ContactPoints to make sure that contact is consistent. Longer probes are alsoavailable through our Customer Care Center at 1-800-732-2677.www.petsafe.net9
4. Check the tightness of the Receiver Collarby inserting one finger between the collarand your dog’s neck (3C). The fit should besnug but not constricting.5. Allow your dog to wear the Receiver Collarfor several minutes then recheck the fit.Check the fit again as your dog becomesmore comfortable with the Receiver Collar.Note: If your dog is young and you expect him/her to grow, you’ll want to leave excess strap toadjust the collar fastening. Replacement strapsare available. Contact our Customer CareCenter at 1-800-732-2677.3B3CCare and CleaningTo ensure the effectiveness of this product andthe comfort and safety of your dog, check the fit of his collar frequently. This Guidedescribes proper collar fitting. If you notice that your dog is experiencing skin irritation,discontinue use of the collar for a few days. If the condition persists beyond 48 hours,see your veterinarian.To prevent skin irritation from occurring: The Receiver Collar should not be worn for more than 8 hours out of every 24-hour period. Your dog’s neck and the Contact Points must be washed weekly with a washcloth andmild hand soap, then rinsed thoroughly. Be sure that your pet’s neck is thoroughly dry before placing the Receiver Collar backon his neck.Step Two4Dog SystemNote: If you wish to add another receiver collar to the training system, accessory receiver collarsare available where you bought your training system, through our website at www.petsafe.net orthrough our Customer Care Center at 1-800-732-2677.To Add Dog 2(PDT00-11951; PDT00-11952; PDT00-11953)Transmitter1. Press the Lower Right button until “2D” appears on the Digital Display.2. After the “2D” appears press the Boost button.3. Set Dog 2 to Stimulation Level 1.4. Press Boost to lock the correction level for Dog 2.Dog 2 Receiver Collar1. With the Receiver Collar off your pet, turn the Receiver Collar off.2. Press and hold the On/Off button for 5 seconds.3. The Receiver Collar will beep and the LED will flash.4. Press Dog 2 the Upper Right or Lower Right button.101-800-732-2677
5. The Receiver Collar will respond and pair.6. If the Receiver Collar does not beep twice, please contact the Customer Care Center at1-800-732-2677.Button Functions for Dog 2 ModeTransmitter AntennaBelt ClipDigital DispayDog 1 ToneDog 1StimulationDog 2ToneDog 2Stimulation 2 Boost(see table below)Charging Jack(with cover)Lanyard ClipRemote Transmitter Functions for Dog 2 ModeUpper Left ButtonDog 1 ToneLower Left ButtonDog 1 Stimulation OnlyDog 1 2 BoostPress Boost and the Lower Left Button simultaneouslyUpper Right ButtonDog 2 ToneLower Right ButtonDog 2 Stimulation OnlyDog 2 2 BoostPress Boost and the Lower Right Button simultaneouslyDog 1/Dog 2 Correction LevelsTo change the correction level for Dog 1 or Dog 2, press and hold the Boost for 5seconds. Both Dog 1 and Dog 2 correction levels will appear. You can now use the UpperLeft button to increase the corrections level for Dog 1 and Lower Left to decrease thecorrection. For Dog 2 press Upper Right to increase the correction level and Lower Rightto decrease. To lock the correction levels for Dog 1 and Dog 2, press the 2 Boost button.To Remove Dog 2 from the Remote TransmitterPress and hold the 2 Boost button for 5 seconds. Press the Right Lowerbutton until the Dog 1 symbol appears on the Digital Display. Press 2Boost to exit the menu.www.petsafe.net11
Step To5Pair Dog 1 Receiver Collar and theRemote TransmitterIf your Receiver Collar does not beep when the Upper Left button of the RemoteTransmitter is pressed, or if you feel the Receiver Collar is not responding to the RemoteTransmitter:1. With the Receiver Collar off your pet, turn the Receiver Collar off.2. Press and hold the On/Off button for 5 seconds.3. The Receiver Collar will beep and the LED will flash.4. Press any Transmitter button.5. The Receiver Collar will respond and pair.6. If the Receiver Collar does not beep twice, please contact the Customer Care Centerat 1-800-732-2677Note: Pairing is for Dog 1 only121-800-732-2677
Training GuideGeneral Tips Eliminate one misbehavior or teach one obedience command at a time. If you move too fast withtraining, your pet may become confused. Be consistent. Correct your pet every time he misbehaves. Unless you can supervise him, it is recommended that you restrict your pet from situations inwhich he has a history of misbehaving. However, setting up a situation as a training session candramatically improve your chances of success. If your pet reacts to the tones by hiding or acting fearful, redirect his attention to a simple andappropriate behavior, such as the “sit” command. Pets should be at least 6 months old before using the Trainer. Only let responsible family members use the Trainer. It is not a toy! Other pets in hearing range will be affected by the training tones. Therefore, training sessionsshould be conducted out of hearing range of other pets. Never use the Remote Trainer to correct or eliminate any form of aggressive behavior. Werecommend you contact your local veterinarian or professional trainer to determine if your petmight be aggressive. Training instructions in this guide are written for use with the Transmitter being programmed toDog 1. Adjust the instructions to fit your desired training mode.Teaching Your Pet the Positive ToneBefore using the Trainer to correct your pet, spend 10 to 15 minutes per day for 2 or 3 dayshelping him create the association of the tone with reward and praise. To accomplish this:1. Push the Tone button for 2 consecutive seconds.2. Release the button and immediately reward your pet with verbal praise, petting, or a small foodreward. Spend 3 to 5 seconds on your rewarding.3. Wait a few minutes and repeat holding the Tone button for 2 seconds following with praise.Vary the reward to prevent your pet from anticipating a specific type. This stage of training iscomplete when your pet obviously anticipates a reward when he hears the positive tone.Find the Best Stimulation Level for Your PetImportant: Always start at the lowest level and work your way up.The Remote Trainer has 8 different Stimulation Levels. This allows you to choose the Stimulationthat is best for your pet.Once you have placed the Receiver Collar on your pet, it is time to find the Stimulation Level thatis best for him. This is called the Recognition Level.A slight change in your pet’s behavior, such as looking around in curiosity, scratching at his collar,or flicking his ears, indicates the Recognition Level that is best for him.Follow the steps below to find your pet’s Recognition Level:1. Starting at Level 1 on the Digital Display, press the Stimulation button continuously for 1 to 2 seconds.2. If your pet shows no reaction, repeat the Stimulation level several times before moving up to thenext level.www.petsafe.net13
3. YOUR PET SHOULD NOT VOCALIZE OR PANIC WHEN RECEIVING STIMULATION.IF THIS HAPPENS, THE STIMULATION LEVEL IS TOO HIGH AND YOU NEED TOGO BACK TO THE PREVIOUS LEVEL AND REPEAT THE PROCESS.4. Move up through the Stimulation levels until your pet reliably responds to the Stimulation.5. If your pet continues to show no response at Level 8, check the fit of the Receiver Collar. Ifyour pet has long or thick hair, contact our Customer Care Center 1-800-732-2677 to obtain alonger set of probes. Then go back to #1 and repeat the process. If this still does not yield anyresults, your pet’s hair will need to be trimmed around the Contact Points.If all of these steps have been done and your pet continues to show no reaction to the Stimulation,see the “Test Light Instructions” section.If after completing all of these steps your dog still does not indicate he is feeling the Stimulation,please contact Customer Care Center or visit our website at www.petsafe.net. 2 BoostA press of the button sends a signal to the collar to issue a correction that is 2 levels higher thanthe currently selected level. For example, if the correction level is set at Level 2, a touch of theBoost control will correct at Level 4. Some trainers like instant access to a higher setting forcircumstances where the dog may not respond to lower levels, such as around high distraction.The system will not correct higher than level 10.Teaching Basic ObedienceThe “Sit” Command1. Put a separate, non-metallic collar on your pet’s neck ABOVE the Receiver Collar, and attach a10-foot leash. Note: Be sure the extra collar does not put pressure on the Contact Points.2. Hold the leash and the Remote Transmitter in one hand. Keep your other hand free to guideyour pet into a “Sit” position.3. Press and hold the Stimulation Only button.4. Immediately give the “Sit” command while continuing to hold the Stimulation Only button.5. Release the Stimulation Only button as soon as your pet is in position, and praise him.6. Release your pet from the “Sit” command and play.7. Repeat Steps 2 through 6.Note: If your pet breaks the “Sit” command, repeat steps 3 through 6. Keep your pet close to you whileteaching the “Sit” command.The “Come” Command141-800-732-2677
1. Put a separate, non-metallic collar on your pet’sneck ABOVE the Receiver Collar, and attacha 10-foot leash. Note: Be sure the extra collardoes not put pressure on the Contact Points.2. Hold your leash in one hand and the RemoteTransmitter in the other.3. Wait for your pet to walk away from you.Using the Recognition Level for your pet,press and hold the Stimulation Only buttonon your Remote Transmitter.4. Immediately give the command “Come” whilecontinuing to hold the Stimulation Only button.5. Using the leash, gently guide your pet towardyou until he begins to come in your direction.6. Immediately release the Stimulation Onlybutton as soon as your pet steps towards you,and praise him enthusiastically.7. Quickly move backwards as your pet begins tocome back to you, praising him the entire time.8. Praise your pet when he returns to you.9. Repeat Steps 3 through 8.10. Once your pet responds readily to the“Come” command several times, back awayfrom him without giving a command. Whenyour pet turns toward you, give the command“Come” (WITHOUT STIMULATION) andpraise him while you continue to back up.Praise your pet when he returns to you.11. Use your leash to prevent your pet fromrunning past you. If your pet manages to runpast you, repeat Steps 3 through 8.The “Stay” Command1. Put a separate, non-metallic collar on your pet’s neck ABOVE the Receiver Collar, and attach a10-foot leash. Note: Be sure the extra collar does not put pressure on the Contact Points.2. Put your pet on his bed. Hold your leash in one hand and the Remote Transmitter in the other.3. Staying within 3 feet, walk the perimeter of the bed. Do not say anything to your pet.4. If your pet tries to leave the bed, press and hold the Stimulation Only button and give the“Stay” command. Continue to hold the button until your pet is back on his bed. If necessary,use the leash to guide your pet onto his place.5. Praise your pet when he is back on his bed.6. Once your pet has settled for a few seconds, release him and play calmly.7. Repeat steps 1 through 5.www.petsafe.net15
Eliminating Unwanted BehaviorJumping UpPets typically jump up to get attention. If you do not want your pet to jump on you, then friendsor members of the family should not encourage this behavior. That means every time your petjumps on someone, he should be reprimanded or redirected to an alternate and acceptablebehavior, for which he can receive praise.Note: It is best if your pet first understands the “Sit” command.1. Choose your pet’s Recognition Level.2. As soon as your pet lifts his paws off the groundto jump on you, press the Stimulation Onlybutton and give the command “Sit.”3. Release the Stimulation Only buttonimmediately once your pet is sitting, andverbally praise him.4. If your pet ignores the stimulation, increase theIntensity Level by 1.5. Practice this exercise in several different areasand use different people for distractions.DiggingIt is important to first understand why your pet is digging. Many dogs, such as terriers, were bredto flush out prey, and digging is very innate to them. Other dogs may be digging to find a coolspot to lie down, or simply out of boredom. Your pet may no longer have the desire to dig if he isprovided with the following: A cool, shaded area in which to lie down, and plenty of water. An alternate activity, such as a favorite toy. Plenty of play, exercise, and attention. A yard free from rodents or prey that he may be trying to flush out.1. Choose the Intensity Level 1 higher than your pet’s Recognition Level.2. Place the Receiver Collar on your pet and wait at least 10 minutes before placing him in theyard. No other people or pets should be in the yard, as you do not want your pet to associatethe stimulation with anything other than his digging. Your pet must be securely fenced in orcontained during training.3. From a window or area where your pet cannot see you, wait until your pet begins to dig.161-800-732-2677
4. While your pet digs, press the Stimulation Only button and release it when he stops digging.Only press the button while your pet is in the act of digging, and do not say anything to him.5. If your pet ignores the stimulation, increase the Intensity Level by 1.6. Continue to watch your pet, as he may choose another area to dig.7. Do not allow your pet in the yard unsupervised until he has completely stopped digging.ChasingChasing is an instinctive behavior stimulated by moving objects. Some dogs have a particularlystrong desire to chase that can put them in harm’s way and leave you helpless. Never allow yourdog off the leash or out of a contained area until he has learned the “Come” command, regardlessof the distraction. Be consistent and correct your dog every time he chases something.1. If your dog has not learned the “Come” command, keep a leash on him so you can physicallystop him before he reaches the object he is chasing.2. Choose the Intensity Level 1 higher than your dog’s Recognition Level.3. Set up a scenario where your dog is enticed to chase an object. Common items could be cars,motorcycles, bicycles, etc. (do not use toys).4. When the object passes in front of your dog, make sure to hold the leash with a firm grip. Assoon as your dog begins to chase the object, press and hold the Stimulation Only button untilhe stops.5. When your dog stops chasing the object, immediately release the button, walk backwards andgive the command “Come.” Praise your dog as he comes to you.6. Repeat the process until your dog stops chasing the object.Trash Rai
Remote Training Series Operating and Training Guide PDT00-11875 – Little Dog Trainer PDT00-11876 – Big Dog Trainer PDT00-11877 – Long Range Trainer PDT00-11951 – 400 Yard Little Dog Add-A-Dog PDT00-11952 - 400 Yard Big Dog Add-A-Dog PDT00-11953 – 1000 Yard Add-A-Dog Please