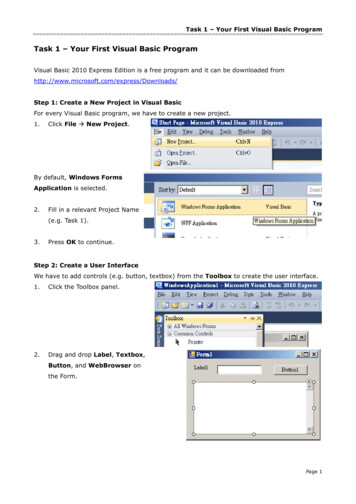
Transcription
Task 1 – Your First Visual Basic ProgramTask 1 – Your First Visual Basic ProgramVisual Basic 2010 Express Edition is a free program and it can be downloaded p 1: Create a New Project in Visual BasicFor every Visual Basic program, we have to create a new project.1.Click File New Project.By default, Windows FormsApplication is selected.2.Fill in a relevant Project Name(e.g. Task 1).3.Press OK to continue.Step 2: Create a User InterfaceWe have to add controls (e.g. button, textbox) from the Toolbox to create the user interface.1.Click the Toolbox panel.2.Drag and drop Label, Textbox,Button, and WebBrowser onthe Form.Page 1
Task 1 – Your First Visual Basic ProgramStep 3: Add Program Code1.Double-click the Button.A new window called the CodeEditor opens. We can addprogram code in it.2.Type the following:WebBrowser1.Navigate(Textbox1.Text)Step 4: Run and Test Your Program1.Click Debug Start Debugging or press F5.This command runs your program.2.In the text box, type a URL (e.g. http://hk.yahoo.com/) and click the button.Step 5: Save and Publish the ProjectTo save the project:1.Click File Save All.To enable other people to use this program, we can publish the project:2.Click Project Publish [project name].A file called Setup.exe and other necessary files will then be created forother people to install your program.Self-Reflection What are the pros & cons of the program? How can you improve it?Page 2
Task 1 – Your First Visual Basic ProgramStep 6: Enhance the interface by customizing looks and behaviorBy using the Properties window, we can change the properties of various controls to customizetheir appearance.1.Drag and drop a Panelon the Form.2.Move the existingLabel, Textbox &Button to be on thepanel.3.Select the Panel control.4.In the Properties window, selectthe Dock property and choosethe top box (i.e. Top).Then, the Panel will expand to fill thetop of the form.5.Select the WebBrowser.6.In the Properties window, selectDock property and click themiddle (i.e. Fill).Then the WebBrowser will fill theremaining form.Page 3
Task 1 – Your First Visual Basic Program7.Select the Button control.8.In the Properties window, selectthe Text property.Delete“Button1” and replace it with“Go!”.9.Similarly, replace the Textproperty of Label1 to be“Address”10. We may also change the font andcolor of the text shown bymodifying the Font andForeColor property.11. Resize or relocate any of the controls, and resize the form to suit your taste.Self-Reflection What are the pros & cons of the program? How can you improve it?Page 4
Task 1 – Your First Visual Basic ProgramBonus PartYou may add the following extra functions in the web browser.1)Go Back and Go ForwardHints: Browse the available functions in Webbrowser12)BookmarkHints: add buttons for going to specified hyperlinks3)Click “Enter” to navigate website of the typed URLHints: Type the program in the appropriate event4)For every change of window size, re-position “Go!” button in right hand side5)For every change of window size, URL textbox will be resized to fit the window’s width6)Textbox will show the updated URL7)Any other suitable functionsPage 5
Task 2 – Vending MachineTask 2 – Vending MachineYou are going to create a virtual vending machine selling your favourite products.A.User Interface DesignA sample interface of a vending machine is shown as below:Which VB controls does the above interface use? To insert a picture on the button, simply modify theBackgroundImage property of that button.You can also handle the image placement and control sizing bymodifying BackgroundImageLayout.You may download appropriate pictures from http://office.microsoft.com/en-us/imagesPage 6
Task 2 – Vending MachineB. Program CodingArithmetic OperationCommon operators used in Visual Basic are:Addition Subtraction-Multiplication*Division/ Pay special attentionCalculationThe value calculated in right-hand side will be put into left-hand side.a 1 3after execution: a becomesb 9–3*2after execution: b becomes VariableVariable is a space for computer to store data (e.g. number, text).We have to tell computer we are going to use variable before using them.We use the following to tell computer:Dim total As Integer 0The above statement tells computer that we allocate a spacecalled:type of storage:initial value:Time to think What variables are needed for the vending machine program?Page 7
Task 2 – Vending Machine Input StatementWe can get users’ input from the Textbox. The code is as follow:Dim paid As Integer 0paid Textbox1.Text Output StatementYou may display information to users by changing the Text property of Label.The codeexamples are as followsLabel1.Text "Hello!"' to display text informationDim amount As Integer 30Label1.Text amount' to display number informationLabel1.Text "You have to pay " & amount' to display both text & numberTask:Try to implement the vending machine program by using the skills learntabove.Self-Reflection What are the pros & cons of the program? How can you improve it?Page 8
Task 2 – Vending MachineBonus PartYou may add the following extra functions in the vending machine.1)Add a list to indicate no. of item sold for each product2)Allow user to enter how much they will pay and calculate the change3)Allow user to clear all the content and start it again4)Any other suitable functionsPage 9
Task 3 – Number Guessing GameTask 3 – Number Guessing GameYou are going to create a number guess game.A.Game Rule Guess the secret number from a range of number (from to ). Hints will be displayed on the screen indicating the range. Decide whether the lower/upper limit IS / IS NOT included in the range.B.User Interface DesignA sample interface is shown as below:Which VB controls does the above interface use?C. Program CodingTime to think What variables do you need to use for the above program? What do you need to do to make the game work?Page 10
Task 3 – Number Guessing Game Random number generatorThe following code will generate a random number from 1 to 9 and put it into variable secret.(note that 10 will NOT be generated).Dim RandomClass As New Random()secret RandomClass.Next(1, 10) Relational OperatorTo test whether certain situations happen, we use the following operators.Try to circle the correct answer for each example. OperatorMeaningExampleResult Greater12 6True / False1 9True / False Greater or Equal3 3True / False10 33True / False7 3True / False8 8True / False Less Less or Equal Equal6 4True / False Not Equal8 2True / FalseConditional StatementWe can ask computer to run some statements ONLY WHEN certain situation is true.The following code only checks for one situation. If the situation is TRUE, then the statement(s)inside If Then and End If will be executed.If a 4 Thenexecute statement(s)NOa 4End IfYESstatement(s)Page 11
Task 3 – Number Guessing GameTime to think How many situations do you need to check for the number guessing program? For each situation, what do you need to do? How do you tell users that they have won the game?Self-Reflection What are the pros & cons of the program? How can you improve it?Page 12
Task 3 – Number Guessing GameBonus Part1)When an out-of-range number is entered, the lower/upper limit may be reset to alower/upper number (refers to the example below). Try to solve this problem. 2)Allow users to guess for a number of times (e.g. 10 times) and display “YOU LOSE”.3)Allow users to define the range of number (e.g. from 1 to 200)4)Any other functions to make the game more interestingYou may need to use the following Boolean operators or Conditional Statements. Boolean OperatorsFor the operator AND, only both conditions which are true will give a true value.Example OperationMeaningResult3 1 AND 4 2True AND TrueTrue3 1 AND 2 4True AND FalseFalse1 3 AND 4 2False AND TrueFalse1 3 AND 1 4False AND FalseFalseFor the operator OR, any one of the conditions which is true will give a true value.Example OperationMeaningResult3 1 OR 4 2True OR TrueTrue3 1 OR 2 4True OR FalseTrue1 3 OR 4 2False OR TrueTrue1 3 OR 1 4False OR FalseFalseFor operator NOT, it will give an opposite value.Example OperationMeaningResultNOT 1 3NOT FalseTrueNOT 3 1NOT TrueFalsePage 13
Task 3 – Number Guessing Game Conditional Statement (continue)The following code will check for one situation. If the situation is TRUE, statement 1 will beexecuted. Otherwise, statement 2 will be executed.If a 4 ThenNOexecute statement 1a 4YESElseexecute statement 2statement 1statement 2End IfThe following code checks for two situations.If the first situation is TRUE, statement 1 will beexecuted. Otherwise, it will continue to check for the second situation. If the second situationis TRUE, then statement 2 will be executed.Otherwise, statement 3 will be executed.If a 4 Thenexecute statement 1ElseIf b 5 ThenNOa 4YESb 5execute statement 2YESElseexecute statement 3NOstatement 1statement 2statement 3End IfNote that you may add more than one Else If Then statement.Also, Else Statement is optional and can be omitted.Page 14
Task 4 – Curve StitchingTask 4 – Curve StitchingYou are going to create a program for drawing lines & curves.A.IntroductionBy using computer, we can ask computer to draw lines accurately and repetitively. Exampleworks are:B.User Interface DesignA suggested interface is shown below.Please change the background to white to facilitatedrawing and clearing.Page 15
Task 4 – Curve StitchingC. Program CodingCoordinate System in Visual BasicPlease fill in the coordinates (x, y) of the following points.1000200300x(,)(,)(,)(,)(,)(,)100200y Line DrawingTo draw a line, we firstly define a pen with a specific colour & pen width.The code below tellscomputer to define a pen withDim myPen As Pen New Pen(Color.Red, 3)color:width:By providing the coordinates of two endpoints, we can ask computer to draw a straight line toconnect them.For example:Me.CreateGraphics.DrawLine(myPen, 100, 200, 300, 100)1st point2nd pointTry to draw the line of the above statement:1000200300x100200y ClearWe can clear the whole screen by filling the whole background with color white.Me.CreateGraphics.Clear(Color.White)Page 16
Task 4 – Curve StitchingLevel 1 Rectangle DrawingTo draw a rectangle, lines have to be drawn.1000200Try to fill the following programming code which draws thex rectangle in the left:Dim myPen As Pen New Pen(Color.Red, 3)100Me.CreateGraphics.DrawLine(myPen, , , , )Me.CreateGraphics.DrawLine(myPen, , , , )200Me.CreateGraphics.DrawLine(myPen, , , , )Me.CreateGraphics.DrawLine(myPen, , , , )y Triangle DrawingTry to draw a triangle in your program.Level 2 Rectangle Drawing (with different size)To draw the rectangle based on the inputted size in the Textbox, we have to read the length,declare a variable and get the input from the Textbox:Dim len As Integerlen Textbox1.Text500100 150 200x50By studying the figure in the right, we can assume thecoordinate of one point remains unchanged. Then, othercoordinates will increase based on the input size.100150Try to rewrite the programming code above and draw the200rectangle based on the input size.yHints: the first line of code isMe.CreateGraphics.DrawLine(myPen, 50, 50, 50, 50 len)Page 17
Task 4 – Curve StitchingLevel 3 Parallel Lines DrawingTo draw 10 lines (as shown in the right), we can use the DrawLine statement for10 times. For each line, we have to specify their coordinates separately:Me.CreateGraphics.DrawLine(mypen, 100, 100, 100, 200)Me.CreateGraphics.DrawLine(mypen, 110, 100, 110, 200)Me.CreateGraphics.DrawLine(mypen, 120, 100, 120, 200)Me.CreateGraphics.DrawLine(mypen, 130, 100, 130, 200)Me.CreateGraphics.DrawLine(mypen, 140, 100, 140, 200)Me.CreateGraphics.DrawLine(mypen, 150, 100, 150, 200)Me.CreateGraphics.DrawLine(mypen, 160, 100, 160, 200)Me.CreateGraphics.DrawLine(mypen, 170, 100, 170, 200)Me.CreateGraphics.DrawLine(mypen, 180, 100, 180, 200)Me.CreateGraphics.DrawLine(mypen, 190, 100, 190, 200)Alternatively, we can also use the following statements:Dim mypen As Pen New Pen(Color.Chocolate, 3)Dim i As IntegerValue of i1st i:For i 100 To 190 Step 10Me.CreateGraphics.DrawLine(mypen, i, 100, i, 200)Next 2nd i: 10th i:Grid DrawingTry to modify the above code and draw the shape in the right.Level 4 Curve StitchingBy studying the figure in the right, write the x and y coordinate of theendpoints of first 5 lines and fill the following blanks:Me.CreateGraphics.DrawLine(myPen, , , , )Me.CreateGraphics.DrawLine(myPen, , , , )Me.CreateGraphics.DrawLine(myPen, , , , )Me.CreateGraphics.DrawLine(myPen, , , , )Me.CreateGraphics.DrawLine(myPen, , , , )Based on the program code in level 3, modify it according to draw the above curve.Page 18
Task 4 – Curve StitchingBonus PartTry to write programs drawing the following shapes or your own shapes:Page 19
Project 1 – Cat CatchingProject 1 – Cat CatchingThis is a simple game which allowsusers to catch the cat by pressingthe button.The bigger no. of hits that the userpresses, the better reactionhe/she has.When the “New” button ispressed, button with the imagecat will move to different positionsat an interval of time.After the preset time limit, gamewill end automatically.We can reset the game bypressing button “Reset”.Checkpoint 1:Cat can jumpWhen the button is clicked, cat should move to a new position.1.Use random number generator to generate random numbers (refer to task 3 of the notes) forthe new position.2.Move Button1 to a new position (e.g. to point 30, 50). You may use the following code:Button1.Location New Point(30, 50)Time to think For every position, how many random numbers are needed? What is the range of random numbers to be generated so that the button will not go outof screen?Page 20
Project 1 – Cat CatchingCheckpoint 2:Cat can jump at an interval of timeWhen the “New” button is pressed, button with the image cat will move to different positions atan interval of time (e.g. 0.5 second).1.We need to use a VB control Timer (under the category “Components”).2.When the timer is enabled, it will ask computer to automatically run specific tasks at aninterval of time (i.e. run the program code in Timer1 Tick constantly)3.Timer1.Enabled True' Timer1 will start countingTimer1.Enabled False' Timer1 will stop countingTo adjust the interval of time, we can simply adjustthe property Interval of Timer.The unit used at Interval is milliseconds.For example:500 0.5 second1000 1 second5000 5 seconds4.We can insert the program code into Timer Tick by double clicking the Timer.Private Sub Timer1 Tick(ByVal sender As System.Object, ByVal e As System.EventArgs)Handles Timer1.Tick' Insert the program code to move the button to a new positionEnd SubCheckpoint 3:Limit the game by 10 secondsAfter the preset time limit (e.g. 10 seconds), the game will end automatically.1.Add another Timer to count the time left for the game.2.Display the time left (default is 10 seconds).3.Stop moving the “cat” button when there is no time left (i.e. value 0).Reduce the time by 1 for every second.Page 21
Project 1 – Cat CatchingCheckpoint 4:Update no. of hits1.Update the no. of hits whenever users press the button.2.After the game stop, we should not allow users to press the “cat” button anymore.To control it, we can adjust the property Enabled by using the following code:Button1.Enabled True' Button1 CAN be pressedButton1.Enabled False' Button1 CANNOT be pressedCheckpoint 5:Reset the gameWe can reset the game by pressing button “Reset”.1.Update the text label and reset the status of button.2.Make sure 2 Timers have stopped.Self-Reflection What are the pros & cons of the program? How can you improve it?Bonus PartYou may allow users to adjust8)default time limit of the game9)the time interval that the “cat” button will move10) the image of button11) other appropriate partsPage 22
Task 2 – Simple CalculatorProject 2 – Simple CalculatorYou are going to create a simple calculator.You may study various designs on the Internet for yourreference.A sample interface is shown in the right for facilitatingdiscussion.Checkpoint 1:1.Number keysWe should append the number on the display by pressing the number keys.We may use the following code to do so:TextBox1.Text TextBox1.Text * 10 12.However, after we press the keys ofoperators ( , -, *, /), we should resetNOPress Ythe display so as to display the newnumber.3.We may refer to the flow chart in theYESDisplay new no.Append the no.right to know when we should reset thedisplay.Press NTime to think What variables are needed for the simple calculator?Page 23
Task 2 – Simple CalculatorCheckpoint 2:Keys for Operators ( , - , *, /)When we press the keys of operators, we should record the last number and the operator pressed.Time to think What variables are needed for the above steps?Checkpoint 3:Equal and Reset keyWhen user presses the equal key, we have to calculate and display the results.The results should be based on the stored data, including last number stored the operator the latest number shown on textboxWhen user presses reset key, we have to erase all the content and reset the valuables.Bonus PartYou may allow calculator to work on1)Decimal calculation (e.g. 3.5 4.8)2)More than one operation (e.g. 1 2 - 3 4)3)Special functions (e.g. sin, cosine, square)Hints: Use VB functions in Math class.4)Memory function (e.g. M , M-, MR, MC)5)Other appropriate functionsPage 24
Task 1 – Your First Visual Basic Program Page 3 Step 6: Enhance the interface by customizing looks and behavior By using the Properties window, we can change the properties of various controls to customize their appearance. 1. Drag and drop a Panel on the Form. 2. Move the ex