Transcription
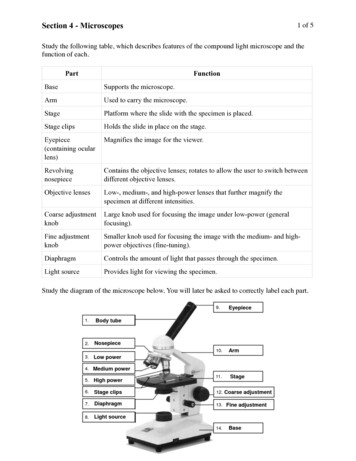
Section 4 - Microscopes1 of 5Study the following table, which describes features of the compound light microscope and thefunction of each.!PartFunctionBaseSupports the microscope.ArmUsed to carry the microscope.StagePlatform where the slide with the specimen is placed.Stage clipsHolds the slide in place on the stage.Eyepiece(containing ocularlens)Magnifies the image for the viewer.RevolvingnosepieceContains the objective lenses; rotates to allow the user to switch betweendifferent objective lenses.Objective lensesLow-, medium-, and high-power lenses that further magnify thespecimen at different intensities.Coarse adjustmentknobLarge knob used for focusing the image under low-power (generalfocusing).Fine adjustmentknobSmaller knob used for focusing the image with the medium- and highpower objectives (fine-tuning).DiaphragmControls the amount of light that passes through the specimen.Light sourceProvides light for viewing the specimen.Study the diagram of the microscope below. You will later be asked to correctly label each part.!!!!!!!!!!!!!!!
Section 4 - Microscopes2 of 5Using the Compound Light Microscope:1. Always carry the microscope by holding the arm of the microscope with one hand andsupporting the base with the other hand.2. Place the microscope on a flat, sturdy surface. The arm should be positioned toward you.3. Look through the eyepiece(s). Adjust the diaphragm so that the light comes through theopening in the stage.4. Place a slide on the stage so that the specimen is in the field of view (what you see in theeyepiece). Hold it firmly in place using the stage clips.5. Always focus first using the coarse adjustment knob and the low-power objective lens. Oncethe object is in rough focus, use the fine adjustment knob to sharpen the image.6. Switch to the medium-power or high-power objective. Use only the fine adjustment knob tofocus the image when using these objective lenses.Storing the Compound Light Microscope:1. Rotate the nosepiece until the low-power objective is in use.2. Move the stage down to the lowest position (farthest from the objective lenses).3. Remove the slide from the stage carefully.4. Turn off the light source.5. Wrap the electrical cord carefully, if present.6. Store the microscope in a protective cover.!Calculating Total Magnification:Magnification describes how much larger an object appears when viewed through a microscopecompared to the unaided eye. The numbers on the eyepiece and objective lenses are marked withthe multiplication symbol (X) and indicate how many times the lens of each microscope partmagnifies an object.!To calculate the total magnification of any object viewed under the microscope, multiply themagnification of the eyepiece (ocular lens) by the magnification of the objective lens in use. Thiscan be shown using the formulaTotal magnification ocular lens x objective lensFor example, if the ocular lens magnifies the image 4X and the low-power objective lensmagnifies the image 10X, the total magnification of the object under low-power is 40X(4 x 10 40X). With the same ocular lens and a high-power objective that magnifies 40X, thetotal magnification would be 160X (4 x 40 160X).Field of View:The area you see when you look into the microscope is called the field of view. As magnificationincreases, the field of view decreases, because we are “zooming in” on a smaller portion of theoverall object. Likewise, as magnification decreases, field of view increases, because as we“zoom out,” we are looking at more of the overall specimen. Thus, magnification and field ofview share what can be described as an inverse relationship.!
Section 4 - Microscopes3 of 5Making a Wet Mount Slide:Many of the slides that are prepared for observation under the microscopes are called wetmounts. Wet mounts are named such because the object to be viewed is prepared, or mounted, inwater. Follow these steps to make a wet mount slide:1. Obtain a clean microscope slide and a coverslip (a thin piece of plastic covering). Add a dropor two of water to the center of the microscope slide.2. Place the specimen in the drop of water.3. Pick up the coverslip by its edges. Do not touch the surface of the coverslip. Stand thecoverslip on its edge next to the drop of water. Allow the drop of water to spread along the edgeof the coverslip. This will help to eliminate air bubbles from forming underneath the coverslip.4. Slowly lower the coverslip over the drop of water and specimen.5. Make sure that the object is totally covered with water. If it is not, remove the coverslip, add alittle more water, and replace the coverslip.6. If excess water seeps out from underneath the coverslip, use a small piece of paper towel togently blot it away.7. The slide is now ready for viewing. When finished viewing, dispose of the specimen properlyand clean the slide and coverslip as instructed by your s, also called dissecting microscopes, are used to observe a larger, thicker,often opaque object. A light source illuminates the object from above and a second light sourceilluminates the object from below. The magnifying power of a stereomicroscope is much lessthan that of a compound light microscope; objects are only magnified 10-50 diameters. Thesemicroscopes are useful in viewing the external structures of a leaf, an insect, or a specimen beingused in dissection, for example.!!!!!!!!!!!
Section 4 - Microscopes4 of 5Comparing Light and Electron Microscopes:Electron microscopes are powerful microscopes that operate by bombarding a specimen with abeam of electrons. There are various types of electron microscopes, which apply electrons to thespecimen in different ways. Study the table below to identify the key differences between lightmicroscopes and electron microscopes.!FeatureLight MicroscopeElectron MicroscopeSizeSmallVery largeCostInexpensive ( 150 )Very expensive ( 20,000 )Training requiredLittle; appropriate for middle- Extensive training required: onlyschool students and olderlaboratory personnel in researchinstitutions will have access.Viewing livespecimensLive specimens can beviewed.Live specimens cannot be viewed.Can see in colorYes, because light is used toilluminate the specimen.No, because electrons are used togenerate an image. Any colors seenare computer-generated for clarity.Total magnification1000X maximumup to around 10,000,000X (somecan view atoms)Clarity/resolutionVague; generally poorresolution.Very clear; very high resolution andclarity.Answer the following questions on a separate sheet of paper. Remember to use the followingformatting:- If typed, use size 12 Times New Roman font and single spacing.- If handwritten, print your responses neatly.- Leave one line of blank space between each response.- Use the following heading in the top left corner of your response sheet:Student NamePre-AP BiologySummer Assignment, Section #Date of completion (not the due date)!!!!!!
Section 4 - Microscopes5 of 5Section 4 Review Questions:1. Calculate the total magnification for the following lenses (you do not have to report youranswers in complete sentences):a. Ocular lens: 10Xb. Ocular lens:4Xc. Ocular lens: 10XObjective lens: 40XObjective lens: 25XObjective lens: 10X!2. Which type of microscope (stereomicroscope, electron microscope, or compound lightmicroscope) would BEST be used in the following situations? Justify your answer.a. A high school student wishes to view his frog dissection a little more closely.b. A scientist is studying the mitochondria within plant cells.c. A person is viewing a thin slice of muscle tissue cells.d. A high school student wishes to view living euglena, protists found found in pond water.!There will be a quiz reviewing this material soon after your return to school. We will practiceusing microscopes in the classroom, and you will learn to prepare wet mount slides. You willbe expected to recall proper procedure for using the microscope. The following will be usefulas you prepare for the quiz:- Study the diagram of the compound light microscope and be able to identify the functions ofeach part.- Be able to calculate total magnification, given a microscope or record of lens power.- Be able to determine which microscopes would best be used in different situations.
1. Obtain a clean microscope slide and a coverslip (a thin piece of plastic covering). Add a drop or two of water to the center of the microscope slide. 2. Place the specimen in the drop of water. 3. Pick up the coverslip by its edges. Do not touch the surface of the coverslip. Stand the coverslip on its edge next to the drop of water. Allow the drop of water to spread along the edge