Transcription
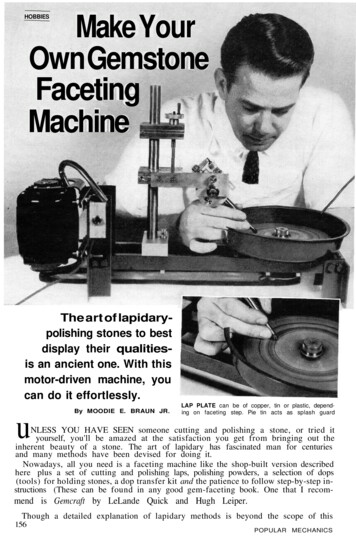
HOBBIESMake YourOwn GemstoneFacetingMachineThe art of lapidarypolishing stones to bestdisplay their qualitiesis an ancient one. With thismotor-driven machine, youcan do it effortlessly.By MOODIE E. BRAUN JR.uLAP PLATE can be of copper, tin or plastic, depending on faceting step. Pie tin acts as splash guardNLESS YOU HAVE SEEN someone cutting and polishing a stone, or tried ityourself, you'll be amazed at the satisfaction you get from bringing out theinherent beauty of a stone. The art of lapidary has fascinated man for centuriesand many methods have been devised for doing it.Nowadays, all you need is a faceting machine like the shop-built version describedhere plus a set of cutting and polishing laps, polishing powders, a selection of dops(tools) for holding stones, a dop transfer kit and the patience to follow step-by-step instructions (These can be found in any good gem-faceting book. One that I recom-mend is Gemcraft by LeLande Quick and Hugh Leiper.Though a detailed explanation of lapidary methods is beyond the scope of this156POPULAR MECHANICS
BOTTOM VIEW of faceting machine shows relationship of work end of rig to the motor. Lap plate itselfis commercially available item and usually has a 1/2-in. mounting hole which is placed over the shaftarticle, a description of some basic steps isnecessary in order to understand the functions of the various machine components.For example, with a round, brilliant cutstone the first stage is preparation of thepreform. This is simply the process ofgrinding the stone to a general shape topermit easier and more accurate finishing.With a round brilliant, the first preformshaping is to grind and polish the top ortable by hand, using the lap plate andholding the stone with your fingers. Thenext step is to grind the outer circumference of the top, to the largest circulardiameter possible. The final step is toshape the stone so that it resembles aturnip.The stone is then mounted on a coneshaped dop using a transfer jig. The transfer jig is a simple, inexpensive accessorywhich enables a stone to be placed accurately on a dop or to be transferredfrom one dop to another. (Use and selection of dops is described in the bookmentioned on the preceding page). Thedop is then mounted in the machine's index head and the facets are ground andpolished according to the shape and typeof stone.During all cutting steps a small butsteady drip of water is required on the lapplate to cool the stone and to wash awaythe cuttings.A faceting machine must be capableof holding a stone at any given presetangle from 0 to 90 in a plane perpendicular to the revolving lap plate. At thesame time, the machine must allow rotation of the stone relative to the lap platesurface in up to 64 accurately spaced divisions. Finally you need a pan surroundingFEBRUARY1971the lap plate to collect and drain awaythe cooling water and cuttings.Begin construction with the machinebed. Make the bed ways as shown andseparate them with two l-in.-square steelspacers. Assemble the frame first byclamping the spacer to the ways. Thesestrips will align the frame and hold itaccurately for drilling the two large 1/4-28bolt holes in each corner. Make the fourbed feet from angle iron and finish thebottom ends accurately by milling, turningor careful filing. The bolt holes in the feetshould be carefully laid out and then spotfaced after drilling. When the bed is completely fabricated, check the parallelalignment of the ways carefully beforeproceeding, and eliminate any rockingtendency the bed may have. The motormounting holes should be drilled afterthe lap-plate bearing assembly is completed and mounted to insure accuratebelt alignment.Next, machine the lap-plate, bearinghousing assembly. The bearing housingitself can be made from hard aluminumor brass, and its machining is straightforward turning and boring. The top bearing is a radial thrust-type (Boston No.704) necessary to support the weight ofthe lap plate while the two lower bearings(Boston No. 3003DS) absorb the belt tension load. All bearings should be a tightpush-fit in the housing. A nut and locknut on the bottom of the lap-plate shaftcan be adjusted to eliminate any bearingplay.The bearing housing is mounted to theframe with the large center mountinghole in the plate, bored 1 1/4 in. using alathe faceplate or four-jaw chuck. The157
5-3/8".1"Upper feedblock, hardaluminum1/2"DrillNo. 251"DrillNo. 169/16"3-1/4"Clamp bolt A7/8"reamINDEX-HEADMOUNTING PLATE9/16"1-1/16"2-1/8"Lowering screwLower feed block,hard aluminum1-9/16"1/4"Clamp bolt BIndex head shaft,drill rod steelIndexheadstopbarScrew 32 x 3/4"Knurled nutLap plate,copper, tinor tingplate64-tooth, 32-pitch3/16"-face BostonS32648-32.164"Index angle stop12"3/4" dia.Boston radial-thrustbearing No. 704,lubricate regularly41/4" dia.Locate 3/16" holein pie tin to receivedrain fitting5/16"dia.Boston bearingNo. 3003 DS(2 reqd.)BearingholderShaft ew.2-3/8"Clampbolt C9" pie tinIndex headaccessopening1-1/2 x 4"Drain fitting,brassThread1/4-2860 Base assemblyPie tin heldin place by4 bearingassembly bolts1"8-32 boltand lockwashers(8 reqd.)3-1/2"5/16"Column base,hard aluminum3/4"1/4"Bearing-housingmounting plateDrillNo. 168"1"1" squaresteelspacers1/2"Base foot.2 reqd.18" steelwaysDrill 4 holes 2-1/2"to suit motorafter lap bearingassembly is mountedDrill to clearpulley setscrew3"1/4-28 x 1/2"(4)1/4" holesFeet, 1-1/2 x 1-1/2" steelangle ironPlay adjustinglock and locknut,1/4-28 x 1/8"
5/32"5/16"5/8"1/2"15/32"INDEX HEADSTOP BAR1/8"5/32"1/2" dia.1/2"3/16"1/4"1/4"Drill No. 36,tap 6-32 (2)Ream3/16"1/2"5/16"INDEX ANGLE STOP(hard aluminum) 1/2" thick6-32 x 1-7/16"bolt1-3/16"Drill No. 25;counterbore 5/16"from rear 1/4" deep3/8"No. 6lock washersTap 6-32Technical Art by Fred Wolff11/16"Index-head shaft1-1/8"Thread1/4-28Index headstop bar5/16"1/2" dia.1/4"1-1/16"dia.7/8"3/4"CLAMP -32 x 9/16"1/4"screws1-1/4"c11/16"B5/32"hole1/2"Boston bearing 1602DS(push fit in holder)Knurled nut 3/8"Tap 1/4-32Thread1/4-289/16"1-3/16" rad.AHard FEEDBLOCK1"4 holes spacedequally aroundperimetertap 8-323-1/8"1-3/8"Base foot2-1/21/2"3-1/2"3/16"7/16"1" 9/16"1"Base foot2"BEARINGHOLDER5/16"LAP-PLATEBEARING ANDSHAFT ASSEMBLY 1/8"1-1/4"2" dia.1/8".500"Shaft5/8"dia.2-1/2"Drill No. 29, 9/16deep, tap 8-32Drill No.and tap1/4-281/4"2"1-3/8"Drill through No. 3 thenopen out 1/4" togap and tap 1/4-28LOWER1-1/2"FEED BLOCK1-1/4"1/2"5/8" rad.1-1/4"1"5/8"1/2"ream1-1/4"ShieldLap plate2-5/8"3-1/2".1/4"7/8"1-3/4"1"3/8"5/8"1/8"Tap 1/4-282-1/2".COLUMN BASE2"BostonradialthrustbearingNo. 704Shaft for lap plate bearingassembly-5/8" mildsteel, silver soldershield to 5/8" shoulderthen turn between center1/4"5/16"Thread 1/4-28both ends3/4" drill rodsteel or tosuit 3" to 4" pulleyhole1-13/16"
Nonadjustableindex lever(option)Cheater leverMount lever tobody with5/8" x 6-32 boltIndex16, wTensioning spring3/16" i.d., 21-ga.spring wire5/16" long Drill No.36tap 6-32 (2)1/4"1/8"No. 6 Drill No.25lockwasherNo. 6nut6-32 x 5/8"1/2"1/2"KnurlDrillNR 161"1-1/2"1/2"1/4"Gear tooth piece5/8"3/16"3-1/4"Index head shaftstainless or drill rod steel1-1/8"5/16"Grind for play-freefit in gear1/4"Tensioningspring 21 ga.7/16"1"1/2"Knurl3/8"1/16"2-1/2"INDEX-HEAD BODY(hard aluminum)1/4"Thread1/4-28 1/4"Drill No.50Force-fit Tap 2-56in "3/32"1/16"13/64;Gear, 64-tooth, 32-pitch,3/16" face, Boston S3264-3/8"GEAR TOOTH PIECE1-1/2"1-1/8"1/4-28 nut1/4"1/8"7/8"1/8"-3/831/4"1/8"1/4"Drill No. 253/4"(2)3/16"9/16"Drill No. 7, 1/2"for spring1/8"CHEATER BODYhard aluminum1/4"1/2"Ream 3/16Drill No. 16Ream 1/16"1/4"2"2-7/8"5/32"3/8"1-1/2"1/8"5/16"NON ADJUSTABLEINDEX LEVER1/8" thick mild steelfour housing bolt holes are drilled usingthe holes previously drilled in the bearing-housing flange as a guide.Make the lap-plate splash pan and cutout an opening to allow unrestricted access by the index head when cutting stonegirdles at 0 angles. Solder a 5/16-in. o.d.brass drain-tube pipe to the pan in a position to clear the bed. The lap-plate shaftis silver-soldered to a brass bearing -LEVER 1/2"BASE1/8"Thread2-56-3/8"9/32"5/32"1/8" thick Drillmild steel No. 165/8"1/8"1/2"DrillNo. 253/8"1/4"CHEATER LEVERafter both are individually machined. Withthe shield soldered to the shaft, true it upby final turning with the assembly heldbetween centers or in a collet to insuretrue running of the lap plate after assembly. Determine belt length after themotor is selected and mounted to allow adistance of 10¼ in. from the edge of thelap plate to the motor end of the frame.Use a 3 to 4-in. pulley on the lap-platePOPULAR MECHANICS
FACETING MACHINE must bestone at any angle from 0 tolar. Text tells which bearingsto get them. Cheater (right) iscapable of holding a90 from perpendicuto use and whereadvised as additionbearing and 1½-in. pulley on the motor.With the frame assembled, the motormounted and the lap plate running satisfactorily, construction can proceed on thevertical column and height adjustingmechanism.The vertical column is made with theends faced in the lathe to an overall lengthof 12 in. and a hole drilled ½ in. from oneend with a ¼-in. center drill to receivea locking setscrew in the column base.The column base has deep insets milledin each side leaving the center 2½ in.wide (to fit smoothly between the bedways). The base is clamped to the bedfrom one edge by a knurled clamp screw.The two fine-feed mechanism blockswhich operate on the vertical column toraise and lower the index head are alsomachined from 1-in. hard aluminum. A¾-in. hole for fitting on the column shouldbe bored or reamed ¾ in., then an expansion cut made with a slitting saw inthe lathe or milling machine, or cut carefully with a thin hacksaw. The ¼-in.hole in the upper block serves as a bearing for the lowering screw and should bereamed. The rest of the work on the feedblocks is straightforward requiring nospecial instructions. The fine-feed adjusting screw is made from 5/16-in. drill rodand must be machined to close diametertolerance in order to minimize any play.Both clamping screws are always lockedwhile actually cutting the stone.The only critical work on the indexhead mounting plate is the distance between the ¼-in. hole, the No. 25 holeimmediately above it and the index markFEBRUARY1971on the top edge. The center of the twoholes must be exactly in line with theindex mark and at a right angle to thehorizontal axis of the mounting plate.The index-head assembly is the heartof the faceting machine and considerablecare should be taken in constructing it.Excessive play in any direction will showup as inaccuracies in the finished stone.Machine the index-head body and faceeach end to an overall length of 2½ in.,then accurately lay out the center on oneend. Make a deep "pop" with a centerpunch, and adjust to run truly in a fourjaw chuck. Start with a center hole, thendrill all the way through 5/16 in.A recess is then bored out 11/16 in. india. by ¼ in. deep to hold (with a tightpush-fit) one of the index-head shaftbearings (Boston No. 160DS). Remove thebody and chuck a scrap piece of ½-in.,or larger, steel rod with about 2 in. protruding. Turn this rod to a diameter whichfits tightly in the 5/16-in. hole in the indexhead body. Twist the end of the body withthe bored recess onto the rod and machinethe second bearing recess. Mark out thepivot shaft hole on one side of the bodyand drill with a No. 3 drill right throughto the 5/16-in. center hole. Before tapping,drill into the No. 3 hole with a 15/64-in.drill to a depth of 3/32 in., then tap 14-28.This will enable the pivot shaft to belocked when tightened up to the ¼-in.shoulder of the threaded end. To finish,lay out, drill, and tap the index lever basemounting holes.The index-head pivot shaft should be(Please turn to page 170)161
GEMSTONE FACETING MACHINE(Continued from page 161)machined with accuracy with both endsreduced to 1/4 in. diameter for 3/8 in. and1 1/8-in. lengths. Tighten the shorter endinto the index head body. The index-headdop shaft also requires careful machiningto insure a play-free fit in the bearings.This shaft should be machined with oneend turned to 1/4-in. dia. for a length of3 1/4 in. and thread the tip 1/4-28 for 5/16- in.170Then drill a 15/64-in. hole 1 1/4-in. deep inthe 1/2-in. dia. end and follow by reaming1/4 in. Use a tail-stock ''V" drill pad anddrill two No. 36 holes in the 1/2-in. dia.part of the shaft 1/8 and % in. respectivelyfrom the end. Drill right through into the1/4-in. reamed hole and tap 6-32. Two 3/8in. 6-32 knurled screws with 45 tips aremachined to engage the groove found indop shafts.The index gear I selected is a BostonNo. S3264, 64-tooth, 32-pitch, 3/16-in.face steel gear with a 3/8-in. hole. Sincethe majority of stones are cut in multiplesof 8 facets, this 64-tooth gear will permitindexing a wide selection of facets.The index lever and base is machinedusing a lathe milling attachment or millingmachine. Any vertical play of the lever isnot important but there should be no sideplay. Also, the gear end of the levershould be carefully ground for a playfree fit in the gear teeth. A simple, nonadjustable index lever could be used butexperience proves that an adjustable lever(called a cheater) is useful. As with mostmechanical devices, things are never absolutely perfect and a cheater enablesminute adjustments to be made. Its construction is fairly simple. The springloaded gear-tooth piece eliminates play,and, as with the simple lever, carefulgrinding is required for a close fit withthe gear teeth to eliminate play and tobring the lever level when it's engaged.In order to eliminate lateral play of theindex head, compensate for pivot shaftwear and to adjust index head loweringtension, the index head which pivots inthe index-head mounting plate is alsosupported by a friction adjusting mechanism. This device consists of a brassbearing holder which serves as an additional 1/4-in. bearing surface for the indexhead-pivot shaft and holder for a frictionadjusting ball bearing. The purpose of theball bearing is to provide a friction-freesurface which will allow the adjusting nutto be tightened to any setting withoutbeing loosened by shaft rotation.The final major component to make isthe angle stop. The rough shape is cut byhacksaw, and after you mark the centerand scribe to interesting lines 90 apart,a 1/2-in. hole is reamed in the center ofthe rough piece. The stop is then mountedon a mandrel and turned to a 2 3/8-in. dia.To finish, mount a switch on one of thelegs, connect the motor in series with theswitch and a power cord, arrange for awater supply, and cut a 2-in. length of 5/32in. drill-rod steel for a clamping screwtightening lever. Finally, paint all nonworking steel surfaces on the bed with twocoats of rust-resistant enamel.***POPULAR MECHANICS
Make Your Own Gemstone Faceting Machine HOBBIES The art of lapidary-polishing stones to best display their qualities-is an ancient one. With this motor-driven machine, you can do it effortlessly. LAP PLATE can be of copper, tin or plastic, depend-By MOODIE E. BRA