Transcription
Introducing Cubismwith A Self PortraitAuthor: Shea BrookGrade Level: 5th GradeTime Span: 5 WeeksFive 45 minute sessionsEssential Question: “What sparks the creative process?”Provoking Questions:1. Can you fill up the entire composition with your self portrait?2. What colors will you use in your self portrait, and what materials will you choose to createthem with?3. What facial feature will you exaggerate?Learning Objectives:1. Students will fill up the entire composition with their head, and neck.2. Students will demonstrate the use of five materials while creating their selfportrait, and will label each on the back of their drawing.3. Students will choose one feature in their self portrait to exaggerate, oncecompleted they will cut up their project and will rearrange the pieces onto acolored piece of cardstock paper.Maine Student Learning Results:A1 Artist’s Purpose A2 Elements of Art and Principles of DesignA3 Media, Tools, Techniques, and ProcessesB1 Media SkillsB2 Compositional SkillsB3 Making MeaningC1 Application of Creative ProcessD1 Aesthetics and CriticismE1 The Arts and History and World CulturesE2 The Arts and Other DisciplinesE3 Goal SettingE5 Interpersonal Skills
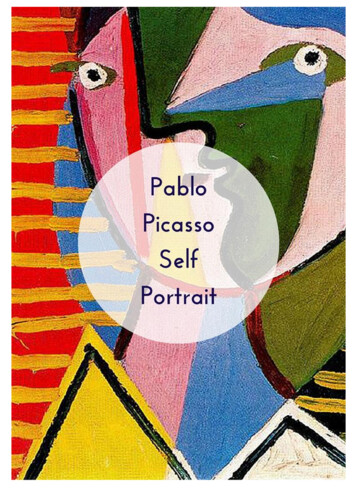
Vocabulary & Visual Provocation:Week 1:Vocabulary: Cubism, abstract, Picasso, size variation, mixed media, geometric forms, distortion, facialfeatures, exaggeration, vibrant colors, composition.Visual Provocation:Cubist Self Portrait:Picasso’s Cubism portrait of a woman:Picasso:Cubism Portrait:Week 2:Vocabulary: Cubism, abstract, Picasso, size variation, mixed media, geometric forms, distortion.Visual Provocation: The teacher’s own work for each step of the demonstration will be a visual aswell as the photos shown in the slide presentation will be printed out and hung as references.
Week 3:Vocabulary: Cubism, abstract, Picasso, size variation, mixed media, geometric forms, distortion,outlining.Visual Provocation: The teacher’s own work for each step of the demonstration will be a visual aswell as the photos shown in the slide presentation will be printed out and hung as references.Week 4:Vocabulary: Cubism, rearranging, manipulation, outlining, exhibition.Visual Provocation: The teacher’s own work for each step of the demonstration will be a visual aswell as the photos shown in the slide presentation will be printed out and hung as references.Week 5:Vocabulary: Critique, feedback, assessment, form, color use, linework, variation, exaggeration.Visual Provocation: Students own completed work will be their visual provocation.Teacher’s Cubist Completed Face Example:
Materials:Week 1: 10”x12”piece of thickwhite paper,pencils, erasers,free standingmirrors.Week 2: Coloredpencils, crayons,tempera paint,watercolor paint,paint brushes,water tubs, oilpastels, markers,chalk pastels,pencils.Week 3: 11“x14”piece of cardstockcolored paper,pencils, black oilpastels, scissors,Elmer’s glue,rulers, coloredpencils, crayons,tempera paint,watercolor paint,paint brushes,water tubs, oilpastels, markers,chalk pastels,pencils.Week 4: 11“x14”piece of cardstockcolored paper,pencils, black oilpastels, scissors,Elmer’s glue,rulers.Week 5: 11“x14”piece of cardstockcolored paper,pencils, black oilpastels, scissors,Elmer’s glue,rulers, assessmentform.Direct Instruction:Week 1: Students will arrive to class and will take their seats to view a slide presentation focused onCubism. The teacher will ask if students know what a self portrait is as well as what they maythink Cubism is as a formal assessment. The teacher will go through each slide talking about color use, geometric form, as well asasking students what they see within each slide. After the presentation the teacher will havethe students gather around a table for a demo of the days project. At each table there will be previously set up stations with free standing mirrors, pencils, anderasers. The teacher will sit in front of their own station for the demo. The first question for thestudents is what shape they may feel the teacher has for a face, then will draw an oval. Theteacher will remind students to look into their mirror for their own face shape since faces varyin size. The teacher will also mention to draw the head to fit the page, nothing small in thecenter but filling the entire composition. The teacher will not be giving step by step instructions for how to properly map out the facialfeatures. This is to see developmentally where students are, and also to demonstrateplacement of the features due to they will have a requirement of exaggerating one facialfeature. The teacher will ask if students know what it means to exaggerate something in artterms, and will demonstrate exaggerating their own nose as an example. Once the teacher has drawn out their face that includes detail of their eyelids, eyelashes, andhair the teacher will ask students to find a station so they may hand out paper to get started.The teacher will hand out paper to tables that are ready and quiet, and will ask students tospend the rest of the class period working on their self portrait. The teacher will remindstudents along the way to look at their mirrors for reference, as well as answering questions asthey arise.Week 2: Students will arrive to class and will take their seats. The teacher will start by asking studentswhat they think multi media means. The teacher will be at the white board with those wordsalready written at the top. The teacher will begin writing down different materials they have in their classroom such as
watercolor, tempera paint, colored pencils etc. The next words to go up are the expectations forthe next step of their self portraits, which is to color their entire self portrait including thebackground using five materials. Each time they use a material they will label that material onthe back of their paper. The teacher will also ask students what they may remember aboutCubist color use, which were vibrant colors that were mostly unnatural to a human face. Theywill have complete color choice freedom within their portrait as well as what five materialsthey utilize. The students will then gather around a table for a demonstration. The teacher will have theirself portrait from the previous class as well as multiple materials that are listed on the board.This is for showing fun vibrant color use as well as reiterating how to use certain materials. Students after the demonstration will return to their seats so the teacher can hand out theirportraits. Once they have retrieved their portraits they will be instructed to work the rest ofclass time on coloring their portraits. The teacher will walk around answering questions as they arise, and will give time warningstowards the end.Week 3: Students will arrive to class and will take a seat. The teacher will pass out their portraits whilereminding them to use five materials to color in their entire portrait, if they need a reminderthe guidelines will be on the whiteboard. Students will have the entire class to work on their projects, and the teacher will walk aroundanswering questions as they arise giving time warnings towards the end.Week 4: Students will arrive to class and will gather around a table for a demonstration. The teacherwill have their portrait ready and filled with five materials that are listed on the back. Theteacher will bring out a printed photo from the first day of class and will remind students howCubists outlined their work in black to help guide the eye and see the features more clearly. The teacher will have in small bins black oil pastels for each table as well as pieces of scrappaper. The teacher will show the students how oil pastels are the only material that will goover the rest of the materials used. The teacher will outline all their facial featuresdemonstrating how hard to press the pastel down as well as introducing the next step. The next step the students will be instructed that they will each get a pencil and a ruler. Theywill turn their portraits over and will use the ruler to draw a line straight down the middle oftheir portrait, then use the rulers to make lines that are slightly slanted like shoots and laddersmaking at least four to five of lines. They may make more if they’d like. The next step will be outlining each piece created on top of a piece of scrap paper outlining thecolored side edges with the black pastels on their table. At this time they will get to choose acolored piece of cardstock paper, write their names on the back, and will get to manipulate andmove around the pieces until they have created a distorted portrait they enjoy. Once they haveplayed around with the pieces they will each get a small Elmer’s glue bottle to paste down thepieces making sure to press down the edges so none curl up. The students will have the entire class to work on this step as well as to finish up their fivematerials. Those who don’t get to pasting or finish outlining their edges will still get a piece ofcolored cardstock paper to write their name on and to place their pieces on top so not to loseany.Week 5: Students will arrive to class and the teacher will have them gather at a table to give thedirections for the day. They will have the first half of class to finish their Cubist portrait, as well
as fill out an assessment. The teacher will go over each question so there’s no surprises, andwill answer any questions the students may have. The second half of class will be for a critique that will involve laying out all the finishedportraits at the tables and talking about each leaving room for comments. The critique will bebased on what was successful for composition, color use, material use etc. The students willalso be asked on what they see within these finished works as well as make final comments.Clean Up:Week 1: Studentswill place theirwork in a pile oneach table withtheir names on theback. The pencilswill be returned toa bin as well as theerasers, theteacher will walkaround gatheringthe mirrors aswell as artwork.Week 2: Studentswill place work ondrying racks, andthen clean out anypaint palettes,water tubs andbrushes if used,put awaymaterials backinto designatedbins, and willclean tables offwith wet sponges.Week 3: Studentswill place work ondrying racks, andthen clean out anypaint palettes,water tubs andbrushes if used,put awaymaterials backinto designatedbins, and willclean tables offwith wet sponges.Week 4: Studentswill place work ondrying racks, andwill put away allmaterials used intheir designatedboxes and bins,and will cleandown the tableswith wet sponges.Week 5: Studentswill place work ondrying racks, andwill put away allmaterials used intheir designatedboxes and bins,and will cleandown the tableswith wet sponges.Modification for Students with Exceptionalities:1. Students may have preferential seating.2. Students may sit or stand while creating their project.3. Students have the choice amongst many materials to create their projects.Technology: Smartboard Technology. Instructional Resources:Cubist Self Portrait:https://s media cache d194d7da2d4.jpgPicasso Cubism portrait of a woman:http://www.escapeintolife.com/wp content/uploads/2010/10/Picasso woman.jpgPicasso’s Cubist piece:http://3.bp.blogspot.com/ 600/maardora portrait de pablo picasso 300 10000 20091209 PF9020 28.jpgCubism ile/view/cubist%20self portrait.jpg/544275600/337x429/cubist%20self portrait.jpg
Teacher’s Art Assessment for Cubist Self PortraitsName:Classroom Teacher:Guidelines:1. Student filled up theentire composition withtheir face and neck.2. Students chose onefacial feature toexaggerate.3. Student used fivematerials to color in theentire page, and labeledeach material on the back.Additional Comments:YESNO
Student Art Assessment: Cubist Self PortraitName:Classroom Teacher:In your Cubist self portrait, which facial feature did you choose to exaggerate and why?In the box below list the five materials you used within your artwork:1.2.3.4.5.What was most difficult about this project and why?Which material was most difficult to work with and why?
Project Introduction:
Students Working:
Student’s Work Before & After:
portrait, and will label each on the back of their drawing. 3. Students will choose one feature in their self portrait to exaggerate, once . will turn their portraits over and will use the ruler to draw a line straight down the middle of their portrait, then use the rulers to make li