Transcription
White Paper Citrix StoreFront 2.0Citrix StoreFront 2.0Proof of Concept Implementation Guidewww.citrix.com
ContentsContents .2Introduction .3Architecture .4Installation and Configuration .5Section 1: StoreFront Initial Deployment . 6Initial Server Configuration . 10Create New StoreFront Deployment . 13Enable the Pass-Through Authentication Service . 26Section 2: Configure Second Receiver StoreFront Server . 27Section 3: Accessing Applications through Receiver . 32Receiver for Web . 36Section 4: NetScaler Load Balancing Configuration . 36Section 5: NetScaler Gateway for Remote Access . 45Conclusion . 47Acknowledgments . 47References . Error! Bookmark not defined.Revision History . 47Page 2
IntroductionCitrix StoreFront provides users an enterprise app store that aggregates resources fromXenDesktop, XenApp, XenMobile App Controller, and VDI-in-a-Box in one place. EachStoreFront user is able to subscribe to their favorite application and desktop resources, thesefavorite resources then automatically follow the user between devices. With Citrix WebInterface reaching end-of-life in 2015, it is important that administrators become familiar withStoreFront to facilitate a successful transition between products.StoreFront’s new modular architecture improves upon the existing design of Web Interface. Itincludes a new user authentication method which directly queries Active Directory ratherthan the existing double-hop Web Interface process where user credentials are sent from theWeb Interface server to the XML broker who then negotiates authentication with theDomain Controller. StoreFront also makes the process of deploying multiple servers easierthrough its configuration synchronization feature.Customers that require a single point of access and self-service for Windows, Web, and SaaSapplications should consider integrating StoreFront with XenMobile AppController.ApController, which is part of XenMobile App Edition, is an additional product that must bepurchased. StoreFront is a no-cost product that is freely available for download for CitrixXenDesktop and XenApp customers. For a complete list of XenMobile AppControllerfeatures, visit the product page.The goal of this document is to guide the reader through the steps required to create asuccessful StoreFront proof of concept environment. Citrix Consulting recommendsimplementing StoreFront in a phased approach beginning with mobile users. This user groupwill receive the greatest benefit since they access resources from multiple devices both insideand outside the corporate network. Selecting the correct user group will ensure that the fullbreadth of StoreFront’s features and self-service capabilities are showcased within this proof ofconcept.Page 3
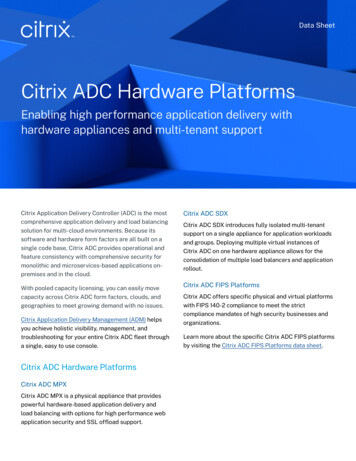
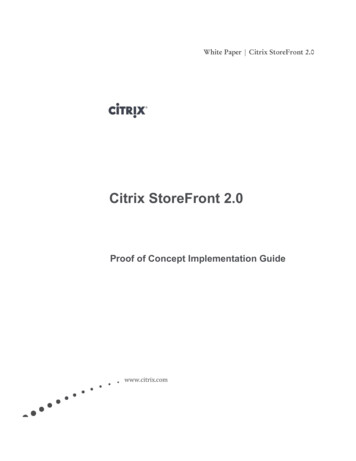
ArchitectureCitrix StoreFront employs a modular architecture, as shown in the following diagram:Figure 1: Citrix Storefront Receiver Architecture Authentication Service. Authenticates users to XenDesktop sites, XenApp farms, andAppController, handling all interactions to ensure that users only need to log on once.Store Services. Retrieves user credentials from the authentication service toauthenticate users to the XenApp and XenDesktop servers providing the applicationand desktop resources. Enumerates the resources currently available from the serversand sends the details to Citrix Receiver.Receiver for Web. Enables users to access applications and desktop resources througha web page providing the same user experience as accessing those resources throughCitrix Receiver.Resource Subscription Database. Stores details of individualized user subscriptionsplus associated shortcut names and locations.Beacon. Citrix Receiver uses beacon points to determine whether users are connectedto internal or public networks and then selects the appropriate access method.Page 4
Hardware and Software RequirementsIn preparation for executing all the steps outlined in this Proof of Concept (PoC)Implementation Guide, the following components will be required: Windows Server 2008 R2 SP1 / Windows Server 2012: Receiver Storefront is onlyavailable for installation on these versions of Windows Server. Citrix Receiver 3.3 (Standard) Windows/ 11.6 Mac: The Citrix Receiver versionsthat supports direct connections to StoreFront and take advantage of automaticaccount provisioning. Receiver 3.1 for Windows and 11.5 for Mac support directconnections to StoreFront but do not support automatic account provisioning.Previous versions of Citrix Receiver, Citrix Online Plugin, and Receiver Enterprisecan be used, but applications and desktops will only be available from the Receiver forWeb site or by a legacy site. NetScaler Access Gateway 10.0.69.4nc : While not required for internal access toresources, Access Gateway is a key feature to enable secure remote access and allow theHTML5 client and Account Services features to function.Installation and ConfigurationThe purpose of this document is to provide step-by-step instructions for the implementationof each component within the Proof of Concept environment. Each step is broken downinto the following individual sections: Section 1:Section 2:Section 3:Section 4:Section 5:StoreFront Initial DeploymentConfigure Second StoreFront ServerAccessing Applications through ReceiverConfigure NetScaler Gateway AuthenticationNetScaler Load Balancing ConfigurationPage 5
Section 1: StoreFront Initial DeploymentCitrix StoreFront can be setup in a single or multi-server deployment. Citrix Consultingrecommends that StoreFront be deployed in a multi-server configuration to ensure highavailability. The following steps detail the installation of StoreFront.1Choose the StoreFront installation file2Click Yes to install the .NET frameworkCheck the accept terms of license boxPage 6
7Internet Information Server (IIS) will be deployed as part of the installationSelect NextPage 7
Select InstallAny pre-requisites missing will be installed automatically by Receiver StoreFront installerPage 8
8The installation has now been completedSelect FinishThe StoreFront Receiver administration console will automatically appearPage 9
Initial Server ConfigurationThe first step in configuring Receiver StoreFront is importing and binding a SSL certificateinside Internet Information Server (IIS). The following section walks through the stepsneeded to complete these tasks.Initial Server ConfigurationScreenshot1Description Before beginning theconfiguration, a SSLcertificate matching thehostname chosen must beimported and bound tothe default IIS Web SiteThis is accomplished in IISManagerSelect the local Serverfrom the left menuSelect Server Certificatesfrom the features menuPage 10
23 Select Import on theActions menu Select the certificate file toimportSelect OK 4 The certificate is nowimportedPage 11
567 Select Default Web SiteSelect Bindings Select Add Select https as the TypeSelect the SSL Certificatefrom the dropdown menuSelect OK Page 12
8 The https binding is nowlistedReturn to the ReceiverStorefront consoleCreate New StoreFront DeploymentThe section walks through the steps to configure the first StoreFront server in a deployment.1When the administration console opens, two options are available. Since this is the firstserver in the deployment, select Create a new deploymentPage 13
2Since a SSL certificate has already been bound, the hostname will automatically be filledin. This is the Hostname of the load balancing vServer on the NetScaler for theStorefront servers. If the hostname is blank, go back to the SSL certification installationstepsSelect Next3Wait for the Store to be created 4Enter in a Store NameIt is recommended choosing a name that helps users identify the apps and desktops. Thisis the name that will appear inside Receiver.Page 14
5This menu allows XenApp, XenDesktop, and Cloud Gateway Enterprise resources tobe added to the Store.To begin adding resources, select Add7First, a XenApp server will be added to the Store.Choose a Display nameChoose XenApp from the Type listPage 15
Change the Transport type and Port accordinglySelect Add8Enter the FQDN of the XenApp server. Select OKPage 16
9The XenApp server is now listed. Select OK10 To add a XenDesktop resource, the same steps are followed.Page 17
Begin by selecting Add11 The XenDesktop type is now selected.Once a server has been added, select OKPage 18
12 Now both XenApp and XenDesktop are listed.Select NextPage 19
13 This step will begin the Remote Access configuration through NetScaler Gateway. Thereare two options available: No VPN tunnel and Full VPN tunnelChoose one and then select Add14 Entera Display Name, Gateway URL, and Callback URLPage 20
The SubNet IP address field can be left blankSelect Next15 Select AddPage 21
16 Enter the STA URL and select OK17 Select Create18 Select CreatePage 22
19 Wait for the Store to be created 20 Click FinishsPage 23
21 Click on AuthenticationObserve that the configuration wizard enabled acecss through NetScaler Gateway andexplicit username/password.Page 24
Page 25
Enable the Pass-Through Authentication ServiceBy default, during the initial configuration of StoreFront, only Explicit and NetScaler AccessGateway pass-through authentications are enabled. To allow users on the domain to passthrough their Windows credentials to Citrix Receiver, the Domain Pass-Through methodmust be enabled. This pass-through option only works with the desktop Receiver, not theReceiver for Web page. For Citrix Receiver to utilize single sign-on, it must be installed withthe following parameter: CitrixReceiver.exe /includeSSON.Initial Server ConfigurationScreenshot1Select Add/Remove Methods2Select Domain pass-through and then click OK.Page 26
3Domain pass-through authentication has now been enabled.Section 2: Configure Second Receiver StoreFront ServerOnce the first server has been configured, a second server should be added to the multi-serverdeployment.1On the first server deployed select Add Server from the Server Group menu.Page 27
2This server will now show an Authorization code that must be entered on the next server joined tothe deployment.3On the second server select Join existing server groupPage 28
4Page 29
56Page 30
7Page 31
Section 3: Accessing Applications through ReceiverTo simplify the Receiver provisioning process, StoreFront has introduced an auto-discoveryservice called Account Services. Available beginning with Receiver 3.3 Standard for Windows(Mac 11.6, iOS 5.6, Android 3.1), this feature allows Receiver to automatically provision auser for internal and remote access. This service eliminates the need for users to downloadProvisioning files and manually import them into Receiver.To allow users outside the corporate network to provision Receiver, NetScaler 10 build69.4.nc and higher now includes a new entry in the session policy profile where theStoreFront Account Services URL is specified. The following steps walk through the processof a user provisioning their account inside Receiver through NetScaler Gateway.1Configure the Account Services Address on the NetScaler Gateway Session ProfilePage 32
234Click YesPage 33
56Click FinishReceiver will now display the subscribed resources. Applications and desktops are nowPage 34
ready to be launchedClick the Settings icon7Stores can be added and removed from this menuPage 35
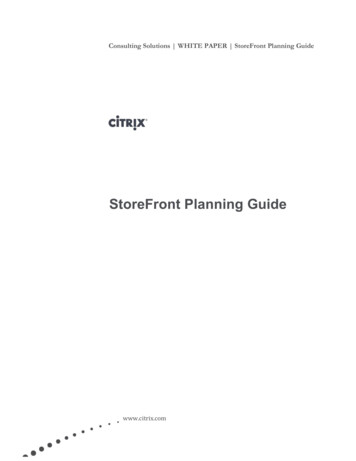
Receiver for WebIn addition to accessing StoreFront Stores within Citrix Receiver Standard, users can alsoaccess applications and desktops through a web page. The Receiver for Web site allows usersto easily connect to their resources on devices that might not have Citrix Receiver installed. Itsupports launching applications with the full Receiver, Receiver Web Plug-in, or HTML5client. This gives users the flexibility to access resources on devices on which that they do nothave permission to install the full Receiver. Receiver for Web also separates applications anddesktops and into tabs, with all desktops available to the user automatically appearing on thedesktop page. It also provides user driven desktop restarts functionality for XenDesktopresources.Figure2: Apps ViewFigure 3: Desktops ViewSection 4: NetScaler Load Balancing ConfigurationThis section will give an overview of the steps necessary to configure a NetScaler to loadbalance StoreFront. NetScaler 10.1 includes a new health monitor designed to intelligentlymonitor StoreFront. This allows NetScaler to provide a high level of reliability to thedeployment.1From the Load Balancing menu, select ServersSelect AddPage 36
2Choose a name and enter in the IP Address for both StoreFront serversSelect Create after each server is enteredPage 37
3Both StoreFront servers are now listed4From the Load Banacing menu, choose MonitorsSelect AddPage 38
5Choose a name for the Monitor and select StoreFront as the TypeLeave the Standard Parameters settings default and choose the Special Parameters tabEnter in the Hostname used for the StoreFront group along with the Store NameCheck StoreFront Account ServicesClick Create6Choose Service Groups from the Load Balancing menuCreating a Service Group allows a single health monitor to be attached to both serversSelect AddPage 39
7Enter in a Service Group Name. Choose SSL for the ProtocolSelect the two StoreFront servers and enter 443 as the Port and then click Add8Select the Monitors tab and choose the previously creted StoreFront monitor and clickAdd.It will then appear as a configured monitorPage 40
9Choose the Advanaced tabClick Override Global, uncheck Use Source IPClick Client IP Header and enter in X-Forwarded-For10Choose the SSL Settings tabSelect the SSL certicate for the StoreFront servers and click AddPage 41
Click Create11Select Virtual Servers from the Load Balancing menu.Select Add12Enter a Name and IP Address for the Virtual ServerChoose SSL for the ProtocolPage 42
13Choose the Service Groups tabChoose the previously created StoreFront Service Group14Choose the Method and Persistence tabSelect SOURCEIP as the PersistencePage 43
15Choose the SSL Settings tabSelect the SSL certificiate and click AddClick CreatePage 44
Section 5: NetScaler Gateway for Remote AccessTo provide remote access for users located outside the corporate network, it is recommendedthat StoreFront be deployed in conjunction with NetScaler Gateway, formally known asAccess Gateway. NetScaler Gateway acts as a reverse proxy, tunneling all Citrix HDX trafficover SSL. Remote users have the option of accessing their resources from either the locallyinstalled Citrix Receiver or via the Receiver for Web site. For an optimal deployment thatallows users to easily connect from inside and outside the organization, it is recommendedthat the Account Services feature be implemented. This feature will allow users to seamlesslyconfigure their locally installed Receiver for external access through NetScaler Gateway. Thisfeature essentially automates the process of downloading and importing a Provisioning file.A Provisioning file is a XML file that includes the necessary information to allow Receiver todecide whether it should connect directly to StoreFront or through NetScaler Gateway. Thisdecision is made by using the beacon addressees included in the file. If Receiver is able toresolve the internal Beacon address, it will connect directly to StoreFront. By default, theinternal Beacon address is set to the load balancing hostname for the StoreFront servers,although this can be changed in the Beacons menu inside StoreFront. For more informationon configuring the Receiver Provisioning file, please reference Citrix eDocs.Session PoliciesTo direct remote users to the optimal location, multiple session policies should be created onNetScaler Gateway. Using HTTP headers, the NetScaler is able to detect if the connection isbeing made from a web browser or directly from inside Receiver. Below is an example of thesession policies required for Native Receiver and Receive for Web access.Priority Policy Name ExpressionProfile10NativeReceiverREQ.HTTP.HEADER User-AgentCONTAINS CitrixReceiver &&REQ.HTTP.HEADER X-Citrix-GatewayEXISTSNative Receiver20Receiver forWebns trueReceiver for WebPage 45
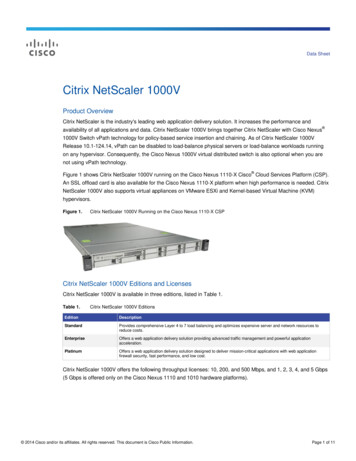
Profile NameSettingsNative ReceiverICA Proxy: On Clientless Access: On Account Services URL:StoreFront Server FQDN WebInterface URL: StoreFront ServerFQDN SSO DomainReceiver for WebICA Proxy: On WebInterface URL: StoreFront Receiver for Web page SSO DomainTo function correctly, Citrix Receiver requires that the StoreFront Services traffic not berewritten, as would normally be the case when NetScaler Gateway is operating in ClientlessAccess (CVPN) mode. To disable rewriting, it is necessary to define a custom rewrite policyfor Clientless mode. Under the Clientless Session Policies tab, a new policy should be createdand binded. The URL Rewite policy should be set to ns cvpn default inet url label and theexpression set to true.Figure 4. Clientless Access PolicyFigure 5. Clientless Access ProfileHTML5 Receiver ClientPage 46
StoreFront 2.0 is packaged with a native HTML5 Citrix Receiver client that can be used as afallback client if the native Receiver is not installed. Receiver for HTML5 allows connectionsto through a browser without having to install any software on the endpoint. The Java client,which was previously used as the fallback option with Web Interface is no longer supportedwith StoreFront. The HTML5 client can be enabled during the initial StoreFrontconfiguration or afterwards on the Receiver for Web section of the administration console.Administrators have the option of configuring the HTML Receiver the primary client for allusers or configuring it as a fallback if the native Receiver is not installed. The only exceptionto the configured options is ChromeOS which always will use the HTML5 client. Beforedeploying the HTML5 client, please verify your environment against Citrix eDocs for a listthe prerequisites that must be in place.ConclusionCitrix Consulting currently recommends StoreFront be implemented in a phased approachbeginning with pilot environment for mobile users. This user group will see the greatestbenefit from having a seamless experience between devices regardless of their location. Thepilot environment should deliver resources from the production XenDesktop & XenAppdeployments. Additionally, StoreFront should be deployed in parallel to the existing WebInterface environment on a separate Windows server instance. This will ensure a smoothtransition while not disturbing any user groups that are utilizing Web Interface.AcknowledgmentsCitrix Consulting Solutions would like to thank all of the individuals that offered guidanceand technical assistance during the course of this project – Roger LaMarca, Carisa Stringer,Andy Baker, Peter Schulz, and Adolfo Montoya. Additionally, thanks go to Peter Smeryagewho helped with the build out of the environment.Revision HistoryRevisionChange DescriptionUpdated ByDatePage 47
1.01.21.31.41.5Initial DocumentDocument UpdateDocument UpdateDocument UpdateDocument UpdateCitrix Consulting SolutionsCitrix Consulting SolutionsCitrix Consulting SolutionsCitrix Consulting SolutionsCitrix Consulting SolutionsMarch 27, 2012April 12, 2012July 31, 2012June 28 , 2013August 15, 2013About CitrixCitrix Systems, Inc. (NASDAQ:CTXS) is the leading provider of virtualization, networkingand software as a service technologies for more than 230,000 organizations worldwide. ItsCitrix Delivery Center, Citrix Cloud Center (C3) and Citrix Online Services product familiesradically simplify computing for millions of users, delivering applications as an on-demandservice to any user, in any location on any device. Citrix customers include the world’s largestInternet companies, 99 percent of Fortune Global 500 enterprises, and hundreds of thousandsof small businesses and prosumers worldwide. Citrix partners with over 10,000 companiesworldwide in more than 100 countries. Founded in 1989, annual revenue in 2009 was 1.61billion. 2013 Citrix Systems, Inc. All rights reserved. Citrix , Access Gateway , Branch Repeater ,Citrix Repeater , Citrix Receiver , HDX , XenServer , XenApp , XenDesktop ,XenClient and Citrix Delivery Center are trademarks of Citrix Systems, Inc. and/or oneor more of its subsidiaries, and may be registered in the United States Patent and TrademarkOffice and in other countries. All other trademarks and registered trademarks are property oftheir respective owners.Page 48
Apr 12, 2012 · XenDesktop, XenApp, XenMobile App Controller, and VDI-in-a-Box in one place. Each StoreFront user is able to subscribe to their favorite application and desktop resources, these favorite resources then automatically follow the user between devices. With Citrix Web Interface reaching end