Transcription
ONE-ON-ONE COMPUTER HELPCOMPUTER CLASSESTECH TUTORONE-ON-ONE COMPUTER HELPCOMPUTER CLASSESTECHTUTORMicrosoftONE-ON-ONE COMPUTER HELPCOMPUTER CLASSESPublisher 2016TECHTUTORONE-ON-ONEkcls.org/techtutorMicrosoft Publisher 2016 ManualRev 11/2017instruction@kcls.orgCOMPUTER HELP
Microsoft Publisher e'a'Publication'from'a'Template'.'9!One on One%Help,%Classes,%and%Online%Courses'.'9!What is Microsoft Publisher?Microsoft Publisher is a desktop publishing program. It is used to design, layout, and create text andpicture-rich publications such as:!! Greeting Cards – invitations, Holiday cards or posters!! Calendars – for family, school, work or hobby!! Books – photo albums, yearbooks, addresses or a brochurePublisher offers excellent control over certain aspects of your publication. Publisher makes it easy towork with documents in a variety of sizes and shapes. It also has a large number of tools to help youarrange and align text, images, and other objects within page margins.
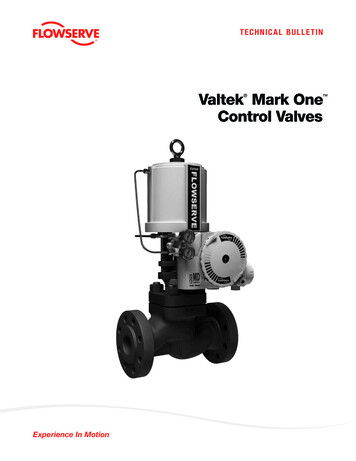
Publisher 2016 Welcome PageOpen Publisher 2016 from the computer desktop. On the Welcome page, notethe various popular templates available. Click a template you’d like to use to see afull description. You would click “Create” to open a document in this particular style.For this class, create a Blank 8.5 x 11” document.Publisher 2016 desktop iconPublisher 2016 Welcome PagePublisher 2016 InterfaceThe way the tools and menus are organized in Publisher 2016 is known as the user interface.You will learn about The Ribbon, Quick Access Toolbar, File Menu and other key parts of Publisher.The RibbonThe Ribbon runs along the top, has all the Publisher tools, and is organized into three parts:!! Tabs – represent a general activity area!! Groups – show related tools (commands) together!! Commands – a button, expandable menu, or a box for entering related informationClick the various Tabs: observe how the Groups and Commands change based on the selected Tab.2% %M i c r o s o f t ' P u b l i s h e r ' 2 0 1 6 '
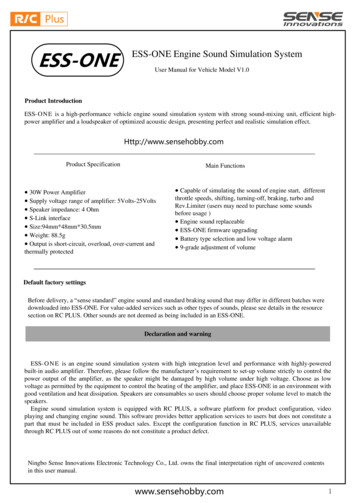
Quick Access ToolbarThe Quick Access Toolbar is above the Tabs and has commands used most often, including “Save”.Place the mouse arrow over each icon (do not click) to see the name and use for each icon.You may customize the commands in the toolbar if you click the black arrow at the end of the toolbar.The Undo command “takes back” any changes made to the document. For example, type “Undo” inthe blank document you have open, then click Undo in the Quick Access Toolbar. Undo keeps track ofactions by sequence; if you accidentally erase (change) data in your file, click Undo right away to get itback. On that note, it is important to “save early and save often.” (See “Saving Your Work” on page 5.)File MenuThe File Menu contains actions at the file level. Click the green “File” tab to the far left of the tabs.What you’ll see is the “backstage” area. From here, you can create a New document, Open an existingone, Save changes to the current document, Save As a different file with a different name, Print thecurrent document, and other options. Click the “back arrow” at the top to exit the backstage area.Title Bar, Help Menu, Window Display OptionsThe Title Bar shows the name of the program and the name (title) of your document. (Top-mostbar in program window.) A new document has a temporary title, Publication1, until you “Save As” witha different name. To the far right on the Title Bar is the Help Menu and Ribbon Display options.The Help Menu has articles on using the software. Not sure how to perform a certain action or whereto find a command? Click the question mark icon to browse Help articles, or search for specific topics.Window Display Options include Minimize (docks window in status bar), Restore (makes windowsmaller for manual re-sizing or full screen), and Close (closes window and program) buttons.Take a moment to locate and explore these features in the Publisher program window.(See picture at top of page 4.)3% %M i c r o s o f t ' P u b l i s h e r ' 2 0 1 6 '
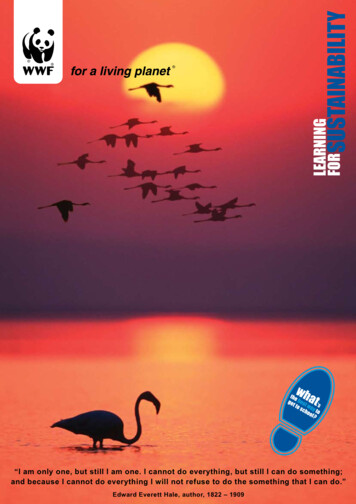
Publisher Organization ToolsPublisher offers many tools to help organize and arrangecontent in your publication. Here are a few.Baselines are evenly spaced horizontal lines that can be usedto line up text. To show Baselines:1.! Click the View Tab2.! Look in the “Show” group3.! Check box next to “Baselines”Baselines will not print. To hide Baselines, uncheck BaselinesView Tab and Baselines shown in documentbox.Boundaries are dark blue dashed borders that appear around objects. Viewing object boundaries canbe useful to align objects or view text.Rulers are on the left and top of the publication to help line up text, images, and other objects. Whenan object is selected, a white space will appear on the rulers to show the object’s location.Guides are thin lines that help to align objects. There are two types of guides:!! Margin guides are blue lines that mark the edges, or margins, of a printable area; they areautomatically created when page margins are set.!! Customizable guides are green lines that can be added anywhere in a publication. To add them:1.! Left-click and hold the horizontal or vertical ruler2.! Drag the mouse to the publication3.! Release to add the guide to a locationThe guide will be placed, and it can be moved at any time by clicking and dragging it.Page Navigation is a pane to the left that displays an image of each page in the publication.4% %M i c r o s o f t ' P u b l i s h e r ' 2 0 1 6 '
Scratch Area is the grey area outside the white page area. It shows objects or portions of objectslocated outside page boundaries; anything in the scratch area will not print. You can think of it as aholding space while you decide what to place and how to place it in your publication.Save Your WorkTo make sure you don’t lose your work on a document, you should “save early and save often.” Let’sstart by saving the document you have open in Publisher 2016:1.! Click the green File Button near the Tabs. Learn more about “File Menu” on page 4.2.! Click Save As. This option is for saving, or naming, a file for the first time. You may create differentversions of a file by “saving as” a new name. Learn more in “Quick Access Toolbar” on page 3.3.! Click “Computer”. See TIP below and “Saving With OneDrive” (page 11) for “cloud” storage info.4.! Click “My Documents” folder. On KCLS computers, files saved to “My Documents” folder areerased at the end of your session. Consider a USB drive, or OneDrive for long-term storage.5.! Name file “My Practice Document”. Generally, choose a name that is easy to remember.6.! Click Save.(See picture at top of page 6.)5% %M i c r o s o f t ' P u b l i s h e r ' 2 0 1 6 '
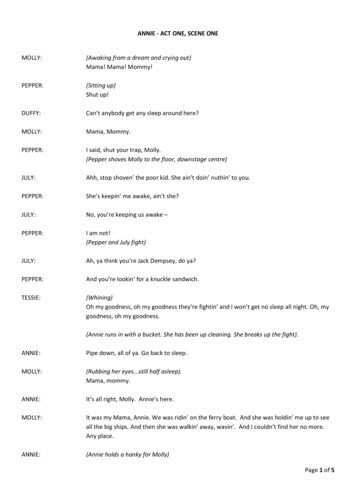
! TIP: Have a Microsoft account with Outlook.com, Hotmail.com or Live.com? Microsoft Office 2016Programs offer “cloud” file storage through OneDrive. Click OneDrive instead of “Computer” tolog in, save the file and access anyplace through the Internet. Learn more at bit.ly/office2016cloud.Working With a u'start.'Page LayoutCreating a publication from a template takes care of many choices for you, but if you use a blanktemplate or decide to modify a built-In template, consider important components of page layout:Size: Publications like flyers can be large or small. Astandard sheet of paper is 8.5 inches wide by 11 inches tall.Larger sheets of paper can be expensive and difficult toprint, so consider your paper size. Select paper size onTemplates Screen (see page 2 of this manual), when youclick “New” in the File Menu, or under Page Design Tab.Orientation: Do you want the publication to havelandscape orientation (wider than tall) or portraitorientation (taller than wide)?'Page Setup options under Page Design TabMargins: Margins are areas of blank space that line the edges of a printed document, so the width ofpage margins can affect the look and feel of the publication. Wide margins can look sophisticated butdo not leave much space for images and text. Narrow margins can provide much more space withwhich to work. You may also need to consider the following:6% %M i c r o s o f t ' P u b l i s h e r ' 2 0 1 6 '
!! Paper type – If you need assistance for what type of paper you should use, employees at your localoffice supply store may be able to help.!! Paper Color – Usually white or cream-colored paper is the best choice, but if you are printing ingrayscale or black and white, colored paper is attention-grabbing and visually appealing.!! Delivery – Consider what type of packaging you will use and how you will add an address.!! Post printing needs - Will your publication need cutting, folding, stapling, or assembling?!! Printing options and settings – Before you print your publication, review Publisher printingoptions and settings by clicking the File menu.!!Add pictures to SlidesYou can easily insert pictures into your publication from the web and other places.Here’s how to insert pictures from the web:'1.! Click Insert Tab.2.! Click “Online Pictures” in Illustrations Group.3.! Search for “New York City” in the Office.com Clip Artbox.4.! Select a picture you like.5.! Click Insert.How to move a picture:1.! Place mouse pointer over picture.2.! Look for cross-like move arrow tool.3.! Click and drag your shape to a new spot.How to re-size a picture:1.! Click into the picture.2.! Look for squares around the frame.3.! Click and drag a frame square.a.! Drag a corner out to enlarge proportionally.b.! Drag a corner in to shrink proportionally.Add a couple more pictures, and try re-sizing them.Editing An Existing PublicationTo practice using some of the tools in Publisher, you will edit an existing 'the'list')Click'“OK”'to'open%7% %M i c r o s o f t ' P u b l i s h e r ' 2 0 1 6 '
You downloaded exercise, Spring 2009 MS Book Talks.pub, is a brochure. You can practice modifyingand saving this document. Notice the Customizable guides (see page 5) between the three sections.The guides indicate where the publication will be folded after it has been printed.! TIP: Click the Save button on the Quick Access Toolbar intermittently, as you complete each of thelisted tasks, to ensure you do not lose your work.Modify Some Text1.! Right click on the default page and in the Zoom In/Zoom Out menu, change the Zoom settingfrom 100% to 150%.2.! Edit the contact information by clicking inside the textplaceholder in the third section that contains the name “TerryMcQuown”. Modify the name to “Local Librarian”.Format Publication1.! Click on the top-left corner of the second section to select that entire section. Then click the ShapeFill command in the Format tab on the Drawing Tools ribbon. Hover over some Scheme and/orStandard Colors to view some tooltips showing names of Shape Fill colors and watch the fill colorchanges in the selected section. Select a color. How about Standard Color Green (col 6)? Fill color ismodified in second section.2.! Highlight the text inside the text placeholder which starts with ‘There are going to be ’ Click theText Fill command in the Format tab of the Text Box Tools ribbon. Hover over some Schemeand/or Standard Colors to see some tooltips showing names of Text Fill colors and watch the textfill color changes in the selected text. Select a color. How about Scheme Color Accent 2 Gold (row 1,col 3)? Text
The Quick Access Toolbar is above the Tabs and has commands used most often, including “Save”. Place the mouse arrow over each icon (do not click) to see the name and use for each icon . You may customize the commands in the toolbar if you click the black arrow at the end of the toolbar.