Transcription
Learning Puppet(Generated on July 01, 2013, from git revision 46784ac1656bd7b57fcfb51d0865ec7ff65533d9)
Learning Puppet — IndexWelcomeThis is Learning Puppet, a series of lessons about managing system configuration with PuppetEnterprise. Installation instructions and a complete reference to the Puppet language are availableelsewhere on the site; this series is meant to be a guided tour to building things with Puppet.If youʼve heard good things about Puppet but donʼt know where to start, this is the best place tobegin.Get the Free VMPuppet can configure or misconfigure nearly any aspect of a system, so when learning how to useit, itʼs best to have some test systems around.To help with this, we provide a free virtual machine with Puppet already installed. Experimentfearlessly!Get the Learning Puppet VMWhile it downloads, move on to the first chapter of Learning Puppet. If you have problems withgetting the VM running, see “VM Tips” below.The Learning Puppet VM is available in VMWare .vmx format and the cross-platform OVF format,and has been tested with VMWare Fusion and VirtualBox.Login InfoLog in as root, with the password puppet.The VM is configured to write its current IP address to the login screen about ten secondsafter it boots. If you prefer to use SSH, wait for the IP address to print and ssh to root@ ipaddress .To view the Puppet Enterprise web console, navigate to https://(your VMʼs IP address) inyour web browser. Log in as puppet@example.com, with the password learningpuppet.Note: If you want to create new user accounts in the console, the confirmation emails willcontain incorrect links. You can work around this by copy-pasting the links into a webbrowser and fixing the hostname before hitting enter, or you can make sure the consoleis available at a reliable hostname and follow the instructions for changing theauthentication hostname.Learning Puppet Learning Puppet — Index2/76
If youʼd rather cook up your own VM than download one from the web, you can imitate it fairlyeasily: this is a stripped-down CentOS system with a hostname of “learn.localdomain,” PuppetEnterprise installed, and iptables disabled. (It also has Puppet language modes installed for Vimand Emacs, but thatʼs not strictly necessary.)To begin with, you wonʼt need separate agent and master VMs; this VM can act in both roles. Whenyou reach the agent/master exercises, weʼll walk through duplicating the system into a new agentnode.ContentsPart one: Serverless PuppetResources and the RAL — Learn about the fundamental building blocks of systemconfiguration.Manifests — Start controlling your system by writing actual Puppet code.Ordering — Learn about dependencies and refresh events, manage the relationships betweenresources, and discover the fundamental Puppet design pattern.Variables, Conditionals, and Facts — Make your manifests versatile by reading systeminformation.Modules and Classes (Part One) — Start building your manifests into self-contained modules.Templates — Use ERB to make your config files as flexible as your Puppet manifests.Parameterized Classes (Modules, Part Two) — Learn how to pass parameters to classes andmake your modules more adaptable.Defined Types — Model repeatable chunks of configuration by grouping basic resources intosuper-resources.Part two: Master/Agent PuppetPreparing an Agent VM — Prepare your tools for the next few chapters with our step-by-stepwalkthrough.Basic Agent/Master Puppet — Tour the agent/master workflow: sign an agent nodeʼscertificate, pick which classes a node will get, and pull and apply a catalog.VM TipsImporting the VM into VirtualBoxThere are several quirks and extra considerations to manage when importing this VM intoVirtualBox:If you are using VirtualBox with the OVF version of the VM, choose “Import Appliance”from the File menu and browse to the .ovf file included with your download; alternately,you can drag the OVF file and drop it onto VirtualBoxʼs main window.Learning Puppet Learning Puppet — Index3/76
Do not use the “New Virtual Machine Wizard” and select the included .vmdk file as thedisk; machines created this way will kernel panic during boot.If you find the system hanging during boot at a “registered protocol family 2” message,you may need to go to the VMʼs “System” settings and check the “Enable IO APIC” option.(Many users are able to leave the IO APIC option disabled; we do not currently know whatcauses this problem.)The VM should work without modification on 4.x versions of VirtualBox. However, on 3.xversions, it may fail to import, with an error like “Failed to import appliance. Error readingʻfilename.ovfʼ: unknown resource type 1 in hardware item, line 95.” If you see this error,you can either upgrade your copy of VirtualBox, or work around it by editing the .ovf fileand recalculating the sha1 hash, as described here. Thanks to Mattias for thisworkaround.Importing the VM into Parallels DesktopParallels Desktop 7 on OS X can import the VMX version of this VM, but it requires extraconfiguration before it can run:1. First, convert the VM. Do not start the VM yet.2. Navigate to the Virtual Machine menu, then choose Configure - Hardware - Hard Disk1 and change its location from SATA to IDE (e.g. IDE 0:1).3. You can now start the VM.If you attempt to start the VM without changing the location of the disk, it will probablykernel panic.Configuring Virtual NetworkingWITH VMWAREIf you are using a VMware virtualization product, you can leave the VMʼs networking in itsdefault NAT mode. This will let it contact your host computer, any other VMs being run inNAT mode, the local network, and the outside internet; the only restriction is that computersoutside your host computer canʼt initiate connections with it. If you eventually need othercomputers to be able to contact your VM, you can change its networking mode to Bridged.WITH VIRTUALBOXVirtualBoxʼs NAT mode is severely limited, and will not work with the later agent/masterlessons. You should change the VMʼs network mode to Bridged Adapter before starting theVM for the first time.Learning Puppet Learning Puppet — Index4/76
If for some reason you cannot expose the VM as a peer on your local network, or you are noton a network with working DHCP, you must configure the VM to have two network adapters:one in NAT mode (for accessing the local network and the internet) and one in Host OnlyAdapter mode (for accessing the host computer and other VMs). You will also have to eitherLearning Puppet Learning Puppet — Index5/76
assign an IP address to the host-only adapter manually, or configure VirtualBoxʼs DHCPserver.See here for more information about VirtualBoxʼs networking modes, and see here for moreabout VirtualBoxʼs DHCP server.To manually assign an IP address to a host-only adapter:Find the host computerʼs IP address by looking in VirtualBoxʼs preferences — go to the“Network” section, double-click on the host-only network youʼre using, go to the“Adapter” tab, and note the IP address in the “IPv4 Address” field.Once your VM is running, log in on its console and run ifconfig eth1 NEW IPADDRESS , where NEW IP ADDRESS is an unclaimed IP address on the host-onlynetworkʼs subnet.Learning Puppet — Resources and the RALWelcome to Learning Puppet! This series covers the basics of writing Puppet code and using PuppetEnterprise. You should already have a copy of the Learning Puppet VM; if you donʼt, you candownload it for free.BeginLog into the Learning Puppet VM as root, and run the following command:# puppet resource serviceservice { 'NetworkManager':ensure 'stopped',enable 'false',}service { 'acpid':ensure 'running',enable 'true',}service { 'anacron':ensure 'stopped',enable 'true',}service { 'apmd':ensure 'running',enable 'true',}. (etc.)Learning Puppet Learning Puppet — Resources and the RAL6/76
Okay! Youʼve just met your first Puppet resources.What Just Happened?puppet: Most of Puppetʼs functionality comes from a single puppet command, which hasmany subcommands.resource: The resource subcommand can inspect and modify resources interactively.service: The first argument to the puppet resource command must be a resource type,which youʼll learn more about below. A full list of types can be found at the Puppet typereference.Taken together, this command inspected every service on the system, whether running orstopped.ResourcesImagine a systemʼs configuration as a collection of many independent atomic units; call them“resources.”These pieces vary in size, complexity, and lifespan. Any of the following (and more) can be modeledas a single resource:A user accountA specific fileA directory of filesA software packageA running serviceA scheduled cron jobAn invocation of a shell command, when certain conditions are metAny single resource is very similar to a group of related resources:Every file has a path and an ownerEvery user has a name, a UID, and a groupThe implementation might differ — for example, youʼd need a different command to start or stop aservice on Windows than you would on Linux, and even across Linux distributions thereʼs somevariety. But conceptually, youʼre still starting or stopping a service, regardless of what you type intothe console.AbstractionIf you think about resources in this way, there are two notable insights you can derive:Learning Puppet Learning Puppet — Resources and the RAL7/76
Similar resources can be grouped into types. Services will tend to look like services, and userswill tend to look like users.The description of a resource type can be separated from its implementation. You can talk aboutwhether a service is started without needing to know how to start it.To these, Puppet adds a third insight:With a good enough description of a resource type, itʼs possible to declare a desired state for aresource — instead of saying “run this command that starts a service,” say “ensure this service isrunning.”These three insights form Puppetʼs resource abstraction layer (RAL). The RAL consists of types(high-level models) and providers (platform-specific implementations) — by splitting the two, it letsyou describe desired resource states in a way that isnʼt tied to a specific OS.Anatomy of a ResourceIn Puppet, every resource is an instance of a resource type and is identified by a title; it has anumber of attributes (which are defined by the type), and each attribute has a value.Puppet uses its own language to describe and manage resources:user { 'dave':ensure uid gid shell home managehome e,This syntax is called a resource declaration. You saw it earlier when you ran puppet resourceservice, and itʼs the heart of the Puppet language. It describes a desired state for a resource,without mentioning any steps that must be taken to reach that state.Try and identify all four parts of the resource declaration above:TypeTitleAttributesValuesResource TypesLearning Puppet Learning Puppet — Resources and the RAL8/76
As mentioned above, every resource has a type.Puppet has many built-in resource types, and you can install even more as plugins. Each type canbehave a bit differently, and has a different set of attributes available.There are several ways to get information about resource types:The Cheat SheetNot all resource types are equally common or useful, so weʼve made a printable cheat sheet thatexplains the eight most useful types. Download the core types cheat sheet here.The Type ReferenceExperienced Puppet users spend most of their time in the type reference.This page list all of Puppetʼs built-in resource types, in extreme detail. It can be a bit overwhelmingfor a new user, but it has most of the info youʼll need in a normal day of writing Puppet code.We generate a new type reference for every new version of Puppet, to help ensure that thedescriptions stay accurate.Puppet DescribeThe puppet describe subcommand can list info about the currently installed resource types on agiven machine. This is different from the type reference because it also catches plugins installed bya user, in addition to the built-in types.puppet describe -l — List all of the resource types available on the system.puppet describe -s TYPE — Print short information about a type, without describing everyattributepuppet describe TYPE — Print long information, similar to what appears in the typereference.Browsing and Inspecting ResourcesIn the next few chapters, weʼll talk about using the Puppet language to manage resources. For now,though, letʼs just look at them for a while.Live Management in the ConsolePuppet Enterprise includes a web console for controlling many of its features. One of the things itcan do is browse and inspect resources on any PE systems the console can reach. This supports alimited number of resource types, but has some useful comparison features for correlating dataacross a large number of nodes.LOGGING INLearning Puppet Learning Puppet — Resources and the RAL9/76
When you first started your VM, it gave you the URL, username, and password for accessingthe console. The user and password should always be puppet@example.com andlearningpuppet. The URL will be https:// IP ADDRESS ; you can get your VMʼs IP addressby running facter ipaddress at the command line.Once logged in, navigate to “Live Management” in the top menu bar, then click the “ManageResources” tab. You can then follow these instructions to find and inspect resources.Since youʼre only using a single node, you wonʼt see much in the way of comparisons, but you cansee the current states of packages, user accounts, etc.The Puppet Resource CommandPuppet includes a command called puppet resource, which can interactively inspect and modifyresources on a single system.Usage of puppet resource is as follows:# puppet resource TYPE [ NAME ] [ATTRIBUTE VALUE .]The first argument must be a resource type. If no other arguments are given, it will inspect everyresource of that type it can find.The second argument (optional) is the name of a resource. If no other arguments are given, itwill inspect that resource.After the name, you can optionally specify any number of attributes and values. This will syncthose attributes to the desired state, then inspect the final state of the resource.Alternately, if you specify a resource name and use the --edit flag, you can change thatresource in your text editor; after the buffer is saved and closed, Puppet will modify the resourceto match your changes.EXERCISESInspecting a single resource:# puppet resource user rootuser { password max agepassword min age 'present','root','0',['root', 'bin', 'daemon', 'sys', 'adm', 'disk', '/root',' 1 jrm5tnjw h8JJ9mCZLmJvIxvDLjw1M/','99999','0',Learning Puppet Learning Puppet — Resources and the RAL10/76
shelluid '/bin/bash', '0',}Setting a new desired state for a resource:# puppet resource user katie ensure present shell "/bin/zsh"home "/home/katie" managehome truenotice: /User[katie]/ensure: createduser { 'katie':ensure 'present',home '/home/katie',shell '/bin/zsh'}NextNext Lesson:The puppet resource command can be useful for one-off jobs, but Puppet was born for greaterthings. Time to write some manifests.Off-Road:The LP VM is a tiny sandbox system, and it doesnʼt have much going on. If you have some devmachines that look more like your actual servers, why not download Puppet Enterprise for free andinspect them? Follow the quick start guide to get a small environment installed, then try using theconsole to inspect resources for many systems at once.Learning Puppet — ManifestsBeginDid you do the puppet resource exercises from the last chapter? Letʼs remove the user accountyou created.In a text editor — vim, emacs, or nano — create a file with the following contents and filename:# /root/examples/user-absent.ppuser {'katie':ensure absent,}Learning Puppet Learning Puppet — Manifests11/76
Save and close the editor, then run:# puppet apply /root/examples/user-absent.ppnotice: /Stage[main]//User[katie]/ensure: removednotice: Finished catalog run in 0.07 secondsNow run it again:# puppet apply /root/examples/user-absent.ppnotice: Finished catalog run in 0.03 secondsCool: Youʼve just written and applied your first Puppet manifest.ManifestsPuppet programs are called “manifests,” and they use the .pp file extension.The core of the Puppet language is the resource declaration. A resource declaration describes adesired state for one resource.(Manifests can also use various kinds of logic: conditional statements, collections of resources,functions to generate text, etc. Weʼll get to these later.)Puppet ApplyLike resource in the last chapter, apply is a Puppet subcommand. It takes the name of a manifestfile as its argument, and enforces the desired state described in the manifest.Weʼll use it below to test small manifests, but it can be used for larger jobs too. In fact, it can donearly everything an agent/master Puppet environment can do.Resource DeclarationsLetʼs start by looking at a single resource:# /root/examples/file-1.ppfile {'testfile':path '/tmp/testfile',ensure present,mode 0640,content "I'm a test file.",}The complete syntax and behavior of resource declarations are documented in the PuppetLearning Puppet Learning Puppet — Manifests12/76
reference manual, but in short, they consist of:The type ( file, in this case)An opening curly brace ( {)The title ( testfile)A colon ( :)A set of attribute value pairs, with a comma after each pair ( path '/tmp/testfile',etc.)A closing curly brace ( })Try applying the short manifest above:# puppet apply /root/examples/file-1.ppnotice: /Stage[main]//File[testfile]/ensure: creatednotice: Finished catalog run in 0.05 secondsThis is just the reverse of what we saw above when we removed the user account: Puppet noticedthat the file didnʼt exist, and created it. It set the desired content and mode at the same time.# cat /tmp/testfileI'm a test file.# ls -lah /tmp/testfile-rw-r----- 1 root root 16 Feb 23 13:15 /tmp/testfileIf we try changing the mode and applying the manifest again, Puppet will fix it:# chmod 0666 /tmp/testfile# puppet apply /root/examples/file-1.ppnotice: /Stage[main]//File[testfile]/mode: mode changed '0666' to '0640'notice: Finished catalog run in 0.04 secondsAnd if you run the manifest again, youʼll see that Puppet doesnʼt do anything — if a resource is inthe desired state already, Puppet will leave it alone.Exercise: Declare another file resource in a manifest and apply it. Try setting a new desiredstate for an existing file — for example, changing the login message by setting the contentof /etc/motd. You can see the attributes available for the file type here.Syntax HintsWatch out for these common errors:Learning Puppet Learning Puppet — Manifests13/76
Donʼt forget commas and colons! Forgetting them causes errors like Could not parse forenvironment production: Syntax error at 'mode'; expected '}' at/root/manifests/1.file.pp:6 on node learn.localdomain.Capitalization matters! The resource type and the attribute names should always be lowercase.The values used for titles and attribute values will usually be strings, which you should usuallyquote. Read more about Puppetʼs data types here.There are two kinds of quotes in Puppet: single ( ') and double ( "). The main difference is thatdouble quotes let you interpolate variables, which we cover in another lesson.Attribute names (like path, ensure, etc.) are special keywords, not strings. They shouldnʼt bequoted.Also, note that Puppet lets you use whatever whitespace makes your manifests more readable. Wesuggest visually lining up the arrows, because it makes it easier to understand a manifest at aglance. (The Vim plugins on the Learning Puppet VM will do this automatically as you type.)Once More, With Feeling!Now that you know resource declarations, letʼs play with the file type some more. Weʼll:Put multiple resources of different types in the same manifestUse new values for the ensure attributeFind an attribute with a special relationship to the resource titleSee what happens when we leave off certain attributesSee some automatic permission adjustments on directories# /root/examples/file-2.ppfile {'/tmp/test1':ensure file,content "Hi.",}file {'/tmp/test2':ensure directory,mode 0644,}file {'/tmp/test3':ensure link,target '/tmp/test1',}user {'katie':ensure absent,}notify {"I'm notifying you.":}Learning Puppet Learning Puppet — Manifests14/76
notify {"So am I!":}Apply:# puppet apply /root/examples/file-2.ppnotice: /Stage[main]//File[/tmp/test1]/ensure: creatednotice: /Stage[main]//File[/tmp/test3]/ensure: creatednotice: /Stage[main]//File[/tmp/test2]/ensure: creatednotice: So am I!notice: /Stage[main]//Notify[So am I!]/message: defined 'message' as 'So am I!'notice: I'm notifying you.notice: /Stage[main]//Notify[I'm notifying you.]/message: defined 'message' as'I'm notifying you.'notice: Finished catalog run in 0.05 secondsCool. What just happened?New Ensure Values, Different StatesThe ensure attribute is somewhat special. Itʼs available on most (but not all) resource types, and itcontrols whether the resource exists, with the definition of “exists” being somewhat local.With files, there are several ways to exist:As a normal file ( ensure file)As a directory ( ensure directory)As a symlink ( ensure link)As any of the above ( ensure present)As nothing ( ensure absent).A quick check shows how our manifest played out:# ls -lah /tmp/test*-rw-r--r-- 1 root rootlrwxrwxrwx 1 root root3 Feb 23 15:54 test110 Feb 23 15:54 test3 - /tmp/test1/tmp/test2:total 16Kdrwxr-xr-x 2 root root 4.0K Feb 23 16:02 .drwxrwxrwt 5 root root 4.0K Feb 23 16:02 .# cat /tmp/test3Hi.Titles and NamevarsNotice how our original file resource had a path attribute, but our next three left it out?Learning Puppet Learning Puppet — Manifests15/76
Almost every resource type has one attribute whose value defaults to the resourceʼs title. For thefile resource, thatʼs path. Most of the time ( user, group, package ), itʼs name.These attributes are called “namevars.” They are generally the attribute that corresponds to theresourceʼs identity, the one thing that should always be unique.If you leave out the namevar for a resource, Puppet will re-use the title as its value. If you do specifya value for the namevar, the title of the resource can be anything.IDENTITY AND IDENTITYSo why even have a namevar, if Puppet can just re-use the title?There are two kinds of identity that Puppet recognizes:Identity within Puppet itselfIdentity on the target systemMost of the time these are the same, but sometimes they arenʼt. For example, the NTP servicehas a different name on different platforms: on Red Hat-like systems, itʼs called ntpd, and onDebian-like systems, itʼs ntp. These are logically the same resource, but their identity on thetarget system isnʼt the same.Also, there are cases (usually exec resources) where the system identity has no particularmeaning, and putting a more descriptive identity in the title can help tell your colleagues (oryourself in two months) what a resource is supposed to be doing.By allowing you to split the title and namevar, Puppet makes it easy to handle these cases.Weʼll cover this later when we get to conditional statements.UNIQUENESSNote that you canʼt declare the same resource twice: Puppet always disallows duplicate titleswithin a given type, and usually disallows duplicate namevar values within a type.This is because resource declarations represent desired final states, and itʼs not at all clearwhat should happen if you declare two conflicting states. So Puppet will fail with an errorinstead of accidentally doing something wrong to the system.Missing Attributes: “Desired State Whatever”On the /tmp/test1 file, we left off the mode and owner attributes, among others. When we omitattributes, Puppet doesnʼt manage them, and any value is assumed to be the desired state.If a file doesnʼt exist, Puppet will default to creating it with permissions mode 0644, but if youchange that mode, Puppet wonʼt change it back.Learning Puppet Learning Puppet — Manifests16/76
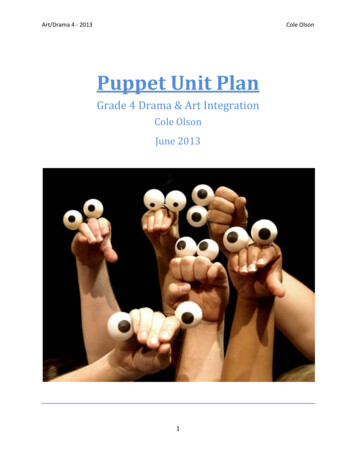
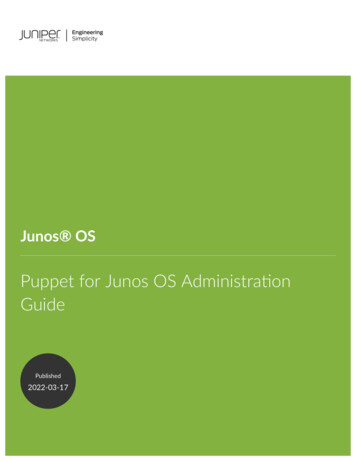
Note that you can even leave off the ensure attribute, as long as you donʼt specify content orsource — this can let you manage the permissions of a file if it exists, but not create it if it doesnʼt.Directory Permissions: 644 755We said /tmp/test2/ should have permissions mode 0644, but our ls -lah showed mode 0755.Thatʼs because Puppet groups the read bit and the traverse bit for directories.This helps with recursively managing directories (with recurse true), so you can allow traversalwithout making all of the contents of the directory executable.Destinations, Not JourneysYouʼve noticed that we talk about “desired states” a lot, instead of talking about making changes tothe system. This is the core of thinking like a Puppet user.If you were writing an explanation to another human of how to put a system into a desired state,using the OSʼs default tools, it would read something like “Check whether the mode of the sudoersfile is 0440, using ls -l. If itʼs already fine, move on to the next step; otherwise, run chmod 0440/etc/sudoers.”Under the hood, Puppet is actually doing the same thing, with some of the same OS tools. But itwraps the “check” step together with the “and fix if needed” step, and presents them as a singleinterface.The effect is that, instead of writing a bash script that looks like a step-by-step for a beginninguser, you can write Puppet manifests that look like shorthand notes for an expert user.Aside: CompilationManifests donʼt get used directly when Puppet syncs resources. Instead, the flow of a Puppetrun goes a little like this:Learning Puppet Learning Puppet — Manifests17/76
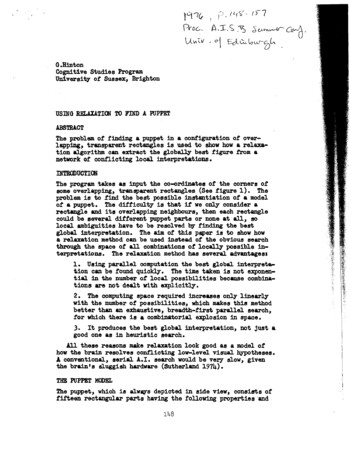
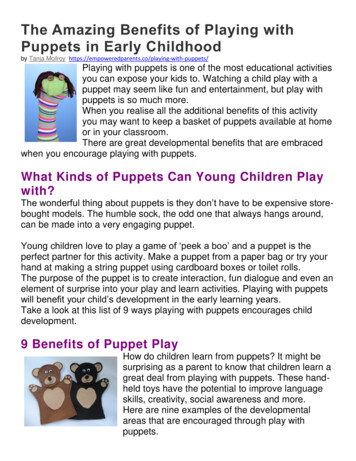
As we mentioned above, manifests can contain conditional statements, variables, functions,and other forms of logic. But before being applied, manifests get compiled into a documentcalled a “catalog,” which only contains resources and hints about the order to sync them in.With puppet apply, the distinction doesnʼt mean much. In a master/agent Puppetenvironment, though, it matters more, because agents only see the catalog:By using logic, manifests can be flexible and describe many systems at once. A catalogdescribes desired states for one system.By default, agent nodes can only retrieve their own catalog; they canʼt see informationmeant for any other node. This separation improves security.Since catalogs are so unambiguous, itʼs possible to simulate a catalog run without makingany changes to the system. (This is usually done by running puppet agent --test -noop.) You can even use special diff tools to compare two catalogs and see thedifferences.The Site Manifest and Puppet AgentWeʼve seen how to use puppet apply to directly apply manifests on one system. The puppetmaster/agent services work very similarly, but with a few key differences:Puppet apply:A user executes a command, triggering a Puppet run.Puppet apply reads the manifest passed to it, compiles it into a catalog, and applies the catalog.Puppet agent/master:Puppet agent runs as a service, and triggers a Puppet run about every half hour (configurable).On your VM, which runs Puppet Enterprise, the agent service is named pe-puppet. (Puppetagent can also be configured to run from cron, instead of as a service.)Puppet agent does not have access to any manifests; instead, it requests a pre-compiled catalogLearning Puppet Learning Puppet — Manifests18/76
from a puppet master server.On your VM, the puppet master appears as the pe-httpd service. A sandboxed copy ofApache with Passenger manages the puppet master application, spawning and killing newcopies of it as needed.The puppet master always reads one special manifest, called the “site manifest” or site.pp. It usesthis to compile a catalog, which it sends back to the agent.On your VM, the site manifest is at /etc/puppetlabs/puppet/manifests/site.pp.After getting the catalog, the agent applies it.This way, you can have many machines being configured by Puppet, while only maintaining yourmanifests on one (or a few) servers. This also gives some extra security, as described above under“Compilation.”Exercise: Use Puppet Agent/Master to Apply the Same ConfigurationTo see how the same manifest code works in puppet agent:Edit /etc/puppetlabs/puppet/manifests/site.pp and paste in the three file resourcesfrom the manifest above.Watch out for some of the existing code in site.pp, and donʼt disturb any nodestatements yet. You can paste the resources at the bottom of the file and theyʼll workfine.Delete or mutilate the files and directories we created in /tmp.Run puppet agent --test, which will trigger a single puppet agent run in the foregroundso you can see what itʼs doing in real time.Check /tmp, and notice that the files are back to their desired state.Exercise: SSH Authorized KeyWrite and apply a manifest that uses the ssh authorized key type to let you log into thelearning VM as root without a password.Bonus work: Try putting it directly into the site manifest, instead of using puppet apply. Usethe console to trigger a puppet agent run, and check the reports in the console to seewhether the manifest worked.Youʼll need to have an SSH key pair, a terminal application on your host system, and somebasic understanding of how SSH works. You can get all of these with a little outsideresearch.Learning Puppet Learning Puppet — Manifests19/76
Watch out: you canʼt just paste the line from id rsa.pub into the key attribute of theresource. Youʼll need to separate its components out into multiple attributes. Read thedocumentation for the ssh authorized key type to see how.NextNext Lesson:You know how to use the fundamental building blocks of Puppet code, so now itʼs time to learnhow those blocks fit together.Off-Road:You already know how to do a bit with Puppet, and managing file ownership and per
Learning Puppet — Index Welcome This is Learning Puppet, a series of lessons about managing system configuration with Puppet Enterprise. Installation instructions and a complete reference to the Puppet language are available elsewhere on the site; this series is meant to be a guided tour to building things with Puppet.