Transcription
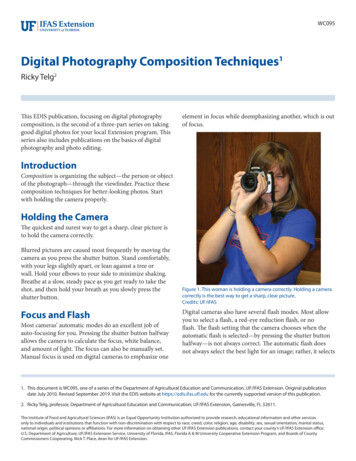
WC095Digital Photography Composition Techniques1Ricky Telg2This EDIS publication, focusing on digital photographycomposition, is the second of a three-part series on takinggood digital photos for your local Extension program. Thisseries also includes publications on the basics of digitalphotography and photo editing.element in focus while deemphasizing another, which is outof focus.IntroductionComposition is organizing the subject—the person or objectof the photograph—through the viewfinder. Practice thesecomposition techniques for better-looking photos. Startwith holding the camera properly.Holding the CameraThe quickest and surest way to get a sharp, clear picture isto hold the camera correctly.Blurred pictures are caused most frequently by moving thecamera as you press the shutter button. Stand comfortably,with your legs slightly apart, or lean against a tree orwall. Hold your elbows to your side to minimize shaking.Breathe at a slow, steady pace as you get ready to take theshot, and then hold your breath as you slowly press theshutter button.Focus and FlashMost cameras’ automatic modes do an excellent job ofauto-focusing for you. Pressing the shutter button halfwayallows the camera to calculate the focus, white balance,and amount of light. The focus can also be manually set.Manual focus is used on digital cameras to emphasize oneFigure 1. This woman is holding a camera correctly. Holding a cameracorrectly is the best way to get a sharp, clear picture.Credits: UF/IFASDigital cameras also have several flash modes. Most allowyou to select a flash, a red-eye reduction flash, or noflash. The flash setting that the camera chooses when theautomatic flash is selected—by pressing the shutter buttonhalfway—is not always correct. The automatic flash doesnot always select the best light for an image; rather, it selects1. This document is WC095, one of a series of the Department of Agricultural Education and Communication, UF/IFAS Extension. Original publicationdate July 2010. Revised September 2019. Visit the EDIS website at https://edis.ifas.ufl.edu for the currently supported version of this publication.2. Ricky Telg, professor, Department of Agricultural Education and Communication; UF/IFAS Extension, Gainesville, FL 32611.The Institute of Food and Agricultural Sciences (IFAS) is an Equal Opportunity Institution authorized to provide research, educational information and other servicesonly to individuals and institutions that function with non-discrimination with respect to race, creed, color, religion, age, disability, sex, sexual orientation, marital status,national origin, political opinions or affiliations. For more information on obtaining other UF/IFAS Extension publications, contact your county’s UF/IFAS Extension office.U.S. Department of Agriculture, UF/IFAS Extension Service, University of Florida, IFAS, Florida A & M University Cooperative Extension Program, and Boards of CountyCommissioners Cooperating. Nick T. Place, dean for UF/IFAS Extension.
light that is neither too dark nor too bright. If using theautomatic flash doesn’t produce satisfactory results, use oneof the other flash settings. It is also recommended to standno closer than 4 feet away from the subject and no fartherthan 10 feet away to get the best flash lighting. When takingpictures on sunny days, turn on the flash to help eliminatethe harsh shadows produced by sunlight.of thirds in mind can be edited later to crop or reframe theimage so that it fits the rule.AnglesOne of the best ways to create interest in photographs isto vary the angles while framing the shot well. An unusualangle or viewpoint can add a great deal of interest to anordinary object. While it is appropriate to shoot at eye levelwith the object or person, varying the camera angle fromtime to time adds a little extra excitement to the photograph. For example, photographed from below, someonelooks strong and dominating. From above, a person appearsmeek, even childlike.Camera angles refer to the different angles you can hold acamera in reference to the object of interest. An eye-level shot looks the subject right in the eye. Somephotographers call it the “bull’s-eye effect” when theeye-level shot is coupled with placing the person directlyin the middle of the picture, creating a “bull’s-eye.” A low-angle shot looks up at the object of interest. Thisangle creates a dramatic look, where everything appearsmagnified. Holding the camera high and shooting down is calleda high-angle shot, where everything in the shot appearsminimized or diminished.Use your imagination to find different angles or perspectives for your photographs. You might try lying downor crouching in front of an object, climbing above it, orputting the camera on the ground.Rule of ThirdsPerhaps the most well-known principle of photographiccomposition is the rule of thirds. The basic principle behindthe rule of thirds is to imagine dividing an image into thirdshorizontally and vertically so that you have nine parts.Position the main subject elements where the dividing linesintersect. This means not placing your subject right in thecenter of the frame. For example, frame the shot so thatthe subject’s eyes are on the line dividing the upper thirdfrom the middle third. For landscapes, position the horizonalong one of the horizontal lines instead of directly in thecenter of the picture. Photographs not taken with the ruleDigital Photography Composition TechniquesFigure 2. These photos show the rule of thirds in action. In each shot,the major impact or action takes place at intersections of the ninesections of the screen.Credits: UF/IFASLinesUsing lines can be an effective way of drawing the viewer’seye into the focal point of an image. Lines can be the shapeof a path, a line of trees, a fence, or any feature in an image.When framing the shot, determine what lines are in front ofyou and how they might add interest to the shot. Diagonal lines are used to draw the viewer’s eye throughthe photograph. Diagonal lines give images depth bysuggesting perspective or depth, and they can also add asense of action to an image. Vertical lines convey a variety of different moods in aphotograph, ranging from power and strength, in suchimages as skyscrapers, to growth, such as in photographsof trees. Horizontal lines convey a message of stability or rest,such as photographs of horizons, oceans, and evensleeping people. Landscape horizons are probably themost common horizontal lines in photographs. Generally,horizons should not be placed in the middle of the frame.A much more effective technique is to place the horizonin the upper or lower third of the frame, following therule of thirds.2
Converging lines occur when two or more lines comefrom different parts of an image to a single point. Converging lines act as a sort of funnel for the viewer’s eyes,directing the viewer’s gaze to a point in the photograph.A good example of converging lines is a set of railroadtracks that converge on a horizon.Figure 5. Example of horizontal lines.Credits: Katie WimberlyFigure 3. Example of diagonal lines.Credits: Erica DerFigure 6. Example of converging lines.Credits: Hyunji LeeDepth of FieldFigure 4. Example of vertical lines.Credits: Ricky Telg, UF/IFASDepth of field refers to the portion of the scene in focus inthe camera. Depth of field can be long or short. Depth offield that has a lot of the scene in focus has a long depthof field. When only a small zone is in focus, with muchof the background out of focus, depth of field is short(also referred to as “narrow”). Depth of field is dependenton several factors, but one of the primary factors is thecamera’s aperture setting.Aperture is the “iris” of the camera, like the iris of youreye. The aperture is the opening in the lens through whichlight passes to the camera sensor; it controls the amount oflight that is allowed into the camera. Aperture settings aremeasured in f-stops (also called f-numbers). The easiest wayto remember f-stop settings is this:Digital Photography Composition Techniques3
The larger the f-stop, the smaller the aperture opening. The smaller the f-stop, the bigger the aperture opening.For example, an f-stop of f-1.7 (small) means the apertureis open, where an f-stop of f-16 (large number) means theaperture is almost completely closed. An aperture with asmall opening (large f-stop) produces a longer depth offield, while an aperture with a large opening (small f-stop)produces a short, or narrow, depth of field. Play with thedepth of field to get an entire field of flowers in focus (longdepth of field), or just a few flowers in focus while all of therest of the flowers are blurred (short depth of field).Figure 10. Short (or narrow) depth of field.Credits: UF/IFASBackground DistractionsFigure 7. This graphic illustrates the f-stops in a camera: the larger thenumber, the smaller the aperture opening.The best advice regarding backgrounds in photographs isto use a simple, plain background, unless the backgroundis part of the story. Avoid extremely light or dark backgrounds. The more distractions that are removed from thebackground, the more attention is drawn to the subject.Types of PhotosTry to shoot a photograph so that someone does not needto read a caption or an accompanying news story to understand what the photograph is about.News and Feature PhotosFigure 8. Short (or narrow) depth of field.Credits: UF/IFASTo illustrate a news article, keep the news photographsimple and get as close as possible to the subject. Try toavoid “grip and grin” photographs—photos of people receiving awards and shaking hands with the person presenting the award, smiling as they receive the honor. If the storyis about an award recipient, try taking a photograph of therecipient doing whatever the person did to earn the awardinstead of a “grip and grin.” Arrange news photos to includea small number of people rather than large groups. Peoplewant to see closer shots of people’s faces, not far-away shotsof large groups.A feature photograph is a photograph not tied to a newsstory. Many times, you will see a feature photograph withjust a caption that details what the photo is about. A photoseries is a group of three to five photographs on the sametopic that tells an overall story. A photo series could bethree to five photographs on how a team prepares for acompetition.Figure 9. Long depth of field.Credits: UF/IFASDigital Photography Composition TechniquesA caption, also known as a cutline, provides writteninformation underneath a photograph that is necessary for4
the reader to understand the photograph. Usually, a captionprovides information about who is in the photograph, whatis going on, where and when the action happened, and whythe action is significant. A caption is one to two sentencesin length. Include the full name of the person in the photograph and, when appropriate, the person’s title. Position and pose the animal properly. Generally, use afull side view or a three-fourths view, when the animal’shead faces more toward the camera than the rest of thebody. The animal’s head should be high.People PhotosThe previous tips are for animals that are not moving, butare posed in a controlled environment. Sometimes, though,it will be necessary to take photos of moving animals, suchas those in a rodeo. To get close to the action, use a telephoto lens and a fast shutter speed to stop the action for thephotograph. Try to anticipate where the animal will be andfollow the animal and rider. Give the animal plenty of leadroom in your viewfinder. If your camera allows you to takemultiple rapid shots by holding down the shutter button, doso. You can choose the best photo later. Try to find varyingangles to shoot from to get interesting photographs.Most photographs have people in them. Following aresuggestions on how to get the best “people pictures”: Avoid posed shots. Do not force people to always posestaring at the camera. Get them doing something. Take candid pictures. Show people working, playing, orrelaxing. Keep people busy. An interesting prop can give theperson being photographed something to work with andcan help create a natural feeling. For example, a rodeocowboy could hold a lasso as his “prop.” Move in close. Fill the camera’s viewfinder with thesubject to create pictures with greater impact. Standingtoo far away, even when taking group shots, producesimages that are harder to see and less interesting. Look your subject in the eye. With children, forexample, that means getting on their height level.Animal PhotosTaking photographs of animals can be fun, but it can alsobe tiring because it’s not possible to control how an animalwill react or cooperate with you as you take pictures. Forphotographs of small animals, such as dogs and cats, usesome of the suggestions in the “People Photos” section:move in close, get on the animal’s eye level, keep the animalbusy, avoid posed shots, and take candid pictures. For largeranimals—cattle, pigs, horses, and other livestock—use thesetips: Groom the animal. If it is a grand champion-typephotograph, make sure the animal looks its best. Aneffective livestock photo should show a good side view ofthe animal so its markings, profile, and general conditionare visible. Use a flash, if possible. A flash will enhance the animal’sappearance by revealing shadow detail.Additional InformationThe Blog Studio. (2007). Digital photographycomposition tips. Retrieved July 23, 2010, ital-photography-composition-tips/Curtin, D. P. (2007). A short course in using your digitalcamera: A guide to great photographs. Retrieved July 23,2010, from http://shortcourses.com/use/King, J. A. (2008). Digital photography for dummies. Hoboken, NJ: Wiley.Long, B. (February 2003). Snap happy: Take perfect pictureswith your digital camera. Macworld Magazine, 86-93.Photographytips.com. (2007). Livestock: Photographinghorses, cattle, sheep, & other livestock. Retrieved July23, 2010, from , V. (2004). You ought to be in pixels. Edutopia, 1(2),24. Show the animal just as it is. Do not use photo editingsoftware to “doctor” the picture. Choose an appropriate background that does not clutter the picture or distract the viewer’s attention fromthe animal. For example, an open field as a backdrop isprobably better than a dark barn.Digital Photography Composition Techniques5
Digital Photography Composition Techniques 3 Converging lines occur when two or more lines come from different parts of an image to a single point. Con-verging lines act as a sort of funnel for the viewer’s eyes, directing the viewer’s gaze to a point in the photograph