Transcription
MyofascialReleasewith Sean Riehlwww.realbodywork.com
Lesson 1Anatomy & physiology of fasciaTime to complete: 30 minutesLearning outcomes:3 types of connective tissueProperties of fasciaCollagenElastinGround substanceCross-linkagesAdhesions4 rules of myofascial techniquesTo do and notice:Watch lesson 1, read the text belowText:Anatomy of fascia- what its made ofThere are 4 types of tissue: muscle, nervous, epithelial and connective tissue. These 4 types of tissue make up everystructure in our body. Connective tissue is the most pervasive, and has three basic ingredients. These are collagen,elastin, and Ground substance.CollagenCollagen fibers are the longest molecules ever found. If onewere as thick as a pen, it would be a yard long.Collagen is a protein consisting of three polypeptidechains that line up to form white fibrils They arestronger than steel and can hold ten thousand timestheir own weight. Collagen fibers give tissues theirtensile strength, resiliency and structural integrity.ElastinElastin fibers are much like rubber bands. Elastin fibersallow the tissue to stretch, thereby helping to absorbshock. Fascia, tendons and ligaments contain both collagen and elastin fibers.Ground substanceGround substance is a viscous, transparent fluid, like raw egg whites. It surrounds all the cells in the body, and ispart of our internal ocean. Chemically the ground substance is a mucopolysaccharide. Its main components arehyaluronic acid and proteoglycans. Hyaluronic acid is viscous and lubricates the collagen, elastin, and muscle fibers,allowing them to slide over each other. Proteoglycans form the gel of the ground substance. This gel is excellent atdispersing shock and holding tissues in place. One of the most amazing properties of the ground substance is itsability to go from a jelly-like state to a completely liquid state. This is called thixotropy. Just like Jell-O- when itscool, it’s a jelly, and when its warm, it’s a liquid.In areas of injury or little use- or in old age, the ground substance in fascia is less of a liquid, and becomes aharder gel. Unfortunately, if the ground substance become too hard it begins to restrict motion and dry up. Inbodywork the mechanical stretch, body heat and bio-electric energy all contribute to taking the ground substancefrom a gel to a liquid. In its liquid state it allows movement, stretch and for the exchange of nutrients and cellularwastes to occur more efficiently.Fascia as the great organizerFascia is a type of connective tissue. Fascial sheaths surround and penetrate almost every structure in our bodies.Fascial sheaths surround individual nerve fibers, and also bundle those fibers into larger trunks. Loose fascialnetworks hold our adipose tissue in place as it pads and protects other structures. Fascia also surrounds arteries andveins as well as interleaving itself through every muscle. There are three layers of fascia in every muscle, theendomysium, the perimysium and the epimysium. These three layers of fascia within the muscle merge at the endsof the muscle to form a tendon. Still the same components- ground substance, collagen and elastin, but now thefibers arrange themselves in parallel to be able to transmit the pull of the muscle without breaking. This fascial2
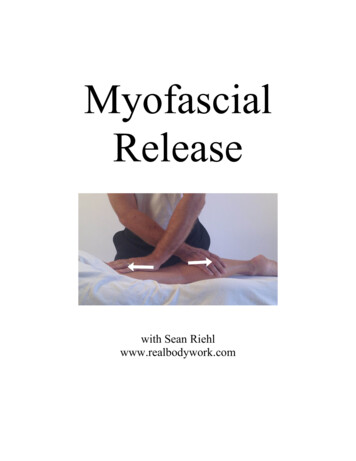
network does not stop there. Not only does this tendon embed itself into the bone, it also fans out, surrounding theentire bone- literally becoming the periosteum of the bone. Then from the periostium to anther tendon, into anothermuscle to another tendon surrounding another bone and so on until the fascia in your toes has connected through thisnetwork to the fascia in your head and fingertips- uniting your body in one continuos fascial network. Add to thatall the other tissues- nerves, arteries, veins, fat and organs all suspended and penetrated by this fascial network- it’sno wonder it’s called connective tissue.Crosslinkages and myofascial releaseUnfortunately, due to the way they are formed, collagen fibers tend to pack closer together and form moreconnections as we age, become injured or develop scar tissue. These connections within the fascia are called crosslinkages and they limit motion and distort posture. Here is a diagram of cross-linkages. On the right the fibers areable to elongate, on the left the cross linkages restrict elongation. Cross linkages that develop between differentfascial sheets are called adhesions.If there is not much movement in an area, the collagen fibers will begin to bond in adjacent sheets of fascia.Adhesions cause the muscles to loose independent movement, dragging their neighbors along with everycontraction. This is energy intensive and can result in pain.Myofascial Release breaks up cross-linkages, removes adhesions, and softens the tissue. This helps to balancepostural distortions, increase range of motion and increase fluid movement patterns.How to perform myofascial releaseGround substance, by its very nature, is designed to resist force. The gelatinous nature of the ground substance andthe rubber-like elastin fibers will effectively disperse shock that comes through the body. For this reason, quickstrokes have no effect on the fascia. Quick strokes indeed will create heat in the area, but only engage the elasticbarrier of the fascia. In a few moments it returns to its original length. If our goal is to lengthen the fascia at the levelof the collagen matrix, we must apply a different type of manipulation than Swedish massage.Studies have shown the initial 90 seconds of stretch only effect the elastin fibers. During this initial stagewe are feeling the elastic barrier release. Once the elastin fibers have reached their full length, only then do thecollagen fibers begin to unwind. Not only does it take time to engage the collagen , it also takes time for the groundsubstance to go from a gel to a liquid. In its gel state, it holds the collagen fibers in place, but in a liquid state, thecollagen fibers can begin to lengthen. As this lengthening occurs, cross-linkages within the fascia begin to break. Asthe cross-linkages break, the strain pattern in the fascial sheet will change. If the practitioner is sensitive to this strainpattern, they can follow the body change the direction of their stroke. This is called unwinding. This takes patience,sensitivity and skill. By quieting the mind and bringing the awareness into our hands, we can follow the body’sunwinding.Myofascial release is a gentle technique. Since collagen is made to resist force, the most effective way torelease the fascia is gentle sustained pressure. In fact too much pressure will decrease the practitioners sensitivity,and the body may resist the work. Usually only a few ounces of force is enough to start the fascia moving.Sometimes practitioners who have studied bodywork styles that uses more force have a hard time trusting that thelighter pressures are effective.Here are the 4 rules that we will follow for almost all myofascial stretchesRule #1Stretch for 2-5 minutes. Performing these techniques for a shorter duration will only stretch the elastincomponent, providing temporary or no results.Rule #2Maintain a continuous stretch. As soon as you let up, the elastin fibers bring the tissue back. It willtake another 90 seconds to engage the collagen.Rule #3Use light pressure. Collagen fibers have a tensile strength of 2000 lbs per square inch. They aredesigned to resist force. Yet they lengthen under gentle, sustained pressure.Rule #4Flow with the tissue. As the tissue unwinds, the direction of force changes, follow the unwinding tobe most effective.3
Lesson 2Experiencing the fasciaTime to complete: 30 minutesLearning outcomes:Feel the difference between muscle stretch and fascial stretchFeel collagen barrierExperience the quality of skin in different areas of the bodyFeel the effects of restricted fasciaExperience how far restricted fascia can reachTo do and notice:Watch lesson 2 in the Beginning Myofascial Release video and perform the exercises. Make sure to spendtime with each stretch and really feel it in your own body.4
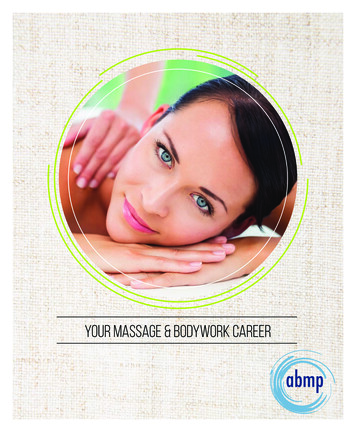
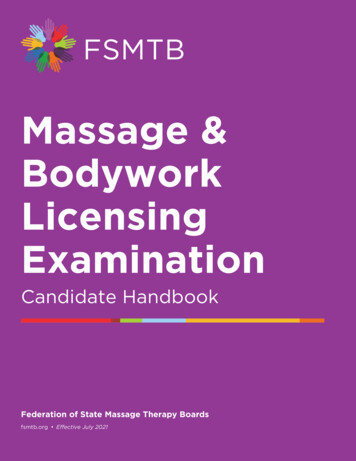
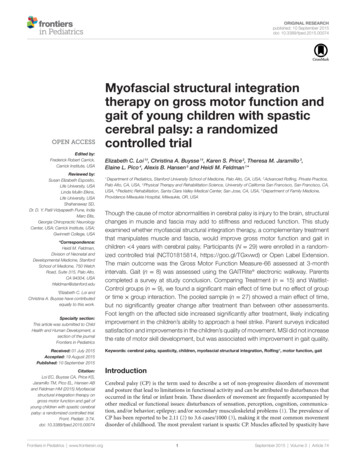
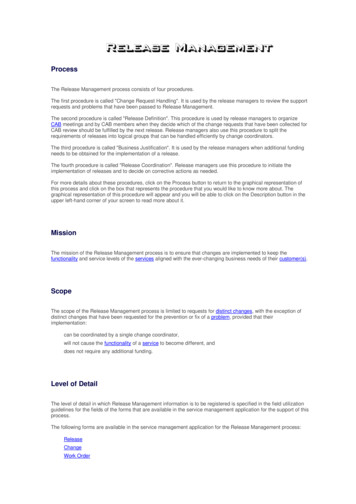
Lesson 3Releasing the superficial fasciaTime to complete: 2 hoursLearning outcomes:The importance of the skinIn allowing joint mobilityBasic skin evaluationUnderstanding of a proper end feelSkin rolling techniques includingRollingSqueezingRotatingLifting (especially for sciatic pain)Flat handed myofascial stretch if skin rolling isn’t effective.Re-testing to see if the techniques workedTo do and notice:Watch the lesson 3 on the Beginning Myofascial Release video. Get 2 friends or clients, and evaluate theskin over their entire body. After evaluating the skin over every aspect, perform skin rolling techniques over allareas of restriction. Then test the skin again. Take your time with each person and spend at least 45 minutes each.Mark the areas of initial restriction on the figures provided on the worksheet.Text:The superficial fascia of the skin covers our entire body. The skin tends to tighten around areas of injury orcontraction. When it tightens, this means that some parts of this bag are stretched, and some are bunched up.Tension in one area can easily be transmitted to another, more distant area. Skin rolling and skin techniques aim athaving the skin bag evenly distributed over the entire body. In this way each part has the mobility that it needs. Byloosening the skin we can free up movement in the deeper fascial layers. Even a small restriction in the skin caninfluence our postural distortions and add to the cycle of pain.We have found that the skin contracts over tight muscle groups, and because thesemuscles are pulling from the joints, the skin over the joints tends to be stretched. So usually we’llpush the skin back into the joints. This feels really good as well. When the skin is restricted, itpulls on the surrounding skin, moving it just a little from where it should be. This migration iswhat causes restricted motion and the hard end feel in the evaluation that we do.EvaluationTo evaluate the skin, we'll pull the skin in 4 directions: up, down,medially and laterally. In each direction the skin should have some movement,with an end feel that is springy. This is the most important part- because someareas of the body have more give than others. For example the back may movean inch or more, where the skin around the ankle may move less than half aninch. If the ending feels sudden, or hard, that indicates restriction.igure 1.You can test the skin all over the body. Figure 1 shows the generalareas to test on the back. Figure 2 shows the main testing spots on the anteriortorso.Figure 2.5
Skin rollingThe technique for skin rolling is topick up the skin between you fingers andthumb, squeeze and roll. A common mistake isto go too fast. This can be painful, so check inwith your client. When you get the end of thearea, move backward through it. In areas thatare restricted, or intense, hold without moving.If you have a hard time getting a good grip,take more tissue between your fingers, anddon’t try to roll as much as just holding. Retestthe area to see if the mobility has increased.Alternate releaseIf skin rolling doesn’t create a softer end feel, push the skin in the direction of the barrier. This is gentlepressure, full hand contact with no gliding on the skin for 90 seconds or more. After doing this, retest to see if theend feel has become soft and springy.Feeding the tissue into the jointsFor clients with posterior knee pain dueto hyperextension, place a hand on each side ofthe joint, then push into the knee. This will help tomove the fascia back towards the joint. Thistechnique should feel really good to the client,because the constant strain on the area is beingrelieved. Do this technique along with some deeptissue work to give your client a completetreatment.This work is also great for the elbow.Place a hand on each side of the lateral elbow,pushing gently towards the joint. This will helptennis elbow, where the fascial connectionbetween the flexor carpi radialis muscles and thehumerus has become strained. This will help toease the strain on the area. Use this techniquealong with cross fiber friction.6
Lesson 4Scar ReleasesTime to complete: 2 hours, spaced over 4 sessionsLearning outcomes:Learn 4 scar release techniquesTo do and notice:Watch lesson 4 in the Beginning Myofascial Release video and read the text.Find a friend or client with a scar. Evaluate the fascia around the scar, then perform the four scar tissuerelease techniques around the scar. The session should last about 15-20 minutes. Over the space of 2 weeks,perform 3 more sessions on the same person, spaced 2-3 days apart (example Monday, Thursday, Sunday,Wednesday). Write your session info on the sheet provided.Text:Myofascial release is one of the best techniques to release scar tissue due to surgery or accident. It isimportant not to work on a fresh scar, due to the fear of tearing the tissue. Wait until the scar is well healed beforeperforming these techniques. For a surgery scar, wait until the medical doctor has said that it is ok. For scars due toinjury, the amount of time varies depending on the depth of the injury.The goal of the scar release technique is to mobilize the scar tissue, freeing fascial restrictions that may befanning out from the scar. This work will also make the scar more pliable and strengthen the scar by encouragingproper scar tissue formation. Scar work can be painful due to the amount of adhesions that cross many levels oftissue. Always be in verbal contact with the client while doing these techniques, and remember that it usually takes aseries of sessions to fully release a scar.Scar release technique #1: skin rollingStarting off the scar, skin roll across the scar in 8 directions: up and down, back and forth, diagonally oneway and then the other. Keep rolling until all the restrictions are released. Skin rolling may be difficult if the scar isadhered to the deeper structures, or there is not enough give in the skin.Scar release technique #2: pincer gripGrip the scar between your finger, and your thumb. Lift the tissueaway from the body. Then angle your pull in all the directions, waiting for arelease in each direction. Apply stretch for at least 90 seconds to 5 minutes.Scar release technique #3: the cross-hand stretch.Cross your hands over the scar, and stretch for 2-5 minutes, waiting until a release occurs. Perform thetechnique in various directions around the scar.Scar release technique #4: direct scar releaseTake the tip of your finger, and glide down the scar, asking your client to tell you when you reach the mostsensitive spot. Then apply direct pressure into the scar. Once you sink into the tissues, rotate your pressure in 4directions, and ask your client again to tell you when you find the most sensitive direction. Once you have found thespot, apply static pressure until a release is felt. Clients may experience burning, heat or pain, and the area may flushwith hyperemia. This is normal as the adhesions are released, just remember to honor your clients wishes if they askyou to stop or lighten up. Remember that it will take several sessions to completely release a scar, and that it’s ok todo it in stages.7
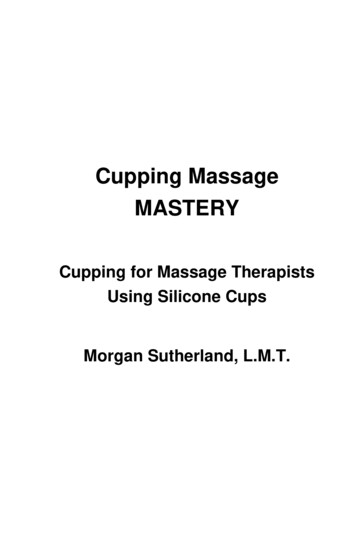
Lesson 5Kinesthetic evaluation- Leg and arm pullsTime to complete: 1 hour 30 minutesLearning outcomes:Learn kinesthetic evaluation for the Ankle, knee, hip and spine.Learn leg pulls to release the hip and backLearn arm pulls to release frozen shoulders, neck and upper back pain.To do and notice:Watch lesson 5 in the Beginning Myofascial Release video, read the test below. Evaluate the kinetic chain,perform leg and arm pulls on at least 3 people. Session time- 20 minutes each. Write down the most restricted jointon each person.Text:The myofascial connection goes from the toes to the top of the head, winding through muscle, tendon andjoint capsule. Each joint is a link in the kinetic chain. If one joint is restricted, others will have to compensate.Kinesthetic evaluation is a simple way to evaluate restriction in each joint.Kinesthetic evaluationStart by evaluating the ankles. Have your client lay face up on the treatmenttable. Kneel or sit at their feet. Place both hands underneath the heels. Grasp thecalcaneus, close your eyes and apply a very slight pull towards yourself. Tug on one sideand then the other to compare the two. This pull is so slight that only the fascia aroundthe ankles is affected. If the knee or the hip moves you are pulling too hard. Extend yourawareness up into the ankles, noticing where there’s restriction. Be patient as you do this,it will take a few tries for you to begin to feel the differences in the tissue. With practiceyou’ll know when an area is restricted.Now grasp above the ankle joint and increase your pull to the level of the knees.Gently tug both sides, and extend your awareness into the knees. If you see the hips oreven the whole body move toward you, you are pullingway too hard. We are pulling just to where we areengaging the knees. Notice if one side feels restricted.Grasp ankles then:To evaluate the hip joint, keep the same handposition, but apply more pull, reaching up into the hip joints. Tug each side andPull to the level of the ankle jointnotice if there is restrictionPull to the level of the kneeFrom here we could actually pull a little harder and feel into the level ofPull to the level of the hipsthe spine. If you can become quiet enough you’ll be able to sense restriction onPull to the level spineeither side of the spine. It’s all a matter of extending your awareness through thebody, and applying the appropriate pull to engage the fascia at that level.Tug at each level to feel the jointplay.Leg pullExtend your awareness into theTo release the ankle, grasp the foot and move it into supination,joint that you are evaluating.pronation, plantar flexion and dorsi flexion. Then pull into the direction that feltmost restricted. As the fascia unwinds, the direction of pull will change. Follow itas it unwinds. Continue this pull for 2-5 minutes. Recheck to see if the joint has increased mobility.To release the knee, position your hands above the ankle joint, and apply a gentle pull to the level of theknee. Wait for 2-5 minutes until the tissue is completely released. Don’t do this on a knee that has strained ligamentsor a loose joint capsule, we don’t want to increase any ligament laxity that may be there. Only perform thesestretches on areas of restriction.To release the hip stand and grasp the foot and gently lean back, pulling to the level of the hips. If the clientslides on the table, or their upper body moves, you are pulling too hard. The client’s foot is in slight externalrotation. Wait here at least two minutes. Then move to the side of the table and bring the hip into flexion. Keep thetraction continuous, if you let up, you’ll have to start all over again and re-stretch the elastin fibers. Feel into thetissues. As they release, increase hip flexion. Change hand positions to keep yourself comfortable, but alwaysmaintain steady traction. Gently flow with the tissues as they unwind. Again, stay here for at least two minutes.This leg pull is great for lower back pain as well as hip dysfunction.Evaluation8
Now continue traction and move around to the other side of the table, bringing the leg with you. On thisside internally rotate the leg as you pull it across the body. To complete, move the leg back down to the startingposition. Then retest to see if the mobility has increased. To get a more accurate picture of these positions, watchthe video.Arm pullWith the leg, the force travels up through the body from the ankle tothe knees, hips and spine. For this reason, dysfunction in the lower joints canaffect the joints above. This means that with clients who have back pain,evaluating all the way up the chain from the feet to the hips is important. Thearm, however is a different story. Because the arm usually doesn’t bearweight, the chain of energy comes from the shoulder down into the wrist andhand. For this reason shoulder restriction can cause elbow and wrist pain,whereas wrist and elbow pain rarely cause shoulder dysfunction. For thesereasons I usually don’t evaluate wrist or elbow mobility, unless the wrist orelbow is hurting.The arm pull consists of releasing the fascia in a radius around theshoulder. There are 5 main positions. Each position releases a differentmyofascial pull. The arm pull can affect fascia all the way up into the neck,and all the way down into the back and hip.To perform the arm pull, stand at the side of the table, one hand graspsabove the wrist, the other just inferior to the elbow. Pull to level of the shoulder andwait for a release. To loosen the fascia up into the neck, pull even more until theDon’t perform the armshoulder depresses, and the head rotates slightly. Stay here for at least two minutes topull out to the side or overrelease the lateral neck. Next move out to the side of the table and continue traction.the head if the client’sDon’t perform this arm pull if your client has a loose joint capsule or if their shouldershoulder dislocated easilyeasily dislocates. Keep moving up releasing the various lines of fascia at each point.or if they have a looseIf you feel resistance, just stop and pull until the resistance dissipates. This techniquejoint capsule.is great for frozen shoulders, or conditions where the joint capsule or fascia isrestricted. This position will pull all the way down the side of the torso and into thehip.Continue to traction as you bring the arm across the body. Place your other hand over the scapula. Use yourfingertips to grab the vertebral border of the scapula. From there you can vary the pull from the scapula to the arm.Wait here at least 2 minutes as the fascia over the back softens and releases. This is a great technique for clients whohave tension in the upper back and neck. Sometimes this position is uncomfortable if the arm is higher than theshoulder either towards the ceiling or by the client’s head. Notice here that the ending position is with the wrist atthe level of the hip, and closer to the floor than the shoulder.To complete the release, move the arm back through all the planes of motion, while keeping traction.Release when the arm is back at the side of the table. Watch the video to clarify these positions in your mind.Caution9
Lesson 6Cross handed stretchesTime to complete: 1 hourLearning outcomes:The location of 3 facial lines:Cross handed stretches for each lineTo do and notice:Watch lesson 6 in the Beginning Myofascial video. Read the text below and practice the cross-handedstretches on 1 friend or client.Text:Fascia is a continuous network though-out the body. There are however, specific lines of pull that the fasciastabilizes as it moves though muscles, tendons, joints and ligaments. We will now look at 3 basic lines of force- thelateral , anterior and superficial fascial lines.The lateral fascial lineThe lateral fascia controls movement from side to side all the way up our bodies.The lateral fascial line starts at the 1st and 5th metatarsals and moves up the side ofthe body though the peroneal muscle, then over the head of the fibula, through theiliotibial tract and through the tensor fascial latae and gluteus maximus in the iliaccrest. From there it moves through the internal and external obliques to the lowerribs. A deeper portion of this fascia runs through and next to the quadratuslumborum muscle. Next the fascia crisscrosses through each level of inter-costalsand ribs until it reaches the splenius cervicis posteriorly and thesternocleidomastoid anteriorly, which end up at the mastoid process. There is alsoa pull that runs from the ribs up the scalenes, ending at the side of the neck.Restriction in one part of the line can effect other structures along the line.Release the legTo release the lower part of the lateral line, position your client face up.Use rhythmic compression with your thumbs to soften and prepare the tissue. Thiswill flush the tissue with fresh blood and increase the heat in the tissues so that theground substance will begin to liquefy. Then rest one palm over the head of thefibula, while the other palm rest over the lower leg. Stretch the hands away fromeach other for 2-5 minutes. Let the tissues unwind through each barrier and flowwith the release. Don’t slide on the skin. This technique can also be performedwith the client in side posture. A trick to this technique is to position your clientso that their foot is off the table. As you perform the technique the foot is allowedto invert more and more. If this lateral line is tight, it can slightly evert the foot.Rebalancing the lateral line can help fallen arches or dysfunctional walkingpatterns.Release the thighTo work this lateral line further up, keep your client in side posture, straighten their leg. One hand restsbelow the knee over the head of the fibula, the other over the lateral thigh. Gently stretch and wait for the releaseand unwinding to occur. Tension in this part of the lateral thigh is often called iliotibial band syndrome. Myofascialrelease can help to soften the tissue, taking pressure off the lateral knee.Next use your fingertips to apply pressure on the anterior edge of the iliotibial band, push posterior andwait for a release. Usually the distal 1/3 of the iliotibial band is the tightest, so focus on this area.Release the hipTo release further up the hip, place one hand over the iliac crest, and the other near the greater trochanter.Stretch and wait as the tissue releases. This area can be tight if the ilium on this side is slipped down, or if the leg onthis side is short. Clients with tight hips will benefit from this technique. This can also be performed with the clientlaying prone.The tissue between the ilium and the rib cage can be stretches by having you client put their top hand overtheir head, and then straighten the top leg. Place on hand on the crest of the ilium and the other over the rib cage.Stretch. This technique is useful if the ilium is slipped up, or if the shoulder on this side is low. Although it’s notquite as effective, you can also perform this technique with the client laying supine. Again one hand is on the crest10
of the ilium, and the other over the lower rib cage. From this position you can also pinch the fascia between yourfingers and thumb. Squeeze and pull toward yourself. This is an excellent technique that will help to free anyrestrictions in this area.The arm pull technique in this plane of movement is also an excellent way to release down the lateralfascial line.The anterior fascial lineThe anterior fascial line starts on the dorsal aspect of the toes, travels through theanterior compartment and periosteum of the tibia into the rectus femoris musclewhere it reaches into the Anterior inferior iliac spine. From here, however, theforce is transmitted to the pubic bone and up through the rectus abdominis. Thismakes sense because these two muscles counter balance each other in relationshipto the position of the ilium (either anterior or posteriorly rotated). From the rectusabdominis this line of fascia reaches up through the pectoral and sternalis fascia tothe manubrium. From here this anterior line travels up through thesternocleidomastoid to the mastoid process. You may think it should move into theneck, but the infrahyoid fascia originates from a deeper fascial line.Notice that both the lateral line and the anterior line end by moving through thesternocleidomastoid and into the mastoid process. This is one of the reasons that aforward head posture is so common- these two lines of fascial force both tend topull the neck into extension and move the head forward.Release lower legTo release through the anterior line, start with your client supine, apply rhythmiccompression to the tibialis anterior muscle using your thumbs. Then kneel at theside of the table and place one hand just below the kneecap and a little laterally,and the other over the lower part of the anterior leg. Stretch and wait for a releaseto occur.Release the thighTo release the anterior line as it moves up the thigh, first use compression to soften and warm the tissues.Now place one hand just below the Anterior superior iliac spine, and the other just above the patella. Follow thetissues as they unwind. Remember to wait at least 2-5 minutes. This is one of the techniques for an anteriorly rotatedpelvis.Release the bellyNow the anterior line jogs to the center and runs up through the rectus abdominis. Place one hand justabove the pubic bone, and the other palm rests inferior to the xyphoid process. If this part of the anterior line istight, the pelvis may be posteriorly rotated, or the client my exihibit a hunching posture. For a hunching posturerelease this lateral line all the way up.Release the solar plexusThe next position is to place one hand over the manubrium, and the other inferior to the xiphiod process.Then stretch. This will loosen the anterior fascia just in the center of the torso. With this technique you are releasingright over the solar plexus. As mentioned earlier, clients with a slumping posture will be tight in this area. Also, thesolar plexus is the seat of held emotions. As you perform this release be sensitive of emotions that may be releasedfrom your client. Long held grief or sadness are not uncommon emotions to be released as the fascia unwinds in thisspot.Release the anterior neckFinally, sit or kneel at the head of the table. Place one hand behind the head at the level ofthe occipital ridge- this hand applies gently traction towards the cranium. The other hand rests onthe sternum and applies pressure towards the feet. Remember that the pressure into the body isslight, just enough to keep the hand from slipping on the skin. Maintain even pressure and gentlyfollow the tissue as it unwinds. This technique is a modified versio
connections as we age, become injured or develop scar tissue. These connections within the fascia are called cross linkages and they limit motion and distort posture. Here is a diagram of cross-linkages. On the right the fibers are able to elongate, on the left the cross linkages restrict