Transcription
Table Management and Reservations Demo ScriptTable Management andReservations Demo ScriptOverviewDigital Dining’s Table Management enables having a Point-of-Sale (POS) Terminalat the Host Station that is used as a tool to make the restaurant’s host staff moreefficient and improve customer service. With Table Management, we have takenintegrated table management to an entirely new level.This script is in two sections. The first section contains features applicable to boththe Table Management module and the Reservations Module. The second sectioncontains features that are only available with the Reservations Module. (Reservationsalso requires Table Management.)FeaturesThe Host Terminal displays:Digital Dining Every table in the restaurant along with its current status. One floor plan with all tables, or multiple areas. The number of tables by area that are occupied, need bussing, or availableat a glance. A table as “Available for Seating” after it is bussed. Standard and user-defined properties for a room, table type, or specifictable. Available table(s) based on host input of customer seating preferences. All available tables. The estimated wait-time when the customer’s desired table type is notavailable. (This is based on the last five table turns in the dining areas.)Demonstration Scripts 1
Table Management and Reservations Demo Script Any change in a customer’s preferences (such as smoking, booth, patio, andso on) and will recheck availability and recalculate the estimated wait-timeif that preference is still not available. The customer’s name that is added to the wait list on the terminaleliminating the need for the usual manual clipboard. Special notes, such as “Needs Booster Seat” or “Needs High Chair.” The recalculated estimated wait and seating times for all names on the list. The customer’s name that has been waiting the longest for the table type.The Host can seat the suggested guest, another guest on the list, or someonenot on the list such as a VIP. The new Change Table button to join two or more tables, reseat acustomer, block a table, move a table to a new station, and move a table to adifferent floor position on the Host Register.The Host can: Drill-through to any area to see the status of any table. View the current wait list at any time. Take drink and/or appetizer orders, providing better customer service, andreducing table turn time. Swipe the customer’s Frequent Diner card and print a status report for thecustomer and/or server. Join tables with the Change Table button. This eliminates the need to usea register option. Change the caption shown under each table with the Table Info button. Inaddition to the customer name, the caption can display the server name, thestation number, the check status, the minutes the table has been seated, andthe estimated minutes until the table will be available for the next seating.Wait list management is a feature that greatly improves the customer’s experienceduring peak times. Today when a guest asks for an estimated time, the Host typicallymakes a guess and adds to it. For example, a guest might be told that the estimatedwait is an hour even though the Host might expect it to be less. The reason is thathosts are like most of us. They do not like to get yelled at! Hosts realize that someguests will complain vociferously if not seated within the estimated time. By addingextra time (often significantly), the guest is likely to be seated on time or early whichhas the opposite effect and makes the Host a hero.The problem with this is the customer might leave rather than wait if given anunrealistic long time. While management cares, the Host often does not. When aguest leaves that is a sale lost forever. Potentially even worse, the guest might notreturn thinking that it’s too difficult to get a table. Also, if a customer is seated wellin advance of the estimated time once they might expect the same the next time.When it doesn’t happen the customer might be unhappy. With Digital Dining’s Wait2 Digital DiningDemonstration Scripts
Table Management and Reservations Demo ScriptList Management, for the first time, the human factor is taken out of the estimate.While the restaurateur needs to be cautioned that the estimate can’t always be 100percent accurate, it is a great improvement on the “seat-of-the-pants” approach oftenused. More importantly, it is yet another significant feature without an answer fromour competitors and further solidifies our status as a total management solution, notjust another POS system.Another significant feature of the Host Terminal is that it allows the customer’sexperience to also be enhanced with faster service once seated. In many restaurants,it’s quite common for guests to be seated, told their server’s name, left a menu, andthen left to wait. This wait is often long. Allowing the host to take the initial ordermakes for happier customers and reduces table turn time.Reservations Demo PreparationIn order to adequately show the capabilities of the Reservations register, it isnecessary to “prep” or “stage” your demo. The Dining Room should always be usedas the area with active servers. We suggest clocking in Staff ID #10, Kay to Station 3 in the Dining Room. Staff ID #32, Michael to Station 4 in the Dining Room, Staff ID #31, Holly to Station 2 in the Dining Room, Staff ID #21, Juan to Station 1 in the Dining Room. Station 5 in the Dining Room should be left open with no server assigned. Also clock in Staff ID #1, Wizard as a server in the Upstairs area, Station 3.I also suggest opening checks on at least 4 tables in the Dining Room. First add themto the wait list and then seat them. This will show the name on the table caption.Items should be ordered on some of the tables. Print the check for one or two of thetables. This will make the table statuses more realistic when demonstrating the TableInfo feature.Host Terminal DemonstrationIn most cases, you should include a brief demonstration of the Host register. In theLog In screen, tap Log In.1Digital DiningType “18” in the Staff ID keypad, then type “1111” in the Enter Passwordkeypad.Demonstration Scripts 3
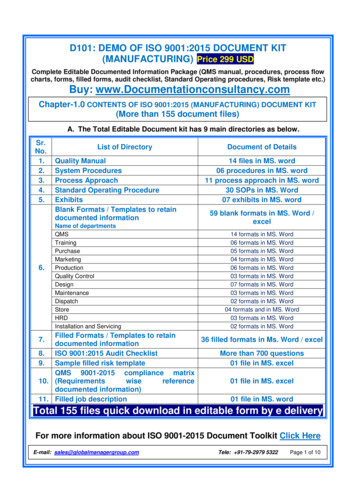
Table Management and Reservations Demo Script2Tap Host/Hostess in the Selection panel (if it is not selected by default).3Tap Clock In.4At the “Send-Stay” prompt, tap Yes.The POS prints a time clock slip for Samantha and displays the Log In screen.Describe the area screen to the customer. The left side of the screen is an area screenfeatures three separate dining areas (“Lounge,” “Dining,” and “Upstairs”), eachrepresenting a different floor plan within the restaurant. Each area icon includes ared, yellow, and green box. These boxes display the number of tables in each floorplan. The red boxes display the number of tables that are occupied, the yellow boxesdisplay the number of tables that need bussing, and the green boxes display thenumber of tables that are available.The right side of the screen displays the wait list.4 Digital DiningDemonstration Scripts
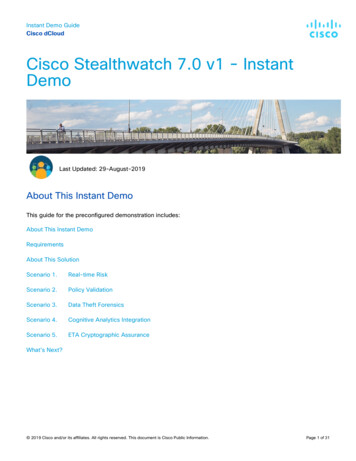
Table Management and Reservations Demo ScriptYou can also associate each icon with an optional background graphic. Note that theDining and Upstairs labels are green while the Lounge label is white. That is becausethere are servers for the Dining Room and Upstairs while there are no servers for theLounge. If the restaurant has only one dining area seated from the host station, thenthe default screen will be the floor plan. In this scenario, we show the lounge as anarea because guests are seated at the lounge tables from the host station. This isbecoming quite common now, especially in non-smoking restaurants.Tap the Upstairs and show that Digital Dining “drills down” to the Upstairs floorplan showing each table and its status. Tap Change Room and tap Dining Room.Note that the tables with a server assigned to their station are green and the tableswith no server are white.To demonstrate the host register, let’s assume that a guest requests a corner table forfour in the atrium.1In the Top panel, tap 4 Covers, and then tap Prefer.The POS displays a new screen with several buttons in the Selection panel.These buttons represent different search criteria for tables referred to asproperties. For instance, if the restaurant was on a beach, you could search fortables that have a view of the water. Or the restaurant might have an atrium.Managers can assign properties to specific tables or rooms and then hosts cansearch for tables based on those properties.Digital DiningDemonstration Scripts 5
NoteTable Management and Reservations Demo Script2Preferences are configurable and should include every request that acustomer might have when asking for a table. For example, booth,corner, by the fireplace, water view, wheelchair accessible, and so on.The same preferences can be used with frequent dining and a customer’spreferences automatically populate to table management andreservations. They can be overridden at the POS.In the Selection panel, tap Corner, tap Atrium, and then tap Done.The Upstairs and Lounge icons are now gray indicating that type of table is notavailable in those areas. The Dining Room floor plan icon remains green, whichmeans it has at least one corner table in the atrium is available.3Tap the Dining Room area and the Dining Room will be displayed.At this time, all but two tables will be white with the table number masked on alltables except Table 135. It is the only corner table available in the Atrium. It is whiteas it is in a station with no assigned server. If there had been a server assigned to thetable it would be green. Even though there is no server currently assigned to Table135 the guests will likely be seated there.To Assign a Guest to a Table6 Digital Dining1Tap Table 135 to seat the guest at the corner table. Tap Seat on the CommandPanel. Because there is no server assigned to the table you will be prompted toselect a server from those working in the Dining Room. Tap Michael, tapAssign Server, enter the cover count, and tap Open.2The table icon appears in red. Tap the table again. The detailed table statusappears on the right. To enter a drink order, tap Order. Order a drink for eachguest. Tap Finish and Send. Note that the speed window for the host onlyallows ordering drinks and appetizers (optional). Also note that the prep ticketshows the order is Michael’s, so no transferring is necessary.Demonstration Scripts
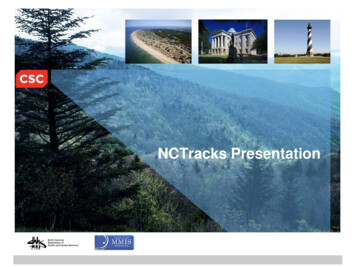
NoteTable Management and Reservations Demo ScriptIf the host attempts to open a table that is in more than one server station,they will be prompted to choose one of the servers. If the host attemptsto open a table with no server assigned, Digital Dining will display amessage telling the host to select from a list of servers working the room.If there are no servers assigned to the room, it will prompt to select fromall servers working.To Add a Customer to the Wait ListTo demonstrate the functionality of the Host terminal we will add new customers tothe wait list, order items, and seat customers from the wait list. (We will addcustomers to the wait list, even though tables are available.)1Tap Wait List at the top of the right panel, and add a customer to the wait list.To add a customer it, you must enter a name and cover count. Additionalinformation may be added. First, add a customer who is a frequent diningmember. Tap Frequent Diner and enter one or more letters of the customer’sname. All frequent dining members with those letter(s) in their name will appearon a button. Select a customer.Digital DiningDemonstration Scripts 7
Table Management and Reservations Demo ScriptOnce a customer is selected, a window showing all the information for thecustomer is displayed on the right. Enter a cover count. Tap 2 Covers or 4Covers in the Top panel for a 2-top or 4-top table, or tap Enter Covers on theTop Panel or Covers on the customer information window. Enter a covercount. Enter an estimated wait time by tapping Time Quoted. Note that thetime will default to the previous time quoted. If the time hasn’t changed, you donot need to reenter it as it will be assigned to the new customer. If a differenttime is quoted, tap Time Quoted and enter the new time.Additional information can be added by tapping any of the fields in the customerinformation panel and entering the information. I suggest adding a note for ahigh chair or a booster seat. Preferences may also be added by touching Preferon the Top panel or in the customer information window. When you finishadding information for the customer, tap Save.28 Digital DiningAdd two more customers to the wait list. With one, enter the name manually. Ifthe restaurant has LRS pagers, you can assign a pager to a customer by tappingAssign Pager in the Command panel.Demonstration Scripts
Table Management and Reservations Demo Script3Order drinks for one customer on the wait list. Tap the customer’s name on thewait list. Tap Order on the Command Panel. Order drinks, then tap Finish andSend. Be sure to order one drink for each cover.If a customer is not seated within the time quoted, an alarm will flash next to thecustomer’s name on the wait list.Digital Dining4Seat customers from the wait list. Tap the desired room icon to drill through tothat room. Tap the customer’s name on the wait list, tap the desired table, thentap Seat on the Command Panel. This will seat the customer.5Log off the host, then log on as the server for the station where that guest wasseated. Access the table and show that the drinks are on the check now assignedto that table.6Reorder the round of drinks and add appetizers. Point out that the ability to havethe host order drinks for a waiting customer often results in another round ofdrinks at the table.7Log the host back on. Go to the Dining Room and tap the table for which theserver just entered the order. Note all the information about the table isdisplayed, including the times of the most recent beverage and food orders at thetable. Also any alarms will be displayed. Explain that the alarms are proactive innotifying servers when one of their tables needs some kind of attention. Somealarms are standard and others are based on sales type profiles. There is also anDemonstration Scripts 9
Table Management and Reservations Demo ScriptNoteAlarm Report in the Back Office that helps management evaluate theperformance of servers.The ability to open a check and order drinks for a customer withouthaving to assign them to a table is a key feature and one that is notavailable on most competitive systems. If drinks are not ordered prior toseating, the host can still take a drink and/or appetizer order whenseating the guests. This will also result in happier customers, faster tableturn times, and in some cases additional drink sales.Change Table FunctionsBefore beginning, be sure to have at least two tables open in addition to the 8-tops.For this example, we will assume Table 123 has an open check.To Demonstrate the Free Table FunctionTap Change Table. A new command panel displays, allowing you to performvarious modifications to tables.Free Table is a register option on table service terminals that has a new function onthe host terminal. It is now used to activate the bussing alarm for a table. Whilepaying a check will activate the bussing alarm, that is normally too late. The time atable needs bussing is not when the check is paid, it is when guests leave. Tap Table123 (or some other table with an open check). Note that in Change Table mode,when a table is tapped, it is highlighted with a box surrounding it. Tap ChangeTable. The “Table Free” message is displayed. Tap OK. The bussing alarm willactivate for the table. (The server will access the existing check using Toggle Viewon the server’s terminal.)Note: Be sure to tap Restore Table at this time. If not, when you join two tables,the freed table will also be joined with them.To Demonstrate the Join Table FunctionTap the icon for Table 128 and Table 127, then tap Join Table. A new icon for an8-top table will appear as Table 127.10 Digital DiningDemonstration Scripts
NoteTable Management and Reservations Demo ScriptThe first table tapped will always be the base table with the others joinedto it. It is also possible to join more than two tables. If an icon for thetotal number of covers is not available, the table will appear as a squarebox with the table number. Checks can be joined in the same manner.This will normally eliminate the need for the Join Table register option.To Demonstrate the Move Table FunctionTap the icon for Table 127, tap Move Table, and then tap an open area of the screenabove one of the 8-top tables to show how a table can be moved on the floor.To Demonstrate the Block Table FunctionNoteTap the icons for Tables 116 and 117, and then tap Block Table. The icons willturn white and the table numbers will be removed, indicating those tables areunavailable. This might be done when a server leaves to close part or all of a stationor to hold the table for an expected use such as an upcoming reservation.This is a “visual” block, not a hard block. Opening a check on the tablealso unblocks it so the Restore function is not necessary.To Demonstrate the Reseat Customer FunctionThere is often the need to move a customer from one table to another. This might bebecause of an accident at a table such as a spilled drink. However, with the procedurethat will almost always be used at the host terminal to open a check it will frequentlybe used to change the original table assignment. The host will assign the guest to atable by opening a check prior to actually seating the guest. Then during the actualseating the guest may have a request for a different table granted. The ReseatCustomer function works perfectly for both of these scenarios.Tap an occupied 4-top table then tap one of the available 4-top tables and then tapReseat Customer. The check will be moved to the new table and the old table willbe flagged for bussing. If this was used to simply change the original tableassignment the host will “buss” the table since there is no resetting necessary.Digital DiningDemonstration Scripts 11
NoteTable Management and Reservations Demo ScriptIf the tables have different servers you will be prompted with a questionasking if you want to transfer the check to the other server.To Demonstrate the Change Station FunctionOne common scenario that happens nightly in busy restaurants is that as businessslows during the evening servers are sent home. In some cases their entire stationmight be shut down. At other times, existing stations are modified by assigning all orsome of the tables to other servers. For example, the reason Station 6 is open is thatthe server has just left.NoteTap Table 131 and then tap Change Station. The stations will be shown withTable 131’s current station highlighted. Tap one of the other stations to reassign thetable. Tap Tables 134 and 135, then tap Block. With this simple step, the stationshave been realigned. This will almost always eliminate the need to change todifferent room layouts during the shift.Different station configurations can automatically be assigned todifferent days and different meal periods.To Demonstrate the Restore FunctionRestore is used to return the default settings to a table. Tapping a table (or tables)and then tapping Restore will do this. It is important that all tables are restored inthe Dining Room or they will not return to the default settings automatically. Thisallows the restaurant to reconfigure an area in advance without it being reset at thestart of the next day.Exit from Change Table.Show the table captions by tapping Table Info in the Dining Room screen. Thereare six captions available: Name, Table Status (opened, ordered, printed, verified,bussing), Time since seated, Time till available for next seating, Server, and Station.These can be sorted to display in any sequence and any can be eliminated. Thisf
Table Management and Reservations Demo Script . Station 5 in the Dining Room should be left open with no server assigned. . four in the atrium. 1. In the Top panel, tap 4 Covers, and then tap Prefer. The POS displays