Transcription
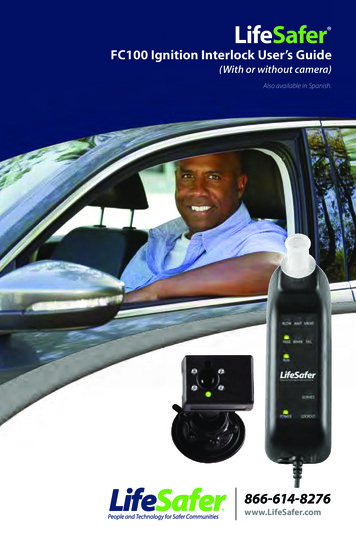
LifeSafer FC100 Ignition Interlock User’s Guide(With or without camera)Also available in Spanish.866-614-8276www.LifeSafer.com
TABLE OF CONTENTSOverview. 3How Does The Device Work. 4Target Tracking And Testing Position. 6Testing. 7Test Results. 10Retest . 12Troubleshooting. 13Service/Monitoring Appointments. 16Proper Car and Use. 18Terms and Conditions. 19Camera Display Overview. 22Handset Display Overview. 25Contact Numbers and 24 Hour Assistance. Back 2016 #1A LifeSafer Inc. All rights reserved.
OVERVIEWHOW DOES THE DEVICE WORK?This manual contains operating instructions for the use of theLifeSafer FC100 Ignition Interlock Device (IID) with or without a camera.Not all jurisdictions require the addition of a camera. If you are not requiredto have a camera please disregard any instructions on camera usage.The purpose of an IID is to prevent vehicle start-up until the user has passedan alcohol test. The IID is not an indicator of your level of impairment or yourability to safely operate a vehicle. You must rely on your own judgment.If you have been drinking alcoholic beverages, please find an alternativeform of transportation.This handbook explains the use of the LifeSafer FC100 IID, includingoperation, reporting and care of the unit. Please take the time toread this handbook while you are waiting for the IID to be installedin your vehicle, so any questions you may have can be answeredbefore you leave.Today, you will be trained on the proper use of the LifeSafer FC100 IID.Your service provider will also confirm the date of your first serviceappointment. At each service appointment the device’s event log willbe downloaded and reported to your Monitoring Authority.LIFESAFER FC100 HANDSETThe LifeSafer FC100 Handset takes your breath sample into the fuel cellchamber. The presence of alcohol in the sensor chamber causes the fuel cellto produce an increased electrical current, which is measured and translatedinto an equivalent blood alcohol concentration (BAC). You must complete abreath test when requested and the Device will record your Breath AlcoholConcentration (BrAC).STATE CAMERA REQUIREMENTSome states require the addition of a camera so that the person taking thetest can be identified and submitted to a monitoring authority as part ofthe reporting process.The LifeSafer FC100 Camera takes your picture and will not let you take a testuntil it has you and the Handset in focus. The Handset must stay in view of theCamera at all times as you blow and test, otherwise the device will ABORT andyou will have to start over.WARNING:!3It is your responsibility to keep your IID in goodworking order. You will be responsible for anylost or damaged parts of the unit.Please call 1-866-614-8276 for details on ourLoss Protection Plan.4
HOW DOES THE DEVICE WORK?LIFESAFER FC100 CAMERAThe LifeSafer FC100 withCamera System Handset iscontrolled by the Camera.The Camera must detect yourimage and “see” the target onthe back of the Handset beforeit will allow you to take a test.Hold the Handset 4-8 inchesfrom the front of the Cameramodule in order to get theCamera to release the Handsetfor the test.In bright light it may be necessary to slowly wave the target on the backof the Handset around in front of the Camera to get the target in clear view.Once the Camera finds the Handset the “BLAP-BLAP” sound will stop.The BLOW light will flash and the Handset will make a higher pitched“BEEP-BEEP” indicating you may start a test.TARGET TRACKING AND TESTING POSITIONTARGET TRACKINGTarget tracking requires that you keep your image and the Handset in fullview of the Camera throughout the test in order to obtain valid photographicidentification of the tester.18 - 24 InchesTESTING/TRACKING POSITIONAfter the Handset has been detected and released to allow a test, it is time toblow into the device. While taking the test the best area to hold the Handset is18-24 inches from the front of the Camera module. The Camera module is placedon a swivel mount to allow adjustment. Adjust the Camera so it is pointingtowards where you will hold the Handset while sitting in the driver’s seat.TIP: If the Handset stays stuck in WAIT make sure your hand is not coveringthe target. Grip the Handset towards the bottom as shown in the photo.56
TESTINGTIME TO TESTTAKING A TESTYou must complete a breath test that indicates your Breath AlcoholContent (BrAC) is below the fail point required by the state before itwill allow you to start your vehicle.When you are ready to take a test,the first step is turning your ignitionswitch to the “ON” position.Once the Device wakes up and theWAIT light glows orange, turn thekey back to the “OFF” position.Wait Light(Orange)Blow Light(Green)Once a test hasbeen initiated,the WAIT lightglows indicatingthe sensor iswarming up,and the Handsetis preparing toaccept a breathtest.Once thesensor isready for atest the GreenBLOW lightcomes on.NOTE: Under normal operating conditions, the WAIT light stays on momentarilywhile the sensor warms up. If you are operating your Device in extremely coldtemperature conditions (-40 F), the Device can take up to 4 minutes to warm-up.Camera Light (Red)While the WAIT light is flashing and the Handset is emitting a“BLAP BLAP” sound, the red light on the Camera will be on,indicating that the target on the Handset has notbeen detected.Hold the Handset within 4-8 inches of the Camera module,gripping the Handset at the bottom with the target in clearview of the Camera module. You may have to slowly wavethe Handset around in front of the Camera module to detectthe target.Camera Light (Green)When the target tracking feature is turned on and theCamera is successfully tracking the Handset during thetest period, the green light on the Camera will illuminate.78
TESTINGTEST RESULTSBlow Light (Green)Pass Light (Green)Once the target is detected, the BLOW light will flash greenindicating the Device is ready for a breath sample. You will alsohear 2 high pitched beeps while the BLOW light is flashing toalert you that a breath test is requested. Take a deep breath andimmediately bring the Handset to your mouth to test, keepingthe target in view of the Camera.When the Device receives a proper breathsample the PASS light will glow and a tripletone will sound indicating a successful test.While taking a test, you must also make a TONE, like a musicalinstrument. It is most easily accomplished by saying the word“DO”, “DAA” or “DEE” into the mouthpiece as you blow.The blowing pressure must be sufficient in strength and durationto ensure a proper and accurate test. When you start to blow andmake the “DO” tone, (steady and solid, never too hard or too soft),the Device will emit a low sound, indicating that you are testingproperly. Continue the test until the sound stops and a higherpitched tone sounds.If you do not deliver a sufficient flow of air or the tone is notdelivered properly, the Handset will sound a higher-pitchedtriple-beep and the red ABORT light will come on.If you do not hear the Device sound, or the Device ABORTS, stop blowing.You need to start over.NOTE: You should concentrate more on blowing than on the tone. Extreme blowing pressure is not necessary. The tone must be delivered in a steady and continuous fashion. Deliver the same tone rather than going up or down the musical scale. You must say the tone continuously for the entire five seconds. It may help to bite down with your teeth andseal your lips on the mouthpiece.You can start your vehicle!Run Light (Green)If the result of the test is a PASS or a WARN theDevice will subsequently Flash the RUN light andclose the ignition relay, allowing a vehicle start.The relay will remain closed for 1 minute while waitingfor the engine to start. If the engine is not started therelay will open back up and the Device will go back tosleep and another test will need to be taken. When theengine is started, the RUN light will change fromFlashing to On Steady.Once the engine is shut off, the RUN light will flashfor the duration of the Stall Protect period (when are-start is allowed without requiring a test). Once theRUN light goes out, the Device will go into a “sleep state”where it is waiting for the driver to start a new test.Blowing and making a “DO”, DEE” and “DAA” for a breath test will quicklybecome second nature to you. Do not blow too hard. Start the test blowingsoftly and increase your blowing pressure until you hear the tone that indicatesyou are blowing hard enough. Continue to blow steadily at that level for thelength of the test.910
TEST RESULTSFail Light (Red)RetestThe Device has detectedthe presence of alcoholabove the preset FAIL level.If the key is in the ON position and the vehicle is runningthe Device will ask for a Retest at random times. When thedevice wants you to Retest, the BLOW light will be flashingand 2 high pitched BEEPS will sound. If the Device doesnot receive a passed test within the first several secondsafter asking for a Retest, the Device will begin to BEEPlouder. If the Device does not receive a passed test aftera few minutes, an additional alarm may sound. You nowhave a limited time to pass a test or pull the vehicle overand turn the key OFF or a Violation will be recorded.Turning the vehicle off prior to taking a Retest whenrequested is a Violation in some jurisdictions. Ask yourService Provider if you have questions on the rules inyour area.Warn Light (Orange)The Device has detected thepresence of alcohol on yourbreath below the FAIL level.A substance that left traceamounts of alcohol in yourbreath may have caused this.If that substance happens tobe a recently consumedalcoholic beverage, youneed to keep in mind thatyour blood alcohol levelmay be rising and you mayFAIL on the next test anda Violation will be recorded.11RETESTTIP:Eating, drinking,using mouthwash,or medicines thatcontain alcoholimmediately priorto a breath testmay result in aFAILED test.If this happens,rinse your mouthout with water,take a few deepbreaths of freshair, and retestafter waiting atleast 5 minutes.Take the Retest only when you feel it is safe to do so.You are encouraged to safely pull the vehicle out oftraffic to take the Retest. IT IS YOUR RESPONSIBILITYTO SAFELY TAKE THE RETEST. You have several minutesfrom the time the unit first asks for a Retest to pass a test.Depending on your jurisdictional requirements, if youfail a retest, you may receive an audible warning notifyingyou to pull the car over out of traffic and turn off the vehicle.CAUTION:!Always exercise safety first. The Device is designed toallow you to continue driving and safely Retest withouttaking your eyes off the road. However, if you areuncomfortable, it is recommended that you pull off the roadand come to a complete stop before taking the Retest. It isyour responsibility to be in a safe place to take the test in amanner not to put yourself or others at risk.12
TROUBLESHOOTINGAbort Light (Red)Camera AbortThe ABORT light indicates the Device did not detect aproper breath sample, meaning either the blow was toohard or too soft, or the tone was not detected. You willalso hear a distinct tone upon aborting a breath test.Aborting the test in this fashion does not mean you failedthe test and is different than a Camera Abort caused bytaking the Handset out of view of the Camera.(See Camera Abort on next page).If the Camera is unable to track the Handset duringthe blow sequence, the ABORT light will go on.You will also hear a ‘BLAP BLAP’ tone and theorange WAIT light will flash. Once you have aborted,the orange WAIT light will come on for 45 secondswhile the Device prepares itself to accept anotherbreath test.Once you have aborted, the WAIT light will come on for45 seconds while the Device prepares itself to acceptanother test.If you have too many Aborts, the WAIT light glows whilethe Device is resetting or re-stabilizing itself. The WAITlight could stay on for up to 5 minutes during this waitperiod. When the Device is ready for another test, theWAIT light will flash and the Handset will emit a‘BLAP-BLAP’ sound.If the Device has not stabilized after the wait periodand the Device is not ready to test, the SERVICE lightand LOCKOUT light will begin to flash and the WAITlight will stay on. If this ever happens call your ServiceProvider immediately.TIP: If you get an ABORT, change your mouthpiece, try to relax, take acouple of deep breaths and try again. You should never blow so hardas to make yourself feel light-headed or dizzy.13NOTE: When the target tracking is turned onand the Camera is successfully tracking theHandset during the test period, the green lighton the Camera will illuminate. If target trackingis enabled and you do not observe the greenlight come on during the test, you are most likelynot in the correct position.The Camera optimally tracks the Interlock at adistance between 18 - 24 inches. Target trackingis not enabled in all jurisdictions.TIP: Keep the Handset Target in clear view of the Camera throughout the Test!14
TROUBLESHOOTINGLockout Light (Red)One or more FAILS in a row will result in aLOCKOUT status for several minutes.While the LOCKOUT light is glowing red youcannot take another test. You must WAIT. After theLOCKOUT light turns off you may test again. You areencouraged to rinse your mouth out with water toremove traces of mouth alcohol and test again.Service Light (Red)The Device will remind you several days before yourprogram service due date by flashing the SERVICE light.SERVICE/MONITORING APPOINTMENTSPeriodically you will be required to have the device’s data downloaded, reviewedand reported by the service provider to the relevant regulatory authority. Thedevice, vehicle and wiring may be inspected for signs of tampering, and thecalibration of the device will be checked.The following is an example of the information the device records and the type ofinformation that the service provider may be required to report:Recorded Violations: Start-up Violations – Starting the vehicle without passing a testwithin the required time frame, which varies by jurisdiction. Power Disconnect – Power is lost to the device’s Relay Box.You should document any reason why the power was disconnected. Failed Test – Failing one or more test attempts indicating BrACat or above the Fail level. Retest Refused – The driver failed to pass a Retest during theallowed period of time. Retest Failed – The driver took the Retest and Failed one or moretest attempts at or above the Fail level. Lockouts – The number of Lockouts between service is recorded. Early Service Recall – If you have met the maximum number of anyViolations an Early Service Recall will be recorded and the devicewill prompt you to return to the Service Center. Time of Vehicle Use – All vehicle starts are recorded and may beused to determine if the vehicle was operated during a restricteddriving time.Required Reporting:Non Compliance Failure to report for scheduled monitoring check or any Early Recallthat results in a Lockout Failure to pay for program services provided Failure to meet any other terms and conditions of theInterlock Program1516
SERVICE/MONITORING APPOINTMENTSCircumvention: Getting someone else to blow the breath test Providing a breath sample using a pump, balloon etc. instead ofhuman breath sample. Disconnecting the vehicle’s battery without Authorizationfrom the Service Provider Attempting to move or obscure the camera.Note: If the camera falls from where it was installed contact your service provider to have it re-mounted.Tampering: Breaking of any anti-tampering seal on any part of thedevice including wires and connectors Opening the device Physically damaging the device in any wayScheduled Service and Lockouts:The device will remind you of your service due date by flashingthe service light.If you don’t return for service by the required date you are inEARLY RECALL and both the LOCKOUT and SERVICE lightswill flash.The device will enter PERMANENT LOCKOUT if it isn’t serviced.If this happens you will not be able to take a test or start your car.You will need to call to obtain a lockout override code or havethe vehicle towed at your expense. When the SERVICE light andLOCKOUT light both remain solid the device is in PERMANENTLOCKOUT and will not ask for a test.PROPER CARE AND USEVehicle Electrical SystemsThe device operates off your vehicle’s electrical system. If your vehicle is over 10 yearsold, you should have the electrical system checked by an automotive professional.If your vehicle has electrical problems or a failed alternator, the power surges candamage the device and void the warranty. If applicable maintain proper water-levelsin your car battery (use distilled water) and keep the terminal connections clean andfree of corrosion. The device will usually work with an old battery, but bad or weakbatteries are the primary cause of problems that can result in Early Service Recall andan unscheduled visit to the service provider at your expense. If your car battery isweak or old, ask your LifeSafer Service Provider what your jurisdiction’s regulationsare for having it replaced. Since all power disconnects are recorded and reported, youmust document each time the battery is disconnected, or the device is disconnectedfrom power.Avoid Contact with Moisture and DirtThe device is not waterproof. It is an electronic product. Keep it out of the rain. Keepthe device stored off the floor of your vehicle. Excessive contact with moisture, dirt,mud, or rain will damage the internal circuitry for which repair or replacement of thedevice is your responsibility.Avoid Electro-Static Discharge (ESD)Place the key in the ignition before picking up the handset.ESD, especially during the cold and dry winter months, is commonand may damage the device.If you have to change a scheduled monitoring appointmentyou must call 866-614-8276 24 hours in advance to avoid aMissed Appointment Fee.1718
TERMS & CONDITIONSTERMS AND CONDITIONS (Version TC201602)The Client is a participant in the Ignition Interlock Program (the “Program”). The Program involves the installation of an ignition interlock system in theVehicle. The ignition interlock system consists of a sample head, relay module, siren and associated wiring, and such other components as may fromtime to time be installed or substituted as additional or replacement components (collectively, the “System”). The Program also involves monitoring theuse an
LifeSafer FC100 Ignition Interlock Device (IID) with or without a camera. Not all jurisdictions require the addition of a camera. If you are not required to have a camera please disregard any instructions on camera usage. The purpose of an IID is to prevent vehicle

