Transcription
Application TechniqueOriginal InstructionsThinManager and FactoryTalk View SEDeployment GuideTM-AT001A-EN-ECopyright 2019 Rockwell Automation Inc. All rights reserved
ContentsBackground . 4Goal of Configuration Guide . 4Terminology and Abbreviations . 4Versions. 5Failover versus Redundancy . 6Workgroup versus Domain Deployments . 6Server Preparation . 7Configure Windows Firewall . 7User Account Control (UAC). 11Data Execution Prevention (DEP) . 13Remote Desktop Services Role Installation and Configuration . 14Domain Environment Setup . 14Remote Desktop Services Licensing Role Installation . 21Remote Desktop Services Licensing Role Configuration. 24Workgroup Deployments. 28Install Remote Desktop Services RD Host and Licensing Server . 28Configure Remote Desktop Licensing . 33Configure Local Group Policy . 34Create Local Users. 39Install FTVSE . 41Publish Remote Applications (Domain Environment Only) . 45Create a RemoteApp for FactoryTalk View SE . 50FactoryTalk View SE Client Configuration . 53FactoryTalk Security . 53ThinManager Installation . 62System Preparation. 62Software Installation . 67FactoryTalk Activation. 72FactoryTalk View SE Client Licenses. 76Redundancy . 76Synchronization. 76ThinManager Configuration . 8029541-AT-001A-EN-E
Display Servers . 80Display Clients . 82Smart Session . 83Session Scaling . 84Failover. 85Terminal Configuration . 88ThinManager Ready Terminals - VersaView 5200 . 93ThinManager Compatible Terminals (PXE/UEFI) . 98ThinManager Clients (iTMC, aTMC, WinTMC) . 100MultiMonitor and MultiSession . 103FactoryTalk View SE MultiMonitor Option with ThinManager . 106ThinManager Security . 111Active Directory Integration and Relevance Users . 111Authentication Pass-Through . 11639541-AT-001A-EN-E
BackgroundFactoryTalk View Site Edition (SE) is a supervisory human machine interface (HMI) software package forenterprise solutions. It can be purchased as a stand-alone HMI (SE Station), or as a distributed andscalable HMI (SE Server) that supports distributed-server/multi-user applications, giving maximumcontrol over information where you want it. ThinManager can be deployed with either SE Stationand/or SE Server. This guide will focus on deploying ThinManager with SE Server, as this is the mostcommon architecture.View SE is composed of the following primary components: FactoryTalk View Studio: Configuration software for developing and testing HMI applications.FactoryTalk View SE Server: HMI Server that stores HMI project components and serves thesecomponents to clients.FactoryTalk View SE Client: HMI Client for viewing and interacting with supervisory-levelapplications developed with FactoryTalk View Studio.These components can be installed on a single server, or distributed across multiple servers. For smaller,less critical applications, these components can be located on a single server.Goal of Configuration GuideThe goal of this Configuration Guide is to provide specific guidance on how to deploy View SE usingThinManager. It is not intended to replace the various FactoryTalk View SE nor ThinManagerdocumentation, but to instead highlight the specific elements that require attention when deployingView SE in a Remote Desktop Server environment, managed by ThinManager. As such, every featureand option of ThinManager will not be described or demonstrated.Terminology and AbbreviationsMicrosoft renamed the Terminal Services components to Remote Desktop Services for the WindowsServer 2008 R2 release. Terminal Services and Remote Desktop Services are often used interchangeably,but since this document will focus on View SE 11.0 in a Windows Server 2012 R2 architecture, theRemote Desktop Services terminology will be used.DHCPDNSHMIFTVFTDFTANLAPXERDSCALSETSCALDynamic Host Configuration ProtocolDomain Name ServerHuman Machine InterfaceFactoryTalk View SEFactoryTalk DirectoryFactoryTalk ActivationNetwork Level AuthenticationPre-boot Execution EnvironmentRemote Desktop Services Client Access LicenseSite EditionTerminal Services Client Access License49541-AT-001A-EN-E
VersionsThis document will focus on the deployment of FactoryTalk View SE version 11.0 within a ThinManagerversion 11.0 environment.View SE version 11.0 supports the following server class operating systems: Windows Server 2016 Standard Edition – 64 Bit OnlyWindows Server 2012 R2 Standard Edition – 64 Bit OnlyWindows Server 2012 R2 Datacenter Edition – 64 Bit OnlyWindows Server 2012 Standard Edition – 64 Bit OnlyWindows Server 2012 Datacenter Edition – 64 Bit OnlyWindows Server 2008 R2 Standard Edition (with and without Service Pack 1) – 64 Bit OnlyWindows Server 2008 R2 Enterprise Edition with Service Pack 1 – 64 Bit OnlyWindows Server 2008 Standard Edition with Service Pack 2 – 32 Bit or 64 BitThinManager 11.0 supports the following server class operating systems: Windows Server 2019 Standard Edition – 64 Bit OnlyWindows Server 2016 Standard Edition – 64 Bit OnlyWindows Server 2012 R2 Standard Edition – 64 Bit OnlyWindows Server 2012 R2 Datacenter Edition – 64 Bit OnlyWindows Server 2012 Standard Edition – 64 Bit OnlyWindows Server 2012 Datacenter Edition – 64 Bit OnlyWindows Server 2008 R2 Standard Edition – 64 Bit OnlyWindows Server 2008 R2 Enterprise Edition – 64 Bit OnlyWindows Server 2008 Standard Edition – 32 Bit or 64 BitTherefore, ThinManager is supported in all of the server class operating systems that View SE 11.0supports.This configuration guide will utilize Windows Server 2012 R2 Standard Edition – 64 Bit Only.ThinManager can also be installed on workstation operating systems like Windows Vista,Windows 7, Windows 8 or Windows 10. For the purposes of this configuration guide,the server class operating systems will be the focus, since they alone offer the RemoteDesktop Services role, which will enable multiple remote desktop connections to a singleserver OS; whereas the workstation class OS only provides a single remote desktopconnection.In this configuration guide, two new images will be created - a primary Remote Desktop Server namedRDS1, and a secondary Remote Desktop Server named RDS2. Each server will be configured with theRemote Desktop Services role. It is important that this role be added to the Remote Desktop Serverfirst, before any applications are installed. Once installed, the View SE client software as well asThinManager will be installed on both servers (although ThinManager is not required on each RDSServer, it is in this configuration guide to demonstrate ThinManager Redundancy). They will then bejoined to an existing FactoryTalk Directory that exists on a third server named FTHMI, which will also be59541-AT-001A-EN-E
the FactoryTalk Activation Server. These FactoryTalk roles can be broken out into separate servers perrecommendations from Rockwell Automation, but they are being consolidated for simplificationpurposes. For the purposes of this configuration guide, the HMI server will be the only FactoryTalk ViewSE HMI Server, but redundant View SE architectures are also suitable. The Cookie Demo sampleapplication will be utilized.Failover versus RedundancyIt is important to understand the difference between Failover and Redundancy with regard toThinManager, as they are often considered the same thing, but they are in fact very different. Failover isincluded in all ThinManager licensing and is the ability for a ThinManager terminal to automaticallyfailover between Remote Desktop Servers to receive its content. Redundancy, on the other hand, ishaving two ThinManager installs whose configurations are automatically synchronized. With RedundantThinManager installations, terminals would be able to receive their firmware and terminalconfigurations from either one. This guide will demonstrate how to configure both Failover andRedundancy.Workgroup versus Domain DeploymentsBoth ThinManager and FactoryTalk View SE can be deployed in either Workgroup or Domainenvironments. The process required to configure the Microsoft Remote Desktop Services role differs onWindows Server 2012 depending on whether a Workgroup or Domain is being utilized. This guide willserve as a document to deploy ThinManager in either type of environment, however it is recommendedthat a Domain environment be used. It is outside of the scope of this document to cover setting up aDomain Controller. For more information on setting up a domain controller, the PlantPAxdocumentation can be used.69541-AT-001A-EN-E
Server PreparationThis section will cover the required configuration that should be made to the Windows Server inpreparation for deploying ThinManager in a Remote Desktop Services environment. The windowsfirewall can be disabled or configured to allow ThinManager to communicate to its terminals and tosynchronize with a Redundant ThinManager server. We will show how to configure the windowsfirewall, which is the recommended setting.Configure Windows Firewall1.Return to the Windows Firewall page of the Control Panel on RDS1 and click the Advanced Settings link.2.From the Windows Firewall and Advanced Security window, right click the Inbound Rules tree item and select NewRule.79541-AT-001A-EN-E
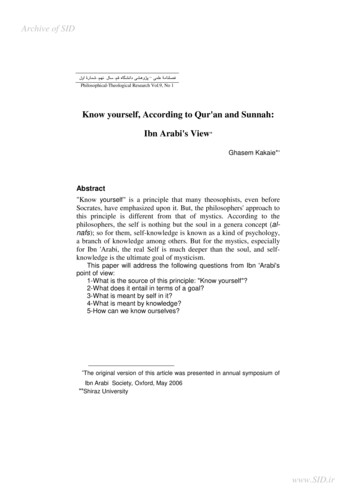
3.From the Rule Type panel of the New Inbound Rule Wizard, select the Port radio button, followed by Next.4.From the Protocol and Ports panel of the New Inbound Rule Wizard, select the TCP radio button and enter 2031in the Specified local ports field. Click the Next button.TCP Port 2031 is required by ThinManager for the Terminal Monitor Connection as well as for the delivery ofthe Terminal Profile to the terminal when it is booting up.89541-AT-001A-EN-E
5.From the Action panel of the New Inbound Rule Wizard, select the Allow the connection radio button and click theNext button.6.From the Profile panel of the New Inbound Rule Wizard, check the Domain checkbox and un-check the Private andPublic checkboxes. Click the Next button.99541-AT-001A-EN-E
7.From the Name panel of the New Inbound Rule Wizard, enter TCP2031 as the Name and ThinManager as theDescription. Click the Finish button.109541-AT-001A-EN-E
User Account Control (UAC)1. In addition, the User Account Control (UAC) will be set to Never notify.o Again, this is to simplify the deployment guide. If you are unable to change this settingin your environment, just ensure that each setup.exe process in the steps that follow is“Run as Administrator” by right clicking it and selecting Run as Administrator.2. Right click the Windows Start button and select the Control Panel menu item.3. From the Control Panel, click the System and Security link.119541-AT-001A-EN-E
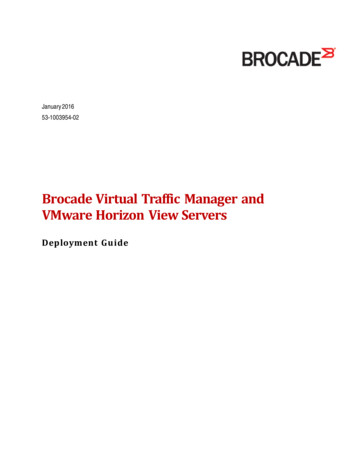
4. From the System and Security window, click the Change User Account Control settings link.5. From the User Account Control Settings window, drag the vertical slider down to Never notify.Click the OK button.129541-AT-001A-EN-E
Data Execution Prevention (DEP)1. Now we will disable Data Execution Prevention (DEP). Right click the Windows Start button andselect Command Prompt (Admin).2. From the ensuing command prompt, enter (Followed by the ENTER key):bcdedit /set nx AlwaysOff3. This command will turn off the Data Execution Prevention (DEP) of Windows.o Additional information on DEP can be found athttp://support.microsoft.com/kb/875352.4. Restart the server.139541-AT-001A-EN-E
Remote Desktop Services Role Installation and ConfigurationStarting with Windows Server 2012, it is highly advised that the server be part of a domain as theRemote Desktop Services graphical configuration is only available to Domain Admins. This document willassume that your new Remote Desktop Services Server is already part of a domain and you havecredentials for a Domain Admin user account. By default, the Domain\Domain Users Group will beadded to the deployment as the users with access to the remote applications that will be published laterin this document. Any domain group of users can be granted access to the deployment.It is possible for you to setup Active Directory for a stand-alone server, and make that server also aDomain Controller. That setup is outside the scope of this document.Important: Installing the Remote Desktop Services role on Windows Server 2012 or Windows Server2012 R2 in a workgroup is not recommended. The Remote Desktop Services configuration tool is notaccessible without being logged in as a domain user resulting in all configuration needing to beperformed through the local group policy editor or PowerShell.Domain Environment Setup1. Log into the Server with a Domain Admin account (or a local admin that is also a domain user).2. Run Server Manager.3. Click on Add Roles and Features.149541-AT-001A-EN-E
4. Click Next.5. Select Remote Desktop Services installation, and then press Next.159541-AT-001A-EN-E
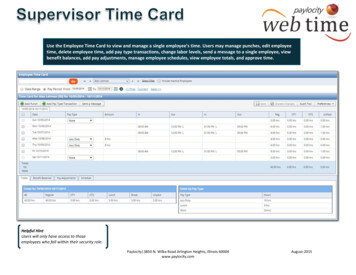
6. On the Deployment Type page of the Add Roles and Features Wizard, select the Standarddeployment option and click Next .The Quick Start option is only suitable when deploying a single Remote Desktop Server.Since this lab is only using a single Remote Desktop Server, this option could have beenused as well.For deployments with more than one Remote Desktop Server, it is best to create aServer Group within Server Manager and add the Remote Desktop Servers to thatgroup. Server groups allow you to view and manage a smaller subset of your serverpool as a logical unit. To create a Server Group, click the Manage menu button withinServer Manager, followed by the Create Server Group item. You can then add thedesired servers to the new group.It is also a recommendation to create a separate Organizational Unit (OU) within theActive Directory domain for the Remote Desktop Servers. You will then be able tomanage the Group Policies for all of your Remote Desktop Servers through a single OU.169541-AT-001A-EN-E
7. On the Deployment Scenario page of the Add Roles and Features Wizard, select Session-baseddesktop deployment and click Next .8. Click the Next button on the Role Services page of the Add Roles and Features Wizard.9. From the RD Connection Broker page of the Add Roles and Features Wizard, click the RightArrow button to add the RDS1.lab.loc server to the Selected list, followed by Next .179541-AT-001A-EN-E
10. On the RD Web Access page of the Add Roles and Features Wizard, click the Right Arrow buttonto add the RDS1.lab.loc server to the Selected list, then click Next .11. On the RD Session Host page of the Add Roles and Features Wizard, click the Right Arrowbutton to add the RDS1.lab.loc server to the Selected list, then click Next .189541-AT-001A-EN-E
12. On the Confirmation page of the Add Roles and Features Wizard, check the Restart thedestination server automatically if required checkbox followed by clicking the Deploy button.The installation process will start and continue for a few minutes. Once finished, RDS1 willautomatically reboot.Note: This process will take a few minutes to complete.199541-AT-001A-EN-E
13. Once RDS1 h
the FactoryTalk Activation Server. These FactoryTalk roles can be broken out into separate servers per recommendations from Rockwell Automation, but they are being consolidated for simplification . It is possible for you to setup Active Directory for a stand-alone server, and make that server